Lesson 3: Implementing Replication
3 4
Replication is generally implemented using SQL Server Enterprise Manager wizards. In this lesson, you learn to configure the properties of a Distributor and a Publisher. You also learn to implement snapshot, transactional, and merge replication. Finally, you learn to configure push, pull, and anonymous subscriptions.
After this lesson, you will be able to
- Configure the properties of a Distributor
- Configure the properties of a Publisher
- Configure snapshot replication
- Configure transactional replication
- Configure merge replication
- Configure push, pull, and anonymous subscriptions
Estimated lesson time: 45 minutes
Configuring Distributor and Publisher Properties
You can configure the properties of a Distributor and a Publisher using the Configure Publishing And Distribution Wizard. You can also configure the properties of a Distributor and a Publisher as part of the process of creating a publication using the Create And Manage Publications Wizard. You can start the Configure Publishing And Distribution Wizard from the Tools menu by clicking Wizards, expanding the Replication container in the Select Wizard dialog box, and then double-clicking Configure Publishing And Distribution Wizard, or by right-clicking the Replication container and then clicking Configure Publishing, Subscribers, And Distribution. The Welcome To The Configure Publishing And Distribution Wizard page appears, as shown in Figure 15.4.
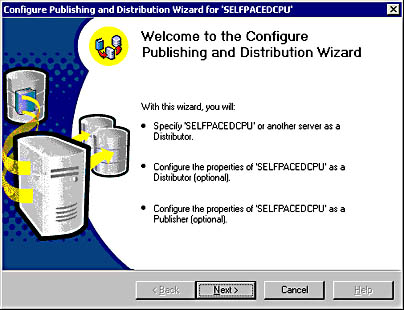
Figure 15.4
Starting the ConFigure Publishing And Distribution Wizard.
Click Next to either configure the local server as a Distributor or select an existing Distributor for this Publisher. The Select Distributor page appears, as shown in Figure 15.5.
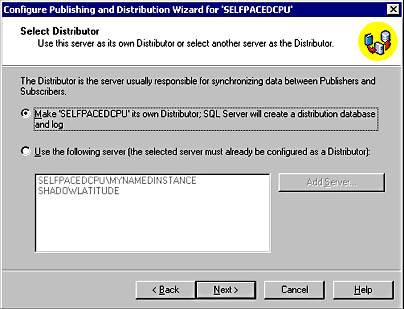
Figure 15.5
Selecting a Distributor.
The default is to use the local server as the Distributor, creating the distribution database and transaction log file. If you select a remote server, that server must already be configured as a Distributor. In addition, you must register the remote server with SQL Server Enterprise Manager before you can select it as the Distributor. Finally, you must have permission to use the remote Distributor.
Next, if you choose to use the local server as the Distributor, the Specify Snapshot Folder page appears where you can specify the location of the snapshot folder. The default location for the snapshot folder on the default instance is C:\Program Files\Microsoft SQL Server\Mssql\ReplData. See Figure 15.6.
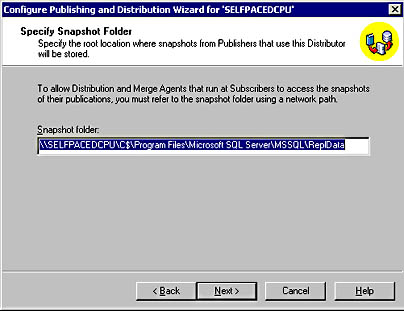
Figure 15.6
Specifying a snapshot folder.
Notice in the Snapshot Folder text box that the default folder is using the C$ administrative share. The Snapshot Agent must have full control access to this folder, and the Distribution Agents and the Merge Agents must have read access. To use a dedicated share at a specified location, you can create the share through Windows Explorer or by clicking the Snapshot Folder ellipsis button. When the Browse For Folder dialog box appears, right-click the Repldata folder (or any other specified folder) and then click Properties. In the Repldata Properties dialog box, click the Sharing tab. Select the Share This Folder option button and then click the Permissions button. In the Permissions For Repldata dialog box, remove Everyone and then add the SQL Server Agent service domain user account, granting Full Control permissions. In Figure 15.7, a Repldata share is created.
In Figure 15.7, notice that the Repldata share is created and the SQL Server Agent domain user account granted Full Control permissions through the share. If additional users (such as Windows Me and Windows 98 users involved in merge replication) must access this snapshot folder, they can be granted read access to permit them to download the snapshot files.
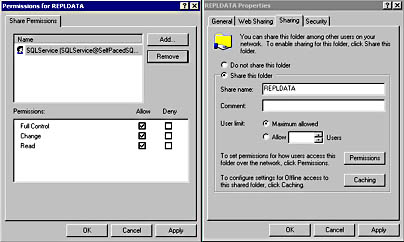
Figure 15.7
Creating a share for the snapshot folder and assigning permissions.
Next, in the Customize The Configuration page, you are given the opportunity to customize the properties of the Distributor or accept the defaults. See Figure 15.8.
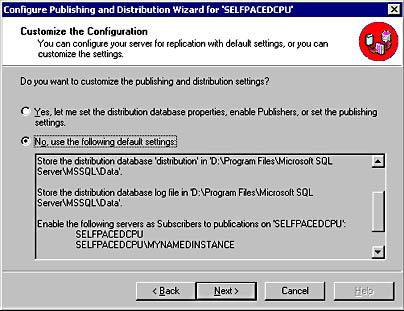
Figure 15.8
Choosing the default settings for the Distributor.
Elect to customize settings if you need to change the default location for the distribution database and transaction log, enable additional Publishers to use this Distributor (only the local server is enabled by default), enable publication databases, or to change enabled Subscribers (all registered instances are enabled by default). Using RAID 1, RAID 10, or a dedicated drive for the distribution database and for the transaction log is recommended for most production environments.
If you elect to customize Distributor properties, the Provide Distribution Database Information page appears. In this page, you can modify the distribution database name, the location for the database file, and the location for the transaction log file. See Figure 15.9.
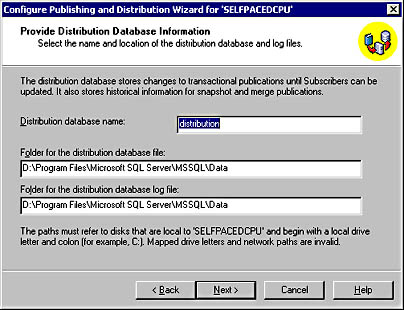
Figure 15.9
Modifying distribution database properties.
Notice that you must choose a local path for the distribution database. Next, in the Enable Publishers page, you can enable additional Publishers. See Figure 15.10.
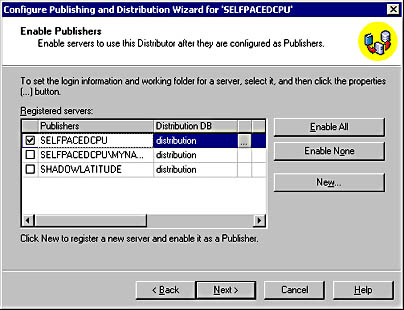
Figure 15.10
Enabling additional Publishers to use a Distributor.
A Publisher cannot use a Distributor unless the Publisher is enabled on that Distributor. By default, only the current instance on the local server is enabled. Click a Publisher's ellipsis button in the Registered Servers grid to view Publisher properties for that Publisher. See Figure 15.11.
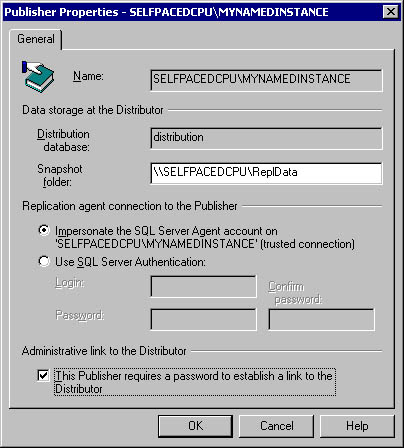
Figure 15.11
Configuring Publisher properties.
Each Publisher can use a different snapshot folder. You can specify a SQL Server login account rather than the SQL Server Agent service domain user account for all replication agents. Finally, if the Publisher and the Distributor are on separate computers, you can require a password for the link between the two (recommended).
Next, in the Enable Publication Databases page, you can enable specific databases for replication. See Figure 15.12.
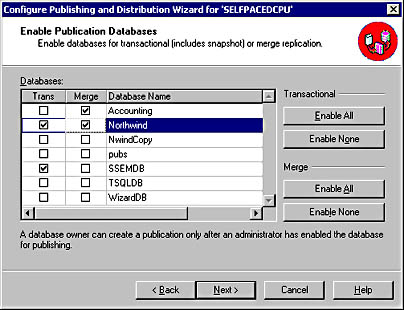
Figure 15.12
Enabling databases for replication.
A member of the sysadmin server role can also enable a database for replication at the time a publication is created. However, if a member of the db_owner fixed database role in a database will be creating the publications, a member of the sysadmin server role must first enable the database for replication. In the Trans column of the Databases grid, click the appropriate Trans check box to enable a database for snapshot or transactional replication. In the Merge column, click the appropriate Merge check box to enable a database for merge replication.
Next, in the Enable Subscribers page, you can enable specified servers to subscribe to publications from this Publisher. See Figure 15.13.
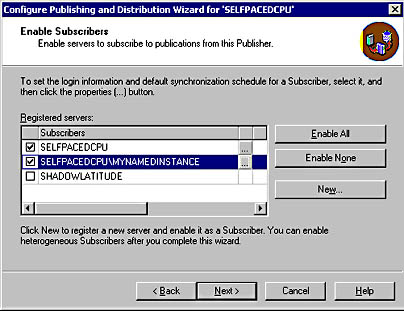
Figure 15.13
Enabling Subscribers.
All registered servers are enabled by default. Click the ellipsis button to display the Subscriber Properties dialog box. You use the General tab of this dialog box to configure Subscriber login information and a default synchronization schedule for a Subscriber. See Figure 15.14.
Similar to other replication agents, a replication agent connecting to a Subscriber uses the SQL Server Agent domain user account by default. You can elect to use a SQL Server login account.
Click the Schedules tab to modify the default schedule for each Distribution and Merge Agent. See Figure 15.15.
Notice that each new Distribution Agent is set to run continuously by default and that each new Merge Agent is set to run hourly by default. You can change these defaults. You can also override these default schedules for each new agent when configuring new subscriptions.
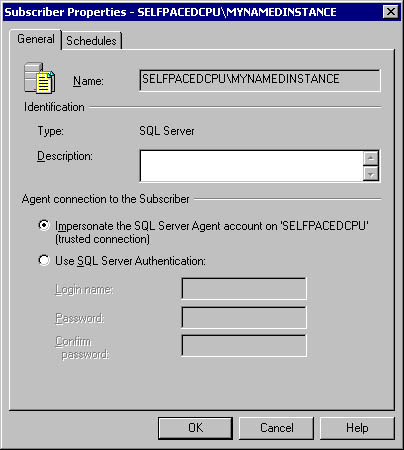
Figure 15.14
General Subscriber properties.

Figure 15.15
Default schedules for all Distribution Agents and Merge Agents.
Finally, in the Completing The Configure Publishing And Distribution Wizard page, you can review all of your choices before the distribution database is created and the Distributor and Publisher configured. See Figure 15.16.
After the Configure Publishing And Distribution Wizard completes, a SQL Server Enterprise Manager message box appears to notify you that Replication Monitor has been added to the console tree. Using Replication Monitor is covered in Lesson 4 of this chapter.
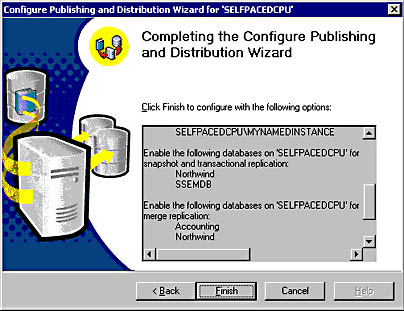
Figure 15.16
Final review of Distributor and Publisher properties.
Practice: Configuring a Distributor
In this practice you create and configure a Distributor using the Configure Publishing And Distribution Wizard in the SQL Server Enterprise Manager.
To configure a Distributor
- Ensure that you are logged on to the SelfPacedSQL.MSFT domain controller as Administrator.
- Click Start, point to Programs, point to Microsoft SQL Server, and then click Enterprise Manager.
SQL Server Enterprise Manager appears displaying the Microsoft SQL Servers and the Event Viewer (Local) console trees in the console root.
- In the console tree, expand the Microsoft SQL Servers container, expand the SQL Server Group container, and then expand the default instance.
- Right-click the Replication container and then click Configure Publishing, Subscribers, And Distribution.
The Welcome To The Configure Publishing And Distribution Wizard page appears.
- Click Next.
The Select Distributor page appears.
- Verify that SelfPacedCPU is selected to be its own Distributor and then click Next.
The Specify Snapshot Folder page appears.
- Click the ellipsis next to the Snapshot Folder text box.
The Browse For Folder dialog box appears with the Repldata folder selected.
- Right-click the Repldata folder and then click Sharing.
The Repldata Properties dialog box appears.
- Click the Share This Folder option button.
- Click the Permissions button.
The Permissions For Repldata dialog box appears.
- Click the Remove button to remove Everyone from the Name list box, and then click the Add button.
The Select Users, Computers, Or Groups dialog box appears.
- In the Name list box, double-click SQLService and then click OK. In the Permissions group box, select the Full Control check box.
- Click OK to close the Permissions For Repldata dialog box.
- Click OK to close the Repldata Properties dialog box.
- Click OK to close the Browse For Folder dialog box.
- In the Snapshot Folder text box, type \\SelfPacedCPU\Repldata (replacing the default entry that uses the C$ hidden administrative share), and then click Next.
A SQL Server Enterprise Manager dialog box appears stating that the \\SelfpacedCPU\Repldata path cannot be verified and asking whether you want to use it anyway.
- Click the Yes button.
The Customize The Configuration page appears.
- Verify that the No, Use The Following Default Settings option button is selected, review the Distributor properties, and then click Next.
The Completing The Configure Publishing And Distribution Wizard page appears.
- Click the Finish button to configure SelfPacedCPU as a Distributor.
A SQL Server Enterprise Manager dialog box appears to show the progress of the Distributor configuration.
- When a SQL Server Enterprise Manager message box appears stating that the SelfPacedCPU was successfully enabled as the Distributor, click OK.
A SQL Server Enterprise Manager dialog box appears stating that Replication Monitor has been added to the console tree.
- Click the Close button. Leave SQL Server Enterprise Manager running.
Creating a Publication
To create your first publication, use the Create Publication Wizard. You can start this wizard from the Tools menu by clicking Wizards, expanding the Replication container in the Select Wizard dialog box, and then double-clicking Create Publication Wizard. Alternatively, you can right-click the Publications container in the console tree (in the Replication container) and then click New Publication. The Welcome To The Create Publication Wizard page appears as shown in Figure 15.17.
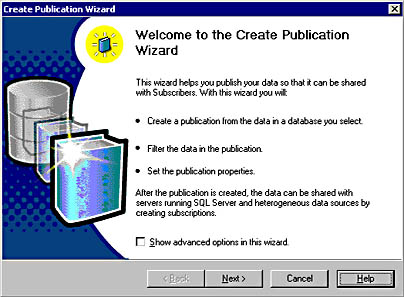
Figure 15.17
Starting the Create Publication Wizard.
Notice that you can select the Show Advanced Options In This Wizard check box. Showing advanced options allows the enabling of updatable and transformable subscriptions.
Next, in the Choose Publication Database page, select the database containing the data and objects to publish. See Figure 15.18.
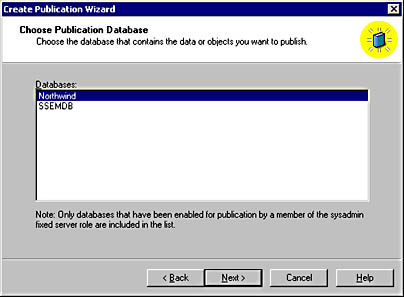
Figure 15.18
Select the publication database.
If a member of the sysadmin server role runs the Create Publication Wizard, all user databases are displayed and any database selected is automatically enabled for replication. If a member of the db_owner fixed database role in a database runs the Create Publication Wizard, the only databases that will appear are databases that have previously been enabled for replication and with respect to which they are db_owners.
Next, in the Select Publication Type page, you select the type of publication. See Figure 15.19.
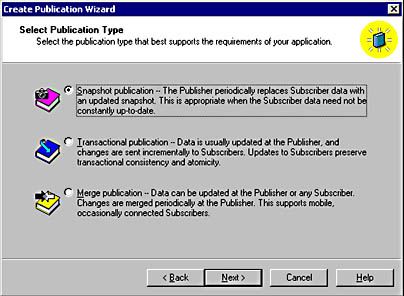
Figure 15.19
Select the type of publication.
You can select the Snapshot Publication, Transactional Publication, or Merge Publication option button.
Creating a Snapshot Publication
If you select the Snapshot Publication option button and you opted to view advanced options, the Updatable Subscriptions page appears. In this page, you can enable the immediate updating and/or the queued updating options. See Figure 15.20.
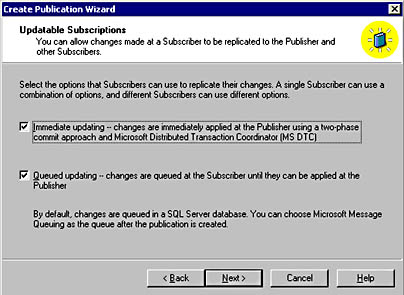
Figure 15.20
Enabling updatable subscriptions.
Notice that if you selected queued updating, changes are queued in a SQL Server database by default. If you want to use Microsoft Message Queuing, you enable this after the publication is created.
If you do not enable updatable subscriptions, the Transform Published Data page appears, and you can choose to permit transformable subscriptions. See Figure 15.21. This is an advanced option that will not appear unless you select the Show Advanced Options In This Wizard check box (see Figure 15.17).
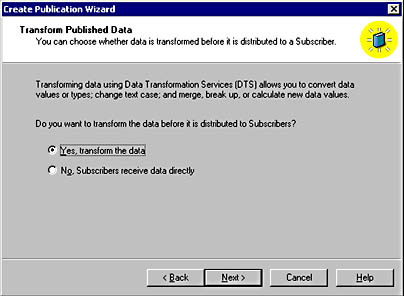
Figure 15.21
Permitting transformable subscriptions.
Next, in the Specify Subscriber Types page, you must specify the types of Subscribers that will subscribe to this publication. See Figure 15.22.
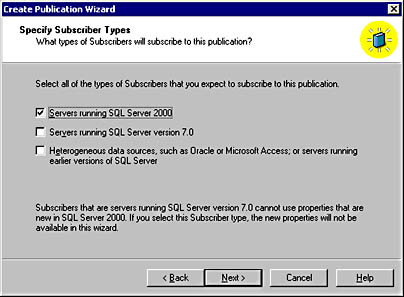
Figure 15.22
Specifying the type of Subscriber.
If you specify that a publication will be supporting subscriptions from SQL Server 7.0 and heterogeneous data sources, options that are incompatible with these types of Subscribers will not be displayed in the wizard. For example, replicating views to SQL Server 7.0 Subscribers is not supported.
Note
If you specify SQL Server 2000 Subscribers, but do not enable any of the new features, SQL Server 7.0 or heterogeneous data sources will still be able to subscribe to the publication.
Next, in the Specify Articles page, specify the articles that will be published as part of this publication. See Figure 15.23.
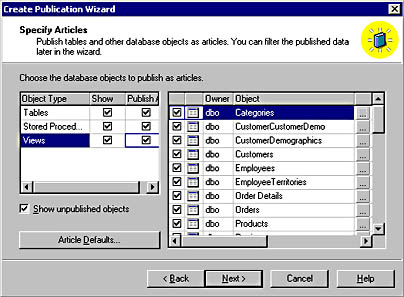
Figure 15.23
Specifying articles for publication.
You can select among tables, stored procedures, and views. You might not see all three types of objects, depending upon choices you made earlier. For example, if you permit transformable subscriptions, you can only publish tables. With respect to published tables, stored procedures, or views, click the Article Defaults button to globally set properties or the ellipsis button for each object to configure properties specifically for the article. By default, replicated articles have the same name in the subscription database as in the publication database. In addition, if a database object with the same name exists in the subscription database, by default it is dropped and re-created. You can also choose to replicate additional objects (such as user triggers) or not replicate indexes (they are replicated by default). For example, click the Article Defaults button to display the Default Article Type dialog box, double-click Table Articles to display the Default Table Article Properties dialog box, and then click the Snapshot tab to modify default table article properties. Figure 15.24 shows the Default Table Article Properties dialog box with the Snapshot tab selected.
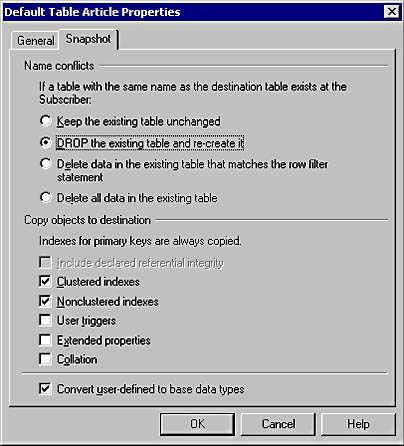
Figure 15.24
Modifying default table article properties.
Next, in the Article Issues box, depending upon the articles you choose to publish and the type of subscriptions permitted, you might receive a message regarding issues involving uniqueidentifier, timestamp, and IDENTITY columns. There are specific types of issues for each column type depending upon the replication type and design of the published database. Refer to the topic "Article Issues" in Books Online for more information regarding these issues. You might also receive a message regarding tables, objects, and views referencing objects not included in the publication. If a database object references other database objects, you must publish each of these database objects or create them manually at the Subscriber. Figure 15.25 displays an Article Issues page.
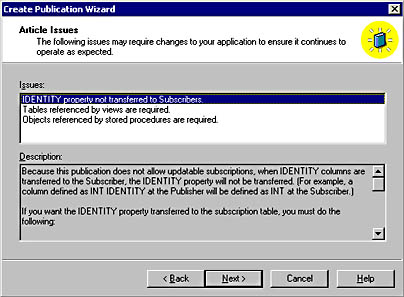
Figure 15.25
Article issues.
In Figure 15.25, notice that an IDENTITY column is being replicated. By default, the value of the column will be replicated, but not the IDENTITY property of the column.
Next, in the Select Publication Name And Description page, select a descriptive name for the publication, describe the publication, and choose whether to list the publication in Active Directory. The option to list the publication in the Active Directory will be grayed out if the SQL Server instance has not been listed in the Active Directory database. See Figure 15.26.

Figure 15.26
Naming the publication and listing it in Active Directory.
Next, in the Customize The Properties Of The Publication page, you can elect to customize the publication by defining data filters, enabling anonymous subscriptions, and configuring a custom schedule for the Snapshot Agent. See Figure 15.27. By default, the Snapshot Agent runs immediately after the publication is created and weekly thereafter.
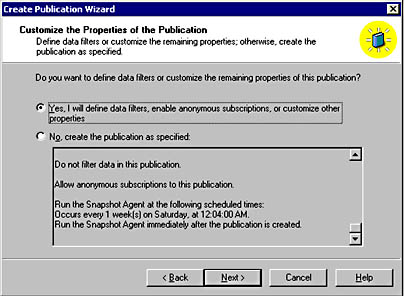
Figure 15.27
Choosing to customize the publication properties.
If you elect to customize the publication, the Filter Data page appears. You can choose to filter the articles in the publication vertically and/or horizontally. See Figure 15.28.
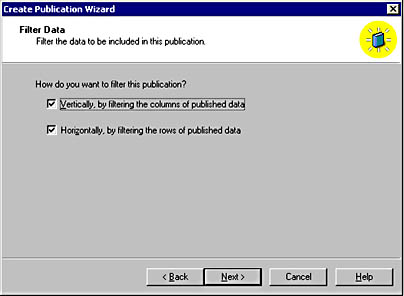
Figure 15.28
Choosing to filter data.
If you chose to filter vertically, the Filter Table Columns page appears. You can elect to exclude specific columns from any published table. See Figure 15.29.

Figure 15.29
Filtering table columns.
By default, all columns are published. To exclude a column, select an article and then clear the check box for the column.
If you chose to filter horizontally, the Filter Table Rows page appears. See Figure 15.30. You can elect to limit rows by selecting the article and then clicking the ellipsis button to display the Specify Filter dialog box. See Figure 15.31. By default, all rows are published.
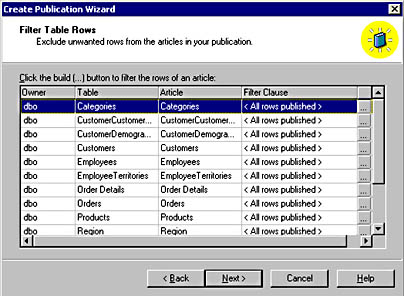
Figure 15.30
Filtering table rows.
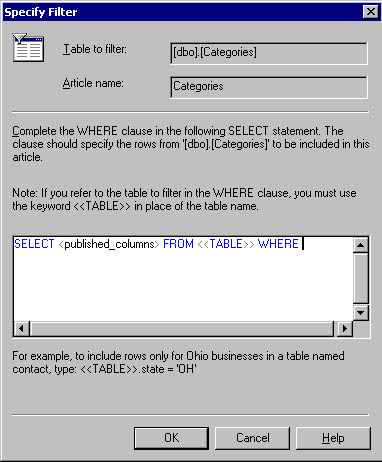
Figure 15.31
Specifying a row filter.
In the Specify Filter dialog box, to filter published rows for a selected article, complete the WHERE clause. Next, in the Allow Anonymous Subscriptions page, you can choose to permit anonymous subscriptions. See Figure 15.32. This is an advanced option that will not appear unless you select the Show Advanced Options In This Wizard check box (see Figure 15.17). This option is used primarily for Internet publishing or for publications to a large number of Subscribers.
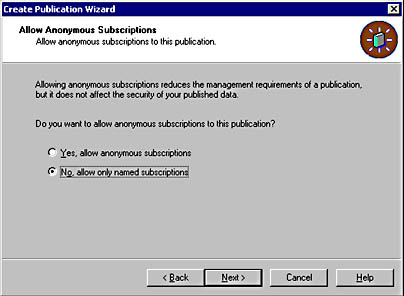
Figure 15.32
Allowing anonymous subscriptions.
If you choose to filter the publication vertically and horizontally, both the Filter Table Columns page and the Filter Table Rows page will appear. Next, in the Set Snapshot Agent Schedule page, you can accept the default schedule or click the Change button to modify the schedule. By default, the Snapshot Agent generally runs nightly (weekly is the default setting for publications that support anonymous subscriptions). Also, there is an option to create the first snapshot immediately if anonymous Subscribers are supported. Otherwise, you generally create the initial snapshot when you create the first subscription. See Figure 15.33.
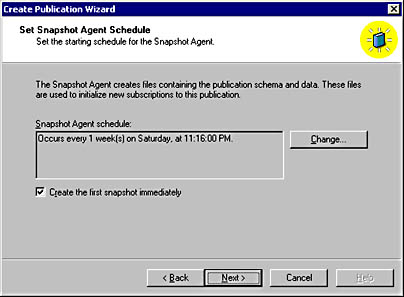
Figure 15.33
Setting the Snapshot Agent schedule.
Finally, in the Completing The Create Publication Wizard page, review the publication options and then click the Finish button. See Figure 15.34.
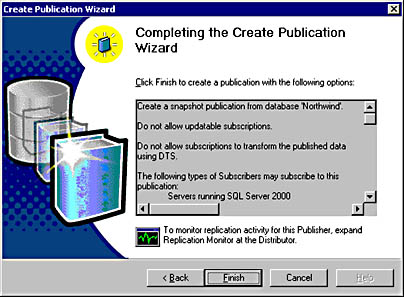
Figure 15.34
Completing the Create Publication Wizard.
Creating a Transactional Publication
Creating a transactional publication is substantially the same as creating a snapshot publication.
Practice: Creating a Transactional Publication
In this practice you create a transactional publication using the Create Publication Wizard in the SQL Server Enterprise Manager.
To create a transactional publication
- In the SQL Server Enterprise Manager console tree, expand the Replication container for the default instance.
- Right-click the Publications container and then click New Publication.
The Welcome To The Create Publication Wizard page appears.
- Select the Show Advanced Options In This Wizard check box and then click Next.
The Choose Publication Database page appears.
- In the Databases list box, click Pubs and then click Next.
The Select Publication Type page appears.
- Click the option button labeled Transactional Publication - Data Is Usually Updated At The Publisher, And Changes Are Sent Incrementally To Subscribers. Updates To Subscribers Preserve Transactional Consistency And Atomicity, and then click Next.
The Updatable Subscriptions page appears.
- Select both the Immediate Updating - Changes Are Immediately Applied At The Publisher Using A Two-Phase Commit Approach And Microsoft Distributed Transaction Coordinator (MS DTC) check box and the Queued Updating - Changes Are Queued At The Subscriber Until They Can Be Applied At The Publisher check box, and then click Next.
The Specify Subscriber Types page appears.
- Verify that only the Servers Running SQL Server 2000 check box is selected and then click Next.
The Specify Articles page appears.
- Locate the Tables cell in the Object Type column, and then select the corresponding Publish All check box.
- Locate the Stored Procedures cell in the Object Type column, and then select the corresponding Publish All check box.
Notice that tables without primary keys will not be published.
- Click Next.
The Article Issues page appears.
- Click Next.
The Select Publication Name And Description page appears.
- In the Publication Name text box, type PubsSales and then click Next.
The Customize The Properties Of The Publication page appears.
- Verify that the No, Create The Publication As Specified option button is selected, review the publication properties, and then click Next.
The Completing The Create Publication Wizard page appears.
- Click the Finish button to create the publication.
Notice that a SQL Server Enterprise Manager dialog box appears to show the progress of the publication being created.
- When a second SQL Server Enterprise Manager dialog box appears stating that the publication was successfully created, click the Close button.
- Do not close SQL Server Enterprise Manager.
Configuring Merge Replication
When you select the merge publication option in the Select Publication Type page of the Create Publication Wizard (see Figure 15.19), the Specify Subscriber Types page appears. In addition to the types of Subscribers supported by other publication types, you can also choose to support Subscribers with devices running SQL Server CE. See Figure 15.35.
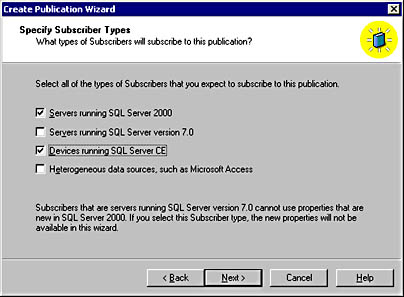
Figure 15.35
Specifying Subscribers using SQL Server CE devices.
Note
If you choose to support devices running Windows CE, anonymous subscriptions are enabled and cannot be disabled.
In the Specify Articles page (see Figure 15.23), you can customize conflict resolution settings for a merge publication. Click the Article Defaults button to display the Default Article Type dialog box, and then click Table Articles to display the Default Table Article Properties dialog box. See Figure 15.36.

Figure 15.36
Defining what constitutes a conflict.
By default, in the General tab, when you are merging changes from multiple sources, changes must be made to the same column to be considered a conflict. You can change this default to specify that changes to any column in a given row be considered a conflict. For example, if one Subscriber changes the phone number for a supplier and another Subscriber changes the contact name for the supplier, by default this is not considered a conflict.
Click the Resolver tab to permit Subscribers to interactively resolve conflicts during on-demand synchronizations. Subscribers cannot use Windows Synchronization Manager unless this check box is selected. See Figure 15.37.
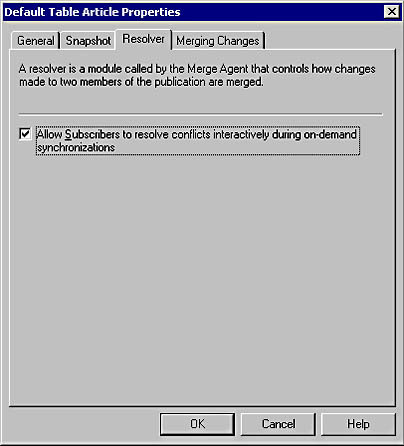
Figure 15.37
Permitting interactive conflict resolution.
In the Merging Changes tab, you can choose to add an additional layer of permissions. See Figure 15.38.
You can require that the Merge Agent security account have permissions to perform INSERT, UPDATE, and DELETE commands, in addition to the permissions required to access the publication database. This is used to limit the types of changes a Subscriber can make. This permission information is stored in the snapshot. If these permissions are changed after the initial snapshot is created, a new snapshot must be created. In addition, by default, multicolumn updates in the same row are made in a single UPDATE statement.
In addition to changing the default merge conflict properties, you can change the conflict resolution properties for each article by clicking the ellipsis button next to the article in the Specify Articles page and then clicking the Resolver tab when the Table Article Properties dialog box appears. See Figure 15.39.
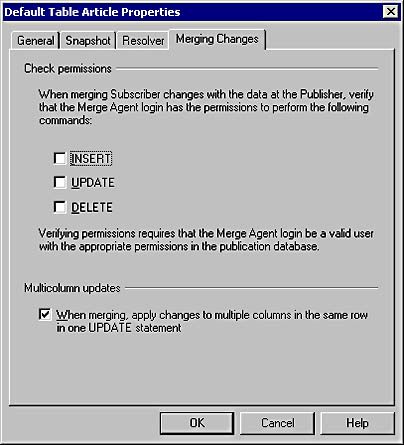
Figure 15.38
Requiring additional permissions for the Merge Agent.
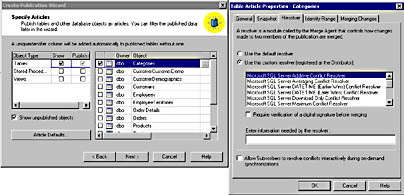
Figure 15.39
Specifying a custom resolver for an article.
By default, conflicts are resolved based on a priority weighting system. With this default resolver, all Subscribers have equal priority (although you can grant different Subscribers different priorities), and the first change to synchronize takes precedence in the event of a conflict.
Instead of the default resolver, you can select either one of the custom resolvers that ship with SQL Server 2000 or create your own using stored procedures or COM objects. The custom resolvers provided with SQL Server 2000 can resolve conflicts in a number of different ways, including the earliest change, most recent change, highest value, lowest value, or averaging. See the topic "Microsoft Resolver Descriptions" in Books Online for a full description of each custom resolver.
In addition, in the Identity Range tab, for any article containing an IDENTITY column, you can choose to have SQL Server automatically assign a range of values for each Subscriber. This allows each Subscriber to add new rows using the IDENTITY property and still ensure that no duplicate values occur. See Figure 15.40.
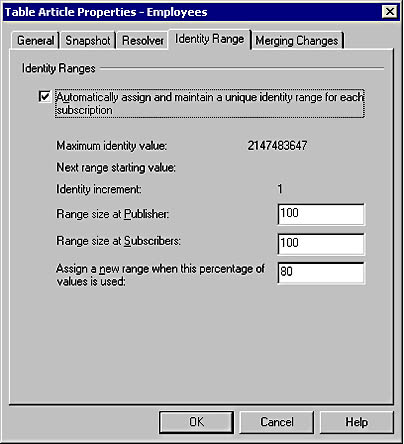
Figure 15.40
Defining identity ranges for Subscribers.
The next two pages, the Article Issues page and the Select Publication Name and Description page, are substantially identical to the equivalent pages for a Snapshot or a Transaction Replication publication. See Figures 15.25 and 15.26.
In the Filter Data page, if you choose to customize the properties of the publication, you can filter the publication vertically and/or horizontally. See Figure 15.41.
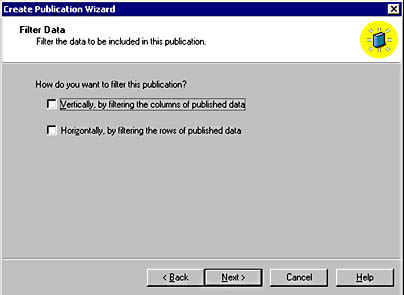
Figure 15.41
Choosing to filter a publication vertically and/or horizontally.
If you chose to filter data vertically, the Filter Table Columns page appears. See Figure 15.28. If you choose to filter data horizontally, merge replication permits you to choose between dynamic and static filters on the Enable Dynamic Filters page. See Figure 15.42.
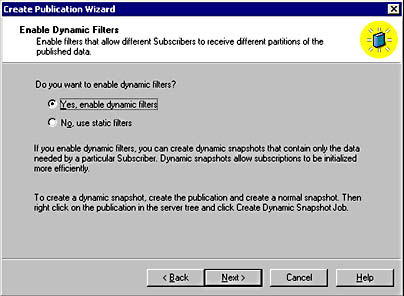
Figure 15.42
Choosing dynamic filters.
Next, in the Generate Filters Automatically page, you can choose to generate either static or dynamic horizontal filters automatically. See Figure 15.43.
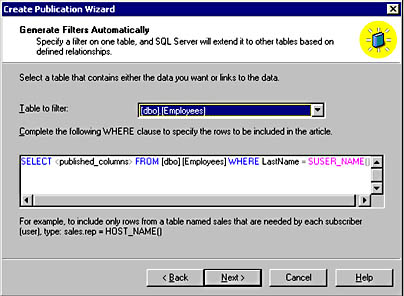
Figure 15.43
Generating filters automatically.
Using this capability, you specify a table containing a column of the characteristics on which you want to filter. For example, in Figure 15.43, the initial filter is based on the LastName column in the Employees table and the name of the logged-in user. Next, in the Filter Table Rows page, SQL Server uses this initial filter to create suggested filters (using join filters) for related tables to limit data being replicated based on the user name. See Figure 15.44.
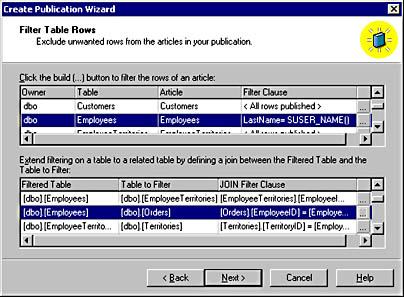
Figure 15.44
Automatically generated filters.
Next, in the Validate Subscriber Information page, by default SQL Server validates Subscriber information used in the dynamic filter automatically each time the Merge Agent reconnects. This page appears only if you have enabled dynamic filters. See Figure 15.45.
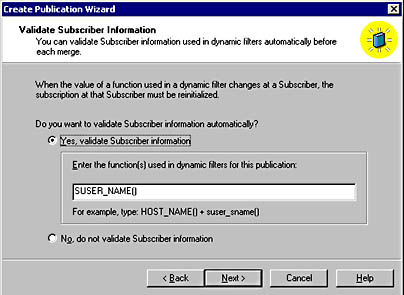
Figure 15.45
Validating dynamic filter information automatically.
This is used to ensure that information is partitioned consistently with each merge. Based on the filtering function used in Figure 15.45, if a Subscriber logs in using a different user name and attempts to synchronize, the synchronization would fail. Generally this is the desired behavior.
Next, in the Optimize Synchronization page, you can choose to improve synchronization performance by storing additional information at the Publisher. See Figure 15.46.
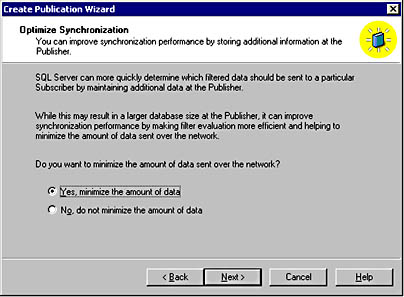
Figure 15.46
Optimizing the synchronization performance setting.
Click the Yes, Minimize The Amount Of Data option button to choose to optimize synchronization during merge replication. This minimizes network traffic when determining whether a change at the Publisher is within the partition of data that needs to be merged with a Subscriber. This is very useful for synchronization over slow network links, but does require additional storage space at the Publisher.
The next two pages, the Allow Anonymous Subscriptions page and the Set Snapshot Agent Schedule page, are substantially identical to the equivalent pages for a Snapshot or a Transaction Replication publication (see Figures 15.32 and 15.33). The Allow Anonymous Subscriptions page is an advanced option that will not appear unless you select the Show Advanced Options In This Wizard check box (see Figure 15.17). On the Set Snapshot Agent Schedule page, by default, the initial snapshot is run immediately for merge publications. Finally, the Completing The Create Publication Wizard appears (see Figure 15.34).
Note
If you enable dynamic filters, you can create dynamic snapshots after creating the normal snapshot by right-clicking the publication and then clicking Create Dynamic Snapshot Job.
Practice: Creating a Merge Publication
In this practice you create a merge publication using the Create Publication Wizard in the SQL Server Enterprise Manager.
To create a merge publication
- In the SQL Server Enterprise Manager console tree, expand the Replication container for the default instance.
- Right-click the Publications container and then click New Publication.
The Welcome To The Create Publication Wizard page appears.
- Select the Show Advanced Options In This Wizard check box and then click Next.
The Choose Publication Database page appears.
- In the Databases list box, click Northwind and then click Next.
The Select Publication Type page appears.
- Click the option button labeled Merge Publication - Data Can Be Updated At The Publisher Or Any Subscriber. Changes Are Merged Periodically At The Publisher. This Supports Mobile, Occasionally Connected Subscribers, and then click Next.
The Specify Subscriber Types page appears.
- Verify that only the Servers Running SQL Server 2000 check box is selected and then click Next.
The Specify Articles page appears.
- Click the Article Defaults button.
The Default Article Type dialog box appears.
- Verify Table Articles is selected and then click OK.
The Default Table Article Properties dialog box appears.
- Click the Resolver tab.
- Select the Allow Subscribers To Resolve Conflicts Interactively During On-Demand Synchronization check box, and then click OK.
The Specify Articles dialog box reappears.
- Locate the Tables cell in the Object Type column, and then select the corresponding Publish All check box.
- Click Next.
The Article Issues page appears.
- Click Next.
The Select Publication Name And Description page appears.
- In the Publication Name text box, type NorthwindSales and then click Next.
The Customize The Properties Of The Publication page appears.
- Click the Yes, I Will Define Data Filters, Enable Anonymous Subscriptions, Or Customize Other Properties option button and then click Next.
The Filter Data page appears.
- Select the Horizontally, By Filtering The Rows Of Published Data check box and then click Next.
The Enable Dynamic Filters page appears.
- Verify that the No, Use Static Filters option button is selected and then click Next.
The Generate Filters Automatically page appears.
- To create a user-defined function to use for the filter, click Start, point to Programs, point to Microsoft SQL Server, and then click Query Analyzer.
The Connect To SQL Server dialog box appears.
- Ensure that the Windows Authentication option button is selected, and then click OK to connect to the default instance on SelfPacedCPU.
- On the toolbar, click the Load SQL Script button.
The Open Query File dialog box appears.
- Open the UDF.sql file in C:\SelfPacedSQL\CH_15.
The script creates a user-defined function to return rows based on the week number.
- On the toolbar, click the Execute Query button.
- After the script executes successfully, close Query Analyzer to return to the Create Publication Wizard.
- In the Table To Filter drop-down list, click [dbo].[Orders].
- In the text box, complete the WHERE clause in the SELECT statement by typing dbo.udf_wknum(orderdate) between 1 and 12 and then click Next.
A SQL Server Enterprise Manager dialog box appears to display the progress of the filters being generated for the publication. When the filters have been created, the Filter Table Rows page appears.
- Click Next.
The Optimize Synchronization page appears.
- Click the Yes, Minimize The Amount Of Data option button and then click Next.
The Allow Anonymous Subscriptions page appears.
- Verify that the No, Allow Only Named Subscriptions option button is selected and then click Next.
The Set Snapshot Agent Schedule page appears.
- Verify that the Create The First Snapshot Immediately check box is selected and then click Next.
The Completing The Create Publication Wizard page appears.
- Review the properties of the publication and then click the Finish button to create the publication.
Notice that a SQL Server Enterprise Manager dialog box appears to display the progress of the publication being created.
- When a second SQL Server Enterprise Manager dialog box appears stating that the publication was successfully created, click the Close button.
- Do not close SQL Server Enterprise Manager.
Configuring Push Subscriptions
Once you have created a publication, you can configure push subscriptions on the Publisher using the Push Subscription Wizard. A push subscription is a subscription that is initiated and configured centrally from the Publisher. You can start this wizard from the Tools menu by clicking Wizards, expanding the Replication container in the Select Wizard dialog box, and then double-clicking Create Push Subscription Wizard, or by right-clicking a publication and then clicking Push New Subscription. The Welcome To The Push Subscription Wizard page appears, illustrated in Figure 15.47.
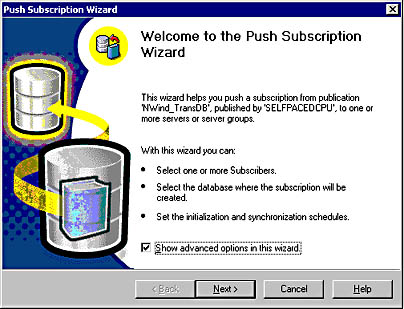
Figure 15.47
Starting the Push Subscription Wizard.
Notice that you can select the Show Advanced Options In This Wizard check box. Showing advanced options allows the updatable subscription options to be set and the configuring of the applicable replication agent to run at the Subscriber rather than the Distributor.
Next, in the Choose Subscribers page, select the Subscribers to whom you want to push this publication. See Figure 15.48. You select one or more Subscribers. A Subscriber must be enabled. If a member of the sysadmin server role runs the Push Subscription Wizard, a registered instance can be enabled on the fly. If a member of the db_owner role in a database runs the Push Subscription Wizard, no additional Subscribers can be enabled.
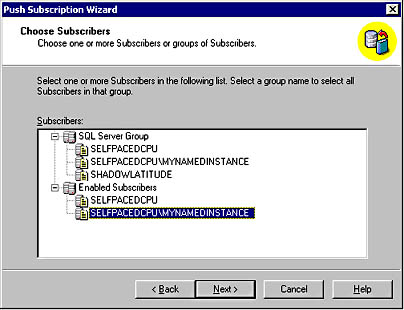
Figure 15.48
Choosing Subscribers.
Next, in the Choose Destination Database page, specify a destination database for the publication. See Figure 15.49.
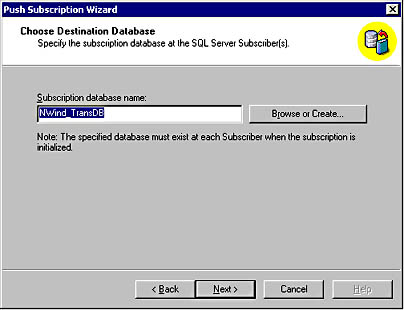
Figure 15.49
Choosing a destination database.
By default the name of the destination database (also called the subscription database) is the same as the publication database. The destination database must exist at each Subscriber prior to initialization. Click the Browse Or Create button to either verify or create the subscription database.
Next, depending upon the type of publication, specify the location for the Distribution Agent in the Set Distribution Agent Location page (see Figure 15.50) or the Merge Agent In This Set Merge Agent Location page (see Figure 15.51). By default, this agent runs at the Publisher, using the server resources of the Publisher. However, you can elect to have this agent run at the Subscriber, using the server resources of the Subscriber (provided the Subscriber is running Windows 2000 or Windows NT 4.0). This is an advanced option that will not appear unless you select the Show Advanced Options In This Wizard check box (see Figure 15.47).
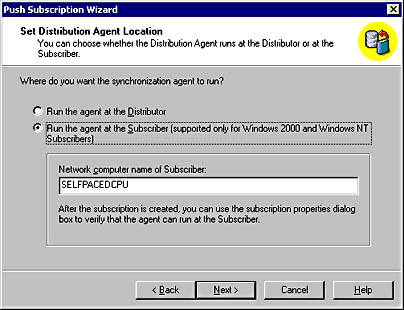
Figure 15.50
Setting the Distribution Agent location.

Figure 15.51
Setting the Merge Agent location.
Next, specify the schedule for the Distribution Schedule Agent in the Set Distribution Agent page (see Figure 15.52) or the Merge Agent in the Set Merge Agent Schedule page. See Figure 15.53.
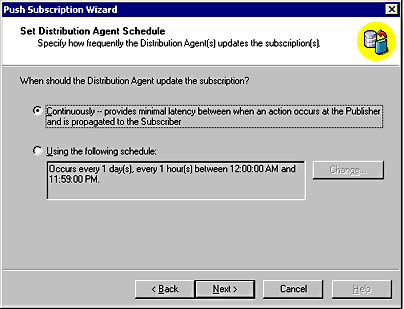
Figure 15.52
Setting the Distribution Agent schedule.
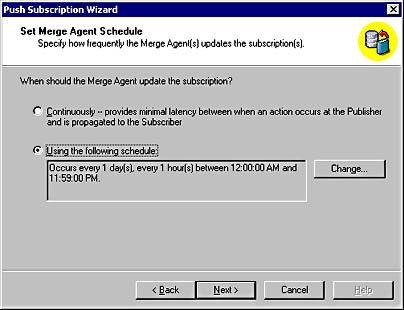
Figure 15.53
Setting the Merge Agent schedule.
Notice that the default schedule for Distribution Agents is continuous and the default schedule for Merge Agents is hourly.
Next, in the Initialize Subscription page, specify whether and when to initialize the subscription. Figure 15.54 illustrates specifying initialization by the Distribution Agent and Figure 15.55 illustrates specifying initialization by the Merge Agent.
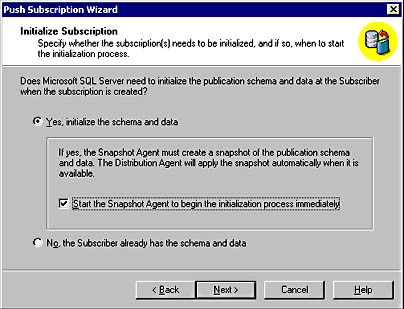
Figure 15.54
Specifying initialization by the Distribution Agent.
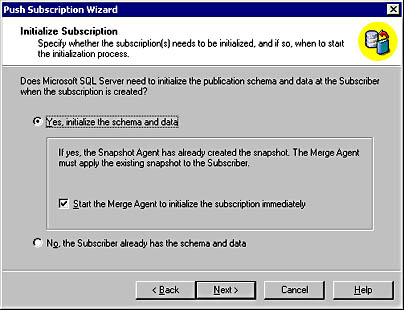
Figure 15.55
Specifying initialization by the Merge Agent.
You can choose to have the Snapshot Agent create the snapshot immediately (if it has not already done so) and then initialize the subscription (rather than wait for the next scheduled run of the Snapshot Agent) by clicking the Yes, Initialize The Schema And Data option button and then selecting the Start The Snapshot Agent To Begin The Initialization Process Immediately check box. This check box will not appear if the snapshot files have not already been created. Remember, the snapshot files must be created before the Distribution Agent or Merge Agent can initialize the subscription. If you have applied the snapshot files manually (using a compact disc or other removable media), specify that the Subscriber already has the schema and data by clicking the No, The Subscriber Already Has The Schema And Data option button.
Next, in the Updatable Subscriptions page, if you are configuring a subscription for a snapshot or transactional publication supporting one of the updatable subscriptions options, you can specify the type of updatable subscriptions. The available options on this page will vary depending on the type of updatable subscriptions enabled in the publication. See Figure 15.56.
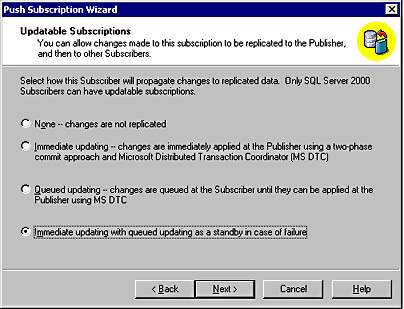
Figure 15.56
Specifying the type of updatable subscription.
Next, in the Specify DTS Package page, if you are configuring a subscription for a snapshot or transactional publication using transformable subscriptions, you must specify a DTS package to use with the subscription. Notice that the DTS package can be located at either the Distributor or the Subscriber. See Figure 15.57.
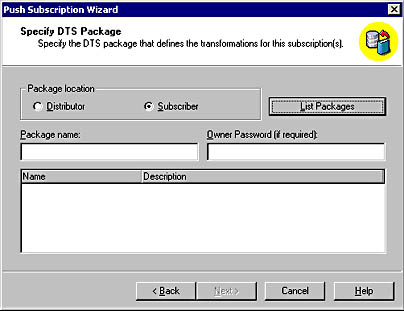
Figure 15.57
Specifying the DTS package.
Next, in the Set Subscription Priority page, if you are configuring a subscription for a merge publication, specify the subscription priority. See Figure 15.58.
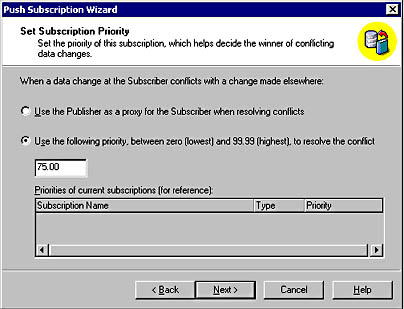
Figure 15.58
Setting the subscription priority for conflict resolution.
The Use The Publisher As A Proxy For The Subscriber When Resolving Conflicts option button is selected by default. This default subscription priority assigns zero priority to all Subscribers. The Publisher merges changes made by a Subscriber and, in effect, assumes authorship of these changes (acting as a proxy for the Subscriber). A subscription without an assigned priority is called a local subscription. However, you can assign a priority to a subscription by clicking the Use The Following Priority Between Zero (Lowest) And 99.99 (Highest), To Resolve The Conflict option button. A subscription with an assigned priority is called a global subscription. In this case, changes made by the Subscriber are merged with data at the Publisher and the priority of the Subscriber making the change is stored in the metadata for the change. This assures that a change made by a higher priority Subscriber is not overwritten by a change by a lower priority Subscriber.
Next, in the Start Required Services page, SQL Server Agent verifies that the required services are running on the Distributor (see Figure 15.59). The SQL Server Agent service is always required. The MSDTC service is required for updatable subscriptions (unless Microsoft Message Queuing has been enabled). If a required service is not running, by default SQL Server Agent will start the service when the wizard finishes. Clear the check box if you want to start it manually.
Finally, in the Completing The Push Subscription Wizard page, review the subscription options and then click the Finish button to create the push subscription. See Figure 15.60.
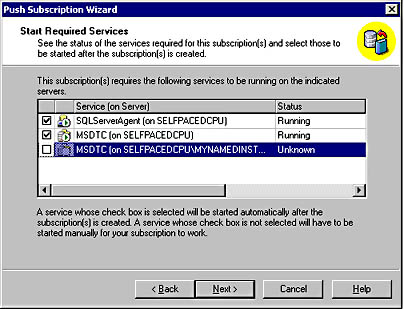
Figure 15.59
Starting required services.
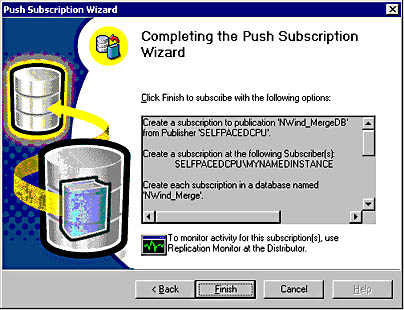
Figure 15.60
Completing the Push Subscription Wizard.
Practice: Creating a Push Subscription
In this practice you create a push subscription using the Create Push Subscription Wizard in the SQL Server Enterprise Manager.
To create a push subscription
- In the SQL Server Enterprise Manager console tree, expand the Replication container for the default instance and then expand the Publications container.
- Right-click PubsSales:pubs and then click Push New Subscription.
The Welcome To The Push Subscription Wizard page appears.
- Select the Show Advanced Options In This Wizard check box and then click Next.
The Choose Subscribers page appears.
- In the Subscribers list box, click SelfPacedCPU\MyNamedInstance and then click Next.
The Choose Destination Database page appears.
- Click the Browse Or Create button.
The Browse Databases On 'SelfPacedCPU\MyNamedInstance' dialog box appears.
- Click the Create New button.
The Database Properties dialog box appears.
- In the Name text box, type PubsPush and then click OK.
- In the Browse Databases On 'SelfPacedCPU\MyNamedInstance' dialog box, verify that PubsPush is selected and then click OK.
- In the Choose Destination Database page, click Next.
The Set Distribution Agent Location page appears.
- Verify that the Run The Agent At The Distributor option button is selected and then click Next.
The Set Distribution Agent Schedule page appears.
- Verify that the Continuously - Provides Minimal Latency Between When An Action Occurs At The Publisher And Is Propagated To The Subscriber option button is selected and then click Next.
The Initialize Subscription page appears.
- Verify that the Yes, Initialize The Schema And Data option button is selected.
- Select the Start The Snapshot Agent To Begin The Initialization Process Immediately check box and then click Next.
The Updatable Subscriptions page appears.
- Click the Immediate Updating With Queued Updating As A Standby In Case Of Failure option button, and then click Next.
The Start Required Services page appears. Notice that the SQL Server Agent service on SelfPacedCPU is required along with the MS DTC service on both instances of SQL Server.
- In the grid, verify that the check box for each listed service is selected and then click Next.
The Completing The Push Subscription Wizard page appears.
- Review the properties of the push subscription and then click the Finish button.
Notice that a SQL Server Enterprise Manager dialog box appears to show the progress of the push subscription being created.
- When the push subscription is completed successfully, a second SQL Server Enterprise Manager dialog box appears. Click the Close button.
- Do not close SQL Server Enterprise Manager.
Configuring a Pull Subscription
To configure a pull subscription using SQL Server Enterprise Manager, it must be run from a Subscriber using the Pull Subscription Wizard. A pull subscription is initiated by the Subscriber, based on a schedule set at the Subscriber, and it pulls replicated data from the Publisher using the resources of the Subscriber. In the case of a merge publication, a pull subscription pushes data back to the Publisher. You can start this wizard from the Tools menu by clicking Wizards, expanding Replication in the Select Wizard dialog box, and then double-clicking Create Pull Subscription Wizard, or by right-clicking Subscriptions and then clicking New Pull Subscription. Figure 15.61 shows the Welcome To The Pull Subscription Wizard page.
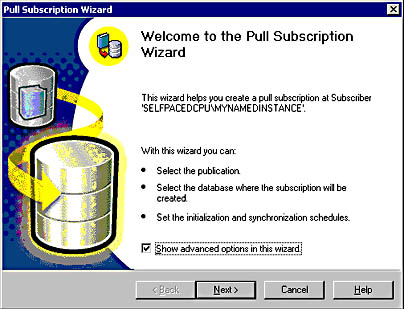
Figure 15.61
Starting the Pull Subscription Wizard.
Notice that you can select the Show Advanced Options In This Wizard check box. Showing advanced options allows the updatable subscription options to be set.
Next, in the Look For Publications page, you can search for publications from servers registered with SQL Server Enterprise Manager, or you can search the Active Directory database for publications listed with Active Directory by Publishers running SQL Server 2000. See Figure 15.62.
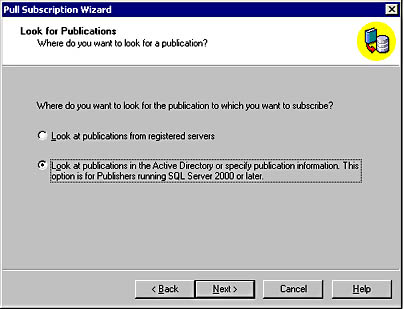
Figure 15.62
Selecting where to look for a publication.
If you choose to look at publications in the Active Directory database, you can enter the publication information in the Specify Publication page without having to register the server with SQL Server Enterprise Manager. This is useful if you do not have sufficient permission to register the Publisher, but know the necessary publication information and have permission to subscribe to the publication. See Figure 15.63. If you do not know the necessary publication information and want to search for a publication, click the Browse button. In the Find SQL Server Publications dialog box, you can search for SQL Server publications based on the publication name or using advanced search criteria. See Figure 15.64.
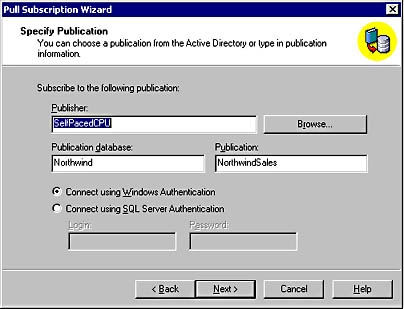
Figure 15.63
Using Active Directory to subscribe to a publication.

Figure 15.64
Specifying in Active Directory for a publication.
If you choose to search for publications registered with SQL Server Enterprise Manager, in the Choose Publication page, select the publication to which you want to subscribe. See Figure 15.65. This page displays publications that are accessible (using the PAL for each publication) based on the login used to connect to the SQL Server instance by SQL Server Enterprise Manager and those that allow anonymous subscriptions.
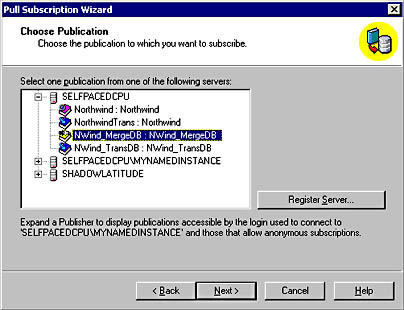
Figure 15.65
Searching registered servers for a publication.
After selecting a publication in the Choose Destination Database page (and being authenticated based on the PAL), select the database on the destination server in which to create the subscription. Select an existing database from the list box or create a new database by clicking the New button. See Figure 15.66.
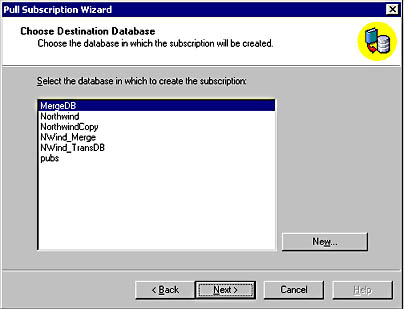
Figure 15.66
Choosing a destination database.
Next, if you have selected a publication permitting anonymous subscriptions, you can elect to make the subscription anonymous in the Allow Anonymous Subscription page. If a subscription is anonymous, no information about the Subscriber is retained by the Publisher. See Figure 15.67.
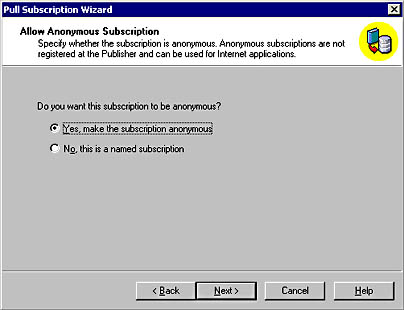
Figure 15.67
Making a subscription anonymous.
If you have selected a publication that is permitted to have updatable subscriptions, you can choose the type of updatable subscriptions in the Updatable Subscriptions page. See Figure 15.68. If you select one of the 2PC types, in the Specify Updating Subscription Login page, specify the login to be used by the Subscriber to connect to the Publisher. Choices are using a predefined linked server (or remote server) login or a SQL Server login. See Figure 15.69.

Figure 15.68
Setting updatable subscription type.
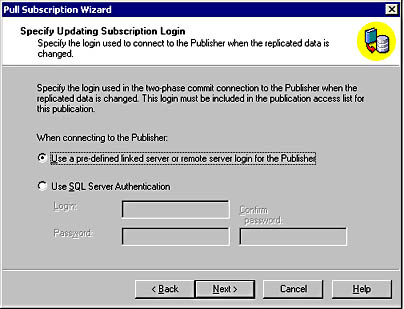
Figure 15.69
Specifying an updating subscription login.
Next, in the Initialize Subscription page, you can choose to initialize the subscription immediately or specify that the Subscriber already has the snapshot files. This option is identical to a push subscription (see Figures 15.54 and 15.55). Next, in the Snapshot Delivery page, specify how to access the snapshot files. See Figure 15.70.
You can use the default snapshot location for the publication or an alternate location (such as a compact disc or an FTP address). The replication agent created with this subscription (either a Distribution Agent or a Merge Agent) must have read access to the snapshot files.
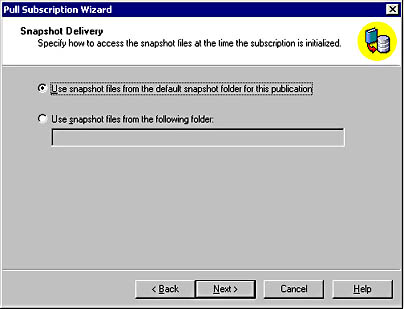
Figure 15.70
Specify the location to access the snapshot files.
Next, specify a schedule for the replication agent (either the Merge Agent in the Set Merge Agent Schedule page or the Distribution Agent in the Set Distribution Agent Schedule page). Options include continuous, according to a set schedule, or on demand only. The On Demand Only option allows a pull Subscriber to use SQL Server Enterprise Manager or the Windows Synchronization Manager to synchronize the subscription. Figure 15.71 illustrates the Set Merge Agent Schedule page.
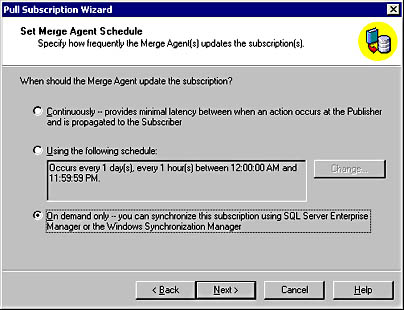
Figure 15.71
Specifying an agent schedule.
Note
To configure an on-demand pull subscription, the domain user account used by the SQL Server Agent service must have full control permissions on the following registry key: HKLM\Software\Microsoft\Microsoft SQL Server\80\Replication\Subscriptions.
Next, if a merge publication is subscribed to, the Set Subscription Priority Page appears. This is the same as with a push subscription. See Figure 15.58.
Next, in the Start Required Services page, the necessary services for this subscription are displayed. If the On Demand Only option was selected in the Set Merge Agent Schedule page, the Start Required Services page will not appear. The SQL Server Agent service will always be one of the options. If a 2PC type of updatable subscription is selected, the MS DTC service will also be selected. See Figure 15.72.
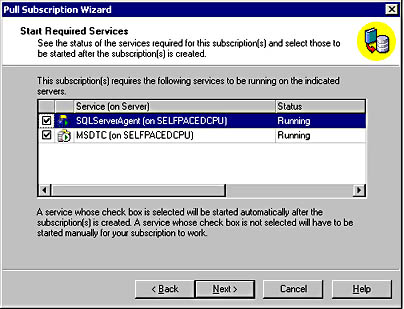
Figure 15.72
Starting required services.
Finally, in the Completing The Pull Subscription Wizard page, review the subscription options selected and then click the Finish button to create the pull subscription.
Practice: Creating a Pull Subscription
In this practice you create a pull subscription using the Create Pull Subscription Wizard in the SQL Server Enterprise Manager.
To create a pull subscription
- Click the Start button, and the click Run.
- In the Open box, type Regedt32 and then click OK.
The Registry Editor appears.
- Expand HKEY_LOCAL_MACHINE, expand Software, expand Microsoft, expand Microsoft SQL Server, expand 80, expand Replication, and then click Subscriptions.
- On the Security menu, click Permissions.
The Permissions For Subscriptions dialog box appears.
- Click the Add button.
The Select Users, Computers Or Groups dialog box appears.
- Double-click SQLService and then click OK.
The SQLService domain user account is added to the Name list box.
- In the Name list box, click SQLService, and then in the Permissions group box, select the Full Control check box.
- Click OK to close the Permissions for Subscriptions dialog box.
- Close Registry Editor.
- In the SQL Server Enterprise Manager console tree, expand the SelfPacedCPU\MyNamedInstance container and then expand the Replication container for MyNamedInstance.
- Right-click the Subscriptions container and then click New Pull Subscription.
The Welcome To The Pull Subscription Wizard page appears.
- Select the Show Advanced Options In This Wizard check box and then click Next.
The Look For Publications page appears.
- Verify that the Look At Publications From Registered Servers option button is selected, and then click Next.
The Choose Publication page appears.
- Expand SelfPacedCPU, click NorthwindSales: Northwind, and then click Next.
The Choose Destination Database page appears.
- Click the New button.
The Database Properties dialog box appears.
- In the Name text box, type NWindPull and then click OK.
The NWindPull database is created using default parameters.
- In the Choose Destination Database page, verify that NWindPull is selected and then click Next.
The Initialize Subscription page appears.
- Verify that the Yes, Initialize The Schema And Data option button is selected.
- Select the Start The Merge Agent To Initialize The Subscription Immediately check box and then click Next.
The Snapshot Delivery page appears.
- Verify that the Use Snapshot Files From The Default Snapshot Folder For This Publication option button is selected and then click Next.
The Set Merge Agent Schedule page appears.
- Click the On Demand Only - You Can Synchronize This Subscription Using SQL Server Enterprise Manager Or The Windows Synchronization Manager and then click Next.
The Set Subscription Priority page appears.
- Verify that the Use The Publisher As A Proxy For The Subscriber When Resolving Conflicts option button is selected and then click Next.
The Completing The Pull Subscription Wizard page appears.
- Review the properties of the pull subscription and then click the Finish button.
Notice that a SQL Server Enterprise Manager dialog box appears to display the progress of the pull subscription being created.
- When the pull subscription is completed successfully, click OK.
- Do not close SQL Server Enterprise Manager.
Lesson Summary
The first step in implementing a replication solution is to define a Distributor and enable Publishers, databases, and Subscribers. You can use the Configure Publishing And Distribution Wizard for this task. Use the Create Publication Wizard to create snapshot, transactional, and merge publications. Configure Subscribers using the Push Subscription Wizard or the Pull Subscription Wizard.
EAN: N/A
Pages: 126