Lesson 3: Restoring a User Database
3 4
Now that you have learned how to perform database backups using SQL Server Enterprise Manager and Transact-SQL, you are ready to use these backups to perform data restorations. In this lesson, you will learn how to view database backups to help determine a restoration sequence. You will learn how to completely restore user databases using SQL Server Enterprise Manager and Transact-SQL. You will also learn how to recover a database to a specified point in time.
After this lesson, you will be able to
- View database and transaction log backup files to determine a restore sequence
- Perform a complete data restoration of a user database using SQL Server Enterprise Manager and Transact-SQL
- Recover a database to a specified point in time using SQL Server Enterprise Manager and Transact-SQL
- Restore a database to standby mode using SQL Server Enterprise Manager and Transact-SQL to determine its state before applying additional backup files
Estimated lesson time: 60 minutes
Determining the Data Restoration Sequence
When you need to perform a data restoration, you must begin by determining the most efficient sequence of backup files to use for accomplishing this task in the shortest time possible. SQL Server Enterprise Manager makes this task easy. Every time you perform any type of backup or restore, SQL Server 2000 records the details of the backup and the restore history in the msdb database. These details include such information as which devices or files the backup is stored on, who performed the backup, and at what time. When you are ready to perform a restoration of a database using SQL Server Enterprise Manager, it uses the information in the msdb system tables to tell you which backup files you need to use to perform the restoration in the quickest time possible. If the msdb database is damaged, you should restore the msdb database from backup before you restore any user databases. This will restore the backup and restore history for all databases on the SQL Server 2000 instance (provided you recently backed up the msdb database).
If you do not have a recent backup of the msdb database or are restoring to another SQL Server 2000 instance, SQL Server 2000 records sufficient information with each backup set to re-create the backup history in the msdb database. You can use SQL Server Enterprise Manager to read each backup file and add the information to the msdb database. SQL Server Enterprise Manager can then use this reconstructed backup history to identify the proper restoration sequence.
Once you have identified the restoration sequence, you need to identify the actual backup media that contains each backup set you want to use. If you labeled them well, this is a simple task. However, occasionally you will need to read the media set name and description to identify the correct backup media and the backup set name and description to identify each backup set on the backup media.
To view the contents of a backup device using SQL Server Enterprise Manager, expand the Management container, click Backup, and then in the details pane, right-click the backup device you want to view and click Properties. In the Backup Device Properties dialog box, the filename or tape drive associated with the backup device will be displayed. Click the View Contents button to display the contents of the backup device in the View Backup Media Contents dialog box. See Figure 9.15.
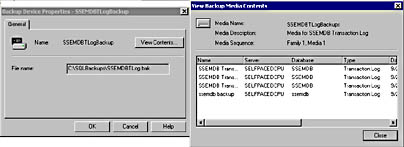
Figure 9.15
Viewing the contents of a backup device using SQL Server Enterprise Manager.
Note
If the backup device does not appear in the Backup container, you will need to re-create the backup history. Re-creating backup history will be covered toward the end of this lesson.
To view the contents of a backup device with Transact-SQL, three commands are available to you to retrieve information regarding the media sets and backup sets. Table 9.2 describes the three commands.
Table 9.2 Information Retrieval Commands in Transact-SQL
| Transact-SQL Command | Description |
| RESTORE LABELONLY | Retrieves backup media header information, including the media set name and description. |
| RESTORE HEADERONLY | Retrieves backup set information, including the backup set name and description for every backup set on a particular backup device. This includes internal information regarding LSNs. SQL Server uses this information to determine what backup files it needs to apply and in what order. |
| RESTORE FILELISTONLY | Retrieves a list of each data and log file backed up within a particular backup set. |
Practice: Retrieving Backup Media Information
In this practice you will retrieve backup media information from a backup device using SQL Server Enterprise Manager and Transact-SQL.
To retrieve backup media information
- Ensure that you are logged on to the SelfPacedSQL.MSFT domain controller as Administrator.
- In the SQL Server Enterprise Manager console tree, expand the default instance, expand the Management container, and then click Backup.
The backup devices for this SQL Server 2000 instance are displayed in the details pane.
- In the details pane, right-click SSEMDBTLogBackup and then click Properties.
The Backup Device Properties – SSEMTLogBackup dialog box appears displaying the filename associated with this backup device.
- Click the View Contents button.
The View Backup Media Contents dialog box appears, displaying the contents of the SSEMTLogBackup device. Details regarding three transaction log backup sets appear.
- Switch to SQL Query Analyzer
- On the toolbar, click the Load SQL Script button.
The Open Query File dialog box appears.
- Open QueryHeaders.sql in the C:\SelfPacedSQL\CH_9 folder.
A Transact-SQL script appears, containing five separate queries, which will retrieve information from the SSEMDBTLogBackup backup device.
- On the toolbar, click the Execute Query button to execute the QueryHeaders.sql statement.
In the results pane, notice five separate result sets. The first result set displays information regarding the media set itself. The second result set displays information regarding each backup set recorded on this backup media. The final three result sets display information regarding each data and transaction log file in each of the three backup sets recorded on this backup media.
- Compare the information available regarding the backup sets using SQL Server Enterprise Manager and Transact-SQL.
- Switch to SQL Server Enterprise Manager.
- Click the Close button to close the View Backup Media Contents dialog box, and then click Cancel to close the Backup Device Properties - SSEMDBTLogBackup dialog box.
- Do not close SQL Server Enterprise Manager or SQL Query Analyzer.
Performing Restorations Using SQL Server Enterprise Manager
SQL Server Enterprise Manager provides a simple graphical interface to interactively perform data restorations. You may need to perform a data restoration because a disk containing a data file failed, because an entire SQL Server 2000 installation failed, or because you want to recover data to an earlier point in time.
Note
Before you attempt to restore a backup to a database that is still functioning, be sure to restrict user access to it.
Restoration of an Entire Database from the Failure of a Data Disk
If a disk containing a data file fails, SQL Server Enterprise Manager will display the database containing the damaged data file as suspect (unless you are using RAID). See Figure 9.16.
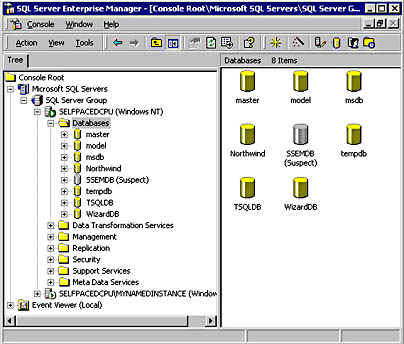
Figure 9.16
A damaged data file displayed as suspect.
If you discover you have a suspect database, you should immediately back up the transaction log without truncation before you attempt any restoration of your data (otherwise, you will lose all changes since the most recent transaction log backup). Backing up the current transaction log (using the Without Truncation option) allows you to recover up to the point of failure. See Figure 9.17.
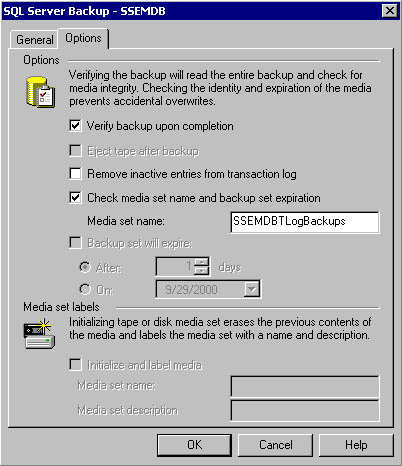
Figure 9.17
Selecting transaction log backup options.
Next, you should replace the failed disk. If your data is using RAID for fault tolerance, all that you need to do is to simply add the new drive to the RAID system. If you do not have RAID, you must restore your data to the new disk before your users can access the damaged database. You can either perform a full database restoration or perform a file or filegroup restoration (see the following section). In either case, to begin the restoration, expand the Databases container, right-click the suspect database in the details pane, point to All Tasks, and then click Restore Database. SQL Server Enterprise Manager will determine the most efficient complete database restoration path for this database using the backup information stored in the msdb database. See Figure 9.18.
If one of the backup sets identified by SQL Server Enterprise Manager for use in the restoration of the database is missing in the Restore Database dialog box, you can select other combinations of backup sets to accomplish the data restoration task. SQL Server Enterprise Manager will assist you in selecting a combination of backup sets that you can use to complete the restoration. For example, if you want to start with an earlier full backup than the one selected, click the First Backup To Restore drop-down list and then select an earlier full database backup. SQL Server Enterprise Manager will quickly determine the requisite backup sets given this earlier starting point for the data restoration and will display them in the list box at the bottom of the dialog box.

Figure 9.18
Specifying backup sets to restore.
If you want to view information regarding the content of a particular backup set, select the backup set in the list box at the bottom of the dialog box and then click the Properties button. The properties of the backup set will appear in the Backup Set Properties dialog box, including information you provided when you created the backup set and information recorded by SQL Server 2000 when it performed the backup. See Figure 9.19.
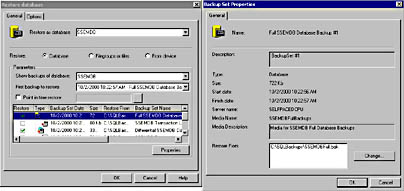
Figure 9.19
Viewing the properties of a backup set.
If the location of the backup file has moved from the original location recorded in the msdb database, you can click the Change button in the Backup Set Properties dialog box and then specify the new location. For example, you may have originally written the backup file to disk, but it may now be on tape. Or, it may be stored on a network disk in a different location.
After you have determined which backup sets you want to restore, click the Options tab in the Restore Database dialog box to set additional data restoration properties. See Figure 9.20.
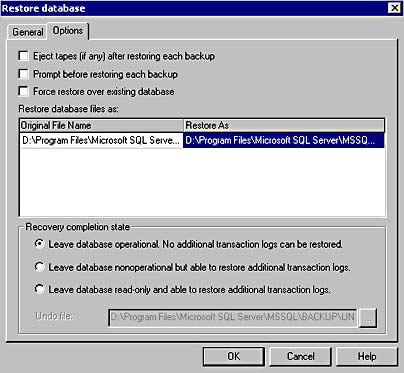
Figure 9.20
Setting additional restoration properties.
In the Options tab under the Restore As column, you can change the physical location of each data file being restored. By default, data files are restored to their original location (overwriting any files with the same names located there). You can also select the recovery completion state. By default, SQL Server 2000 will restore each backup set you selected, and after the last backup has been applied, it will recover the database. This is equivalent to the Transact-SQL recovery option. If you are not applying all of the backups that you want to apply, you must change this setting to allow you to apply additional transaction logs. You have two choices.
- You can choose to leave the database nonoperational but able to restore additional transaction logs. This is equivalent to the Transact-SQL no-recovery option.
- You can choose to leave the database read-only and able to restore additional transaction log files. This is equivalent to the Transact-SQL standby mode option. Selecting the read-only option requires the specification of an undo file that will be created during the restoration. This undo file is created by default in the Backup folder and is named UNDO_ DatabaseName.DAT. Use a different name to avoid overwriting previous undo files, if necessary. This undo file contains rollback changes that are made to the database to allow you to view the database in a logically consistent state while in standby mode. These consist of incomplete transactions that SQL Server 2000 does not yet know the completion status of. If you choose to apply additional transaction logs, these rolled-back transactions in the undo file will be rolled forward before additional transaction logs are applied.
After you click OK, the selected backup sets are restored, and your database is either recovered or left in a no-recovery state for more transaction logs to be applied.
Restoring a Data File or Filegroup
If you want to perform a file or filegroup restoration rather than a complete database restoration, click the Filegroups Or Files option button in the General tab of the Restore Database dialog box to see a display of all files and filegroups that that have been backed up, along with all transaction log files. This includes all data files backed up as part of a full database backup as well as files backed up explicitly as a file or filegroup backup. See Figure 9.21.
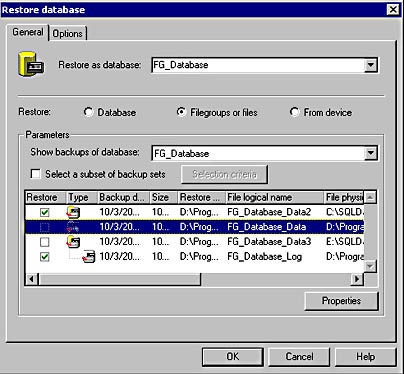
Figure 9.21
Selecting filegroups or files to restore.
Once you select one or more data files to restore, SQL Server Enterprise Manager selects the transaction log files that must be applied with the data files you selected in order to bring the entire database to a consistent state.
When you click the Select A Subset Of Backup Sets option button, you can use the Selection Criteria button to filter the backup sets based on the data file drive, the date of the backup set, or backup sets of particular files and filegroups only. Remember, to restore a database using a file or filegroup backup, you must restore all transaction log files more recent than the data files you are restoring in order to ensure that your database is in a consistent state. See Figure 9.22.
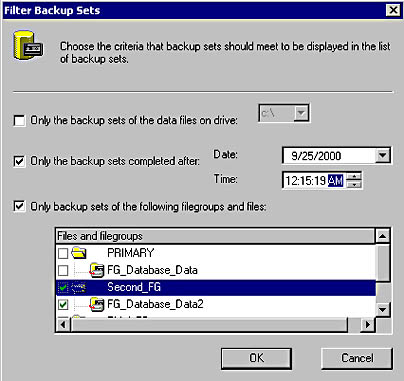
Figure 9.22
Filtering the criteria for displaying backup sets.
Practice: Performing a Complete Database Restoration
In this practice you will perform a complete database restoration using SQL Server Enterprise Manager.
To perform a complete database restoration
- Ensure that you are logged on to the SelfPacedSQL.MSFT domain controller as Administrator.
- In the SQL Server Enterprise Manager console tree, right-click your default instance and then click Stop.
A SQL Server Enterprise Manager dialog box appears asking if you are sure you want to stop the SQL Server Service.
- Click the Yes button.
A Service Control Failure dialog box appears asking if you also want to stop the SQL Server Agent service.
- Click the Yes button.
- Open Windows Explorer.
- In the Address window, type C:\Program Files\Microsoft SQL Server\MSSQL\Data and then press Enter on your keyboard.
- Move the SSEMDB_Data1_Data.mdf file to your desktop.
- Close Windows Explorer.
- In the SQL Server Enterprise Manager console tree, expand your default instance.
After a few moments, notice that SQL Server Enterprise Manager starts the SQL Server service and connects to the default instance.
- In the console tree, click the Databases container.
The databases appear in the details pane, with the SSEMDB database marked as suspect (because you moved the data file).
- In the details pane, right-click SSEMDB, point to All Tasks, and then click Backup Database.
The SQL Server Backup - SSEMDB dialog box appears.
- Click the Transaction Log option button.
- In the Destination group box, click the Add button.
The Select Backup Destination dialog box appears.
- Click the Backup Device option button and then select SSEMDBTLogBackup in the Backup Device drop-down list.
- Click OK.
- Verify that SSEMDBTLogBackup is the only device listed in the Destination group box.
- Verify that the Append To Media option button is selected.
- Click the Options tab.
- Clear the Remove Inactive Entries From Transaction Log check box and then click OK.
The Backup Progress dialog box appears displaying the progress of the backup. When the backup has completed, a SQL Server Enterprise Manager message box appears stating the backup operation was a success.
- Click OK.
- In the SQL Server Enterprise Manager console tree, right-click SSEMDB, point to All Tasks, and then click Restore Database.
The Restore Database dialog box appears, displaying the backup sets required to completely restore the SSEMDB database. Notice that SQL Server Enterprise Manager has selected the original full database backup, the differential database backup, and all transaction log backups since the differential database backup (a total of three out of four transaction logs are selected).
- Click OK to completely restore the SSEMDB database.
The Restore Progress dialog box appears displaying the progress of the restoration. When the restoration is complete, a SQL Server Enterprise Manager
- Click OK.
- In the console tree, expand SSEMDB and then click Tables.
The tables in the SSEMDB database appear.
- In the details pane, right-click Customer, point to Open Table, and then click Return All Rows.
The Data In Table 'Customer' In 'SSEMDB' On 'SelfPacedCPU' window appears displaying the contents of the Customer table after the restoration.
- Verify that SQL Server Enterprise Manager restored all 33 rows and then close the Data In Table 'Customer' In 'SSEMDB' On 'SelfPacedCPU' window.
- Do not close SQL Server Enterprise Manager.
message box appears stating that the restoration of the SSEMDB database was completed successfully.
Restoring a Database to a Different SQL Server 2000 Instance
You may need to restore a database to a different SQL Server 2000 instance for a variety of reasons. For example, you may want to perform a temporary restoration of a database to an earlier point in time to recover some data accidentally deleted without rolling back your entire production database to that point in time and without taking the entire database down.
When restoring a database to a second SQL Server 2000 instance using SQL Server Enterprise Manager, you must first create the database in SQL Server into which you will restore the database. Generally, you should use the same database name and database file paths as the one you are restoring. If you choose a different name, you will have to select the Force Restore Over Existing Database check box in the Options tab of the Restore Database dialog box when you perform the restoration to the second instance of SQL Server 2000. In addition, if you choose to restore to a different physical path, you will need to adjust the restoration path for the database files.
After you have created the database in the SQL Server instance into which you will restore the database, you must use the information stored with each backup set in the original database to perform the restoration. The reason for this is that the msdb database in this SQL Server 2000 instance has no knowledge of any backups of the database you want to restore. You begin by right-clicking the database in the console tree for the SQL Server 2000 instance that you want to restore, pointing to All Tasks, and then clicking Restore Database. In the General tab of the Restore Database dialog box, click the From Device option button. See Figure 9.23.
Next, you need to click the Select Devices button to select a backup device from which to restore data. However, because this instance has no knowledge of any backup devices for the database being restored, you need to click the type of de vice (disk or tape), in the Choose Restore Devices dialog box, and then click the Add button to point SQL Server Enterprise Manager toward a backup device from which to read backed up data. See Figure 9.24.
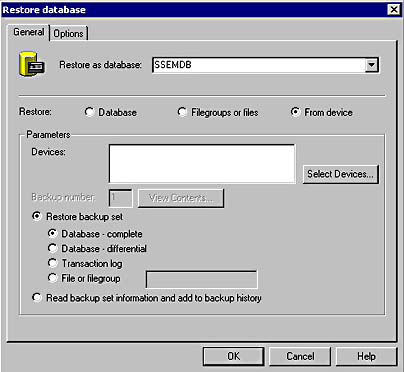
Figure 9.23
Selecting a device from which to restore.
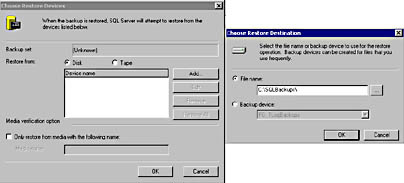
Figure 9.24
Adding a device from which to read.
After you select a file or tape drive from which to restore data, you can choose among several options. You can view the contents of each backup set on the backup device; you can restore a specified backup set from the backup device and either recover or leave the database able to restore additional transaction logs; or you can choose to read the backup set information from a specified device and add it to the backup history in the msdb database. See Figure 9.25.
Whichever way you choose to proceed, you must work with one backup set at a time. Thus, if you want to read backup set information into the msdb database from a different instance of SQL Server 2000 from three backup devices containing a total of seven backup sets, you will have to read from seven separate backup sets to either perform the restoration or to restore information into the msdb database. In this particular scenario, using Transact-SQL is much quicker than using SQL Server Enterprise Manager.
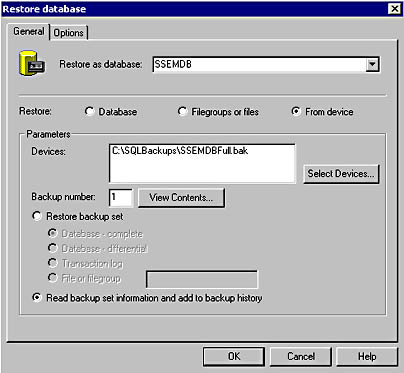
Figure 9.25
Choosing restore method options.
Recovery of a Database to a Point in Time
If you determine that you need to restore a database to a specified point in time, you may need to restore one or more backup sets and leave the database in no recovery or standby mode between each transaction log restoration. Standby mode allows you to view the condition of the database at the end of each restoration before you apply additional transaction log files. Once you have determined the point in time to which you need to recover, you select the Point In Time Restore check box in the General tab of the Restore Database dialog box, and then choose the date and time at which you need recovery of the database to be halted. See Figure 9.26.
You cannot select a time earlier than the earliest transaction log that you select. In addition, you cannot choose to leave a database nonoperational and able to restore additional transaction logs when you choose point-in-time restore.
Note
Although you can recover to a named mark as well as a specific point in time, you must use Transact-SQL to recover to a named mark.
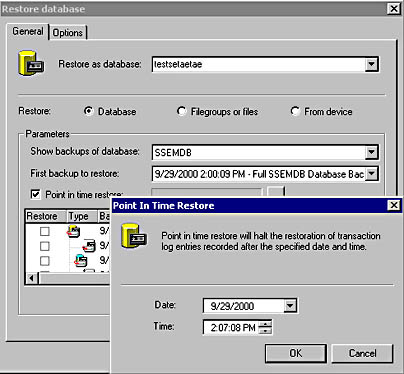
Figure 9.26
Selecting a point in time for recovery.
Practice: Performing a Database Restoration to a Specified Point in Time
In this practice you will perform a database restoration to a specified point in time using SQL Server Enterprise Manager.
To perform a database restoration to a specified point in time
- Ensure that you are logged on to the SelfPacedSQL.MSFT domain controller as Administrator.
- In the SQL Server Enterprise Manager console tree, expand your default instance and then expand Databases.
- In the console tree, right-click SSEMDB, point to All Tasks, and then click Restore Database.
The Restore Database dialog box appears.
- In the Parameters group box, clear all backup sets selected by SQL Server Enterprise Manager and then select the Full SSEMDB Database Backup #1 backup set check box. Verify that no other backup sets are selected.
- Click the Options tab.
- Click the Leave Database Nonoperational But Able To Restore Additional Transaction Logs option button, and then click OK.
The Restore Progress dialog box appears displaying the progress of the restoration. When the restoration is complete, a SQL Server Enterprise Manager message box appears stating that the restoration of the SSEMDB database was completed successfully.
- Click OK.
In the console tree, notice the SSEMDB database indicates it is loading. You cannot view any database objects in the database.
- In the console tree, right-click SSEMDB, point to All Tasks, and then click Restore Database.
Notice that you can perform additional transaction log restorations, but you cannot apply the differential database restoration without restoring the original full database backup.
- Clear all backup sets selected by SQL Server Enterprise Manager and then select the Full SSEMDB Database Backup #1 backup set check box. Verify that no other backup sets are selected.
- Click the Options tab.
- Click the Leave Database Read-Only And Able To Restore Additional Transaction Logs option button, and then click OK.
The Restore Progress dialog box appears displaying the progress of the restoration. When the restoration is complete, a SQL Server Enterprise Manager message box appears stating that the restoration of the SSEMDB database was completed successfully.
- Click OK.
In the console tree, notice that the SSEMDB database now indicates it is read-only.
- In the console tree, click Tables.
- In the details pane, right-click Customer, point to Open Table, and then click Return All Rows.
The Data In Table 'Customer' In 'SSEMDB' On 'SELFPACEDCPU' window appears displaying the contents of the Customer table after the restoration.
Notice that only 21 rows were restored and then close the Data In Table 'Customer' In 'SSEMDB' On 'SELFPACEDCPU' window.
- In the console tree, right-click SSEMDB, point to All Tasks, and then click Restore Database.
Notice that SQL Server Enterprise Manager selects the remaining transaction logs for restoration.
- Clear all backup sets selected by SQL Server Enterprise Manager and then select the SSEMDB Transaction Log Backup #1 backup set check box. Verify that no other backup sets are selected.
- Click the Options tab.
- Click the Leave Database Read-Only And Able To Restore Additional Transaction Logs option button, and then click OK.
The Restore Progress dialog box appears displaying the progress of the restoration. When the restoration is complete, a SQL Server Enterprise Manager message box appears stating that the restoration of the SSEMDB database was completed successfully.
- Click OK.
- In the console tree, click Tables.
- In the details pane, right-click Customer, point to Open Table, and then click Return All Rows.
- Notice that 23 rows were restored (two additional rows added) and then close the Data In Table 'Customer' In 'SSEMDB' On 'SELFPACEDCPU' window.
- In the console tree, right-click SSEMDB, point to All Tasks, and then click Restore Database.
Notice that SQL Server Enterprise Manager selects the remaining transaction logs for restoration.
- Clear all backup sets selected by SQL Server Enterprise Manager and then select the SSEMDB Transaction Log Backup #2 backup set check box. Verify that no other backup sets are selected.
- Click the Options tab.
- Click the Leave Database Read-Only And Able To Restore Additional Transaction Logs option button, and then click OK.
The Restore Progress dialog box appears displaying the progress of the restoration. When the restoration is complete, a SQL Server Enterprise Manager message box appears stating that the restoration of the SSEMDB database was completed successfully.
- Click OK.
- In the console tree, click Tables.
- In the details pane, right-click Customer, point to Open Table, and then click Return All Rows.
The Data In Table 'Customer' In 'SSEMDB' On 'SELFPACEDCPU' window appears displaying the contents of the Customer table after the restoration.
- Notice that 31 rows were restored (8 additional rows added) and then close the Data In Table 'Customer' In 'SSEMDB' On 'SELFPACEDCPU' window.
- In the console tree, right-click SSEMDB, point to All Tasks, and then click Restore Database.
Notice that SQL Server Enterprise Manager selects the remaining transaction logs for restoration.
- Expand the Backup Set Date column so you can view the entire date and time.
- Select the Point In Time Restore check box.
The Point in Time Restore dialog box appears.
- Select a time 15 seconds later than the time of the third transaction log backup and then click OK.
- Click OK to perform the point-in-time restoration.
The Restore Progress dialog box appears displaying the progress of the restoration. When the process is finished, a SQL Server Enterprise Manager message box appears stating that the restoration of the SSEMDB database was completed successfully.
- Click OK.
Given the small data set we are working with, this practice cannot properly demonstrate this feature. The choice of 15 seconds later is arbitrary and will not show any difference compared to restoring through the end of Transaction Log Backup #3. However, in a production system, it would.
- In the console tree, click Tables.
- In the details pane, right-click Customer, point to Open Table, and then click Return All Rows.
The Data In Table 'Customer' In 'SSEMDB' On 'SelfPacedCPU' window appears displaying the contents of the Customer table after the restoration.
- Notice that 32 rows were restored, and then close the Data In Table 'Customer' In 'SSEMDB' On 'SelfPacedCPU' window. The thirty-third row was not added.
- Close SQL Server Enterprise Manager.
The Data In Table 'Customer' In 'SSEMDB' On 'SELFPACEDCPU' window appears displaying the contents of the Customer table after the restoration.
Performing Restorations Using Transact-SQL
You can also perform restorations using the Transact-SQL RESTORE DATABASE and RESTORE LOG commands. You can view the entire syntax for each of these commands, with all possible options, in SQL Server Books Online. Transact-SQL commands require the same information discussed earlier with SQL Server Enterprise Manager database restorations, but the syntax requires practice and sometimes patience. In addition, Transact-SQL provides a few additional parameters for additional control of your backup. Most of these parameters are for use only with tape devices, but the following options for all backup media are available only using Transact-SQL.
- You can restrict access to the newly restored database to database administrators as part of the restore process.
- You can move a database to a new location using the MOVE option.
- You can supply a password.
- You can restart an interrupted restore.
- You can recover to a named mark.
Like the BACKUP commands, the RESTORE DATABASE and RESTORE LOG commands are initially intimidating. The following examples will help you learn how to use these commands. Perhaps the most important difference between using SQL Server Enterprise Manager and Transact-SQL is that you must determine and specify the correct backup sets in the correct order, including the specification of the backup set number on the media set.
Restoring a Complete Database
The RESTORE DATABASE and RESTORE LOG commands can be very simple or very complex.
RESTORE DATABASE Northwind FROM DISK = 'C:\SQLBackups\Temp.bak'
The preceding example restores a full database backup of the Northwind database from the C:\SQLBackups\Temp.bak file on disk.
RESTORE DATABASE Northwind FROM NorthwindFullBackup WITH NORECOVERY RESTORE DATABASE Northwind FROM NorthwindDiffBackup WITH FILE = 2, NORECOVERY RESTORE LOG Northwind FROM NorthwindTLogBackup WITH FILE = 4, NORECOVERY RESTORE LOG Northwind FROM NorthwindTLogBackup2 WITH FILE = 5
The preceding example restores a full database backup of the Northwind database from the NorthwindFullBackup backup device, followed by a restoration of a differential database backup (backup set 2 on the backup device), and then followed by the restoration of two transaction log backups (backup sets 4 and 5 on the backup device). Recovery occurs after the second transaction log is restored.
Restoring a Data File or Filegroup
RESTORE DATABASE Northwind FILE = 'Second_Data_File' FROM File_Backup WITH RESTRICTED_USER, NORECOVERY, STATS = 25 RESTORE LOG Northwind FROM NorthwindTLogBackup WITH FILE = 2
The preceding example restores a backup of a secondary data file for the Northwind database from the File_Backup backup device with no recovery and provides notification of the progress of the restoration after each 25 percent completes. The restoration of the transaction log backup follows (backup set 2 on the backup device), and then the database is recovered. After recovery, database access is restricted to database administrators.
Restoration Using the Move Option
RESTORE DATABASE Northwind FROM NorthwindFullBackup WITH NORECOVERY , MEDIANAME = 'NorthwindBackups' , MEDIAPASSWORD = 'my_password' , MOVE = 'Northwind' TO 'D:\SQLDATA\NwindNew.mdf' , MOVE = 'NorthwindLog' TO 'E:\SQLLogs\NwindNewLog.ldf' , RESTORE LOG Northwind FROM NorthwindTLogBackup
The preceding example restores a full database backup of the Northwind database, followed by a restoration of the transaction log. It specifies that the data file is moved to D:\SQLDATA\NwindNew.mdf and that the log file is moved to E:\SQLLogs\NwindNewLog.ldf. Finally, it also specifies that the media set name, NorthwindBackups, must appear on the backup media being restored.
Restoring to Standby Mode
RESTORE DATABASE Northwind FROM NorthwindFullBackup WITH NORECOVERY RESTORE LOG Northwind FROM NorthwindTLogBackup WITH FILE = 4 , NORECOVERY RESTORE LOG Northwind FROM NorthwindTLogBackup WITH FILE = 5 , STANDBY = TO 'D:\SQL\UNDO.tmp'
The preceding example restores a full database backup of the Northwind database from the NorthwindFullBackup backup device, followed by the restoration of two transaction log backups (backup sets 4 and 5 on the backup device). Recovery to standby mode occurs after the second transaction log is restored.
Restoring to a Specified Point in Time
RESTORE DATABASE Northwind FROM NorthwindFullBackup WITH NORECOVERY RESTORE LOG Northwind FROM NorthwindTLogBackup WITH FILE = 4 , NORECOVERY RESTORE LOG Northwind FROM NorthwindTLogBackup WITH FILE = 5 , RECOVERY, STOPAT = 'Oct 2, 2000 5:08:32 PM'
The preceding example restores a full database backup of the Northwind database from the NorthwindFullBackup backup device, and then followed by the restoration of two transaction log backups (backup sets 4 and 5 on the backup device). Recovery to October 2, 2000 at 5:08:32 P.M. occurs after the second transaction log is restored.
Practice: Performing Restorations Using Transact-SQL
In this practice you use several Transact-SQL scripts to perform a restoration of a full database backup, a differential database backup, and two transaction log backups of the SSEMDB database.
To perform restorations using Transact-SQL
- Ensure that you are logged on to the SelfPacedSQL.MSFT domain controller as Administrator.
- Switch to SQL Server Query Analyzer.
- On the SQL Query Analyzer toolbar, click the Load SQL Script button.
The Open Query File dialog box appears.
- Open SSEMDB_Restore1.sql in the C:\SelfPacedSQL\CH_9 folder.
A Transact-SQL script appears, which will restore the SSEMDB full database backup, followed by the SSEMDB differential database backup, and then followed by the restoration of two transaction log backups. The database is left in standby mode using an undo file. The script also contains a SELECT statement to display the results of the restoration.
- On the toolbar, click the Execute Query button to execute the SSEMDB_Restore1.sql statement.
In the results pane, notice that 32 customers were restored. Also notice the restoration of each backup set (click the Messages tab).
- Open SQL Server Enterprise Manager.
- In the console tree, expand SQL Server Group, expand your default instance, and then expand Databases.
Notice that the SSEMDB database is in standby mode (read-only).
- Switch to SQL Query Analyzer.
- On the toolbar, click the Load SQL Script button.
The Open Query File dialog box appears.
- Open SSEMDB_Restore2.sql in the C:\SelfPacedSQL\CH_9 folder.
A Transact-SQL script appears, which will restore the final transaction log backup file and then perform a recovery of the database. The script also contains a SELECT statement to display the results of the restoration.
- On the toolbar, click the Execute Query button to execute the SSEMDB_Restore2.sql statement.
In the results pane, notice that all 33 customers were restored. Also notice the restoration of each backup set (click the Messages tab).
- Switch to SQL Server Enterprise Manager.
- In the console tree, expand your default instance, right-click Databases, and then click Refresh.
Notice that the SSEMDB database is no longer in standby (read-only) mode.
- Close both SQL Server Enterprise Manager and SQL Query Analyzer.
Lesson Summary
You can use SQL Server Enterprise Manager or Transact-SQL to perform database restorations. When you use SQL Server Enterprise Manager, you are assisted in restoring backup files in the correct sequence. When you use Transact-SQL, you must determine the sequence on your own. Both SQL Server Enterprise Manager and Transact-SQL provide tools for querying a backup media to determine the contents.
EAN: N/A
Pages: 126