Lesson 2: Backing Up Databases, Files, Filegroups, and Transaction Logs
3 4
After determining your backup media and creating backup devices, you are ready to back up your data. In this lesson, you will learn to perform each type of database backup using SQL Server Enterprise Manager and Transact-SQL. You will learn all of the backup options that are available to you when you perform these types of backups using SQL Server Enterprise Manager, and you will learn the equivalent options using Transact-SQL.
After this lesson, you will be able to
- Perform full database backups using SQL Server Enterprise Manager and Transact-SQL
- Perform differential database backups using SQL Server Enterprise Manager and Transact-SQL
- Perform transaction log backups using SQL Server Enterprise Manager and Transact-SQL
- Perform file or filegroup backups using SQL Server Enterprise Manager and Transact-SQL
Estimated lesson time: 60 minutes
Perform Backups Using SQL Server Enterprise Manager
SQL Server Enterprise Manager provides a simple graphical interface to interactively perform database backups. Using SQL Server Enterprise Manager is a good way to begin performing database backups, allowing you to become familiar with backup terms and options. Understanding backup options through SQL Server Enterprise Manager will help you understand the Transact-SQL syntax for backups. You can perform a backup directly with SQL Server Enterprise Manager, or you can use the Create Database Backup Wizard.
Using the Create Database Backup Wizard
The SQL Server Enterprise Manager wizards are available from the Tools menu, and from any taskpad view. Figure 9.2 displays the Select Wizard dialog box, from which you can select a variety of wizards, including the Backup Wizard.
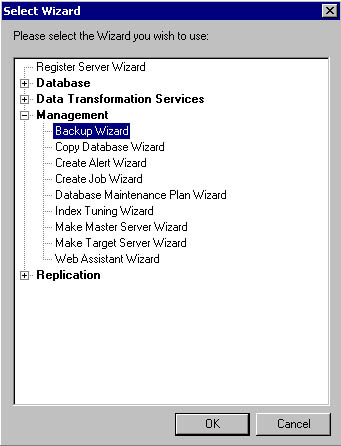
Figure 9.2
The Select Wizard dialog box.
After you start the Backup Wizard, you select a database to back up in the Create Database To Backup page. You can browse and select any database on the current server. See Figure 9.3.
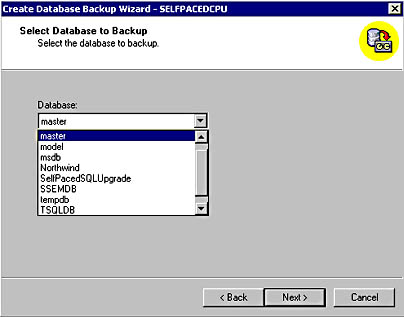
Figure 9.3
Selecting a database to back up.
After you select the database you want to back up, you must select a name for this backup set in the Type Name And Description For Backup page. Select a descriptive name, such as Northwind Full Backup. You can also provide a description for this backup set. The description is optional, but quite useful when distinguishing between multiple backups. See Figure 9.4.
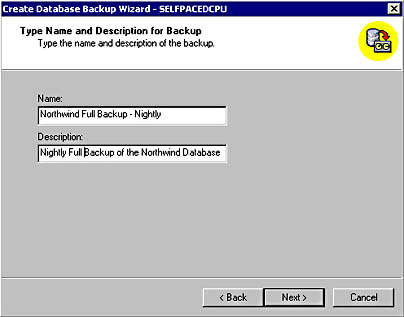
Figure 9.4
Naming the backup set.
Next, in the Select Type Of Backup page, you select the type of backup you want to perform. Using the Create Database Backup Wizard, you can perform full database, differential database, and transaction log backups (you cannot perform file and filegroup backups). If a particular backup type is grayed out, this means that you cannot perform this type of backup with the database you have chosen. For example, you can only perform a full database backup of the master database, and you cannot perform a transaction log backup of a database that is using the Simple Recovery model. See Figure 9.5.
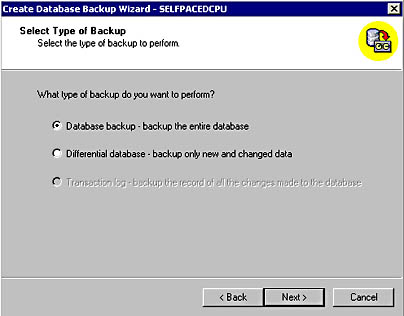
Figure 9.5
Selecting the type of backup.
Note
You cannot perform a differential database backup of a database until you perform a full database backup of the database.
Next, in the Select Backup Destination And Action page, you select the backup device you want to use for this backup set. You can select a tape, a file, or a previously created backup device. Notice that the default location for a file is the Backup folder for your SQL Server 2000 instance (such as C:\Program Files\Microsoft SQL Server\Mssql\Backup). You can choose to append this backup set to any existing backup sets on the backup media you have selected, or overwrite any existing backup sets on the backup media. You can also choose to have SQL Server 2000 read and verify the integrity of the backup after completing the backup. This does not verify the structure of the data itself, but rather verifies that the backup files have been written and are readable. See Figure 9.6.
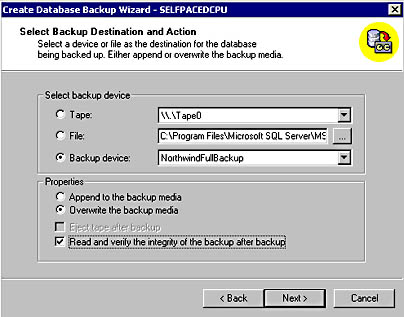
Figure 9.6
Selecting the backup destination and its properties.
Note
Performing database consistency checks is covered in Chapter 14.
Next, in the Initialize Media page, if you chose to overwrite the backup media, you can choose to initialize the media (write a media header) by providing a media set name and description. A media set name can be very useful for identifying backup media. For example, if you have a backup tape and you do not know what is on the tape, you can use SQL Server Enterprise Manager or Transact-SQL to retrieve the media header from the tape to help identify its contents (provided that you created a good label in the first place). See Figure 9.7.
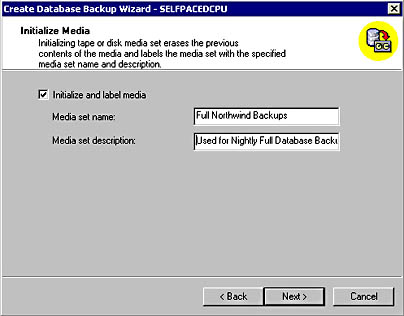
Figure 9.7
Initializing the backup media.
Next, in the Backup Verification And Scheduling page, unless you have chosen to initialize the backup media and provide a new media set name, you can choose to verify that you are writing to a specified media set and that the backup set expiration date (if any) has passed. You can use this capability to prevent the overwriting of a backup set that has not yet expired or the writing of a backup set to the wrong tape or file. Mistakes such as inserting the wrong tape or clicking the wrong device in the graphical interface are easy to make and can have severe consequences. For example, if you accidentally overwrite a tape storing part of a striped set of backup tapes from a parallel backup or any one of those tapes is damaged, the entire media set is unusable. You can also choose to skip this check of media set names and backup set expiration dates.
Note
SQL Server 2000 only uses the expiration date on the first backup set on the backup media to determine whether the entire backup media can be overwritten.
You have the option to set an expiration date on a backup set when you create it. For example, you may keep one week's worth of backups on disk, each in separate backup devices, and archive these to tape regularly. You could use an expiration date to protect against accidentally overwriting a backup set before the expiration of seven days. Finally, you can also create a job and schedule the backup that you just defined to occur on a regular basis. See Figure 9.8. Jobs and schedules are covered in Chapter 13.
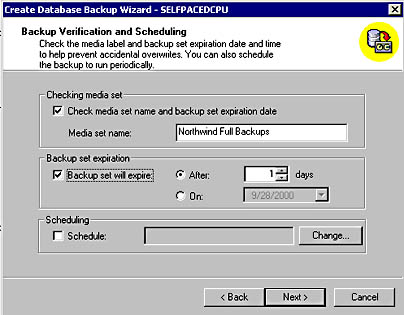
Figure 9.8
Setting an expiration date and scheduling the backup.
Next, in the Completing The Create Database Backup Wizard page, you are given the opportunity to review the selections you have made before you actually you want to change. Click the Finish button to back up the database. See Figure 9.9.
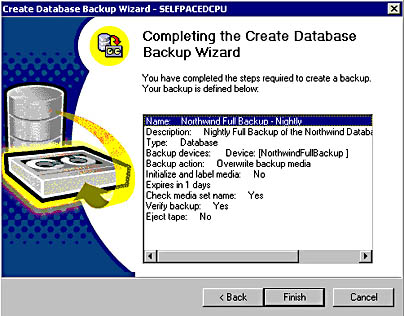
Figure 9.9
Completing the Create Database Backup Wizard.
Practice: Backing Up the master Database Using the Create Database Backup Wizard
In this practice you use the Create Database Backup Wizard to back up the master database.
To back up the master database using the Create Database Backup Wizard
- Ensure that you are logged on to the SelfPacedSQL.MSFT domain controller as Administrator.
- Click Start, point to Programs, point to Microsoft SQL Server, and then click Enterprise Manager.
SQL Server Enterprise Manager appears displaying the Microsoft SQL Servers and the Event Viewer (Local) console trees in the console root.
- In the console tree, expand the Microsoft SQL Servers container, expand the SQL Server Group container, and then click the default instance.
- On the Tools menu, click Wizards.
The Select Wizard dialog box appears.
- Expand Management and then double-click Backup Wizard.
The Welcome To The Create Database Backup Wizard page appears.
- Click Next.
The Select Database To Backup page appears.
- In the Database drop-down list, select master and then click Next.
The Type Name And Description For Backup page appears.
- In the Name text box, type Full master Database Backup #1.
- In the Description text box, type Backup Set #1 and then click Next.
The Select Type Of Backup page appears. Notice that you can only perform a full database backup of the master database.
- Click Next.
The Select Backup Destination And Action page appears.
- Click the Backup Device option button and then, in the Backup Device drop-down list, select MasterFullBackup.
- Click the Overwrite The Backup Media option button.
- Select the Read And Verify The Integrity Of The Backup After Backup check box and then click Next.
- Select the Initialize And Label Media check box.
- In the Media Set Name text box, type MasterBackups.
- In the Media Set Description text box, type Media for Master Database Backups and then click Next.
The Backup Verification And Scheduling page appears.
- Click Next.
The Completing The Create Database Backup Wizard page appears. Review the details of the backup you have defined.
- Click the Finish button.
The Backup Progress dialog box appears, displaying the progress of the backup of the master database. Next, the Verify Progress dialog box appears, displaying the progress of the verification of the master database backup. When the database backup is complete, a Wizard Complete message box appears.
- Click OK to close the Wizard Complete message box.
- Do not close SQL Server Enterprise Manager.
The Initialize Media page appears.
Using SQL Server Enterprise Manager Directly
To create a backup using SQL Server Enterprise Manager directly, you can either click the Databases container and then click Backup Database from the Tools menu, or you can right-click the Databases container (or the container for any specific database), point to All Tasks, and then click Backup Database. You can use SQL Server Enterprise Manager to perform any type of database backup. The General and Options tabs in the SQL Server Backup dialog box allow you to provide the same type of backup information discussed earlier with respect to the Create Database Backup Wizard (such as database, backup set name, type of backup, append or overwrite, and media set name). See Figures 9.10 and 9.11.
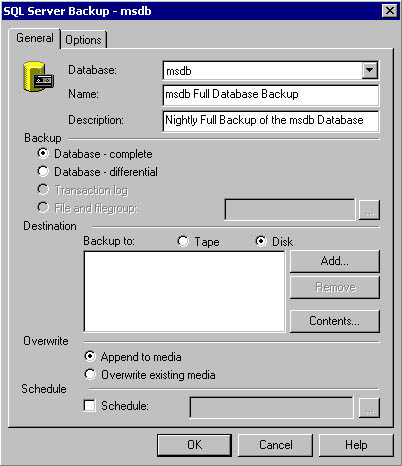
Figure 9.10
Creating a backup in the General tab.
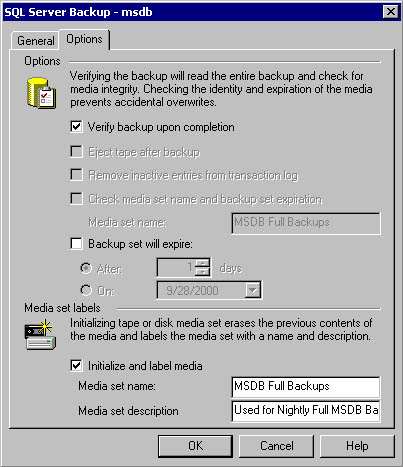
Figure 9.11
Selecting backup options in the Options tab.
Note
Notice a check box in Figure 9.11 that allows you to choose whether to remove inactive entries from the transaction log. This check box is grayed out if you are not backing up the transaction log. If you are backing up the transaction log, the default is to truncate the transaction log after a backup. Clear the check box to back up the transaction log without truncation (for example, after a disk failure).
In the General tab, if you are performing a file or filegroup backup, click the ellipsis to select the file or filegroup you want to back up. You can select either a single data file or an entire filegroup in the Specify Filegroups And Files dialog box. If you select a filegroup, all files in the group are automatically selected. See Figure 9.12.
After you select the backup media (tape or disk), click the Add button to select a destination for the backup. In the Select Backup Destination dialog box, you can either specify a backup file (if you selected disk), a tape drive (if you selected tape), or an existing backup device. See Figure 9.13.
Note
If you create backup devices using a Transact-SQL statement in SQL Query Analyzer while SQL Server Enterprise Manager is open, you may need to disconnect and reconnect to your SQL Server 2000 instance in SQL Server Enterprise Manager to refresh the connection and access this newly created backup device.
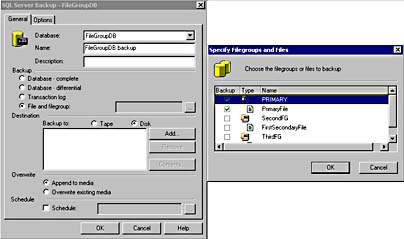
Figure 9.12
Selecting a file or filegroup.
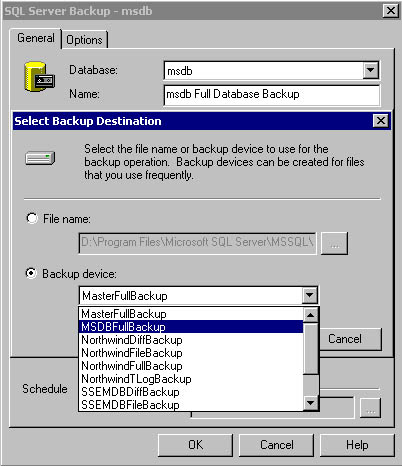
Figure 9.13
Selecting a backup destination.
After you select a backup device, you can click the Contents button in the General tab to view the contents of the selected backup device (to determine whether you want to overwrite the backup sets on the backup device). If it does contain backup sets, you can view the contents of each backup set in the View Backup Media Contents dialog box. This situation is an example of why using intuitive names and descriptions for your backup sets can be very useful. See Figure 9.14.
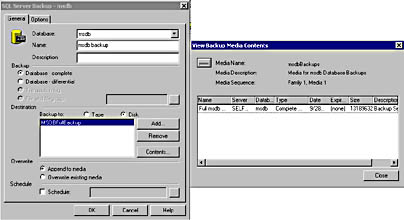
Figure 9.14
Viewing the contents of the backup device.
Practice: Backing Up the msdb Database Directly Using SQL Server Enterprise Manager
In this practice you use the SQL Server Enterprise Manager directly to back up the msdb database.
To back up the msdb database directly using SQL Server Enterprise Manager
- In the SQL Server Enterprise Manager console tree, expand the Microsoft SQL Servers container, expand the SQL Server Group container, expand the default instance, and then expand Databases.
- Right-click msdb, point to All Tasks, and then click Backup Database.
The SQL Server Backup - Msdb dialog box appears with the General tab selected.
- In the General tab, in the Name text box, type Full msdb Database Backup #1.
- In the Description text box, type Backup Set #1.
Click the Add button.
- The Select Backup Destination dialog box appears.
- Click the Backup Device option button.
- Select MSDBFullBackup from the Backup Device drop-down list, and then click OK.
- Click the Overwrite Existing Media option button and then click the Options tab.
- Select the Verify Backup Upon Completion check box.
- Select the Initialize And Label Media check box.
- In the Media Set Name text box, type msdbBackups.
- In the Media Set Description text box, type Media for msdb Database Backups and then click OK.
The Backup Progress dialog box appears displaying the progress of the backup of the msdb database. Next, the Verify Progress dialog box appears displaying the progress of the verification of the msdb database backup. When the database backup is complete, a SQL Server Enterprise Manager message box appears.
- Click OK to close the SQL Server Enterprise Manager message box.
- Do not close SQL Server Enterprise Manager.
Perform Backups Using Transact-SQL
You can also perform backups using the Transact-SQL BACKUP DATABASE and BACKUP LOG commands. You can view the entire syntax, with all possible options, in SQL Server Books Online. Transact-SQL commands require the same information discussed earlier using SQL Server Enterprise Manager for database backups, but the syntax requires practice and a little patience. In addition, Transact-SQL provides a few additional parameters for additional control of your database backups. Most are for use only with tape devices, but the following options for all backup media are available only by using Transact-SQL.
- You can secure a backup set with a password. You must supply the password to restore the backup.
- You can secure a media set with a password. You must supply the password to restore any backup sets from the media set.
- You can restart an interrupted backup. This is particularly useful for large databases.
Although the BACKUP DATABASE and BACKUP LOG commands are initially intimidating, the following examples will help you become more comfortable with using these commands.
Performing a Full Database Backup
The BACKUP DATABASE command can be very simple or very complex. You can create a backup file on the fly, or use an existing backup device.
BACKUP DATABASE Northwind TO DISK = 'C:\SQLBackups\Temp.bak'
The preceding example performs a full database backup of the Northwind database to the C:\SQLBackups\Temp.bak file on disk.
BACKUP DATABASE Northwind TO NorthwindFullBackup RESTORE VERIFYONLY FROM NorthwindFullBackup
The preceding example performs a full database backup of the Northwind database to the NorthwindFullBackup backup device, and then verifies the backup.
BACKUP DATABASE Northwind TO NorthwindFullBackup WITH FORMAT , MEDIANAME = 'NorthwindBackups' , MEDIADESCRIPTION = 'Media for Northwind Database Backups' , NAME = 'Full Northwind Database Backup #1' , DESCRIPTION = 'BackupSet #1' , STATS = 25
The preceding example performs a full database backup of the Northwind database to the NorthwindFullBackup backup device. It initializes the media, creates the NorthwindBackups media set with a description of Media for Northwind Da tabase Backups, and creates the Full Northwind Database Backup #1 backup set with a description of Backup Set #1. It also reports the progress of the backup in increments of 25 percent.
BACKUP DATABASE Northwind TO NWindDevice1, NWindDevice2 WITH MEDIANAME = 'Media Set for Northwind Database Backups'
The preceding example performs a full database backup of the Northwind database to the NwindDevice1 and NwindDevice2 backup devices in parallel. SQL Server 2000 verifies that the media set is labeled Media Set for Northwind Database Backups before it begins writing the backup file to each backup device.
Performing a Differential Database Backup
To perform a differential database backup using the BACKUP DATABASE command, you simply use the WITH DIFFERENTIAL argument with any of the preceding examples (provided you have performed a full database backup first).
BACKUP DATABASE Northwind TO NorthwindDiffBackup WITH DIFFERENTIAL
The preceding example performs a differential database backup of the Northwind database to the NorthwindDiffBackup backup device.
Performing a File or Filegroup Backup
To perform a file or filegroup backup using the BACKUP DATABASE command, you add the FILE = logical_filename or the FILEGROUP = logical_filegroup_name argument to the BACKUP DATABASE statement.
BACKUP DATABASE Northwind FILEGROUP = 'SECOND_FG' TO NorthwindFGBackup
The preceding example performs a filegroup backup of the Second_FG filegroup in the Northwind database to the NorthwindFGBackup backup device.
Performing a Transaction Log Backup
Perform a transaction log backup using the BACKUP LOG command, using syntax that is almost identical to that for the BACKUP DATABASE command.
BACKUP LOG Northwind TO NorthwindTLogBackup
The preceding example performs a transaction log backup of the Northwind database to the NorthwindTLogBackup backup device.
BACKUP LOG Northwind TO NorthwindTLogBackup WITH NO_TRUNCATE
The preceding example performs a transaction log backup of the Northwind database to the NorthwindTLogBackup backup device, but does not truncate the transaction log (use this command when a disk containing a data file fails).
Practice: Performing Backups Using Transact-SQL
In this practice you use several Transact-SQL scripts to perform a full database backup, a differential database backup, and two transaction log backups of the SSEMDB database.
To perform backups using Transact-SQL
- Ensure that you are logged on to the SelfPacedSQL.MSFT domain controller as Administrator.
- Click Start, point to Programs, point to Microsoft SQL Server, and then click Query Analyzer.
- In the Connect To SQL Server dialog box, click OK to connect to SelfPacedSQL using Windows authentication.
- On the toolbar, click the Load SQL Script button.
The Open Query File dialog box appears.
- Open SSEMDB_Full.sql in the C:\SelfPacedSQL\CH_9 folder.
A Transact-SQL script appears, which will create the Customer table in the SSEMDB database. It will populate the Customer table with 21 customers from the NewCustomerData1.txt file using a BULK INSERT statement. It will then perform a full database backup of the SSEMDB database using the SSEMDBFullBackup backup device.
- Press F5 to execute the SSEMDB_Full.sql statement.
In the results pane, notice that the script added 21 customers to this newly created Customer table in the SSEMDB database. Also notice (click the Messages tab) that the SSEMDB database was successfully backed up, including both the data file and a single page from the transaction log file (there was no database activity during the backup).
- On the toolbar, click the Load SQL Script button.
The Open Query File dialog box appears.
- Open SSEMDB_TLog1.sql in the C:\SelfPacedSQL\CH_9 folder.
A Transact-SQL script appears, which will add two additional customers to the Customer table using an INSERT statement. It will then perform a transaction log backup of the SSEMDB database using the SSEMDBTLogBackup backup device.
- On the toolbar, click the Execute Query button to execute the SSEMDB_TLog1.sql statement.
In the results pane, notice that two new customers (for a new total of 23 customers) were added to the Customer table in the SSEMDB database. Also notice (click the Messages tab) that the SSEMDB transaction log was successfully backed up.
- On the toolbar, click the Load SQL Script button.
The Open Query File dialog box appears.
- Open SSEMDB_Diff.sql in the C:\SelfPacedSQL\CH_9 folder.
A Transact-SQL script appears, which will add seven additional customers to the Customer table from the NewCustomerData2.txt file using a BULK INSERT statement. It will then perform a differential database backup of the SSEMDB database using the SSEMDBDiffBackup backup device.
- On the toolbar, click the Execute Query button to execute the SSEMDB_Diff.sql statement.
In the results pane, notice that the script added seven new customers (for a new total of 30 customers) to the Customer table in the SSEMDB database. Also notice (click the Messages tab) that the SSEMDB database was successfully backed up, including both the data file and one page from the transaction log file (there was no database activity during the backup).
- On the toolbar, click the Load SQL Script button.
The Open Query File dialog box appears.
- Open SSEMDB_TLog2.sql in the C:\SelfPacedSQL\CH_9 folder.
A Transact-SQL script appears, which will add one additional customer to the Customer table using an INSERT statement. It will then perform a transaction log backup of the SSEMDB database using the SSEMDBTLogBackup backup device.
- On the toolbar, click the Execute Query button to execute the SSEMDB_TLog2.sql statement.
In the results pane, notice that the script added one new customer (for a new total of 31 customers) to the Customer table in the SSEMDB database. Also notice (click the Messages tab) that the SSEMDB transaction log was successfully backed up.
- On the toolbar, click the Load SQL Script button.
The Open Query File dialog box appears.
- Open SSEMDB_TLog3.sql in the C:\SelfPacedSQL\CH_9 folder.
A Transact-SQL script appears, which will add one additional customer to the Customer table using an INSERT statement. It will then perform another transaction log backup of the SSEMDB database, again using the SSEMDBTLogBackup backup device.
- On the toolbar, click the Execute Query button to execute the SSEMDB_TLog3.sql statement.
In the results pane, notice that the script added one new customer (for a new total of 32 customers) to the Customer table in the SSEMDB database. Also notice (click the Messages tab) that the SSEMDB transaction log was successfully backed up.
- On the toolbar, click the Load SQL Script button.
- Open SSEMDB_Insert4.sql in the C:\SelfPacedSQL\CH_9 folder.
A Transact-SQL script appears, which will add one additional customer to the Customer table using an INSERT statement. Notice that this insertion is not backed up.
- On the toolbar, click the Execute Query button to execute the SSEMDB_Insert4.sql statement.
In the results pane, notice that one new customer (for a new total of 33 customers) was added to the Customer table in the SSEMDB database.
- Do not close SQL Query Analyzer.
The Open Query File dialog box appears.
Lesson Summary
You can use the SQL Server Enterprise Manager Create Database Backup Wizard to perform full database backups, differential database backups, and transaction log backups. You can also perform backups directly with SQL Server Enterprise Manager. This method allows you to perform any type of database backup. Transact-SQL allows you to fully script each type of database backup. You can specify a number of backup options for both the backup media and the backup set. Working with these properties using SQL Server Enterprise Manager helps you understand the Transact-SQL syntax for specifying the same options.
EAN: N/A
Pages: 126