3.7 Software mirroring and LVM
| < Day Day Up > |
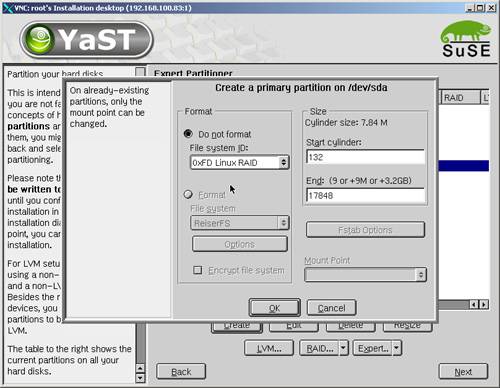
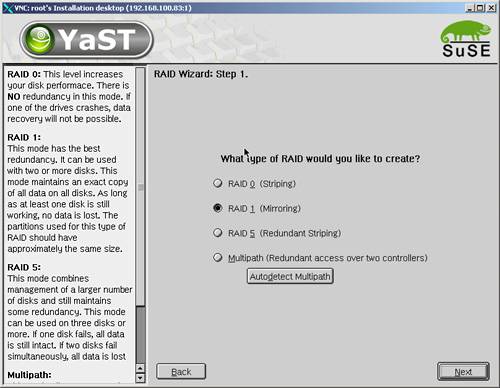
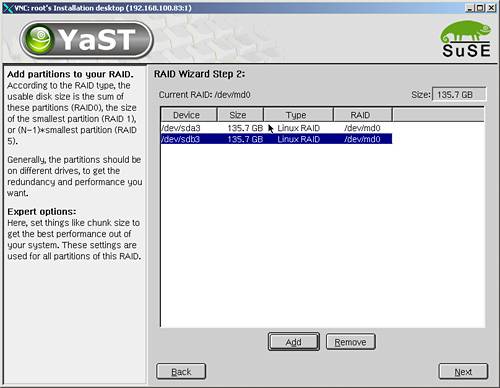
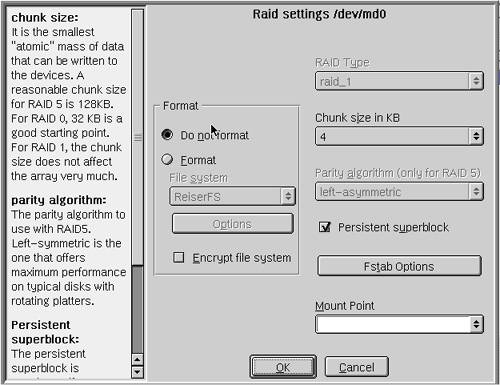
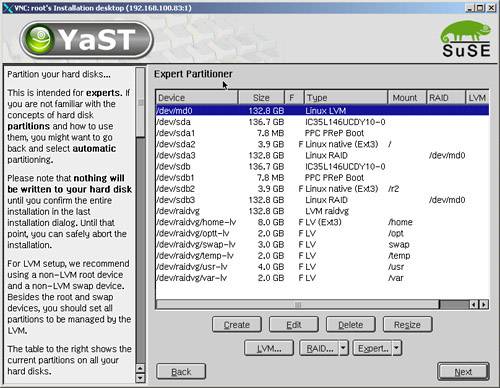
| Linux LVM does not provide mirroring functionality by itself. However, it can use mirroring achieved through a hardware RAID controller or through software. More information on Linux software RAID can be found at: http://en.tldp.org/HOWTO/Software-RAID-HOWTO.html Currently, Linux supports linear md devices, RAID0 (striping), RAID1 (mirroring), and RAID4 and RAID5. Because we can use LVM for linear device and striping, and do not have enough disks for RAID5, we are going to create RAID1, a software mirror. 3.7.1 Using YaST to create RAIDFrom the LVM point of view, a RAID device (/dev/md0) is just storage, so we need to create mirrored disks or partitions first and place an LVM volume group on it. This can be achieved by YaST, as shown in Example 3-5. First, we create two partitions which we will use for our RAID, as shown in Figure 3-7. We need at least two because we want to mirror them, which only makes sense when the partitions reside on different physical hard disks. Figure 3-7. Creating a RAID device with YaST, step1 Next , we choose the RAID level we want to use, as shown in Figure 3-8. For mirroring, we choose RAID1. We do not recommend using striping through RAID, because you can achieve the same result by using LVM. Figure 3-8. Choosing desired RAID level Now we can assign our RAID partitions, /dev/sda3 and /dev/sdb3, to a newly created RAID device, /dev/md0 ,as shown in Figure 3-9 on page 125. Figure 3-9. Assigning RAID type partitions in order to create a device In order to be able to use our mirrored device for LVM, we are not going to format it; see Figure 3-10. Figure 3-10. No format is chosen However, it is possible to format and mount the mirrored device directly. Now we can use /dev/md0 as a normal storage device. We can create an LVM volume group on it and LVM volumes in it, as shown in Figure 3-11 on page 127. Figure 3-11. Placing a volume group and volumes on raid device /dev/md0 Restriction We do not recommend using software RAID or LVM for the root and the boot partition. In our testing, although we were able to configure it, the system hung on the reboot. 3.7.2 Using the command line to create RAIDIn Example 3-12 on page 128 we have two disks; a small part of the first is used for / partition and a swap device, and the second disk is empty. We can create a logical partition on our first disk and mirror it to the partition on the second disk. For better compatibility and performance, we choose to span identical cylinders . Example 3-12. Starting point software RAID# fdisk -l Disk /dev/sda: 255 heads, 63 sectors, 17849 cylinders Units = cylinders of 16065 * 512 bytes Device Boot Start End Blocks Id System /dev/sda1 * 1 1 8001 41 PPC PReP Boot /dev/sda3 15 537 4200997+ 83 Linux /dev/sda4 538 17848 139050607+ 5 Extended /dev/sda5 538 799 2104483+ 82 Linux swap Disk /dev/sdb: 255 heads, 63 sectors, 17849 cylinders Units = cylinders of 16065 * 512 bytes Device Boot Start End Blocks Id System First we create a RAID partition on the first disk (we type: fdisk /dev/sda, n, l , Enter, Enter, t, 6, fd ).
Example 3-13. Creating a RAID partition on the first diskfdisk /dev/sda The number of cylinders for this disk is set to 17849. There is nothing wrong with that, but this is larger than 1024, and could in certain setups cause problems with: 1) software that runs at boot time (e.g., old versions of LILO) 2) booting and partitioning software from other OSs (e.g., DOS FDISK, OS/2 FDISK) Command (m for help): n Command action l logical (5 or over) p primary partition (1-4) l First cylinder (800-17848, default 800): Using default value 800 Last cylinder or +size or +sizeM or +sizeK (800-17848, default 17848): Using default value 17848 Command (m for help): t Partition number (1-6): 6 Hex code (type L to list codes): fd Changed system type of partition 6 to fd (Linux raid autodetect) Command (m for help): w The partition table has been altered! Calling ioctl() to re-read partition table. WARNING: Re-reading the partition table failed with error 16: Device or resource busy. The kernel still uses the old table. The new table will be used at the next reboot. Syncing disks. In Example 3-14, we create a RAID partition on the second disk and use 800 as a start cylinder in order to be analog to the first one. We will lose additional space anyway if we are going to mirror the partitions. Example 3-14. Creating a RAID partition on the second diskCommand (m for help): n Command action e extended p primary partition (1-4) p Partition number (1-4): 4 First cylinder (1-17849, default 1): 800 Last cylinder or +size or +sizeM or +sizeK (800-17849, default 17849): Using default value 17849 Command (m for help): t Partition number (1-4): 4 Hex code (type L to list codes): fd Changed system type of partition 4 to fd (Linux raid autodetect) Command (m for help): w The partition table has been altered! Calling ioctl() to re-read partition table. WARNING: Re-reading the partition table failed with error 16: Device or resource busy. The kernel still uses the old table. The new table will be used at the next reboot. Syncing disks. Now we have partition sda6 and sdb4 ready for RAID. In order to define what kind of RAID we want to create, we edit /etc/raidtab as shown in Example 3-15. Example 3-15. /etc/raidtab fileraiddev /dev/md0 raid-level raid1 nr-raid-disks 2 chunk-size 32 persistent-superblock 1 device /dev/sda6 raid-disk 0 device /dev/sdb4 raid-disk 1 Now we run the mkraid command in order to create a RAID device defined in /etc/raidtab, as shown in Example 3-16. Example 3-16. mkraid# mkraid /dev/md0 handling MD device /dev/md0 analyzing super-block disk 0: /dev/sda6, 136946061kB, raid superblock at 136945984kB disk 1: /dev/sdb3, 136954125kB, raid superblock at 136954048kB We can watch the status of our RAID device by issuing the cat /proc/mdstat command, as shown in Example 3-17. Example 3-17. Checking RAID status# cat /proc/mdstat Personalities : [raid1] read_ahead 1024 sectors md0 : active raid1 sdb3[1] sda6[0] 136945984 blocks [2/2] [UU] [>....................] resync = 1.8% (2538560/136945984) finish=140.7min speed=15917K/sec unused devices: <none> Note We do not need to wait for reconstruction to finish in order to use the RAID device; the synchronization is done using idle I/O bandwidth. The process is transparent, so we can use the device (place LVM on it, partition and mount) although the disks are not synchronized yet. If one disk fails during the synchronization, we will need our backup tape. Now we can create a volume group and add /dev/md0 to it, as shown in Example 3-18. Example 3-18. Creating VG on RAID device# vgcreate raidvg /dev/md0 vgcreate -- INFO: using default physical extent size 4 MB vgcreate -- INFO: maximum logical volume size is 255.99 Gigabyte vgcreate -- doing automatic backup of volume group "raidvg" vgcreate -- volume group "raidvg" successfully created and activated And a logical volume in this volume group, as shown in Example 3-19. Example 3-19. Creating LV in raidvglvcreate -L 20G -n mirrordata1 raidvg lvcreate -- doing automatic backup of "raidvg" lvcreate -- logical volume "/dev/raidvg/mirrordata1" successfully created This newly created volume can be formatted and mounted. |
| < Day Day Up > |
EAN: N/A
Pages: 108