12.6 Handling a Form Event


As discussed in Chapter 11, "The Document Objects: Forms, Images, and Links," the document object has a forms property. It contains an array of all the forms that have been defined in the document. Each element of the array is a form object and the number in the index of the array represents the order in which the form appeared on the page. The first form would be document.forms[0] . Each form contains elements, also represented as an array. The elements represent the input types of the form, such as a checkbox, radio button, or text field. By naming each of the forms and its respective elements, it is much easier to work with them in JavaScript. (See Chapter 11 for a complete discussion of the forms[] array.) There are a number of events associated with the form's elements. Many of them were also covered in Chapter 11. They are listed in Table 12.6.

Table 12.6. Event handlers for the form's elements.

Object

Event Handler

button

onClick, onBlur, onFocus

checkbox

onClick, onBlur, onFocus

FileUpLoad

onClick, onBlur, onFocus

hidden

none

password

onBlur, onFocus, onSelect

radio

onClick, onBlur, onFocus

reset

onReset

select

onFocus, onBlur, onChange

submit

onSubmit

text

onClick, onBlur, onFocus, onChange

textarea

onClick, onBlur, onFocus, onChange

12.6.1 Buttons

One of the most common GUI form elements is the button. The button object has no default action and is normally used to trigger an event such as the OnClick event. HTML 4 allows you to create a <button> tag without the <input> tag. [3] There are several buttons associated with a form; the buttons are called:

[3] The <button> </button> tags give greater flexibility to the appearance of the button by allowing HTML content to be displayed instead of plain text that is assigned to the value attribute of a button created using the <input type="button">.

  • submit

  • reset

  • button

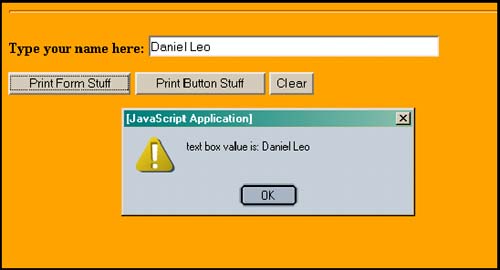
If an event is an attribute of a form tag, then the event occurs when the user presses one of the buttons associated with the form object.

12.6.2 this for Forms and this for Buttons

The this keyword refers to the current document and is especially helpful when dealing with forms. In forms that contain multiple items, such as checkboxes, radio buttons, and text boxes, it is easier to refer to the item with the this keyword, than by using its full name when calling a function or an event handler. (Examples of the this keyword are shown in Chapter 11.)

In a form, this could be the form itself or one of the input devices. With an event handler, the this keyword by itself references the current object, such as an input device, whereas this.form references the form object where the input device was created.

Example 12.12
 <html><head><title>The this keyword</title>     <script language="JavaScript"> 1       function display_formval(  myform  ){             alert("text box value is: " +  myform.namestring.value  );         } 2       function display_buttonval(  mybutton  ){             alert("button value is: " +  mybutton.value  );         }     </script>     </head>     <body><b>     <hr> 3  <form  name="simple_form">         <p>         Type your name here:         <input type="text"  name="namestring"  size="50">         <p> 4  <input type="button"  value="Print Form Stuff" 5  onClick="display_formval(this.form);"  >  <input type="button"  value="Print Button Stuff" 6  onClick="display_buttonval(this)  ;" >         <input type="reset" value="Clear">     </form>     </body></html> 

EXPLANATION

  1. The function called display_formval() is defined. Its only parameter is a reference to a form started on line 3. The purpose of this function is to display the text that the user typed in a text box, called "namestring" . The function is called when the onClick event handler is triggered on line 5.

  2. The function called display_buttonval() is defined. Its only parameter is a button input type, defined on line 4. It displays the value in the button.

  3. This is the start of a form named simple .

  4. The input type is a button in the form named simple .

  5. The onClick event handler is triggered when the user presses this button. The argument sent to the display_formval() function, this.form , is a reference to the form object. Without the form property, the this keyword would refer to the current object, the button. See line 6. Rather than using the full JavaScript hierarchy to reference a form, the this keyword simplifies the process.

  6. The onClick event is triggered when the user presses this button. Since the handler is assigned to the button, the this keyword is a reference to the button object. The display is shown in Figure 12.14.

    Figure 12.14. The user clicked on the Print Form Stuff button.

    graphics/12fig14.jpg

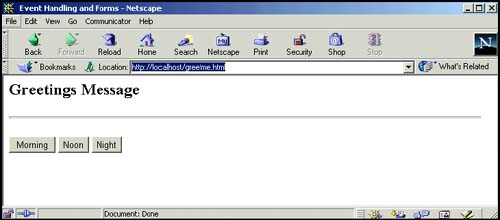
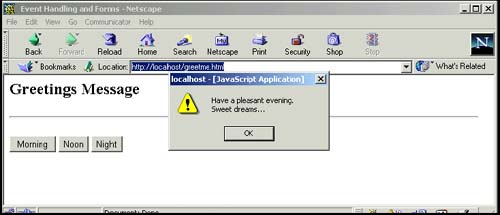
12.6.3 Forms and the onClick Event Handler

The onClick event handler is used most often in forms. The click event occurs when a button in a form, such as a radio or checkbox, is pressed. It also happens when an option is selected in a Select menu. In Chapter 11, we used many examples of the onClick event handlers. Here are a few more.

Example 12.13
 <html>     <head>     <title>Event Handling and Forms</title>  <script language=javascript>  1       function greetme(message){  alert(message);  }  </script>  </head>     <body bgcolor=white>     <h2>     Greetings Message     </h2>     <hr> 2  <form>  3       <input type="button" value="Morning" 4  onClick="greetme('Good morning. This is your wakeup   call!')">  <input type="button" value="Noon"  onClick="greetme('Let\'s do lunch.')">  <input type="button" value="Night"  onClick="  greetme('Have a pleasant evening.\nSweet             dreams...')">     </form>     </body>     </html> 

EXPLANATION

  1. A simple function called greetme() is defined. It will be called each time the user presses one of three buttons and send an alert message to the screen.

  2. The HTML form starts here.

  3. The input type for this form is three buttons, respectively labeled, "Morning", "Noon" , and "Night" . See Figure 12.15.

    Figure 12.15. Three buttons waiting for a user to click one of them.

    graphics/12fig15.jpg

  4. When the user presses a button, the onClick event is fired up, and the greetme() function is called with a string. See Figure 12.16. Watch the quotes in the string. Because the outside quotes are double quotes, the inner quotes are single. And if the outer set of quotes had been single quotes, the inner set would be double. It's very easy to ruin a program just because the quoting is off, as you well know by now if you've gone this far in the book.

    Figure 12.16. The user clicked on the Night button.

    graphics/12fig16.jpg

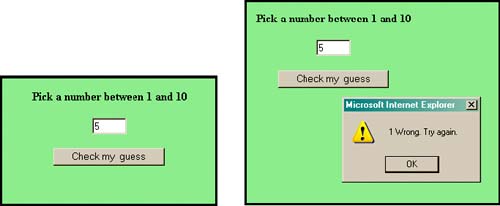
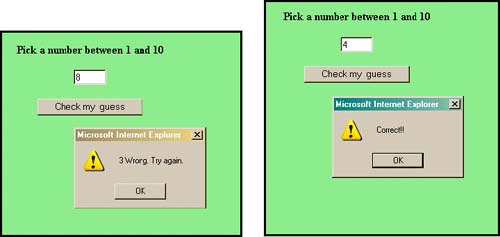
12.6.4 Event Handlers and Event Methods Working Together

You'll find that many JavaScript programs use a combination of event handlers and event methods, especially when working with forms. The following example uses event handlers and event methods. It creates a random number between 1 and 10, and asks the user to guess what the number is. As soon as the document is loaded, the onLoad event handler is triggered, and when the user presses the button, the onClick handler is fired up. The focus() method is used to put focus in the text box where the user will enter his guess.

Example 12.14
 <html>     <head><title>Event Handling</title>     <script language="JavaScript">     var tries=0; 1       function randomize(){             //  Random number is set when the document has loaded  var now=new Date();             num=(now.getSeconds())%10;   //  Very cool!  num++;         } 2       function guessit(form){         //  Function is called each time the user clicks the button  if (form.tfield.value == num){                alert("Correct!!"); 3  form.tfield.focus();  n=0;                randomize();             }             else{                tries++; 4              alert(tries + " Wrong. Try again.");                form.tfield.value="";  //  Clear the text box   form.tfield.focus();  //  Put the cursor in the text box  }         }     // End hiding from old browsers -->     </script>     </head>     <body bgcolor="lightgreen" 5  onLoad="randomize()  ">  <!--  Call function when page is loaded-  ->     <center>     <b>Pick a number between 1 and 10</b>     <form name="myform"> 6       <input type="textbox" size=4             name="tfield">             <p> 7       <input type="button"             name="button1" 8           value="Check my  guess"  onClick="guessit(this.form)  ">     </form>     </body>     </html> 

This script was modified from one written by Andree Growney available at http://www.htmlgoodies.com/primers/jsp/hgjsp_.html.

EXPLANATION

  1. A function called randomize() is defined. It will create a random number by dividing the number of seconds by 10 and returning the remainder ( modulus ); for example, 59/10 would return the number 9. Then, by adding 1 to that, we get 10.

  2. The function called guessit will take one argument, a reference to the form. Its purpose is to see if the number entered by the user, form.tfield.value , matches the value of the random number calcuated in the randomize() function.

  3. The focus() method puts the cursor in the text field.

  4. If the user guessed wrong, the alert dialog box appears and tells him so, the text field is cleared, and focus is put there.

  5. Once the document has loaded, the onLoad event handler is triggered, causing the function randomize() to be called. This sets the initial random number for the program.

  6. The form's input type is a text box. This is where the user will enter his guess.

  7. This input type is a button.

  8. When the user clicks on this button, the onClick event handler is triggered, causing the guessit() function to be called with this form as an argument. The display is shown in Figures 12.17 and 12.18.

    Figure 12.17. The user makes a guess (left), but is told he guessed wrong (right).

    graphics/12fig17.jpg

    Figure 12.18. After three wrong guesses (left), the user finally got it (right).

    graphics/12fig18.jpg

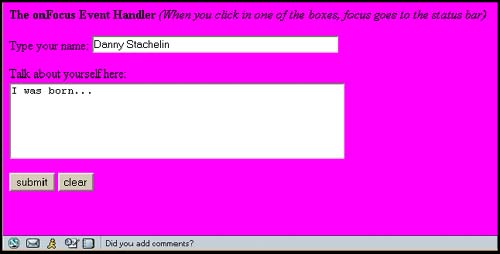
12.6.5 Forms and the onFocus and onBlur Event Handlers

The onFocus event handler is triggered when a form element has focus: the cursor is sitting in the box, waiting for key input or in the case of a button, for the Enter key to be pressed. The onBlur event is triggered when the form element loses focus: when the cursor is moved away from the input device.

Example 12.15
 <html>     <head><title>Using the onFocus Event Handler</title>     <script language="JavaScript"> 1  function handler(message)  { 2  window.status = message;  //  Watch the status bar  }     </script>     </head>     <body bgcolor="magenta"><b>The onFocus Event Handler     <i>(When you click in one of the boxes, focus goes to the status         bar)</i> 3  <form name="form1">  <p>Type your name: 4       <  input type="text"  name="namestring"             size="50" 5  onFocus="handler('Don\'t forget to enter your name')">  <p>Talk about yourself here:<br> 6       <  textarea name="comments"  align="left" 7  onFocus="handler('Did you add comments?')"  rows="5" cols="50">I was born...         </textarea><p>         <input type="button"             value="submit">         <input type="reset"             value="clear">     </form>     </body>     </html> 

EXPLANATION

  1. A user-defined function called handler() is defined. It takes a string as its only parameter.

  2. The string message, "Don't forget to enter your name" (or "Did you add comments?") is passed to the function and assigned to the window's status bar.

  3. The HTML form starts here.

  4. The first input type is a text box.

  5. The text box contains the attribute for the onFocus event handler. When this box has focus, the event will be fired up and call the handler() function.

  6. A text area is defined to hold user comments.

  7. The text area contains the attribute for the onFocus event handler. When this box has focus, the event will be fired up and call the handler() function. See Figure 12.19.

    Figure 12.19. Look at the status bar.

    graphics/12fig19.jpg

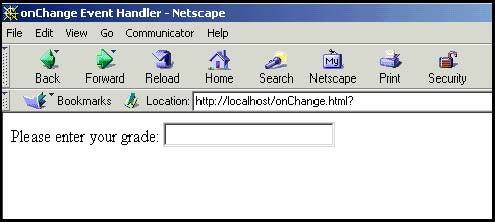
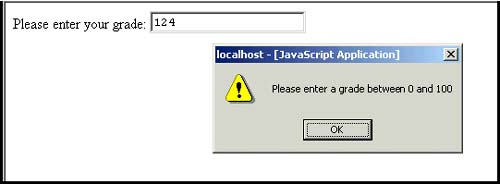
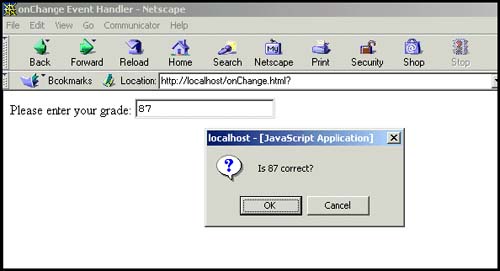
12.6.6 Forms and the onChange Event Handler

The onChange event handler is triggered after the user modifies the value or contents of an HTML input, select, or text area element in a form, and then releases the mouse. This is another event handler that can be useful in checking or validating user input.

Example 12.16
 <html>     <head><title>onChange Event Handler</title>     </head>     <body> 1   <form>         Please enter your grade: 2  <input type="text" onChange="  grade=parseInt(this.value);  //  Convert to integer  3           if(grade < 0  grade > 100){                alert('Please enter a grade between 0 and 100');             } 4           else{                confirm('Is '+ grade + ' correct?');             } 5  " >  6   </form>     </body>     </html> 

EXPLANATION

  1. The HTML form starts here.

  2. The input type is a text field. The onChange event is triggered when something changes in the text field box, such as a user entering input.

    Instead of assigning a function to the handle the event, the JavaScript statements are enclosed in double quotes and will be parsed and executed when the event is triggered. It might be less error prone to write a function than to try to keep this whole section of code together in quotes.

  3. If the input assigned to grade is less than 0 or greater than 100, it is out of the legal range, causing an alert box to appear.

  4. If the input was within the limits, then the else block is executed. A confirm box will appear to verify that this is what the user meant to type.

  5. This quote marks the end of the JavaScript statements, and the > marks the end of the input type tag.

  6. The HTML form ends here. The actions of the handler are shown in Figures 12.20 through 12.22.

    Figure 12.20. The user enters no value at all: there is no change.

    graphics/12fig20.jpg

    Figure 12.22. User enters a value. The onChange handler is invoked. The value entered was out of range, causing the alert box to appear.

    graphics/12fig22.jpg

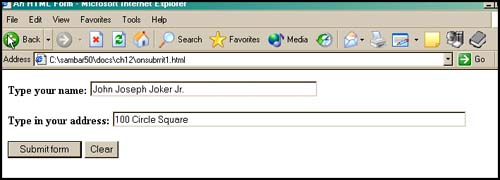
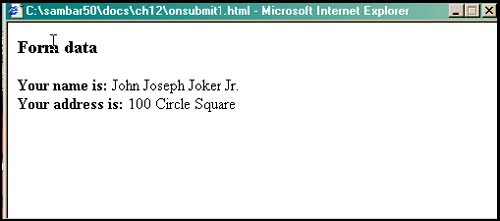
Figure 12.21. The user enters a value. A change has taken place. The onChange handler is invoked.

graphics/12fig21.jpg

12.6.7 Forms and the onSubmit Event Handler

The onSubmit event handler was discussed in detail in Chapter 11, but it is included again in this chapter since it is such an important form event. You will see this event again in Chapter 13, "Regular Expressions and Pattern Matching." If you recall, the onSubmit event is an attribute of the HTML <form> tag and is triggered when the user presses the submit button after filling out a form. This event allows the programmer to validate the form before sending it off to the server. If the return value from the event handler is true, the form will be submitted; if false it won't be submitted. The following examples demonstrate two different validation programs using an onSubmit event handler.

Example 12.17
 <html><head><title>The onSubmit Event Handler</title></head>     <body font="arial" size=3>     <script language="JavaScript"> 1  function popUp(){  2           newWin=window.open('','NewWin','toolbar=no,                status=no,width=500,height=200'); 3           newWin.document.write("<h3>Form data</h3>");             newWin.document.write("<b>Your name is:</b> " +                document.form1.namestring.value);             newWin.document.write("<br><b>Your address is: </b>" +                document.form1.address.value);         }     </script>     <b> <hr> 4  <form name="form1" onSubmit="popUp();">  <p>     Type your name: 5   <input type="text"         name="namestring"         size="50">     <p>     Type in your address:     <input type="text"         name="address"         size="80">     <p> 6  <input type="submit" value="Submit form">  <input type="reset" value="Clear">     </form></body>     </html> 

EXPLANATION
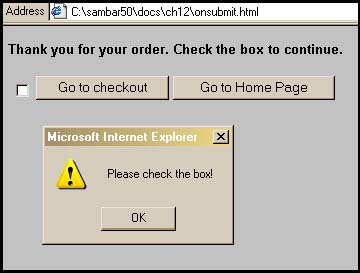
  1. A function called popUp() is defined. It will cause a pop-up window to appear with data that was entered into a form.

  2. This is where the new window object is created and assigned properties.

  3. The write() method will send its output to the new window.

  4. The HTML form starts here. When the submit button is pressed, the onSubmit event handler will be triggered and call the popUp() function, causing a new pop-up window to appear containing the information that the user typed into the form. At this point the program could ask the user if the data is valid and continue to process the information by sending it to a server. Since the action attribute for the HTML form hasn't been defined, nothing will happen.

  5. The input types for the form are defined here as two text boxes, one for the user's name and one for his address.

  6. The submit button is created here. When the user submits the form, the onSubmit handler on line 4 will be triggered. The action is shown in Figures 12.23 and 12.24.

    Figure 12.23. The fillout form.

    graphics/12fig23.jpg

    Figure 12.24. Pop-up window with form data after submit.

    graphics/12fig24.jpg

Example 12.18
 <html><title>Check it Out!</title>     <head>     <script language="JavaScript">     //  Script modified from original found at  //  http://javascript.internet.com  1  function okForm(form  ){             if (form.accept.checked == true){                return true;}             else{                alert("Please check the box!");                form.accept.focus();                return false;}         }     </script>     </head>     <body bgcolor="silver">     <font face="arial,helvetica" size=2>     <b>Thank you for your order. Check the box to continue.</b> 2   <form action="/cgi-bin/checkout.pl"         method="post" 3  onSubmit="return okForm(this)">  <input type="checkbox"         name="accept"         value="0"  > 4  <input type="submit"   value="Go to checkout" >  <input type="button"         value="Go to Home Page" 5  onClick="window.location.replace('../localhost/default.htm');" >  </form>     </body>     </html> 

EXPLANATION

  1. A function called okForm() is defined. The function is called by the onSubmit event handler. Its purpose is to ensure that a checkbox has been checked. If it has, the return value is true , and the form will be submitted. If not, the user will be reminded to check the box, false will be returned, and the form will not be submitted. See Figure 12.25.

    Figure 12.25. The user didn't check the box.

    graphics/12fig25.jpg

  2. The action attribute is the URL of the server where the form data will be sent for processing, once it has been submitted.

  3. The onSubmit event handler is triggered when the user presses the submit button for this form.

  4. When this submit button is pressed, the onSubmit handler on line 3 is triggered.

  5. When the user presses this button, the onClick handler will be fired up, and cause the current window to be replaced with another window, the home page for the site.


JavaScript by Example
JavaScript by Example (2nd Edition)
ISBN: 0137054890
EAN: 2147483647
Year: 2003
Pages: 150
Authors: Ellie Quigley

flylib.com © 2008-2017.
If you may any questions please contact us: flylib@qtcs.net