6.3 Loops
6.3 LoopsLoops are used to execute a segment of code repeatedly until some condition is met. JavaScript's basic looping constructs are
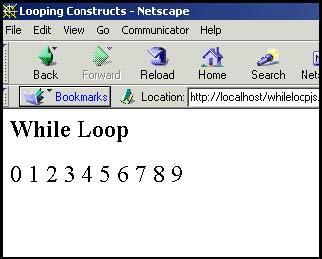
6.3.1 The while LoopThe while statement executes its statement block as long as the expression after the while evaluates to true; that is, non-null, non-zero , non-false. If the condition never changes and is true, the loop will iterate forever (infinite loop). If the condition is false control goes to the statement right after the closing curly brace of the loop's statement block. The break and continue functions are used for loop control. FORMAT while (condition) { statements; increment/decrement counter; } Example 6.4 <html> <head> <title>Looping Constructs</title> </head> <body> <h2>While Loop</h2> 1 <script language="JavaScript"> document.write("<font size='+2'>"); 2 var i=0; // Initialize loop counter 3 while ( i < 10 ){ // Test 4 document.writeln(i); 5 i++; // Increment the counter 6 } // End of loop block 7 </script> </body> </html> EXPLANATION
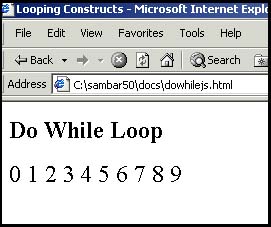
6.3.2 The do/while LoopThe do/while statement executes a block of statements repeatedly until a condition becomes false. Owing to its structure, this loop necessarily executes the statements in the body of the loop at least once before testing its expression, which is found at the bottom of the block. The do/while loop is supported in Netscape Navigator and Internet Explorer 4.0, JavaScript 1.2, and ECMAScript v3. FORMAT do { statements;} while (condition); Example 6.5 <html> <head> <title>Looping Constructs</title> </head> <body> <h2>Do While Loop</h2> <script language="JavaScript"> document.write("<font size='+2'>"); 1 var i=0; 2 do{ 3 document.writeln(i); 4 i++; 5 } while ( i < 10 ) </script> </body> </html> EXPLANATION
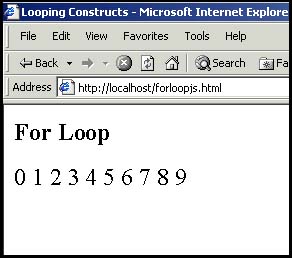
6.3.3 The for LoopThe for loop consists of the for keyword followed by three expressions separated by semicolons and enclosed within parentheses. Any or all of the expressions can be omitted, but the two semicolons cannot. The first expression is used to set the initial value of variables and is executed just once, the second expression is used to test whether the loop should continue or stop, and the third expression updates the loop variables ; that is, it increments or decrements a counter, which will usually determine how many times the loop is repeated. FORMAT for(Expression1;Expression2;Expression3) {statement(s);} for (initialize; test; increment/decrement) {statement(s);} The above format is equivalent to the following while statement: Expression1; while( Expression2 ) { Block; Expression3}; Example 6.6 <html> <head> <title>Looping Constructs</title> </head> <body> <h2>For Loop</h2> <script language="JavaScript"> document.write("<font size='+2'>"); 1 for( var i = 0; i < 10; i++ ){ 2 document.writeln(i); 3 } </script> </body> </html> EXPLANATION
6.3.4 The for/in LoopThe for/in loop is like the for loop, except it is used with JavaScript objects. Instead of iterating the statements based on a looping condition, it operates on the properties of an object. This loop is discussed in Chapter 9, "JavaScript Core Objects," and is only mentioned here in passing, because it falls into the category of looping constructs. 6.3.5 Loop Control with break and continueThe control statements, break and continue , are used to either break out of a loop early or return to the testing condition early; that is, before reaching the closing curly brace of the block following the looping construct. Table 6.1. Control statements.
Example 6.7 <html> <head> <title>Looping Constructs</title> </head> <body> <h2>While Loop</h2> 1 <script language="JavaScript"> document.write("<font size='+2'>"); 2 while(true) { 3 var grade=eval(prompt("What was your grade? ","")); 4 if (grade < 0 grade > 100) { document.write("Illegal choice<br>"); 5 continue; // Go back to the top of the loop } 6 if(grade > 89 && grade < 101) {document.write("A<br>");} 7 else if (grade > 79 && grade < 90) {document.write("B<br>");} else if (grade > 69 && grade < 80) {document.write("C<br>");} else if (grade > 59 && grade < 70) {document.write("D<br>");} 8 else {document.write("You Failed.<br>");} 9 answer=prompt("Do you want to enter another grade? ",""); 10 if(answer != "yes"){ 11 break; // Break out of the loop to line 12 } 12 document.write("So long.<br>"); </script> </body> </html> EXPLANATION
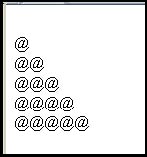
6.3.6 Nested Loops and LabelsNested LoopsA loop within a loop is a nested loop. A common use for nested loops is to display data in rows and columns. One loop handles the rows and the other handles the columns . The outside loop is initialized and tested, the inside loop then iterates completely through all of its cycles, and the outside loop starts again where it left off. The inside loop moves faster than the outside loop. Loops can be nested as deeply as you wish, but there are times when it is necessary to terminate the loop owing to some condition. Example 6.8<html> <head> <title>Nested loops</title> </head> <body> <script language=javascript> <!-- Hiding JavaScript from old browsers 1 var str = "@"; 2 for ( var row = 0; row < 6; row++){ 3 for ( var col=0; col < row; col++){ document.write(str); } 4 document.write("<br>"); } //--> </script> </body> </html> EXPLANATION
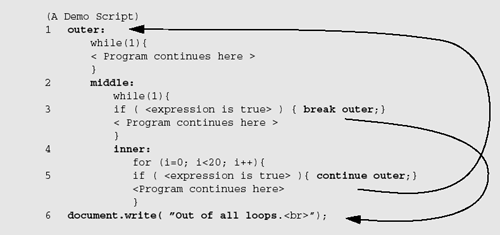
Labels.Labels are identifiers followed by a colon and placed on a line by themselves. They can be named the same as any other legal identifier that is not a reserved word. They are used if you want to branch to some other part of the program. By themselves , labels do nothing. You name labels as you would name any other identifier. Labels are optional, but can be used to control the flow of a loop. A label looks like this, for example: Top: Normally, if you use loop-control statements such as break and continue , the control is directed to the innermost loop. There are times when it might be necessary to switch control to some outer loop. This is where labels most often come into play. By prefixing a loop with a label, you can control the flow of the program with break and continue statements as shown in Example 6.9. Labeling a loop is like giving the loop its own name. Example 6.9. EXPLANATION
|
EAN: 2147483647
Pages: 150
- Article 396 Messenger Supported Wiring
- Article 411: Lighting Systems Operating at 30 Volts or Less
- Example No. D2(a) Optional Calculation for One-Family Dwelling Heating Larger than Air Conditioning [See Section 220.82]
- Example No. D10 Feeder Ampacity Determination for Adjustable-Speed Drive Control [See 215.2, 430.24, 620.13, 620.14, 620.61, Tables 430.22(E), and 620.14]
- Annex E. Types of Construction