Integration with Individual Office Applications
| In addition to the integration points between project workspaces that most Office products share, discussed in the previous section, Outlook and Excel have some integration with project workspaces that is unique. Project workspaces use a lot of email functionality, and you can control some of that email and interact with project workspaces through Outlook, which is a part of the EPM solution. Excel has many integration points because it's a good choice for dealing with lists of informationthe building blocks of a project workspace site. The next section highlights some of the unique integration points that Outlook and Excel share with project workspaces. Project Workspace Integration with OutlookBecause Outlook is considered to be part of the EPM solution, it's natural to expect a lot of integration with project workspaces. Some of the integration features are useful but perhaps not easily discovered, such as the topic of the next section: creating and managing SharePoint alerts in Outlook. Creating and Managing SharePoint Alerts in OutlookBecause you can create alerts and manage them in project workspaces, you might not think about having the ability to do the same in Outlook. However, this feature does exist, and after people discover it, they find it easier to work with their alerts consolidated in one place instead of going to individual project workspaces. To access this feature in Outlook, follow these steps:
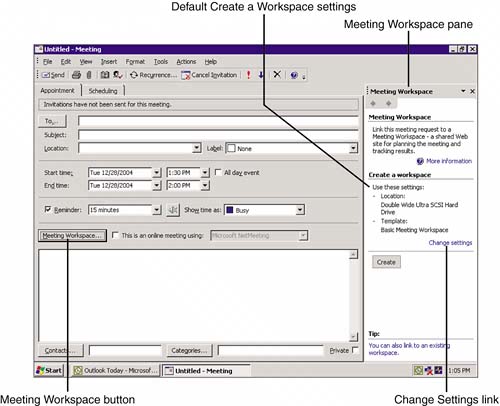
From this interface, you can create new alerts, view and modify properties, delete alerts, and create an Outlook rule to automatically deal with the notification you get from an alert. Creating a Meeting Workspace from OutlookA meeting workspace is an entire WSS site devoted to providing a structure for all your meeting needs. Meeting workspaces provide lists and document libraries so that you can post meeting agendas, post meeting minutes, record objectives, record decisions, track tasks, save documents, and host discussions. Some project managers find it convenient to use meeting workspaces for their formal project meetings, such as a Project Kickoff meeting. To create a meeting workspace from Outlook, follow these steps:
CAUTION The same caution applies here as it does for document workspaces: When you create a meeting workspace site, it is created as a subsite of the existing WSS site that you choose. After a subsite is created and the meeting is over, the meeting workspace is easily forgotten, and hunting down meeting workspace sites buried under project workspaces involves manually opening each project workspace site, selecting the Documents & Lists navigation link on the upper menu bar, clicking meeting workspaces under See Also on the Actions pane, and reviewing the entries in the Sites and Workspaces page. Not easy to do, if you have hundreds of project workspaces. Fortunately, the same solution exists as for the similar problem with document workspaces. The command-line utility, stsadmin, with its enumsubsites command, solves the problem of finding subsites, but it doesn't allow you to see the data that's there to assist in making a disposition decision. At this point, you may want to review the third-party web parts available to help find these needles in the haystack. Check out the Microsoft Office FrontPage 2003 Customization Kit for SharePoint Products and Technologies website for available web parts. Viewing Shared Events and Contact Lists from Within OutlookIf events and contact lists are important enough to your project that you enter them into the project workspace, perhaps you want to consider seeing them in Outlook, too, as shown in Figure 24.7. After an event list is "imported" into Outlook, you can display it side-by-side other calendars. Contacts and events are updated automatically when new items are added to the project workspace site. Figure 24.7. SharePoint folders displayed in Outlook with a shared contact list and a shared calendar from a project workspace.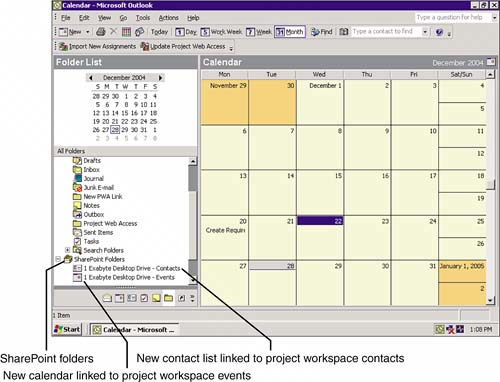 Viewing Project Workspace EventsTo add an event list to Outlook, you first need to open the project workspace in your web browser. Perform the following steps:
NOTE If you don't see the Link to Calendar link in Step 2, you may be viewing the web part for the Events list on the project workspace home page. If that's the case, click the Events link in the header bar for the web part to navigate to the Events list. Viewing an Events List in OutlookIn your Calendar view, under Other Calendars on the Navigation pane, select the check box for the project workspace entry you want to view. To view the Calendar side-by-side with another calendar, simply click the check boxes to display the calendars you want to see. Finally, clear the check boxes for calendars you do not want to be displayed. NOTE If you try to edit an event in an Events list that belongs to a project workspace event list or a contact from the project workspace Contact list, you get a message letting you know that in Outlook the item is read-only and asking whether you want to save a copy of the item in the default folder for the item. If you answer yes, your changed item is copied (with your changes) to either the Outlook Contacts folder or the Outlook Calendar, depending on which type of item you are working with. To edit the original event or contact, you have to go to the project workspace site. Project Workspace Integration with ExcelWhen it comes to working with lists in project workspaces, Excel is unmatched in the number of features available. Not only can you manage the data from a list in Excel, you also can synchronize the data with your local copy of the online list, publish a list to your project workspace, and, finally, from the project workspace, import a local spreadsheet as a new list. Publishing an Excel List to a Project WorkspaceOne way to create a new list in a project workspace is to create the list first in the familiar Excel spreadsheet format and then publish it to the project workspace. If you're creating a list with many columns, you may prefer this method to creating the list in the web browser, which involves creating each column step-by-step and selecting the options individually for each column. You could also perfect your list in an iterative fashion using this feature, publishing and deleting your list until you get it right. To publish your active list from the data on the current Excel worksheet page to a project workspace, follow these steps:
NOTE If you used the linked list option, your list is created with an ID column, which displays in Excel. While the list remains linked, this column will be read-only. Importing a Spreadsheet As a New ListJust as you can export data from a local list contained in a spreadsheet, you can create a new list in a project workspace by importing an Excel spreadsheet. Follow these steps to import a spreadsheet as a new list:
Using the Import Spreadsheet As a New List feature is an alternative to publishing your list to the project workspace from Excel. Publishing the list from Excel is probably the most efficient choice if you have been working with the list and still have it open in Excel. The Publish from Excel option also gives you choices about how to import your data, such as specifying the data types for your columns. Synchronizing a List Between Excel and the Project WorkspaceYou may decide that you want to work with a list offline. To synchronize the data in a list that you have permission to access offline after you have taken a list offline and edited it, follow these steps:
CAUTION It's important to remember that synchronization is not automatic, as you might expect if you've worked with importing contact or events lists into Outlook from a project workspace. In fact, Excel won't prompt you to synchronize when the list is saved or closed locally. You get a notification only if you open the file that contains unsynchronized changes. |
EAN: 2147483647
Pages: 227