The Project Workspace and Shared Office Integration
| This chapter first covers integration between the project workspace and Office in generalpoints of integration with two or more Office programsand then delves into integration specific to individual Office programs. The chapter also reviews document workspaces, document libraries, and web discussions. Saving a Document to a WorkspaceAn essential element of the project workspace is the capability to host documents pertinent to the project in a document library. Document libraries then become a good tool for storing project collateral or artifacts. But if you want team members to collaborate on a document, the project workspace offers the capability to create an entire site around a documenta document workspace. This allows team members to easily collaborate on the document. WSS is all about enhancing collaboration, and there's no better example of that than document workspaces. A document workspace is a WSS site created around one or more documents. The enhanced capabilities of a document workspace include those that every WSS document library hasdocument check-in/check-out and versioningbut there are also other WSS features, such as task lists, links to other content/references, and presence information for real-time collaboration. Figure 24.1 shows the home page of a document workspace. Like any other WSS site, you can customize a document workspace site using a web browser. Figure 24.1. A document workspace looks and functions like other WSS sites but contains other elements designed to facilitate collaboration around a document or group of documents.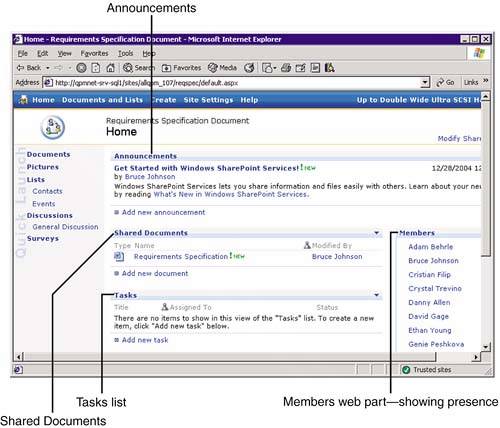 NOTE Access and Publisher do not support integration with the document workspace feature. Document workspaces can be created in a couple of ways. The most common way is emailing a shared attachment. When you create an attachment to an email, the Attachment Options pane is displayed allowing you to choose whether to send a shared attachment or a regular attachment (see Figure 24.2). If you choose shared attachment, you get to choose where to create the document workspace. To make the location selec tion, follow these steps:
Figure 24.2. Email with shared attachment option.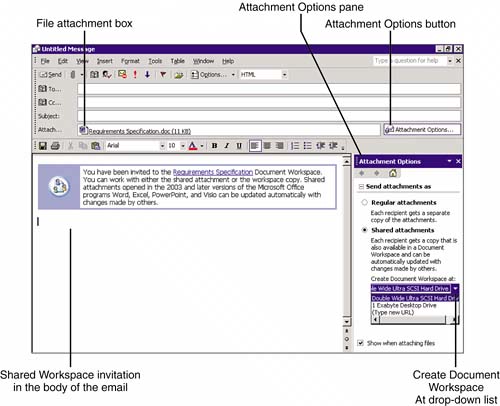 NOTE If you don't see the Attachment Options pane and you have the EPM solution implemented, look for the Attachment Options button at the right end of the attachments box. When you send your email with the shared attachment, four things happen:
Members of the document workspace can work together on the document. When members are online, they can work on a local copy of the document. Periodically, the Office document they are working in checks for updates. Any changes saved to the copy of the document workspace can be merged with their local copy, or, if the changes conflict, members can choose which copy to keep. Finally, they can save their changes to the document in the document workspace, where everyone can integrate them into their copy of the document. NOTE You can also create the document workspace from the Shared Workspace task pane in Microsoft Office Word 2003, Microsoft Office Excel 2003, Microsoft Office PowerPoint 2003, and Microsoft Office Visio 2003. When you create the workspace using this method, you can specify the name for the site. Members can access the document by navigating to the document library of the document workspace site in a browser. Document workspaces are an easy way to facilitate collaboration among project team members. The ease with which they can be created and the capability to create them within almost any Office application could quickly make them a favorite tool of the project team. CAUTION One concern your organization should address before allowing everyone to create document workspaces is management. The proliferation of document workspaces could be a real problem for the organization if some controls or standards are not followed. Here are some considerations:
When you create a document workspace site, it is created as a subsite of the existing WSS site that you choose. After a subsite is created and team members are finished collaborating on the document, the subsite is easily forgotten, and hunting down document workspace sites buried under project workspaces involves manually opening each project workspace site, selecting the Documents & Lists navigation link on the upper menu bar, clicking Documents Workspaces under See Also on the Actions pane, and reviewing the entries in the Sites and Workspaces page. Not easy to do, if you have hundreds of project workspaces. Fortunately, the command-line utility, stsadmin, with its enumsubsites command solves the problem of finding subsites, but it doesn't allow you to see the data that's there to assist in making a disposition decision. At this point, you may want to review the third-party web parts available to help find these needles in the haystack. Check out the Microsoft Office FrontPage 2003 Customization Kit for SharePoint Products and Technologies website for available web parts. Before leaving the discussion about document workspaces, it is worth mentioning the other features contained on the Shared Workspace task pane of the Office products that share this feature. Because a document from a document workspace is really a document from a document library contained in a WSS site, the Shared Workspace task pane contains all the functionality of a document in a document library in WSS. Several practical features on the pane work hand-in-hand with the WSS document workspace. Figure 24.3 shows that, in addition to having a link to open the site in your browser, several site management links on the Shared Workspace task pane give you options to delete the workspace site, delete the document, change the site title, change other site settings, and disconnect the open document from the workspace. This last option disassociates the document from its document workspace and releases the document's connection with the workspace. The application will no longer automatically check the workspace for updates, and your local copy will be detached from the document workspace. To complete the disconnection, you must close the document and save it. Figure 24.3. Site management options on the Shared Workspace task pane.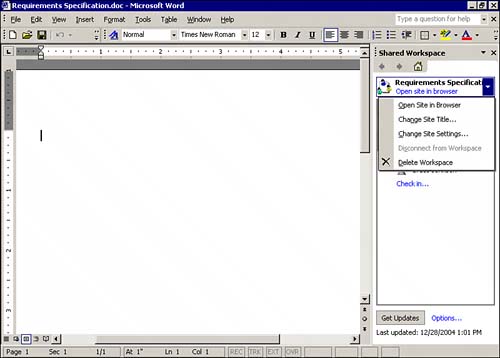 The Shared Workspace task pane also has six tabs that integrate with the project workspace, as shown in Figure 24.4. The Status tab gives you the current status on document updates. The Members tab tells you who's onlinethe drop-down list on each name gives you other collaboration options, for example, scheduling a meeting, member administration options, and, where appropriate, the ability to Edit Site Group Membership. Figure 24.4. Tabs on the Shared Workspace task pane.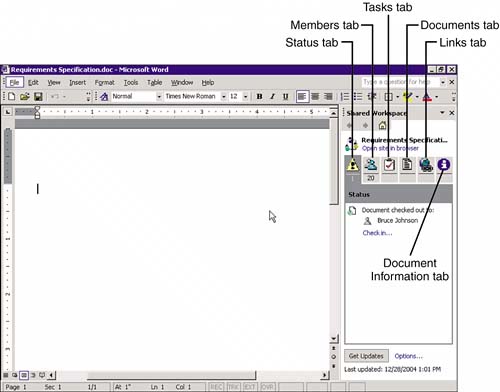 The Tasks tab allows you to assign tasks to workspace members. Other documents in the workspace's document library can be seen and opened from the Documents tab. The Links tab allows you to create links to relevant content and, finally, the Document Information tab displays information about the current document. Saving a Document, Versioning, and Check-In/Check-OutProject workspace document libraries provide a great deal of integration with Office products in the form of a rich document management environment for project-based documents, including versioning and check-in/check-out features. Provided that you have the proper permissions, you can save a document to a project workspace from your Office application, add versioning comments, and set document properties (metadata such as status and other custom properties). The one challenge to all this integration is easy access to your project workspaces. Setting up your project workspaces as items in My Network Places so that you can access them in the Save dialog box from your Office application is one way to make it easy. If you don't have the project workspace already set up in My Network Places, you can set it up from the Save As dialog box in your Office application (see Figure 24.5). Here's how:
Figure 24.5. The Save As dialog box set up with project workspace places.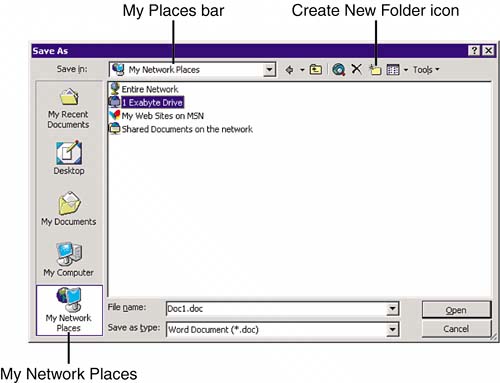 TIP When you get to the What Is the Address of This Network Place Wizard screen, you have to type in the URL of the project workspace. If you don't remember the number that the project workspace was created with, you'll have to navigate to it in a browser and copy it to the Clipboard so that you can paste it back into the wizard screen. The alternative to this document save process is to start your document directly from the document library by clicking the New Document link on the library's toolbar. Using this method, your document will be created with the default document template the administrator of the project workspace site has chosenprobably a Word template. When you choose a Network Place to save your document to, make sure that the location you're saving to is a document library. If you're not in a document library but instead one level up in the hierarchy and you have the permissions to do so, you can save to that folder. Doing so means that your document will not appear in the default document library view when you go to the project workspace. If this happens, the easiest solution is to click the Explorer View link on the Action bar in the document library; click the project's name in the Other Places drop-down list in the Explorer view. Your newly saved document should appear here along with other folders from the workspace such as Shared Documents, Lists, and so on. From here, because you're in Explorer view, simply drag your document to the document library where you want it to be located. Web DiscussionsUsing web discussions, you can comment on a document without having to open the document and share comments with your team members. Additionally, team members can use web discussions to comment on a document without having the facility to edit the document. This feature has limited usefulness, so it is not covered in this chapter. If you are interested in web discussions, there's good documentation in Special Edition Using Microsoft Office 2003, copyright 2004, Que Books. |
EAN: 2147483647
Pages: 227