Updating Project Progress
| Whether your project team members are in the same office building or in a different country, collaborating on shared projects and updating them can be a challenge. Managing all changes made to all shared documents by each project team member can quickly become a logistical nightmare. The consequences of mismanaging document changes and project progress information can be serious. They may include duplicated task effort, unauthorized project changes, and inconsistent task work. With this in mind, it is important to design and maintain an adequate progress tracking system for your project portfolio. Tracking Project ChangesSome project teams track changes and updates by email or in periodic status meetings. Project managers collect the update and change information first and then update and republish their project plans for the rest of the project team. This method may work for smaller less formal project teams, but it can be difficult to scale up for large, more formal ones. Other project teams may decide to use team collaboration features available in Project Server 2003 software. This tracking system can work well if everyone on the project team uses those features consistently. Collaborating on projects with team members has come a long way from the days when project team members passed around floppy disks or paper folders. Today, many collaborative technologies are available to choose from, enabling you to keep your project-related documents on an intranet or extranet, and you can collaborate and communicate project updates and changes across the world. However, when it comes to project progress tracking, one thing remains the same. To collaborate and track your project progress effectively, you should stay informed of changes, additions, and deletions to project task and resource assignments, documents, and other related project artifacts. Updating Project Progress WorkflowThis section focuses on the role of the project manager in the project update process. If your role in your organization is a project manager, you can use the Updates page in the PWA client to review, accept, or reject task updates or requests sent by your team members. The Updates page contains a listing of all task updates sent by your team members working on projects controlled by you, whether they are newly created tasks, delegated tasks, or updates for a task's actual progress. You as a project manager then have the option to accept or reject the updates from your resources before committing the changes to the appropriate project plan, as part of the overall plan update cycle. NOTE This process ensures that the project manager remains the gatekeeper of the project plan. All updates have to pass through and be accepted by the project manager before the updates are saved to the plan. This maintains the integrity of the project plan and gives the project manager needed control over his resource assignments. The Updates page is available to project managers and those who have the permission to view the Updates page. The ability to manage task changes is set by the system administrator. The activities that can be carried out from the Updates page include
For the project manager to track the project progress and report that progress to senior management, she must save the task changes and updates submitted by project team resources back into the Project Professional plan. After all changes and updates are saved in the project plan, the project manager then makes necessary adjustments to the project plan to meet the project requirements and republishes the plan, including all changes to resources assignments, back to the Project Server. Figure 22.4 describes the flow of these activities in relation to the entire plan update cycle process. The part of the cycle carried out by the project manager using the Updates page and the Project Professional client are highlighted in white. The grayed out areas are other parts of the process performed by the project team members. Figure 22.4. The schematic workflow of task update information and the role a project manager plays in this process.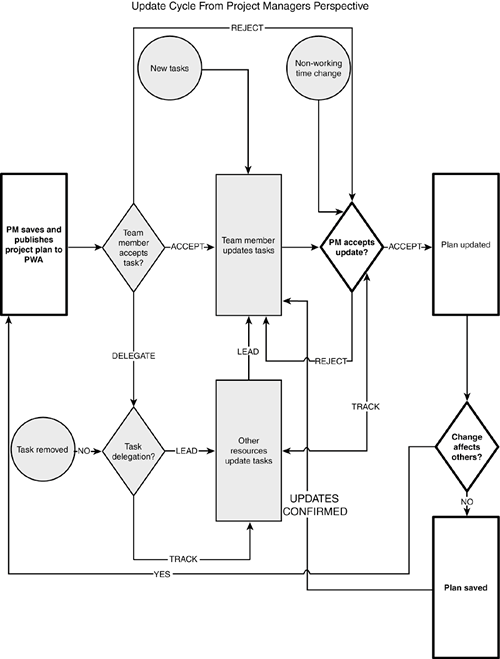 After the project manager processes all task updates and changesrejecting or accepting themin the Updates page, the updated information is transferred to the project plan by clicking the Update button. For the tasks accepted by the project manager, the relevant project plans will be opened and the changes automatically applied to the appropriate plan. Not until the plan is saved are the task changes and updates permanently saved in the project plan. Updating and Saving Task Changes into Project SchedulesAs a project manager, you must save the task updates and changes submitted by your resources back into your project schedule. The Project Professional client must be installed on the machine used for updates processing. If the Project Professional client is not running, it will automatically be launched and a connection to the Project Server will be established to update relevant enterprise project plans. If any updates cannot be completed, an alert is displayed. When you accept a change, the relevant project schedules open and the changes are applied automatically to all relevant open plans. The plans remain open with icons in the information column indicating the tasks where these changes have had an impact. Until you save the plans, the changes and updates do not become permanent. After all the updates and changes are saved to the plans, you should republish the plans to Project Server and save the updated project schedules. Setting the Status DateAfter you save the latest actual information to your project plan, it is important to reset the project status date. Anybody who needs information about the project progress then knows when your plan was updated the last time. To do so, select Project, Project Information from the menu. Enter the date in the Status Date field. This date is usually set to the last day with actual work reported for your last reporting period, as shown in Figure 22.5. Any task updates and changes you have entered through the end of that day will be reflected in any reports or schedule updates. Figure 22.5. The dialog box where you reset your status date for the next reporting period.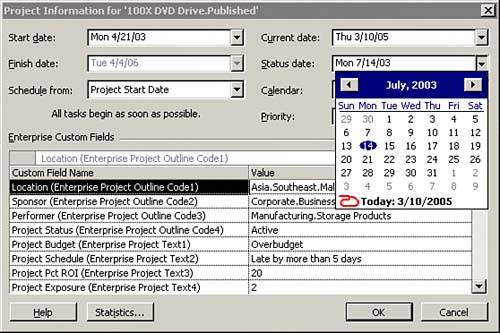 Publishing the ProjectFor the project information to be made available in PWA, you first must save and publish project information to Project Server. By doing so, project managers make project information available to team members, stakeholders, and anyone who has been granted the appropriate permission to view project information. There are two ways of publishing project information on the server: manually and automatically. To publish project information manually, follow the process described by the following steps:
Project Professional offers users four choices when it comes to publishing information on the server:
To publish project information to Project Server automatically, from the Project Professional menu, select Tools, Options to open the Options dialog box; then select the Collaborate tab. Under On Every Save, Publish the Following Information to Project Server, select from the following:
It is important to mention here that the Publish feature also has the effect of flagging resources as Committed. If assignments are not published on the server for a particular project, the result is that resources assigned in that project are flagged as Proposed. In this case, the "proposed" resources do not receive any task assignments on their Tasks page. This could be an effective method to perform a quick "what-if" analysis regarding task assignments and their effect on the overall resource allocation. Updating the ProjectAfter setting the status date, the next important step is to reschedule any work that was scheduled to be completed but for whatever reason did not get completed. It is imperative to understand and analyze carefully the impact of the last update on your project plan. As a result of the last update, you may need to make some changes to your plan before moving on. When you consider your options for schedule corrections due to changes caused by accepted and saved actual updates, the following list provides some suggestions to choose from (in order of preference), with the caveat that you may not have some of these options available in your situation:
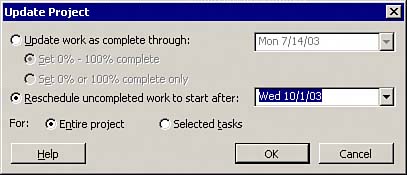
Select Tools, Tracking, Update Project from the menu. Then click on Reschedule Uncompleted Work to Start After and enter a date. This action may change the finish date for some tasks, as shown in Figure 22.6. Figure 22.6. Reschedule uncompleted work and make sure that it gets done in the future.
With the changes saved into the project plan, you can then analyze and adjust the project schedule as required and publish the plan, including any changes to resources assignments, back to the Project Serverthat is the last step in the update cycle. |

EAN: 2147483647
Pages: 227