Building Project Teams
| Staffing projects involves assigning resources to tasks from a pool of available resources. Because resources are required to have the specific skills necessary for the tasks to which they are assigned, it is important to identify required skills for all resources in your Enterprise Resource Pool. Skills are Enterprise Resource Outline Codes with the Use to Match Generic Resources property enabled. Microsoft Office Project Server 2003based EPM solution allows a maximum of 29 skill codes per resource. Ten of the 29 skill codes are defined as multivalue outline codes (Enterprise Resource Outline Code 20 to 29). Each multivalue Enterprise Resource Outline Code sets a limit for number of skills being selected within the single Enterprise Resource Outline Code. Each resource can be assigned a maximum of 255 skill values within each multivalue Enterprise Resource Outline Code. You can assign resources to projects by using the Build Team feature in Project Web Access (PWA) or the Build Team from Enterprise feature in Microsoft Office Project 2003 Professional client. This chapter focuses only on project team-building features provided by the Microsoft Office Project Professional 2003 client. You can build teams for projects based on many different parameters, including resource skills, location, availability, and/or current workload. Your final project team can be a collection of many different resources. Your project team resources can be either proposed or fully committed individual resourcesindividuals who meet the skill and availability requirements for staffing the project and subsequent task assignmentsor generic resourcesresources that represent general categories and skills required for the task.
Table 21.1 shows Project Server 2003 global and category permissions required to build a project team.
NOTE For detailed information about all permissions, see Appendix C, "Project Server Permissions," in the Microsoft Office Project Server 2003 Administrator's Guide available from http://go.microsoft.com/fwlink/?LinkID=20236. Identifying the Right Resources for Your ProjectWhen you add resources to project teams, you can prefilter resources by availability and time period to ensure that the resources you assign are available for the assigned tasks. Before you can assign enterprise resources to your project tasks, you must use the Build Team feature available in the Project Professional client to select the resources from the Enterprise Resource Pool. You can also use the Build Team feature to replace resources currently assigned to your tasks in your project plans. Figure 21.1 shows the Build Team dialog box. Figure 21.1. In the Build Team dialog the enterprise resources are displayed on the left side, and the project team resources are listed on the right.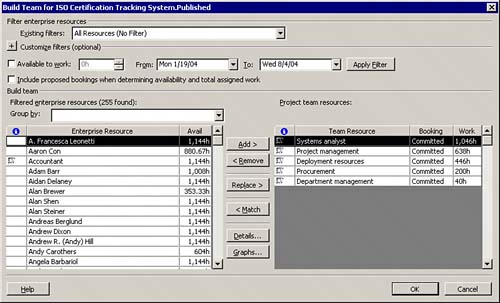 TIP For performance reasons, if you have permission to view more than 1,000 resources from your Enterprise Resource Pool, a prefilter dialog automatically displays. If this happens, you need to either select an existing filter or create a customized filter in the dialog to limit the number of resources displayed. These filters are based on enterprise custom outline code fields defined and created based on your business requirements. If the number of resources matching the criteria is still more than 1,000, the prefilter dialog displays a second time. Either add additional criteria to further limit the number of resources or just click OK, and all the resources will display. If there are no resources displayed matching the selection criteria you entered, an alert appears, which states that no resources meet your criteria. Selecting and Grouping Resources Based on SkillsBefore you can add any resourcegeneric or individualto your project team, you need to choose the appropriate resources to add from possibly a large Enterprise Resource Pool containing thousands of resources. If you want to select your project resources based on skills, you may want to first organize or group your enterprise resources listed on the left side of the dialog box by their skills or any other available resource attribute you may have defined, such as Location. This simple step makes selection of resources with the right skills for your project a lot easier. After your enterprise resources are grouped based on their skills, you can then select resources with desired skills and add them to your project team or perhaps replace the generic resources in your project team with individuals with the right skills. You can also use the Group By list to select a different grouping format not based on resource skills in which you want to have your enterprise resources organized. For example, you can use RBS enterprise outline code to group and display your resources based on how your organization's Resource Breakdown Structure (RBS) is defined. Three types of indicators and four possible types of resources can be displayed in the Build Team dialog box:
NOTE Any enterprise resources already part of the project teamlisted on the rightare grayed out in the resource list in the left pane. Figure 21.2 shows an example of enterprise resources organized and grouped by their skills. Figure 21.2. Use the Build Team for Project Name dialog with grouped enterprise resources displayed on the left side to simplify the project team selection based on skills. To use the Build Team from Enterprise feature and select resources for your project team follow these steps:
Selecting Resources Based on Availability, Current Workload, and Other CriteriaAfter your enterprise resources are grouped based on their skills, you can apply additional criteria to filter the list of resources displayed further. The criteria can include number of work hours a resource should be available within a specific time frame. You can also use many predefined filters available from the Existing Filters list box or define your own custom filters using the Customize Filters (Optional) feature. Selecting Resources Using Existing Predefined FiltersTo select resources using existing predefined filters, open the Build Team dialog box and, under Filtered Enterprise Resources, select a filter from the Existing Filters drop-down list. Figure 21.3 shows an example of the existing filters to choose from. Figure 21.3. Use the Build Team for Project Name dialog and select from the list of predefined filters to limit the size of your enterprise resource list.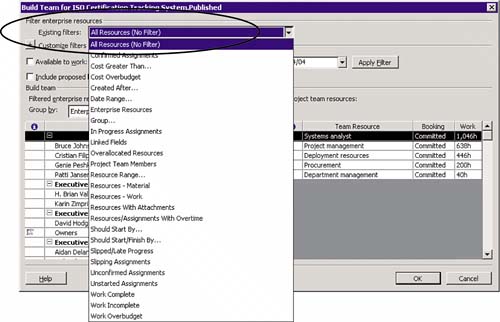 NOTE For more information about the use of existing predefined filters and how to create your custom filters, click the Help button to open the Build Team dialog box topic in the Project Professional Help window. The help information covers "how to" instructions as well as provides a detailed description of all available existing filters. Selecting Specific Resources Based on Custom FiltersTo select specific resources using custom filters, perform these steps:
Figure 21.4 shows an example of a custom filter being defined. Figure 21.4. Use the Build Team for Project Name dialog to define your custom filters to limit the size of your enterprise resource list.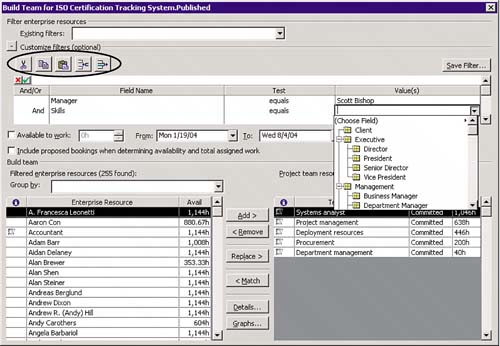 NOTE To remove the filters, open the list at the top of the dialog and select All Resources (No Filter). Selecting Resources Based on Number of Work Hours AvailableYou can also select resources based on their current workload and availability. This filter is always available, no matter whether other filters are applied to the list of your enterprise resources. The filter searches through the nonmaterial resources returned from the Enterprise Resource Pool and selects resources with remaining availability equal to or greater than the number entered for the "work required" value between the dates specified. Select the Available to Work check box to specify whether a resource should be filtered for work availability during a specific period of time. To use this option, specify the amount of time the resource will be required to workfor example, 300 hours (300h)and then use the From and To calendar options to specify the period of time during which they will be needed. When you are finished, click the Apply Filter button. Figure 21.5 demonstrates how the Available to Work feature works. Figure 21.5. The Build Team for Project Name dialog shows the prefiltered enterprise resource list based on a defined minimum work availability (300h) between two specific dates.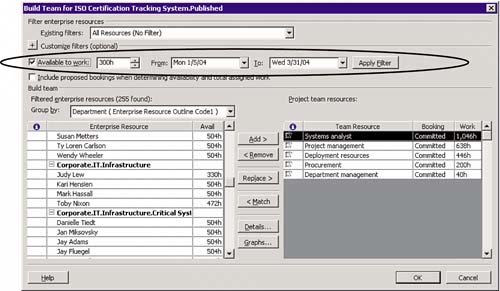 Determining Future Resource Availability Based on Current WorkloadTo determine the future resource availability based on the resource's current load, follow these steps:
Figure 21.6 shows the Graphs dialog with availability information for selected enterprise resources. Figure 21.6. The Graphs dialog shows future availability and current assignment work information for the selected enterprise resources.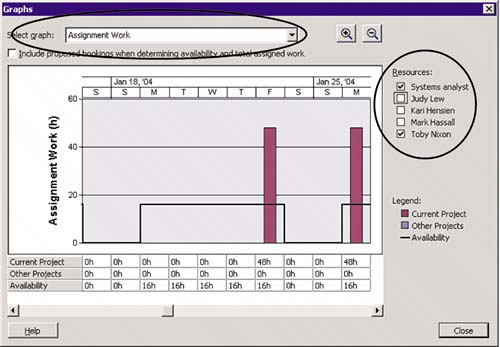 NOTE You can select multiple resources from the list and then click Graphs to display availability for all the selected resources. You can also later interactively deselect and select the resources in the Graphs dialog box to focus on current work and availability of a single resource. Including Proposed Bookings for Resources When Determining AvailabilityTo include the proposed bookings for resources when determining their availability, select the Include Proposed Bookings When Determining Availability and Total Assigned Work check box to indicate whether the proposed assignments should be considered when filtering for availability and work. Figure 21.7 shows the Build Team for Project Name dialog where you can make a choice regarding proposed bookings. Figure 21.7. Check this box to include proposed assignments in the total of the current work assignment.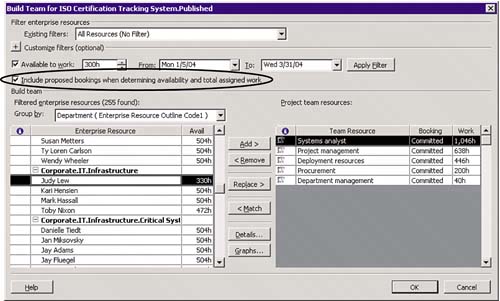 Adding Generic Resources to Your Project TeamAdding generic resources to your project team is a common task for project managers. Before adding individual resources to a project team you may know already the skills required for your project team. It makes sense to first add the generic resources to your project team, making sure that you identified all required skills for your project, and then, later on, when you have more information about individual resource availability, replace these generic resources with individuals using tools such as the Build Team from Enterprise or Resource Substitution Wizard. One tool you can use to assign generic resources based on the skill set defined in your project is the Build Team from Enterprise feature. Figure 21.8 shows the Build Team from Enterprise dialog box displaying a filtered list of generic resources ready to be added to your project team. Figure 21.8. Adding generic resources to your project team is the first step in building a well-balanced project team.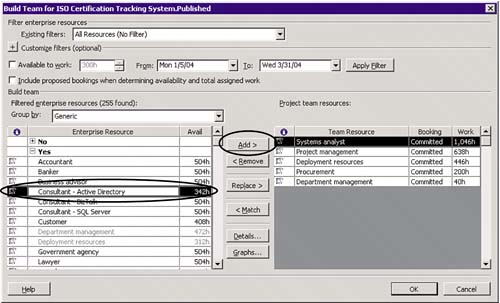 To add generic resources to your project team, perform these steps:
Adding Individual Resources to Your Project TeamSometimes it is desirable to have a project team defined as a mix of generic and individual resources. As the resource availability and workload information becomes clearer, more generic resources are replaced with individual ones. In some cases, perhaps when the Enterprise Resource Pool is not that big and every project manager knows every person's name, you can start building your project team using individual resources from the beginning. If you already identified the correct individual resources in your Enterprise Resource Pool to add to your project team, use the Build Team from Enterprise feature to add individual resources to your project team. Figure 21.9 shows the Build Team from Enterprise dialog box displaying a filtered list of individual resources ready to be added to your project team.
Figure 21.9. Adding individual resources to your project team is sometimes performed at the beginning of building your project team.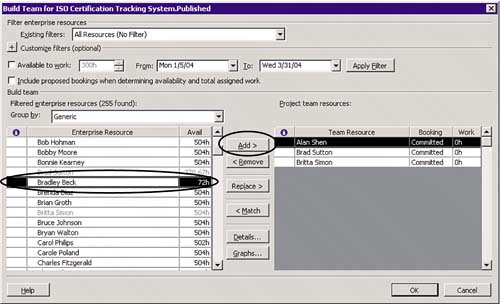 Matching Skills of Generic Resources with Individual ResourcesAfter some more negotiation and a few meetings you now know the correct individual resources in your Enterprise Resource Pool to add to your project team. You can use the Build Team from Enterprise feature to replace generic resources already identified in your project team with individual resources based on the skill match. This action is often performed when your project plan started as a template and the designers of the project template defined the skills required to perform each detailed task. Figure 21.10 shows the Build Team from Enterprise dialog box displaying a list of individual resources ready to be matched with generic resources from your project team. Figure 21.10. Replace generic resources with individual resources based on matching skills and build your project team with individual resources.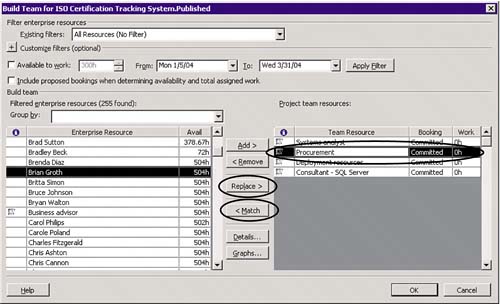 To replace generic resources with individual resources, follow these steps:
How the Resource Matching Feature WorksResource matching can be a useful and powerful technique to select resources with the right skills, but the resource matching functionality has a limitation. If multiple Enterprise Global Resource Outline Codes are set to Use for Matching Generics, every one of those codes is included in the "match" function's filter query. Therefore, the default query can be pretty large for the match. The user can then reset the AND/OR condition and rerun the filter for submatching purposes. Your managers often need to make decisions about resource assignments based on multiple criteria. Custom filters may be used to modify the default filter conditions that enable you to define unique resource requirements when building your project team from resources in your Enterprise Resource Pool. Unlike the functionality provided by resource matching, a custom filter can be based on multiple criteria that use AND or OR logical operators. Resource matching also uses different test criteria depending on the skill code used to find a match:
Replacing Existing Project ResourcesYou can also replace existing individual resources with new individual resources or, if necessary, existing generic resources with new generic resources. To replace individual resources with different individual resources, perform the following steps:
Removing Team Members from a ProjectTo remove existing resources from your project team, use the Build Team from Enterprise feature. To remove team members from the project team, perform these steps:
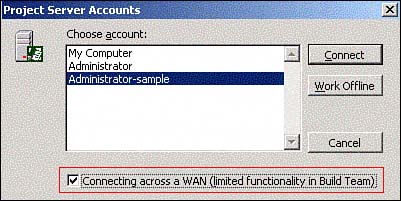
NOTE If the resource on your project team is the right resource, but the resource's data is incorrect, consider modifying the resource's information in the Enterprise Resource Pool first instead of removing the project team member from the project team. You can also use the Assign Resources feature, which preserves actual work associated with existing, already assigned resources but moves any remaining work to the new resource. Using the Build Team Feature in a Wide Area Network EnvironmentIf your Project Professional client is connected to Project Server over a Wide Area Network (WAN), filtering for resource availability using the Build Team feature can become very slow, especially if your connection experiences a high degree of latency. You can improve the performance of your Project Professional client over a WAN by disabling the capability to filter for resource availability in the Build Team dialog box. Figure 21.11 shows the Project Server Accounts dialog box with the Connecting Across a WAN check box selected. Figure 21.11. Disable filtering for resource availability by selecting the Connecting Across a WAN check box.
To disable filtering for resource availability when using the Build Team feature, follow these steps:
|

EAN: 2147483647
Pages: 227