| The Enterprise Global template is a critical part of an enterprise configuration. Enterprise standards, custom objects (Views, Reports, Modules, Forms, Tables, Filters, Calendars, Toolbars, Maps, Fields, and Groups), and the currency symbol are established in the template. These enterprise standards are applied to all projects and can be modified only by an authorized user with Save Enterprise Global permission. Setting the Currency Symbol To define the currency symbol in the Enterprise Global template, perform the following steps: 1. | Open the Enterprise Global template by selecting Tools, Enterprise Options, Open Enterprise Global.
| 2. | Select Tools, Options and select the View tab.
| 3. | Under the Currency options, enter the currency symbol.
| 4. | Save the Enterprise Global template.
|
NOTE The currency symbol is the only environment option that can be set in the Enterprise Global template. All enterprise projects will inherit this setting if enterprise features are enabled and the Enforce Single Currency As Specified in the Enterprise Global Template option is selected on the server configuration in PWA.
Customizing Enterprise Fields Enterprise-level custom fields are similar to Project custom fields but are standard across all projects and have some unique attributes. Enterprise custom fields include task, resource, and project-level custom fields and outline codes. The following sections provide detailed instructions on how to create enterprise custom fields. To customize enterprise fields you must first open the Enterprise Global template. Within the checked-out Enterprise Global template, select Tools, Customize, Enterprise Fields. The Customize Enterprise Fields dialog box appears presented as shown in Figure 20.7. Figure 20.7. The Customize Enterprise Fields dialog box in Project Professional. 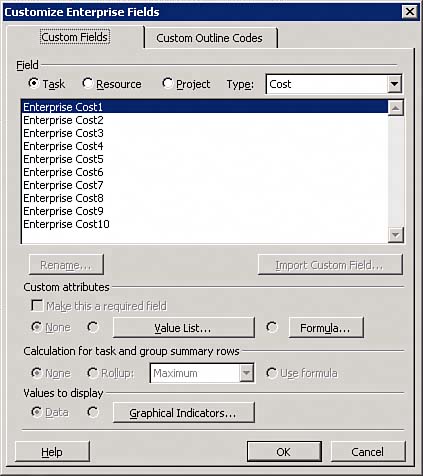
Customizing Enterprise Outline Codes Outline codes are hierarchical codes that use a code mask to define each level in the structure. There are 30 definable outline codes for each type, project, resource, and task. Enterprise Resource Outline Code 30 is predefined as Resource Breakdown Structure (RBS) and is used in the Project Server security model. Enterprise Resource Outline Codes 20 to 29 are multivalue codes that allow selection of one or more values from the lookup table. Project and Resource Enterprise Outline Codes are included dimensions in the OLAP Portfolio Analyzer cube built for the Project Server. To customize an outline code, perform the following steps: 1. | Select the Custom Outline Codes tab.
| 2. | Select the type of code (Project, Resource, or Task) by selecting the radio button.
| 3. | Highlight the outline code from the list to customize.
| 4. | Click the Rename button, replace the code name with a suitable alias, and click OK.
| 5. | Select Define Code Mask, and the Outline Code Definition dialog box appears, as shown in Figure 20.8.
Figure 20.8. The Outline Code Definition dialog box. 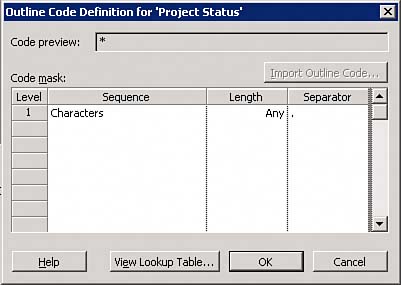
| 6. | Enter the sequence, length, and separator for each outline level by highlighting the cell and entering a value.
NOTE The separator can be selected from the predefined list, or you can use any special character by typing in the value. | 7. | Edit the lookup table and enter values for the outline code. Use the arrows to indent or outdent values in the table. Add a definition for the code by selecting the cell and entering a value. Code tables may be shared with another outline code by selecting the Share Another Code's Lookup Table check box and clicking Choose Outline Code. Project, resource, and task codes can be shared across types.
NOTE The following items should be considered when creating outline codes: Define level one as the code name and indent all other entries to create a summary level rollup when grouping. The code table is sorted alphabetically when saved. Use number prefixes if presentation order is desired. Do not use special characters in the outline code value. This may cause errors in the OLAP cube when built. Definitions are appended to the code value in the field selection presentation. Field values are the concatenated string of all levels for the selected code. PWA view's grouping titles use the definition if defined.
| 8. | Set the rules for the code.
| 9. | Select Make This a Required Code to enforce a selected value for all projects saved to the Project Server.
| 10. | Select Only Allow Selection of Codes with No Subordinate Values to force users to select only the lowest level codes in the lookup table.
| 11. | On Resource Outline Codes, select Use This Code for Matching Generic Resources to include the outline code in the match function in the Build Team function and Resource Substitution Wizard.
|
Customizing Enterprise Custom Fields Enterprise custom fields can be defined for storing task, resource, or project information. Each category contains the same type and number of custom fields. Table 20.13 describes the enterprise custom fields available. Table 20.13. Enterprise Custom FieldsField Name | Field Data Description |
|---|
Cost | Cost formatted number. Negative values are formatted as ($5.00). | Date | Valid date value. | Duration | Valid duration value. | Flag | Yes/No value. | Number | Any positive or negative number. | Text | Alphanumeric, up to 256 characters. |
To customize an enterprise field, perform the following steps: 1. | Select the Custom Fields tab.
| 2. | Select the field of code (Project, Resource, or Task) by selecting the radio button.
| 3. | Select the type of code from the list to customize (Cost, Date, Duration, Flag, Number, or Text).
| 4. | Highlight the field name from the list to customize.
| 5. | Click the Rename button, replace the code name with an appropriate alias, and click OK.
| 6. | Select Make This a Required Code to enforce a value for all projects saved to the Project Server.
| 7. | Under Custom Attributes, select the following:
- None Allows users to enter free-form values
- Value List Specifies allowed values for list
- Formula Calculates the value based on other project fields
NOTE The following items should be considered when creating enterprise custom fields: Value lists for enterprise custom fields cannot be appended by users. Enterprise custom field formulas cannot reference local project custom fields. Task-level custom fields are not available in Project Center views.
| 8. | Set calculation for task and group summary rows by selecting None, Roll-up, or Formula. The default value is None.
NOTE The following items should be considered when creating formulas: With calculation set to None, summary task values can be set manually. The calculation for task and group summary rows for text fields is available only using the formula if defined. The field type determines the rollup calculations available.
| 9. | To create a value list, select the radio button for Value List and select the Value List button to enter desired values. The Value List dialog box opens as shown in Figure 20.9.
Figure 20.9. The Value List dialog box. 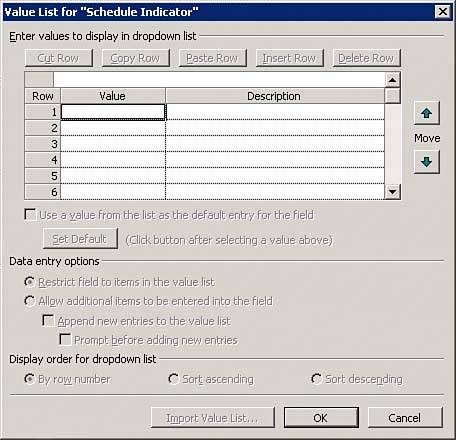
| 10. | Enter values by selecting the cell and entering the data value. Enter description text as desired.
| 11. | To set a default value, select the row that contains the default value, select the Use a Value from the List As the Default Entry for the Field check box, and click the Set Default button. The row text becomes red to denote the default value.
| 12. | Value lists can be displayed by row number or by ascending or descending order of the values by selecting the associated radio button.
| 13. | Field values can be displayed as data (the value) or graphical indicators based on user-defined conditions.
| 14. | To define graphical indicators, click the Graphical Indicators button. The Graphical Indicators dialog box appears, as shown in Figure 20.10.
Figure 20.10. The Graphical Indicators dialog box. 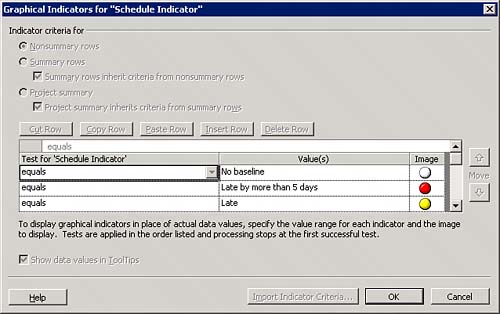
| 15. | Enter a test by selecting one of the conditional statements from the drop-down list.
| 16. | Enter a value to measure against. You can enter text or select a project field.
NOTE The Value field can contain a wildcard (? or *). | 17. | To create a calculated custom field, select the Formula radio button.
| 18. | To open the formula dialog box, click the Formula button.
| 19. | Enter the formula for the field and click OK.
| 20. | Set the calculation method for task and group summary rows by selecting None, Roll-up, or Formula.
|
Adding Custom Objects The Enterprise Global template is distributed to all Project Professional users, and any objects within the template are available. These objects can be permanently changed only by the administrator with Wave Global permissions. In a user session, objects can be modified but will not be saved on exit. There are two ways to add objects to the Enterprise Global template: Use the Organizer to copy objects from existing projects or build the objects directly in the Enterprise Global template. On installation, the Enterprise Global template contains the following two objects: The Enterprise Resource Pool is not stored as a project and does not contain objects. Build a resource table and associated view to contain the custom resource fields to simplify adding or modifying enterprise resources. |