Enterprise Options
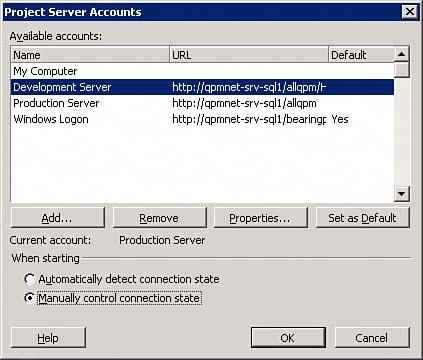
| The Enterprise Options feature is available in Project Professional by selecting Tools, Enterprise Options. Enterprise Options provides access to the enterprise configuration functionality of Project Professional. Enterprise Options is your portal for configuring the enterprise-level options for your Microsoft Project configuration. Microsoft Office Project Server AccountsYou can now work on project files in three modes: local desktop, connected to a project server instance, and offline with a Project Server schedule. When Project Professional is installed, a single account is created called My Computer, as shown in Figure 20.1. This account is used to work in the local desktop mode. When using this account, the local Global template is used as the template in all new project files created. The Global template is usually located in the \Program Files\Microsoft Office\Office11\1033 directory. Figure 20.1. The Project Server Accounts dialog box allows you to select an account to connect to.
To configure Project Professional to work with a specific Project Server 2003 instance, you must create an account to use the collaborative features of an enterprise installation. To set up an account, follow these steps:
NOTE On creating a Project Server account, the following registry is added:
The folder for offline project files is also created using the GUID in the preceding example for the folder name at C:\Documents and Settings\<User>\Application Data\Microsoft\MS Project. The new account then appears on the Project Server Accounts dialog box. To set the starting options for Project, select Automatically Detect Connection State or Manually Control Connection State. The Automatically Detect Connection State option automatically connects to the default account when you start Project. If the server is available, it connects to the enterprise Project Server. If the server is unavailable, it starts in the offline mode for that account. Manually Control Connection State presents the Project Server Accounts dialog box from which you can select the name of the account you want to use. This should be used if you use multiple Project Server accounts, you require the option to load resource summary data, or you require to work offline in local desktop mode. The specified default account is highlighted in the manual connection mode as shown in Figure 20.3. Figure 20.3. The Project Server Accounts dialog box allows you to select the connection type and the default account.
Use the Project Server Accounts dialog box to modify account properties as necessaryfor example, if the project server was moved and a different URL is used, or if you are using various Project Server accounts to test permissions on group security. After the accounts are created, you must connect to the specific project server before you can work offline with that account. On initial connection, the registry is modified to include additional information of the profile and copy the Enterprise Global template to C:\Documents and Settings\User\Application Data\Microsoft\MS Project\11\1033 under the GUID matching the offline folder name. Connection to Project Server AccountsOn starting Project Professional, depending on the Control Connection State setting, Project connects to the default account or presents the Project Server Accounts dialog box from which you can select the name of the account you want to use. In the manually controlled connection state, you also have the option to load or not load resource summary data. Tools Plus OptionsSetting the options that control the behavior of Project Professional 2003 in a Project Server 2003 environment requires an understanding of the interaction of the global templates and the specific options. When Project Professional is set up to connect to a Project Server 2003 instance, there are three global template files: Local Global, Non-cached Enterprise Global template, and the Cached Enterprise Global template. Project loads dependent on the connection. Some possible connection scenarios follow:
The Enterprise Global template does not control the environment options except for setting the currency symbol provided by the Project Server configuration feature by selecting Enforce Single Currency As Specified in the Enterprise Global Template option is elected. The following sections provide details of the environment options and precedence. The View TabThe View tab allows you to establish settings regarding the way things appear in Project Professional. Table 20.1 outlines the features available in Options when the View tab is selected, as well as what template those features apply to.
The General TabThe General tab in the Options window allows you to control what features of Project Professional appear. For example, you can select the option Open Last File on Startup, which means that the last .mpp file you viewed before closing Project Professional will open automatically the next time you connect to Project Server. Table 20.2 outlines the features available to you when selecting the General tab on the Options window and the template the features apply to.
The Edit TabThe Edit tab in the Options window allows you to control the editing features of Project Professional. For example, you can select the option Edit Directly in Cell, which allows you to edit directly in the cell of the grid (and not have to do it in the top bar). Table 20.3 outlines the features available to you when selecting the Edit tab on the Options window and the template the features apply to.
The Calendar TabThe Calendar tab in the Options window allows you to control what calendar features of Project Professional are used for your project files. For example, under the Calendar tab you can set options such as what day the week starts on, the default start time, and so on. Table 20.4 outlines the features available to you when selecting the Calendar tab on the Options window and the template the features apply to.
The Schedule TabThe Schedule tab in the Options window allows you to customize what features of Project Professional are used for scheduling in your project files. For example, you can select the default scheduling unit for resource assignments and whether you want to see a percentage or a decimal number. Table 20.5 outlines the features available to you when selecting the Schedule tab on the Options window and the template the features apply to.
The Calculation TabThe Calculation tab in the Options window allows you to customize what features of Project Professional are used when performing calculations in your project files. For example, you can select a manual calculation mode that prevents Project Professional from running automatic recalculations while you are working with your project file. This can be particularly useful if you are using the built-in function for leveling resources and don't want to see recalculation after each minor change you make. Table 20.6 outlines the features available to you when selecting the Calculation tab on the Options window and the template the features apply to.
The Spelling TabThe Spelling tab in the Options window allows you to customize the Autocorrection and Ignore options for spelling within the project files. Table 20.7 outlines the features and selections available to you when choosing the Spelling tab on the Options window and the template the features apply to.
The Collaborate TabThe Collaborate tab in the Options window allows you to customize features used for collaborating using Project Professional. For example, you can select what assignments, if any, Project Professional should publish when you save a project file. Table 20.8 outlines the features available to you when selecting the Collaborate tab on the Options window and the template the features apply to.
The Save TabThe Save tab in the Options window allows you to customize the save options available to you in Project Professional. For example, you can select the Auto Save interval so that Project Professional saves your projects every X minutes. Table 20.9 outlines the features available to you when selecting the Save tab on the Options window and the template the features apply to.
The Interface TabThe Interface tab in the Options window allows you to customize the interface options available to you in Project Professional. For example, you can select which of the indicators you want to appear in your project file. Table 20.10 outlines the features available to you when selecting the Interface tab on the Options window and the template the features apply to.
The Security TabThe Security tab in the Options window allows you to customize your security setup for Project Professional. For example, you can set the privacy options to remove information such as Author, Company, Last Saved By, and so on, from a newly created project file. Table 20.11 outlines the features available to you when selecting the Security tab on the Options window and the template the features apply to.
Using the OrganizerThe Organizer is a utility provided in Project to copy, rename, or delete objects in project schedules and templates. This allows the user to share objects from one file or template to another file or template. Table 20.12 demonstrates the objects contained in a project file/template.
TIP When creating or modifying an object, maps, toolbars, and macros are saved to the Local Global template. All other objects are saved in the active project file. To access the Organizer, select Tools, Organizer. The Organizer dialog box appears, as shown in Figure 20.4. Figure 20.4. The Organizer dialog box allows you to select the tabs for selecting the desired objects.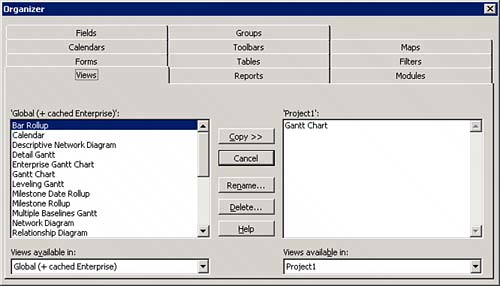 The Organizer dialog box has a tab for each type of object and a radio button to select task or resource objects on appropriate objects. Two windows list the object names based on the file selected in the drop-down list at the bottom of each window. The global template being used and any open project files will be listed. From this interface you can copy, rename, or delete objects. TIP An object used within a project file becomes a unique object in that file. Any changes to objects or any new objects are stored in the project file object and not the global object. The exceptions are maps, modules, and toolbars. To copy an object from one file to another, perform the following steps:
To delete or rename an object, perform the following steps:
Tools Plus Enterprise OptionsProject Professional provides access to enterprise functions to manage Project Server accounts, the Enterprise Global template, and the Enterprise Resource Pool, and to import projects or resources to the enterprise environment. These functions can be located using the Tools, Enterprise Options menu. Microsoft Project Server AccountsYou access Project Server accounts by selecting Tools, Enterprise Options, Microsoft Project Server Accounts. The Project Servers Accounts dialog box opens, allowing modification of your accounts.
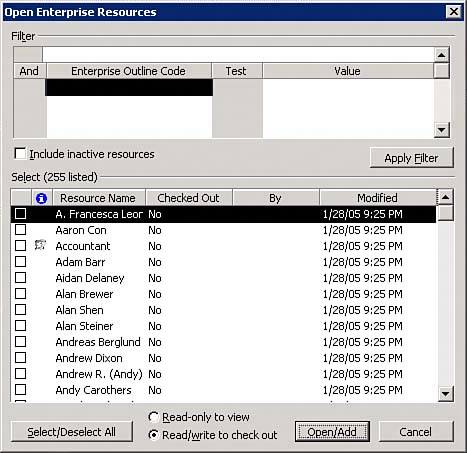
Open Enterprise Global TemplateThe Enterprise Global template is similar to your Local Global template but allows you to create enterprise standards for project schedules. When a user connects to Project Server, the Enterprise Global template is merged with the Local Global template to create the Global (+ noncached Enterprise) template. To modify the Enterprise Global template select Tools, Enterprise Options, Open Enterprise Global. NOTE You must connect with an account that has permission to Save Enterprise Global to modify it. The Enterprise Global template opens as a Checked-out Enterprise Global and displays as a blank project schedule. When the template is opened, you can create or add custom views, tables, reports, filters, groups, forms, modules, calendars, toolbars, maps, and fields that are then available to all users connected to the Project Server. NOTE The Enterprise Global template resides in the Project Server. Each version of the Global template is retained in Project Server to enable version archiving. The most recent template is the active Enterprise Global. Project must be closed and reopened to access the modifications in the Enterprise Global template. NOTE To transfer an item from a project file to the Enterprise Global template, open both files and use the Organizer to copy the item to the template. Open Enterprise Resource PoolTo modify the Enterprise Resource Pool select Tools, Enterprise Options, Open Enterprise Resource Pool. This presents the Open Resources dialog box as shown in Figure 20.5. Figure 20.5. The Open Enterprise Resources dialog box displays the resources the user has permission to see in the Enterprise Resource Pool.
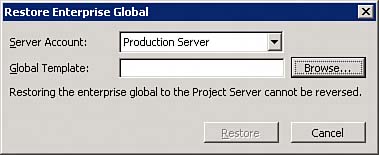
To filter the resources, select an Enterprise Outline Code and select the value. Only defined outline codes can be used. Click the Apply Filter button to filter the list based on the selections. To include inactive resources, check the Include Inactive Resources box and click Apply Filter. To select individual resources, select the box next to the resource name. Use Select/Deselect All to include all resources in the list. The Open/Add button opens the Enterprise Resource Pool and presents the selected resources in the Resource Sheet view. Resource attributes can then be modified, or new resources can be added. Import Project to EnterpriseThe Import Project to Enterprise option saves an existing local project file to the Project Server. When executed, the Import Project Wizard is initialized. Resources in the project file are automatically mapped to enterprise resources, provided that the names match. If resources are not matched, they are identified as local resources in the project file. Tasks are then listed, and local task custom fields can be mapped to enterprise task custom fields. The Import Resources to Enterprise OptionThe Import Resources to Enterprise option adds resources from a project file to the Enterprise Resource Pool. The Import Resource Wizard allows mapping of local custom fields to enterprise fields and setting of resource attributes as desired. The Backup Enterprise Global TemplateThe Enterprise Global template can be saved as a Microsoft Project template file. To back up the Enterprise Global template, select Tools, Enterprise Options, Backup Enterprise Global. The Save As dialog box opens where you can select the folder and enter a name for the backup. The Restore Enterprise Global TemplateThe Enterprise Global template can be restored from an Enterprise Global backup file. To restore an Enterprise Global template, select Tools, Enterprise Options, Restore Enterprise Global. The Restore Enterprise Global dialog box appears as shown in Figure 20.6. Figure 20.6. The Restore Enterprise Global dialog box.
Select the server account where you want to restore the template to. All Project Server accounts identified will be listed in the pull-down list. Select the backup file location and name using the Browse button. Select Restore to load the backup file to the Project Server. The restored global cannot be removed; however, you may restore again. NOTE The Work Breakdown Structure (WBS) is a local project file field. Enterprise Global cannot be restored if it contains local fields. Use the Organizer to delete those fields and repeat the restore process. | |||||||||||||||||||||||||||||||||||||||||||||||||||||||||||||||||||||||||||||||||||||||||||||||||||||||||||||||||||||||||||||||||||||||||||||||||||||||||||||||||||||||||||||||||||||||||||||||||||||||||||||||||||||||||||||||||||||||||||||||||||||||||||||||||||||||||||||||||||||||||||||||||||||||||||||||||||||||||||||||||||||||||||||||||||||||||||||||||||||||||||||||||||||||||||||||||||||||||||||||||||||||||||||||||||||||||||||||||||||||||||||||||||||||||||||||||||||||||||||||||||||||||||||||||||||||||||||||||||||||||||||||||||||||||||||||||||||||||||||||||||||||||||||||||||||||||||||||||||||||||||||||||||||||||||||||||||||||||||||||||||||||||||||||||||||||||||||||||||||||||||||||||||||||||||||||||||||||||||||||||||||||||||||||||||||||||||||||||||||||||||||||||||||||||||||||||||||||||||||||||||


EAN: 2147483647
Pages: 227