Issues
| Project managers use issues management to help organize and prioritize the current challenges that threaten project success. Issues are different from risks, in that they have already occurred and usually need some immediate attention, whereas risks are issues that may occur. Often, team members approach project managers with issues that are impeding their assignment progress. By documenting, analyzing, and assigning them to be resolved, issues are often taken care of quickly and with thought toward project priorities instead of languishing in inaction. All projects should use issues management to help resolve what's important versus what's not important in the issues that come up for a project. PWA provides a feature for defining and managing issues on each project in the repository. This facility includes the ability to describe the issue, categorize the impact of the issue, assign resolution to a resource, establish a due date, and set the status of the issue. Selecting the Issues tab reveals a list of projects you have permissions to view as shown in Figure 18.19. Figure 18.19. View and submit issues in all projects.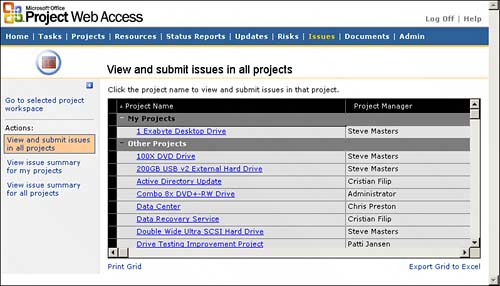 NOTE You must have Windows SharePoint Services to use issues in PWA.
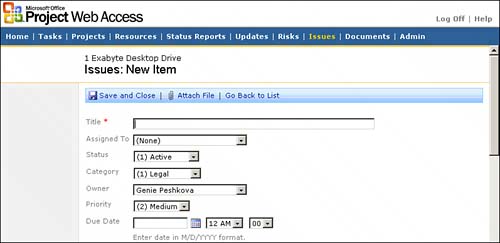
Issues SummariesOn the initial projects Issues page, you may choose to select summaries of issue statistics for all projects you can view. This allows you to see the number of active, postponed, or closed issues for your projects. This grid can then be printed or exported to Excel using the links at the bottom of the grid. NOTE The Go to Selected Project Workspace selection as shown previously in Figure 18.2 allows you to go to the workspace for the selected project if you want to view documents, risks, and issues related to a project you select. For details on the project workspace, see "Collaboration Using Windows SharePoint Services" earlier in this chapter. When you select a project name link, the issues list for that project is presented, and you can view, update, and report on issues for the project as shown in Figure 18.20. Figure 18.20. Issues list for a project in PWA.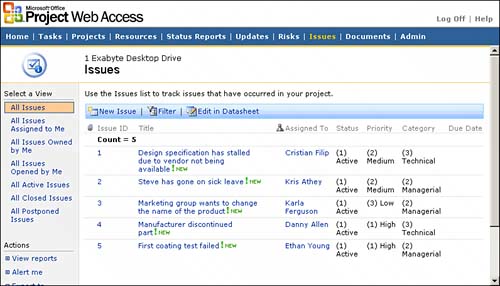 Creating IssuesTo be able to add an issue to the project you must be a member of the Team Members site group, meaning that you have an assignment within the project schedule. The project manager of a project has full permissions to add and change the issues for the project. To add an issue, perform the following steps:
NOTE When an issue is defined for a project, a graphical icon is displayed adjacent to the project within the Project Center Summary view. If an issue is attached to a specific working task, a graphical icon appears within the Project Center detail views. If you select an issue graphical icon, PWA opens the appropriate project issue group for review and updates. Editing, Deleting, and Alert Me Actions on IssuesFrom the project's issues list, the Issue ID and Title are hyperlinks that take you to the detailed view of an existing issue. From this view, you can edit, delete, or create an alert for the issue so that you can be notified about changes to that issue. Select Edit Issue, Delete Issue, or Alert Me from the toolbar. You can also click to the right of the issue title and, in the drop-down list that displays, select Edit Issue, Delete Issue, or Alert Me as shown in Figure 18.22. Figure 18.22. Drop-down list to select action on an issue.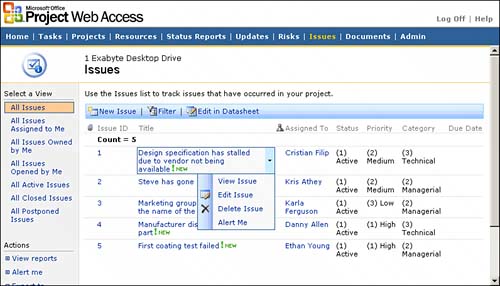 Viewing and Reporting Issue ItemsYou have several options for viewing and reporting on the issues for a project. These especially come in handy for sorting through long issues lists or analyzing the issues. Filtering IssuesTo view the issues on your project in different ways, you can select one of numerous filters under Select a View in the side pane as shown in Figure 18.22. You can also select Filter on the toolbar above the issues list and use the filters from the drop-down lists that appear above each field on the list. For example, you could view only those issues assigned to a particular team member on your project. After enabling the filtering function, the Filter button alters the Change Filter or Hide Filter choices to change or remove the filtering you have applied. View ReportsUnder Actions in the side pane, you can select View Reports. On the Report Types screen, select the kind of report you want to view. You can analyze issues by category, issue assignee, or dates. Figure 18.23 shows a report by person (the person assigned to the issue). Figure 18.23. A category issues report.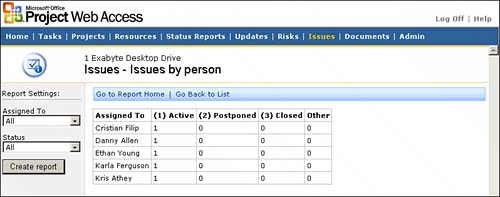 Alert MeYou can use the Alert Me option at the issue list level to receive an email to notify you of any changes for all issues in the project. You can choose to be notified when issues are added, changed, or deleted, or for all changes. You can also choose to be notified immediately or in a daily or weekly summary. NOTE This is different from the Alert Me function described previously for individual issues. You can select to be emailed about individual issues and all issues on a project. Export to SpreadsheetYou can export the issues list to an Excel spreadsheet as shown in Figure 18.24. To do so, click on Export to Spreadsheet in the Actions side pane on the issues list for the project. This is especially handy for taking the list of issues to meetings to discuss and update them within the meeting itself, or for sharing the issues list with others who may not have access to Project Server. Then, after you make changes in Excel, you can use the Synchronize with Project Server selection on the side pane to bring the changes you made in Excel into Project Server. Figure 18.24. The issues list exported to an Excel spreadsheet.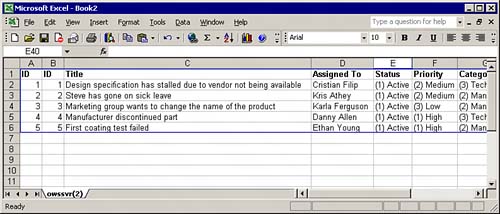 Edit in DatasheetThe issues list can also be mass edited by using the Edit in Datasheet option on the toolbar. This presents the data elements from the view in a datasheet form. You can edit the issues more easily and more quickly than in the Standard view. TIP In the Datasheet view, select the Task pane and explore the various Microsoft Office tools you can use to analyze and report on issues. For example, you can use Create an Excel PivotTable Report to chart your issues trends. Modify Settings and ColumnsThis feature allows you to make changes to the issues columns and values to customize the issues repository to match your issues management standards.
Synchronize with Project ServerUse this function to synchronize data you might have changed in Excel or Access, if you exported the issues to an Excel spreadsheet or an Access database. When you select this feature, it updates the data changed in those applications within Project Server. |

EAN: 2147483647
Pages: 227