Using the Tasks Page to Record Actual Work
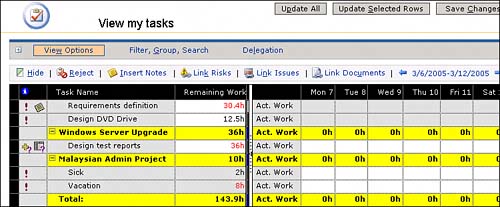
| The Tasks page allows team members to report time spent on project tasks and nonproject tasks (such as vacation or training). The project manager then approves the time on the Updates page, and, when approved, the time is automatically entered in the project schedule. The timesheet on the Tasks page also allows team members to enter estimated remaining time so that they can indicate to the project manager how much time is left on the task to complete it (also known as estimate to complete). This ability of the team member to indicate changes in original task estimates is one of the most powerful features in Project Server. However, it creates a profound challenge because most team members are not used to the concept, and many project managers are worried about how changes will affect the project schedule. You can also implement the tool without having team members use this function and capture actual work information accurately, but allowing team members to change estimated remaining time can empower them to start thinking about their time spent on tasks. To access the Tasks page from your Home page (or any other location in PWA), click Tasks in the menu bar. You see the View My Tasks screen as shown in Figure 15.1 with the tasks you have been assigned to. Figure 15.1. PWA Tasks page for reporting time spent on tasks.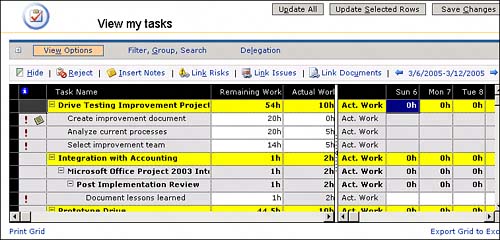 NOTE Make sure that you have a strong vision for training in the use of timesheets in Project Server. Team members not used to providing actual work information on tasks will need reassurance and a good understanding of how the information they provide helps the organization understand what it takes to complete a project. You also have some choices about how you want to implement Project Server 2003 for time tracking:
Before making a decision on which method to use, make sure that you understand the entire process needed and the implications of each option. The administrator sets which option you choose, and the way timesheets look and act will be slightly different based on this choice.
You also need to make a decision about who reports time to tasks. Generally, people doing the work will report time, including the project manager, but will resource managers ever report time or any other role using Project Server? You will want to assign the Team Member group role to anyone who will report time. Note that the project manager role already has team member settings. Project managers also need to understand several things about the timesheet update cycle:
One more decision your organization needs to make is to choose what features the team members can use on the Tasks page. Do you want them to be able to create new tasks or add themselves to existing ones? Some organizations do not like the idea of allowing team members to perform these actions. Remember, the project manager has full authority over accepting new tasks or a team member's addition to a task into a schedule. Some organizations also do not want to allow team members to delegate tasks to others. The Timesheet Update CycleThe Timesheet Update cycle defines how actual work and task progress are reflected in PWA and Project Professional. Processes need to be implemented to ensure that this cycle is completed to reflect current information. The flow for updating a timesheet and actual work into the project schedule is as follows:
Timesheet Format and SetupThe first thing you need to consider is setting up the standards for how you want the timesheet to display for the team members initially. You can set some of the formatting organizationally via a view in Admin called the Timesheet view. You may also want to recommend a few settings that the team member needs to set manually, such as adding Scheduled Work in the View Options tab.
Different Tracking Methods for TimesheetsYour organization may select one of three time tracking methods for your projects in the enterprise environment: percent work complete, actual work, and day-by-day. The following list describes each method in more detail:
Your organization may have a circumstance where you need to support several tracking methods at the same timefor example, percent work complete and day-by-day for different departments within your organization. Although this isn't recommended for creating a true enterprise environment that standard processes encourage, sometimes you may need this choice until you can transition all your departments to one timesheet tracking method. To do this, the administrator needs to allow multiple tracking methods, and each project manager needs to publish her project schedules to indicate the tracking method she wants.
NOTE If the team member has been assigned tasks from different projects with different tracking methods, if even one task is using Hours of Work done per time period as its tracking method, the Timesheet view is displayed by default. Viewing Data on the TimesheetThe main section of the timesheet is divided into two parts as shown in Figure 15.2. Figure 15.2. Grid and Timesheet entry view on the Tasks page.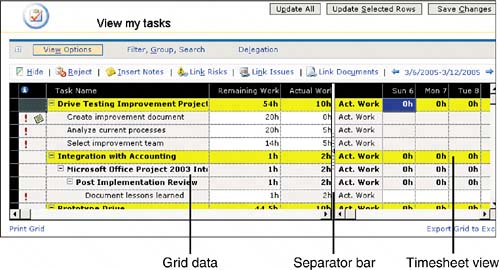 Grid DataOn the left side of the separator bar is the grid data. It shows information from the task such as name, work, start and finish dates, and so on. These fields are set by default in the Timesheet view via the Admin tab, Manage Views. You may want to add or remove some of the fields that are shown here by modifying that view. TIP The administrator may want to move the Baseline Work field into the Timesheet view. Because the Work field can change due to updates to Remaining Work and Actual Work, it is useful for the team members to see the original estimate. You also may want to move the Remaining Work column to the left, just after the Task Name field to allow for easy data entry. NOTE Do not remove the Work, Actual Work, or Remaining Work fields from the Timesheet view. They are important for calculations that will show in the view. If you remove them, the field calculations may not be accurate. One of the most important fields in the grid data is the indicator field, the column on the far left. The field displays a number of indicators that identify the status of tasks or associated information. Placing the cursor over the icon displays a ToolTip with information relevant to each task. A large "X" in this field indicates that the task has been deleted from the project schedule. Timesheet View/Gantt ChartOn the right side of the separator bar is where either the Gantt chart or the Timesheet view (not to be confused with the Timesheet view that the administrator sets in the Admin tab) can display. The Timesheet view is used for viewing assigned work and updating actual hours when entering time day-by-day. The Gantt chart is useful for understanding the relative timing, length, and order of the tasks to be performed. TIP If your organization's team members report that they can't enter their day-by-day time, it's usually because the Gantt Chart view is showing. Let them know they need to choose the Timesheet view in the side pane on the Tasks page. The Timesheet view shows either day-by-day or actual work per week. Team members can enter time only in the day-by-day Timesheet view. Otherwise, they enter % complete or actual work in the grid data area to the left of the separator bar. The Gantt chart does not allow any data entry. This will probably not be used very often by team members, but it may be used to understand overall task timelines. You can use the Go to Task icon to bring the Gantt bar for a particular task into view. To do so, highlight the task, and then click the Go to Task icon. The Zoom In/Zoom Out icons allow you to easily change the timeline scale, from day-by-day to week-by-week or month-by- month. Figure 15.3 shows the Zoom In/Zoom Out and Go to Task icons on the Gantt Chart view. Figure 15.3. The Gantt Chart view with the Zoom In/Zoom Out and Go to Task icons.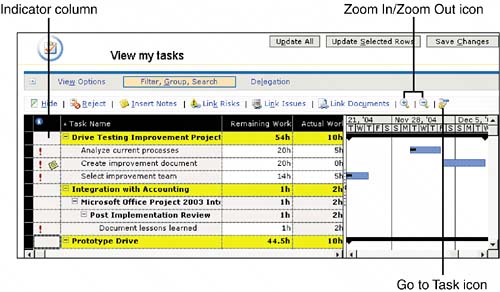 The team member can choose either display by selecting Timesheet View or Gantt Chart in the upper-left corner of the side pane as shown in Figure 15.4. Figure 15.4. View Options for the Timesheet view.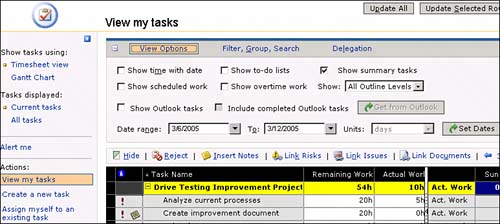 NOTE If the timesheet tracking method is set to % Work Complete or Actual Work and Work Remaining, the Gantt Chart view is displayed by default, and team members enter their data in the grid portion of the timesheet. If the timesheet tracking method is set to Hours of Work done per time period, the Timesheet view is displayed by default. Current Tasks/All TasksBy default, only current tasks are displayed when you first enter the Tasks page. Current tasks are those currently in progress or scheduled to start in the near future. The administrator specifies the number of days from the current date that the current tasks view will show (10 days is a default setting). You can also choose to view all tasks, which displays every task assigned to you. Figure 15.4 shows where the team member can choose to view Current Tasks or All Tasks. TIP Sometimes team members say they do not have tasks in their timesheet, when the project managers know they have assigned the task. This could be due to a task not scheduled for the current time period. Make sure that the team members choose All Tasks, to confirm that the task shows in the tasks list. View OptionsYou can manually set up what displays on the Tasks page via the View Options tab. Figure 15.4 shows some of the selections you have in the View Options tab when you are in the Timesheet view. What shows in this tab changes based on whether you are in the Timesheet view or the Gantt Chart view. Usually, the defaults set are sufficient, but you might be interested in instructing your team members about a few of them:
You can also set the date range to see a different range of dates in your timesheet. You can change it to just a day, a few days, a week, two weeks, or whatever time period is most useful for you to see and then record actual work. To change the currently displayed options or dates, you can click on the View Options tab. To hide the options, click on the tab again. Filter, Group, SearchThe Filter, Group, Search tab can help you view your task list from different perspectives. One of the most useful options on this tab is Filter. You may filter out task subsets you want to see as shown in Figure 15.5. For example, you could look at just recently assigned tasks by selecting Newly Assigned Tasks, or you might use Completed Tasks to view and then remove tasks you have completed work on (using the Hide function). You may want to use the Group field to group the tasks list by whatever fields shown in the grid, such as Project, Project Manager, or Work. However, the Project grouping is the default, and you usually will not need to change the grouping. The Search For selection finds characters or words you might need to find in the grid data. Figure 15.5. Filters for viewing tasks in the timesheet.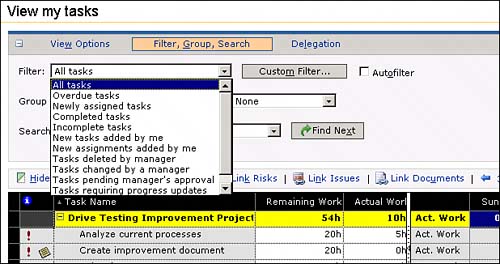 Sizing/Moving Columns Around on the TimesheetYou also have several options to customize the look and feel for your timesheet as described in the following list:
After you choose these settings, they will persist, so that when you log off and then log on to a new session, the task list will look the same as when you last saw it. Entering Time on TasksYou can enter actual work or day-by-day work for a given time period. In all cases, the Tasks page contains a Remaining Work field for the team member to provide a complete picture of the progress being made on the assignment. Your organization will have decided on one of three choices for entering time:
To enter time for a day-by-day timesheet, follow these steps:
After you are finished entering actual task work for the current reporting period, click on one of the following buttons in the upper-right corner of the Tasks page:
When you enter actual work in the timesheet, the entry turns red to indicate that the actual task assignment work has been entered but not approved and saved. This remains red until the project manager approves the update, saves the project plan, and publishes the changes. If you see black in the timesheet, the project manager has accepted the time into the schedule. Editable fields are shown in white. Time entry fields that appear in gray are closed due to your organization using the Managed Time Period feature. Tasks that have been delegated to others are highlighted in yellow. NOTE If a project manager rejects a task update, you will receive an email notification and an indicator icon will display in the indicator field. Action Bar ActionsThe Tasks page action bar allows you to perform the following actions on tasks, where each of the actions is performed by selecting a task in the task sheet and then clicking on the appropriate button in the menu:
Alert MeThe Alert Me function in the side pane takes you to the same email notification settings page you find on the home page. You can configure task-related events you want to be notified about.
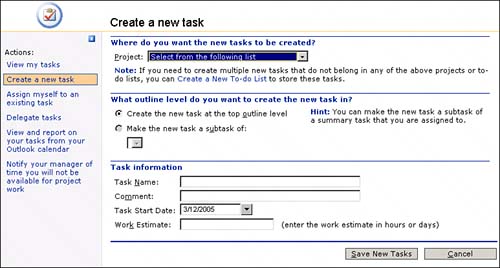
Creating a New TaskThis feature is useful for team members to communicate about tasks that have been forgotten or that were unplanned. As you start working on a project, you may realize that the project manager has not created a task that you need. This may be because you have better knowledge about the tasks required to accomplish the project goal or the scope of the project changes requiring additional tasks. Some organizations also create project schedules that contain unplanned tasks, such as trouble tickets. This allows team members to add a task and then report actual work, without the project manager having to add them first in the project schedule. When you create a new task you need to
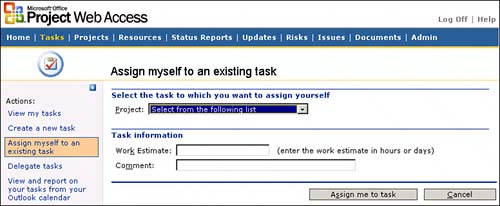
NOTE The project manager needs to carefully review new tasks. He may need to reject the new task, change the work hours planned for the new task, or move it to a different place in a task hierarchy of the project schedule. The project manager still needs to review how it affects the work breakdown structure, linking, and the critical path and end date for the project. Assigning Myself to a New TaskAt times, you need to add yourself to an existing task because you have been asked to do some work that was not originally planned, you need to take the work over from someone else, or perhaps you need to replace a generic resource skill that was assigned to a task by the project manager. To add yourself to an existing task, perform the following:
NOTE The project manager needs to review the new task assignments resulting from resources adding themselves to existing tasks. She may need to adjust the hours in another resource assignment if this resource is taking over the task assignment. If this resource is helping another resource, the project manager may need to check to make sure that it will not increase the duration of the task. Delegating TasksSometimes it may be useful to transfer a task assignment to another resource using the Delegate Tasks function as shown in Figure 15.11. Some organizations use this feature when a project manager assigns tasks to a team lead, and then the team lead delegates the task to someone specific on his team. Some organizations send tasks to the resource manager, expecting him to then delegate the task to resources available in his department. When tracking delegated tasks, the actual values are reflected in your timesheet but do not require updating. Figure 15.11. Delegating a task to another resource.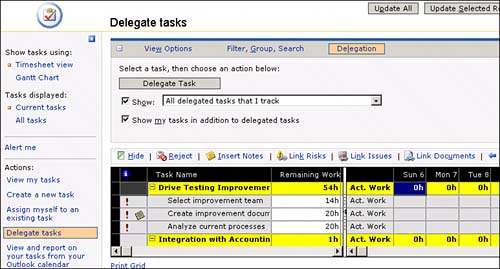 Delegate a task by selecting the task or tasks to delegate and then clicking the Delegation tab on the Tasks page, or select Delegate Task from the side pane. You need to select Delegate Tasks on the pane that then appears to see the Delegate Tasks Wizard to start the delegation process. You may choose a summary task to select all the subtasks for delegation. If any tasks you select cannot be delegated, you see a message informing you that some of the tasks cannot be delegated. Choose the Show Details button in this dialog box to see which tasks cannot be delegated and why. You may not be able to delegate a task for one of several reasons:
When you are ready to delegate the task, you see a wizard that lets you select what you want to do, as follows:
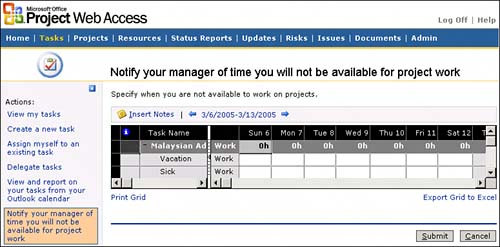
Email notifications inform everyone about what has happened to a task that is being delegated. When you delegate a task, an email notification goes to whom you have delegated the task and to the project manager of the task. If the project manager rejects the delegation, you and the delegated resource will be notified, and you retain responsibility for the task. If the delegated resource rejects the delegated task, you and the project manager will be notified. Requesting the Status of a Delegated TaskIf you have the lead role in tracking a delegated task, you can request an update from the resource that's been delegated the task. To do so, select the task and click the Request Task Status button on the Delegation tab. Viewing and Reporting on Your Tasks from Your Outlook CalendarIf your organization uses Outlook heavily and some of your users prefer working from Outlook, you can download the timesheet update function to work within Outlook. You can select to download the Outlook add-in from here or from the home page to update Tasks and view PWA dashboards or links from Outlook instead of using PWA. Before this add-in will work, the PWA administrator must allow the Integration with External Timesheet System permission. When you use the Outlook download, make sure that you have permission as the local administrator, or that your Windows policies allow you to perform this installation. Notifying Your Manager of Nonproject TimeIf your organization chooses to use administrative projects to record nonproject time, you will be assigned to tasks such as administration, vacation, training, and so on, in a special project. These tasks display at the bottom of your timesheet.
This feature allows you to notify your manager of upcoming time you will not be available via this special administrative project. Then, you will be shown as not available to work during that time in the future, just like any other project in the enterprise environment. When you in fact need to report the actual time, you will just enter the time into the Actual Work field of the timesheet for the task. To notify your manager of time you are taking off in the future, follow these steps:
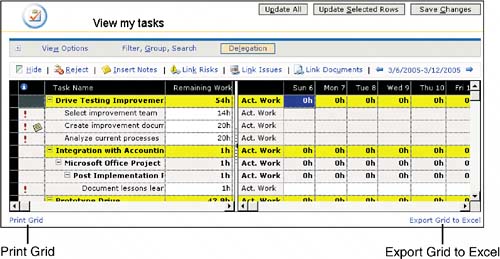
This request is submitted to your resource manager for approval and saved into a special project that records your request for future time off, training, or other nonproject activity. The time you have requested shows as Scheduled Work for that task in the Timesheet view if you checked Show Scheduled Work on the View Options tab. When you actually take the time off, you enter the actual work as usual in your timesheet to reflect the actual hours you spent on the nonproject time. Printing the Timesheet/Using ExcelYou can use the Print Grid function to print the timesheet or export it to Excel. In some cases, you may have so many tasksthe size limit of characters or data may be exceeded if you choose to print the gridthat you need to export the data to Excel. Whichever you use, the Print Grid or the Excel spreadsheet, you might like to use this function to print your timesheet for the week, keep it by your desk, and then enter your time for each day. Subsequently, at the end of the week, you can easily transfer your time to the timesheet in Project Server. Some organizations use this function for managerial signature approval or other kinds of record-keeping the organization may require. To select the Print Grid or Export Grid to Excel, follow these steps:
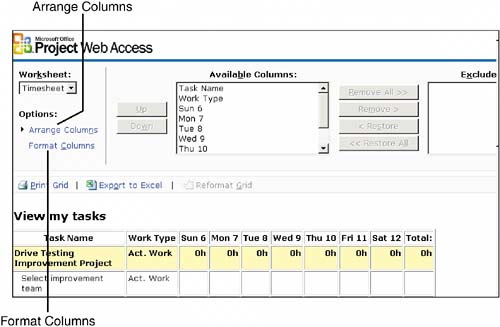
Timesheet or Grid Data WorksheetWhen you choose Print Grid, a separate window displays. You can change the Worksheet format to Timesheet (which shows only the task list and actuals for the time period showing) or a Grid Data (which shows fields for the tasks, such as scheduled work, % complete, start/finish dates, and other task-related data). For each of these selections, you can choose to Arrange Columns and/or Format Columns as shown in Figure 15.13. When you choose to arrange columns, follow these steps:
When you choose to format columns, select a column and then choose to allow or disallow column wrapping, allow or customize the column width, and/or set the column alignment. Exporting the Timesheet to ExcelYou can also export your timesheet to Excel. This allows you to show the Grid Data and Timesheet data in an Excel spreadsheet. Some organizations use this to add comments to the timesheet that might not be appropriate as task comments that would stay in the schedule. It allows you to print large collections of task data, whereas the Print Grid function has limitations. Customizing the TimesheetYour organization may need to add fields to timesheets so that team members can add custom data for your organization. For example, perhaps the project manager needs to record the task's billing code, and you need to record the information when you are entering time. You can do so through a series of steps to set up the timesheet to allow this customized reporting.
|

EAN: 2147483647
Pages: 227