Building Web Applications with XSLT-CWP
| < Day Day Up > |
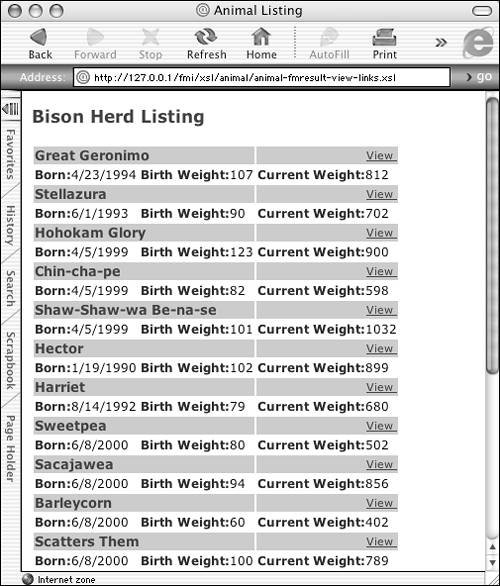
| All of the examples shown so far consist of one query at a time. And so far the examples have all been oriented toward displaying search results. In this section, we'll demonstrate some techniques for building multi-screen sites that allow you to navigate smoothly between different views of your data, and allow you to create, edit, and delete records as well. Building a "View Detail" LinkSuppose you envision something more interesting ”for example, the capability to click a View link in the list view and come to a new screen with more detailed information on the record. To do this, the View link needs to consist of another Custom Web Publishing URL, one that links to a stylesheet that searches for one specific record, and displays information about it. That URL will look like this: <a href="animal-detail.xsl?-recid=2&-find">View</a> (This assumes, by the way, that the animal_detail.xsl file is in the same directory as the list view file, so as to be accessible via a relative URL.) What's new in this URL is the -recid parameter. FileMaker stores a unique identifier of its own for each database record. This identifier is internal to FileMaker and is in addition to any primary key fields you may define. In Custom Web Publishing, the fmresultset grammar (among others), contains the record ID for each returned record (it's in the record-id attribute of the <record> element) ”so you have access to the record ID in your stylesheets. Additionally, if your XSL URL contains the -recid parameter, and a database action of -find , the Web Publishing Engine attempts to find that specific record, which is exactly the behavior you want. Figure 23.13 shows how you might like the new Web page to look. Figure 23.13. You might like to add a simple View link to the HTML list. The strategy, then, is to retool the earlier record list stylesheet so that it contains links to the detail stylesheet. Each link needs to reference a specific record ID. Second, a stylesheet needs to be written for the detail view. The first thing to consider is the modified stylesheet that includes a View link. It's presented as Listing 23.4. Listing 23.4. Stylesheet for a List with a View Link <?xml version="1.0" encoding="UTF-8"?> <xsl:stylesheet version="1.0" xmlns:fmrs="http://www.filemaker.com/xml/fmresultset" xmlns:xsl="http://www.w3.org/1999/XSL/Transform"> <?xslt-cwp-query params="-grammar=fmresultset&-db=Animal&-lay=web &-findall"?> <xsl:output doctype-public="-//W3C//DTD HTML 3.2 Final//EN" indent="yes" method="html"/> <xsl:template match="/fmrs:fmresultset"> <html> <head> <title>Animal Listing</title> <STYLE MEDIA="screen" TYPE="text/css"> H3 { font-weight:800; font-size:12.5pt; font-family:verdana,helvetica,arial; color The code is similar to Listing 23.3. The main difference is in the added link, which is placed in its own table cell (we added some additional CSS styling for this cell as well). The text View is wrapped in an <a>...</a> tag pair. To output the href attribute, we use the <xsl:attribute> tag. For the href , we provide the name of the stylesheet we'll be using to view the record detail, which we've named animal-detail.xsl . We've also added a query string that picks the record-id attribute out of the current <record> element and adds a database action of -find . Now consider what animal_detail.xsl might look like. It's a straightforward stylesheet, and appears as Listing 23.5. Listing 23.5. Stylesheet to Produce a Detail View<?xml version="1.0" encoding="UTF-8"?> <xsl:stylesheet version="1.0" xmlns:fmrs="http://www.filemaker.com/xml/fmresultset" xmlns It was relatively easy to take the list view stylesheet and move a few things around to get the stylesheet shown in Listing 23.5. In addition to changing the styling and formatting of the data somewhat, and adding the Gender field, the only other significant change is in the setup of the static query parameters, where we've changed the database action from -findall to -find . Remember that the stylesheet still uses any additional parameters coming in unless the static parameters override them. Because we don't override the inbound -recid , the stylesheet accepts it and uses it as the basis for the database search. Using Tokens to Share Data Between StylesheetsSuppose you wanted to build a list-and-detail page arrangement like the one in the previous section, but you wanted to add the capability to page through records in "detail" mode. You'd like to have a Next and a Previous link on the detail screen, so that you can flip between records without having to go back through the list view. The Web page might appear as in Figure 23.14. Figure 23.14. A detail view of an animal record with links added to allow paging between records.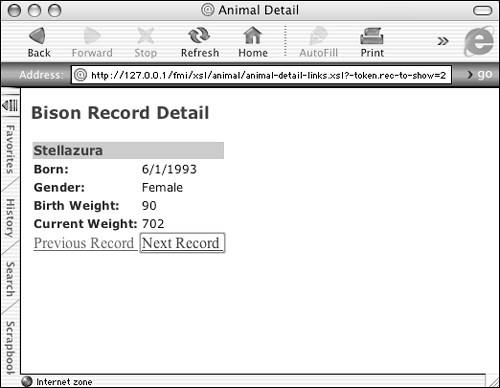 Well, the links to do this will presumably look just like the links used to get from the list view to an individual detail view. Those links, again, look like this: <a href="animal-detail.xsl?-recid=2&-find">View</a> The Next and Previous links will look just like this, but will reference the record IDs of the next and previous records. You might think at first glance that you need to pass these record IDs from the list stylesheet over to the detail stylesheet, but this doesn't quite work. After you begin paging through the records in detail view, you'll quickly "use up" the record IDs that were passed in, and you won't know where to go next. To do this correctly (well, more correctly), you need to change the way the detail page works. Previously we accessed the detail page with a -recid parameter and a -find action, instructing the Web Publishing Engine to search for one specific record ID, and display just that record. What you want to do now is ask instead for a -findall action, but only display the one chosen record. Because you'll have access to all the records in the set, you'll still be able to pull out the next and previous record IDs to use in the Next Record and Previous Record links. To do things this way, you don't want to pass in the record ID as a -recid parameter anymore. The action specified for the detail page is going to be a -findall , so passing an explicit -recid could be confusing (to a programmer if not to the software!). You need another means to pass along the record ID. To do this, you can use a CWP tool called a token . A token is a named piece of information (much like a variable) that you can pass in a CWP URL and that the target stylesheet can then extract. A URL that included a token for the specific record ID to show might look like this: <a>href="animal-detail-links.xsl?-token.rec-to-show=3 Tokens in the URL are denoted by the -token parameter, with a suffix that gives the token its own unique name. You need to provide a -token parameter and a unique name for each token you want to pass. NOTE There's no limit to the number of tokens you can pass, or to the size of the data you can pass with them, except for that imposed by the HTTP standard. If you're passing tokens via the URL itself (an HTTP GET request), you're probably limited to at most a few hundred characters in the URL. If you're passing the tokens via a form, there should be no limit to the number of tokens nor the amount of data passed. To do this in the list/detail arrangement, you need to modify the View links in the list page to include a token for the current record ID. Then you need to modify the detail page to cause it to find all records, limit the display to the record ID corresponding to the passed token, and generate Next and Previous links based on the record IDs of the records before and after the record displayed. Listing 23.6 contains a code fragment showing how you can rewrite the View link from Listing 23.5 to pass the current record ID as tokens. Listing 23.6. A Record Detail Link Containing a Record ID Token<a> <xsl:attribute name="href">animal-detail-links.xsl?-token.rec-to-show=<xsl:value-of Now that you have a link that passes along the current record ID as a token, you need to add some code to the detail view that will extract these tokens, as well as some code to generate Next and Previous links based on the current record ID. This is actually a bit tricky. It turns out that the Web Publishing Engine provides a way for you to access any request parameter from within a stylesheet. You could use this technique to access a token value, or the specific values of search criteria, or the name of the requested database ”anything that was sent in the query string that was part of the calling URL. The Web Publishing Engine passes all this information to every stylesheet via an XSL parameter . XSL parameters look a lot like function parameters: They're values that are passed in to your stylesheet "from the outside" and are available to you under specific names . Suppose you access the detail stylesheet with this URL: http://192.168.101.100/fmi/xsl/animal/animal-detail.xsl?-token.rec-to-show=3 If you then issue the following command within the stylesheet: <xsl:param name="request-query" /> this creates an XSL variable, called $request-query , which contains the following XML document fragment: <query action="animal-detail.xsl" xmlns="http://www.filemaker.com/xml/query"> <parameter name="-token.rec-to-show">3</parameter> </query> Note that the <query> element defines a new namespace! To access this document fragment, you need to add a matching namespace declaration at the top of your stylesheet. Assume you add the following namespace declaration: xmlns:fmq="http://www.filemaker.com/xml/query" You can then access your token via an expression of the following type: $request-query/fmq:query/fmq:parameter[@name = '-token.rec-to-show'] NOTE As we get into more advanced Custom Web Publishing, we'll be getting into more advanced XSLT as well. We'll touch on a number of the major significant XSLT topics as we go, but this book is no substitute for a solid grounding in XSLT, and you'll need that grounding to get the most out of Custom Web Publishing. XSL variables and XSL parameters are somewhat more advanced XSL concepts. We recommend you study them thoroughly in the XML reference guide of your choice. See Appendix A, "Additional Resources," for a list of recommended readings . To see how to use these tokens in the detail page, it's best just to see the whole page and then look at it piece by piece. It's shown as Listing 23.7. Listing 23.7. Stylesheet Showing a Single Record with "Next" and "Previous" Links<?xml version="1.0" encoding="UTF-8"?> <xsl:stylesheet version="1.0" xmlns:fmq="http://www.filemaker.com/xml/query" xmlns:fmrs="http://www.filemaker.com/xml/fmresultset" xmlns:xsl="http://www.w3.org/1999/XSL/Transform"> <?xslt-cwp-query params="-grammar=fmresultset&-db=Animal&-lay=web&-findall"?> <xsl:output doctype-public="-//W3C//DTD HTML 3.2 Final//EN" indent="yes" method="html"/> <xsl:param name="request-query"/> <xsl:variable name="rec-to-show"> <xsl:value-of select="$request-query/fmq:query/fmq:parameter [@name = '-token.rec-to-show']"/> </xsl:variable> <xsl:variable name="document-path"> http://127.0.0.1/fmi/xsl/animal/animal-detail-links This stylesheet shows off quite a number of new XSLT-CWP techniques. We go through them one by one. In the first place, we've added a new namespace declaration: xmlns:fmq="http://www.filemaker.com/xml/query" As we said before, this is mandatory if you're going to be able to access individual request parameters, as you'll see shortly. Next, we've changed the statically-encoded database action from -find to -findall . This is in keeping with our new strategy, which is to fetch all the records and then sift through them to find a particular one. CAUTION In general, fetching all records here would not be a good idea. You'd want to use some combination of the -max and -skip parameters to fetch the records in groups. See Table 23.3 for some notes on -max and -skip . Table 23.3. Custom Web Publishing Database Action Commands
Next, we declare one stylesheet parameter and two XSL variables , as shown in Listing 23.8. Listing 23.8. Extracting a Token from a Request<xsl:param name="request-query"/> <xsl:variable name="rec-to-show"> <xsl:value-of select="$request-query/fmq:query/fmq:parameter [@name = '-token The <xsl:param> statement provides access to the data passed to the stylesheet under the name request-query . The following <xsl:variable> statement reaches into the XML that's contained in the request-query variable, and digs out the parameter called -token.rec-to-show , which is the token passed from the list view. This value is now available under the name rec-to-show . Finally, we set up another variable, called document-path , which contains the path to the detail stylesheet. We need to use it in several places later, and it's always a better idea to pull out such "magic values" and keep them in one place, instead of having to update them in several places if something changes. The next change is in the <xsl:for-each> selector used to pick out the record of interest. In the previous version, we simply looped over all instances of the <record> element, knowing there would only be one. Here, because the action is -findall , all the records are available, and we need to make sure to select only the one we're interested in. We do it like this: <xsl:for-each select="/fmrs:fmresultset/fmrs:resultset/fmrs:record [@record-id=$rec-to-show]"> The expression in square brackets is known in XSL as a predicate . It's a logical test that has the effect of limiting the previous expression to just those elements that match the predicate expression. So, rather than selecting all <record> elements, it selects only those whose record-id attribute is equal to the rec-to-show variable (which we already set equal to the token passed from the list view). At the same spot, we take the opportunity to look at the records before and after the one we're displaying, and store their respective record IDs in different XSL variables, as shown in Listing 23.9. Listing 23.9. Using the "Sibling" Axes<xsl:variable name="rec-previous"> <xsl:value-of select="preceding-sibling::fmrs:record/@record-id"/> </xsl:variable> <xsl:variable name="rec-next"> <xsl:value-of select="following-sibling::fmrs:record/@record-id"/> </xsl:variable> To make this technique work, we use some special XSL axes called preceding-sibling and following-sibling. These expressions enable us to step back or forward one record within the <resultset> element, and then reach in and grab the record-id attribute. If we're on the first or last <record> element, these expressions won't find anything, and we'll end up with a blank value, which is fine. All that's left is to write some code that creates the Next and Previous links, based on whether the next and previous record IDs are empty or not (see Listing 23.10). If not (meaning we're on the first or last record), no link is generated. Listing 23.10. XSL Code for Next and Previous Links<tr> <td class="record-link"> <xsl:if test="$rec-previous !=''"> <a> <xsl:attribute name="href"><xsl:value-of select="$document-path"/> ?-token To generate each link, we use <xsl:if> to test whether the relevant record ID is empty or not. If it's empty, we output nothing. Otherwise we output an HTML link with a URL based on our document-path variable, which also passes the correct record ID in the -token.rec-to-show parameter. This example introduced a fair number of additional XSL constructs, such as stylesheet parameters, XSL variables, and some of the more advanced expression axes. It also introduced a number of concepts peculiar to XSLT-CWP, such as token passing and the capability to extract request parameters within a stylesheet. We recognize that these are advanced concepts, so we suggest you start by understanding the supplied demo files and begin modifying them to experiment with these techniques. Using a Stylesheet to Delete a RecordSo far, all our actions have involved searching for records. But it's also possible to send the Web Publishing Engine a URL with a query string that contains a command to create, edit, or delete a record as well. Suppose you have a list view in HTML, like those you've already looked at, and you want to add a link to each row that enables to delete the record. Let's also say you want to see some kind of confirmation screen before you actually perform the delete, and you further want some way to know the deletion has been performed. This can be done with three separate Web pages: the list view, a page that shows a yes/no confirmation message, and a page that confirms that the deletion has actually occurred. The flow of the pages might look like Figures 23.15, 23.16, and 23.17. Figure 23.15. A new list view of animals with a Delete link.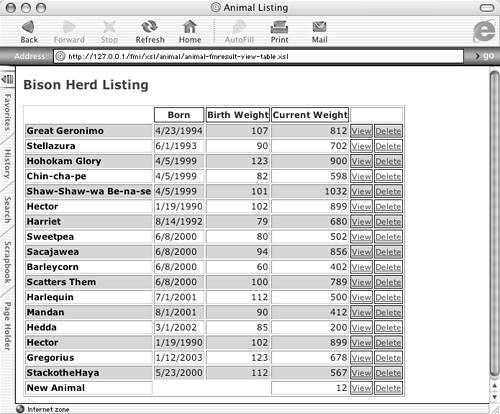 Figure 23.16. A small screen to prompt the user to confirm the deletion.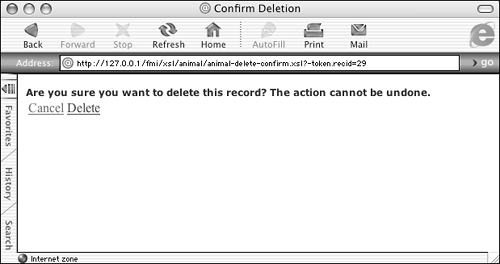 Figure 23.17. A final screen to confirm the deletion and enable the user to return to the list.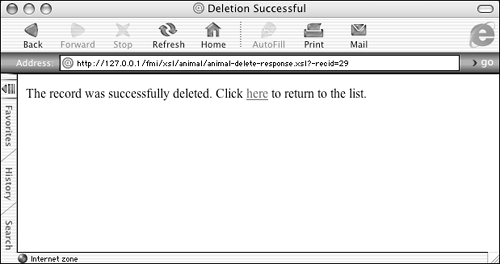 To accomplish this, you need a link in the list view that passes the user over to delete-confirm.xsl , and passes the record ID as a token. The delete-confirm.xsl page does very little: It just interrogates the user as to whether to proceed with the deletion. If the user decides not to delete, she's returned to the main list view. If she decides to go ahead with it, she's brought to delete-response.xsl , which is the page that actually performs the deletion and informs the user of the results. Take a look at the code for the three pages. First is the code for the list view. We've modified the page so that it presents the records in an ordinary table grid, with View and Delete links at the end of each line. We've also added a little code to color alternate rows. The code is shown in Listing 23.11. Listing 23.11. Stylesheet for a Table with View and Delete Links <?xml version="1.0" encoding="UTF-8"?> <xsl:stylesheet version="1.0" xmlns:fmrs="http://www.filemaker.com/xml/fmresultset" xmlns:xsl="http://www.w3.org/1999/XSL/Transform"> <?xslt-cwp-query params="-grammar=fmresultset&-db=Animal&-lay=web&-findall"?> <xsl:output doctype-public="-//W3C//DTD HTML 3.2 Final//EN" indent="yes" method="html"/> <xsl:template match="/fmrs:fmresultset"> <html> <head> <title>Animal Listing</title> <STYLE MEDIA="screen" TYPE="text/css"> H3 { font-weight:800; font-size:12.5pt; font-family:verdana,helvetica,arial; color:#333333;} .label {font-weight:800; font-size:9pt; font-family:verdana,helvetica,arial; color:#000099;} .data {font-weight:300; font-size:9pt; font-family:verdana,helvetica,arial; color:#000000;} .number-data {font-weight:300; font-size:9pt; font-family:verdana,helvetica,arial; color:#000000; text-align:right;} .view-cell { text-align:right; font-weight:300; font-size:8pt; font-family:verdana,helvetica,arial; color:#000099;} </STYLE> </head> <body> <H3>Bison Herd Listing</H3> <table border="1"> <tr> <th> <xsl:text>&nbsp;</xsl:text> </th> <th class="label">Born</th> <th class="label">Birth Weight</th> <th class="label">Current Weight</th> <th colspan="2"> <xsl:text>&nbsp;</xsl:text> </th> </tr> <xsl:for-each select="/fmrs:fmresultset/fmrs:resultset/fmrs:record"> <tr> <xsl:if test="position() mod 2 = 1"> <xsl:attribute name="bgcolor">#cccccc</xsl:attribute></xsl:if> <td class="data"> <b> <xsl:value-of select="fmrs:field[@name='name']/fmrs:data"/> </b> <td class="data"> <xsl:value-of select="fmrs:field[@name='date_birth']/fmrs:data"/> </td> <td class="number-data"> <xsl:value-of select="fmrs:field[@name='weight_birth']/fmrs:data"/> </td> <td class="number-data"> <xsl:value-of select="fmrs:field[@name='weight_current']/fmrs:data"/> </td> </td> <td class="view-cell"> <a> <xsl:attribute name="href">animal-detail.xsl?-recid=<xsl:value-of select= "@record-id"/> </xsl:attribute>View</a> </td> <td class="view-cell"> <a> <xsl:attribute name="href">animal-delete-confirm.xsl?-token.recid=<xsl:value-of There's not a great deal that's new in this stylesheet, other than the reformatting into a table layout, and the addition of the Delete link. You'll notice that this link points to a page called animal-delete-confirm.xsl , and passes the record ID of the current record across to that page in a token called -token.recid . With that in mind, now look at the code for the deletion confirmation page, which is presented in Listing 23.12. This page performs no database actions; it merely confirms that the user wishes to perform the specified deletion. Listing 23.12. A Stylesheet for a Deletion Confirmation Page <?xml version="1.0" encoding="UTF-8"?> <xsl:stylesheet version="1.0" xmlns:fmq="http://www.filemaker.com/xml/query" xmlns:fmrs="http://www.filemaker.com/xml/fmresultset" xmlns:xsl="http://www.w3.org/1999/XSL/Transform"> <?xslt-cwp-query params="-grammar=fmresultset&-process"?> <xsl:output doctype-public="-//W3C//DTD HTML 3.2 Final//EN indent="yes" method="html"/> <xsl:param name="request-query"/> <xsl:variable name="rec-to-delete"> <xsl:value-of select="$request-query/fmq:query/fmq:parameter [@name = '-token.recid']"/> </xsl:variable> <xsl:template match="/fmrs:fmresultset"> <html> <head> <title>Confirm Deletion</title> <STYLE MEDIA="screen" TYPE="text/css"> .label {font-weight:800; font-size:9pt; font-family:verdana,helvetica,arial; color:#000099;} </STYLE> </head> <body> <span class="label">Are you sure you want to delete this record? The action cannot be undone.</span> <table> <tr> <td> <a href="http://127.0.0.1/fmi/xsl/animal/animal-fmresult-view-table.xsl">Cancel</a> </td> <td> <a> <xsl:attribute name="href">http://127.0.0.1/fmi/xsl/animal/animal-delete-response.xsl? -recid=<xsl This stylesheet is a little different from those you've worked with thus far, in that it doesn't perform any database action. This is signified by the statically-encoded -process action in the <?xslt-cwp-query?> processing instruction. The -process command tells the XSL processor to process the stylesheet without interacting with FileMaker Server at all. This is useful in stylesheets that don't need to touch a database: It keeps the load on the server from being heavier than it needs to be. This stylesheet contains code to extract the -token.recid from the query parameters. The code is identical to that in Listing 23.8. The stylesheet presents an HTML page that asks the user whether he wants to perform the deletion, and gives two choices, each one formatted as an HTML hyperlink. The first link, Cancel, takes the user back to the list view and performs no action. The second, Delete, passes the selected record ID along to a page called animal-delete-response.xsl . Let's now look at the code for the third page, presented as Listing 23.13. Listing 23.13. A Stylesheet for a "Deletion Response" Page <?xml version="1.0" encoding="UTF-8"?> <xsl:stylesheet version="1.0" xmlns:fmrs="http://www.filemaker.com/xml/fmresultset" xmlns:xsl="http://www.w3.org/1999/XSL/Transform"> <?xslt-cwp-query params="-grammar=fmresultset&-db=Animal&-lay=web&-delete"?> <xsl:output doctype-public="-//W3C//DTD HTML 3.2 Final//EN" indent="yes" method="html"/> <xsl:template match="/fmrs:fmresultset"> <xsl:variable name="error-code"> <xsl:value-of select="fmrs:error/@code"/> </xsl:variable> <xsl:variable name="doc-title"> <xsl:choose> <xsl:when test="$error-code !=0">Deletion Error</xsl:when> <xsl:otherwise>Deletion Successful</xsl:otherwise> </xsl:choose> </xsl:variable> <html> <head> <title> <xsl:value-of select="$doc-title"/> </title> <STYLE MEDIA="screen" TYPE="text/css"> .label {font-weight:800; font-size:9pt; font-family:verdana,helvetica,arial; color:#000099;} </STYLE> </head> <body> <xsl:choose> <xsl:when test="$error-code !=0"> <span class="label">Sorry, there was an error deleting the records. (Error code = <xsl:value-of select="$error-code"/>)</span> </xsl:when> <xsl:otherwise>The record was successfully deleted.</xsl:otherwise> </xsl:choose> Click <a href="http://127.0.0.1/fmi/xsl/animal/animal-fmresult-view-table.xsl">here </a> to return to the list. </body> </html> </xsl:template> </xsl:stylesheet> There are a few new twists in this stylesheet. By the time this page is reached, the user has confirmed that she does indeed want to perform a deletion. The ID of the record to delete has been passed to the page, this time in the standard -recid query parameter. We've statically coded the rest of the query parameters, including the database name, layout, and the database action, which now is called -delete . The -delete action looks for an inbound -recid , and if it finds it, it tries to delete that record. There's something new in this stylesheet that really should be present in every stylesheet you write, namely error handling. In general, it's a bad idea to assume that a database operation will succeed. Even for a simple search, the search might contain no valid criteria, or you might misspell a database name, or the connection between the Web Publishing Engine and FileMaker Server could be down. Any of these circumstances would cause your stylesheet to generate an error. CAUTION For stylesheets (or indeed any kind of program!) that are going to be deployed in production, careful error checking is mandatory. You should develop some standard techniques for checking errors in your XSLT-CWP stylesheets. The error test here is pretty simple. We create an XSL variable called error-code and populate it with whatever error code the underlying XML contains. (In the fmresulset grammar, this can be found at /fmrs:fmresultset/fmrs:error/@code , assuming the namespace has been abbreviated as fmrs .) This code will be either 0 (no error) or some non-zero numeric value, indicating an error of some kind. Based on the error code, we create another variable, called doc-title , because we want to cause the page to appear with different titles, depending on whether the deletion worked or not. Finally, in the body of the stylesheet, we use an <xsl:choose> construct that checks the error code variable and decides which confirmation message to display. In all cases we present the user with a link back to the list view. Using Stylesheets to Create and Edit RecordsIt's also possible, using techniques similar to those we demonstrated for record deletion, to make stylesheets that can create records (with the -new action) or edit them (with the -edit action). Space prevents us from giving detailed examples (a full treatment of Custom Web Publishing could fill a book of its own!) but we can discuss them generally. Both record creation and record editing can be thought of as requiring two different pages. The first page consists of a data entry form where the user either enters or updates some data. As in the deletion example in Listing 23.13, the other page is responsible for actually performing the database action and reporting on the result. (The deletion example contained a third intermediate page where the user was prompted for confirmation of this more dangerous database action.) To form a better idea of how record creation and editing work, we recommend that you use the Site Assistant to generate a full suite of XSLT stylesheets for a simple database, and then inspect those of the generated stylesheets that handle adding and updating records. The Site Assistant generates three stylesheets that handle these actions: addrecord.xsl , editrecord.xsl , and browserecord.xsl . Here's an overview of what these generated pages do:
We've depicted the relationships among these three pages in Figure 23.18, which should help to clarify how commands and data flow among the three pages. Figure 23.18. The flow of data and commands among the three Site Assistant pages. |
 For details on functions and function parameters,
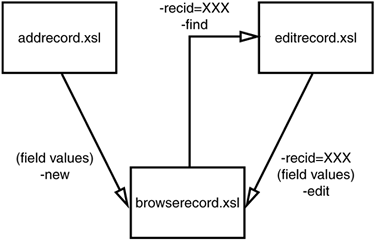
| < Day Day Up > |