Navigation
| < Day Day Up > |
| Navigation implementations can come in many forms, and depending on how one defines it, can include a variety of functional elements as well. Your system might perform validation checks, run security routines, manage audit trails, and more. In FileMaker Pro 7, scripts depend on layout context to establish table context. This then means that your users won't be the only ones needing to navigate the system: Scripts will need to switch to different layouts to establish context, and return to the original to maintain the user experience. Likewise, users won't want to only navigate. For example, at times they'll be interested in also manipulating found sets or perhaps seeing record selections made, automatically changing modes, or having navigation include a sort command. In addition to the wide variety of functions navigation performs , its presentation can vary as well. Tabbed interfaces are common, which boil down to simply a series of buttons on a layout that have Go To Layout scripts attached. Again, we don't go into all of these options, but explore the behind-the-scenes techniques you'll find useful and can apply in a variety of ways as you see fit. Tabbed NavigationThis is one of the classic ways to get around a FileMaker database. Regardless of whether or not you make your buttons actually look like tabs, the basic idea is that you have a series of buttons on each layout, one of which is in a "current" state, and that users can see this omnipresent navigation element as they use the system (see Figure 13.4). Figure 13.4. The "tab" look was created by simply laying a 2-pixel line along the bottom of the button that needed to appear as a "front" or current tab. Implementation methods vary widely. At the simplest level, you need only create a button for each layout in your system and attach a Go To Layout button behavior to it. This basic approach isn't the best way to manage buttons in a database solution, but it's a perfectly serviceable method. You should try to abstract things a bit more. First off, never attach anything other than scripts to buttons to avoid painting yourself into a corner. Second, because navigation routines are going to duplicate a good deal of functionality (ultimately it's only the destination layout that changes) and will very likely evolve over time with a given solution, try to limit the number of scripts that you have to edit when modifying the navigation routines. If you can rely on one central place for all such logic, it is relatively easy to add functionality to your database or to, say, change one layout from an old version to a new updated version. Navigation Mediator and the Global Nav ScriptBy using script parameters you can drive most, if not all, of your navigation through one script. The layers of abstraction here could potentially become fairly complex, so we recommend keeping an eye on your goal: creating a simple, single routine for handling navigation. This routine might be called from a button on a layout or from another script. In either case, it needs to work. It would be a waste of effort to have to re-create navigation processes for scripts. The basic technique is this: Attach a single Nav script to your navigation buttons and set a parameter that the button in question should pass to the script. You could certainly pass a layout name as a parameter and, within the Nav script called, use the Go To Layout script step combined with a Get(ScriptParameter) calculation. But that still means you have hard-coded layouts attached to buttons. Here's the basic script step: Go to Layout [Get(ScriptParameter)] Now consider where your script parameters live: attached to the however-many buttons you have in your database. If you use this approach, you will essentially hard-code all your layout names to your button assignments. If you need to change the layout to which a particular set of buttons points, you'll be stuck editing all the parameters of those buttons. This will also be true for a simple renaming of a layout. This dependency nearly obviates the advantages of a single navigation script by giving up flexibility. To truly abstract your process, you need to set up a mediator table . The goal here is to address the inflexibility of attaching layout names to buttons and provide a layer of abstraction that allows again for flexibility. If you store layout names in a data table (the mediator table), and point to specific rows in that table via script parameters, it'll be a snap to modify which layouts the buttons refer to in the future. You could accomplish the same from a large switch process of If Else script steps in a large script, but things are far simpler and more flexible when you simply place your logic in a data table. We'll walk you through the process.
Listing 13.1. The Navigate Script# # get Selected script parameter Set Field [ Nav::gNavCodeSelected; Get (ScriptParameter) ] # # trap the layout from which the script originated Set Field [ Nav::gNavOriginal; Get ( LayoutName ) ] # # go to the target layout as specified by the SelectedNav relationship Go to Layout [ Nav::gNavTargetLayout ] # # if the SelectedNav requires a sub-script, run "switch_SubScripts" If [ not IsEmpty (Nav::gNavTargetScript) ] Perform Script [ "_switch_SubScripts" ] End If # # test whether the SelectedNav is intended to return users to the original layout # and do so when warranted If [ Nav::gNavTargetReturn = "yes" ] Go to Layout [ Nav::gNavOriginal ] End If # After you complete this main script, you need to create a _switch_SubScripts script that calls whatever additional script you might want after the navigation routine has taken place. This script holds however many optional sub-scripts you might want, and pulls its target script from the value placed in NavScript. You can write routines that are as elaborate or as simple as you wish. The _switch_SubScripts script might look something like this: If [ IsEmpty (Nav::gNavTargetScript) ] Exit Script Else If [ Nav::gNavTargetScript = "beep" ] Perform Script [ "Beep" ] Else If [ Nav::gNavTargetScript = "findAll" ] Perform Script [ "Find_All_Records" ] Else If [ Nav::gNavTargetScript = "sortAuthorLast" ] Perform Script [ "Sort_by_AuthorNameLast" ] Else If [ Nav::gNavTargetScript = "sortAuthorfindAll" ] Perform Script [ "Find_All_Records" ] Perform Script [ "Sort_by_AuthorNameLast" ] End If Keep in mind that we've not taken this methodology all that far at this point. You could very easily add script steps (or sub-scripts for clarity) to handle closing and locking the Status Area, maintaining window positions , or processing data integrity checks, or to include security privilege checks before taking a user to a specific layout. This overall approach is clearly more work than simply using the Status Area Layout menu or dropping a few buttons on your layouts with Go To Layout button behaviors attached, but we think it's an approach that can grow with almost any system. If you're honestly planning only a handful of layouts in a solution, the overhead here might not be worth the result, but we suspect that if you're reading this chapter you're already working on systems that would benefit from this approach. Branched Layout NavigationOne interesting possibility this approach also offers is the potential to branch your navigation routines based on data. Imagine building two layouts and driving users to them by either preference or privilege: You could offer two different list views, for example, and your navigation system could direct users as appropriate. The architecture fleshed out in the current example doesn't support this, but it wouldn't be difficult to extend for that purpose. This drives home the point of this exercise as well. Imagine building this navigation scheme and having your users request exactly that which we've described: Some users want to see "version one" of a list layout, and other users need access to a "version two." If you'd built your navigation with separate, multiple scripts or attached Go to Layout script steps to buttons without the benefit of scripts, the alterations your database would require might be fairly numerous . In this abstracted navigation approach, you need only modify and test the one Navigate script, and need not modify your layouts or buttons at all. One approach in dealing with branching layouts would be to modify the way in which the NavLayout is determined. As it stands today, that value is simply entered by an administrator or developer in data. It would be almost trivial to insert some logic here in the process whereby a second table is consulted with a concatenation of NavCode and Get(PrivilegeSetName) . Back ButtonsOne of the most dreaded questions we used to hear while working with previous versions of FileMaker Pro was, "Where's the Back button?" It's not that Back buttons were technologically that big a deal it's just that they used to be a lot of work, and added unwelcome overhead to database solutions. In FileMaker Pro 7, they're a snap, and the new ceiling on storage limits makes overhead a complete non-issue. This is a great example of how FileMaker Pro 7 dramatically extended the horizon forward for all of us. FileMaker Pro has two layers of navigation (a subtlety many novice users don't immediately grasp): navigation from record to record and navigation from one layout to another. Web browsers aren't troubled by such things, nor in their stateless world is there a distinction between "data" and "page." The metaphor of a Back button isn't a perfect fit in FileMaker Pro, but users will immediately understand what they do. They'll help users distinguish more easily between the book icon (or your replacement for it) and navigating from layout to layout. The approach shown here leverages the abstracted navigation routine described in the preceding section. We hope you've been following along. Our goal here is to track each instance of navigation that a user makes ”by writing to a navigation history table ”and then be able to trace backward along those historical records. The first task you'll have is to trap the instances of navigation commands that you want to store in history. Create a NavHistory table, as shown in Figure 13.6. Figure 13.6. AccountName and NavCode are the two points of data you need to track navigation history.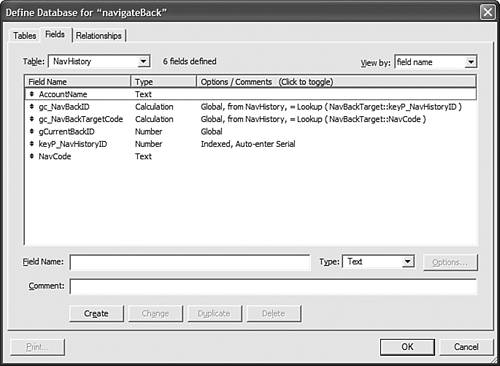 Notice in the figure that you're storing AccountName with NavHistory records. If you didn't do so, you'd have no means of differentiating your back history from someone else's ( assuming you've assigned one account per person). You also need to create a self-join relationship to a second table occurrence, relating gCurrentBackID to keyP_NavHistoryID (see Figure 13.7). This relationship enables you to track the current row in the history by controlling the values in gCurrentBackID . It provides the target NavCode you need if someone clicks the Back button. Keep in mind: It's the second most-recent record you need, not the first. If someone clicks the Back button, you don't want to perform the last navigation command executed. That simply takes him to the layout on which he already sits. You need to step back one record in the history. To accomplish this, simply change your relationship from an equijoin ( = ) to a greater than ( > ) relationship. Figure 13.7. This relationship actually relates to all the prior records (you'd see them if you set up a portal) but FileMaker, when asked, takes values from only the first valid match it finds.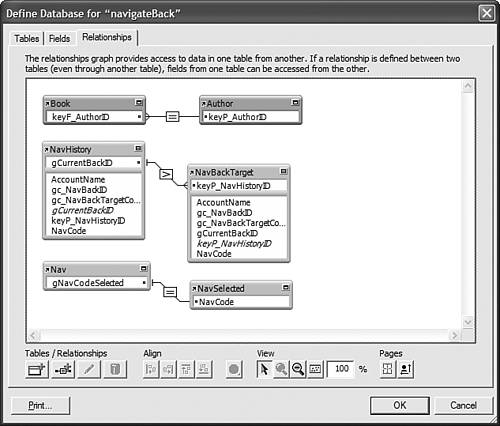 Now create a script for creating new records in the NavHistory table. You should call this script each time the user clicks on a navigation button. Go to Layout [ "NavHistory" (NavHistory) ] New Record/Request Set Field [ NavHistory::AccountName; Get (AccountName) ] Set Field [ NavHistory::NavCode; Get (ScriptParameter) ] Set Field [ NavHistory::gCurrentBackID; NavHistory::keyP_NavHistoryID ] Commit Records/Requests [ No dialog ] Go to Layout [ original layout ] Notice that this script depends on a script parameter as well. You need to set this from within your Navigate script, and it is the same parameter that was passed from the original button that was clicked for navigation. Also notice that you're establishing context with the Go to Layout ( "NavHistory" ) step, and then returning to whatever context in which the system was at the beginning of the script. NOTE The NavCode field could be populated by lookup or some other approach, but a script parameter seemed fairly straightforward and didn't require a relationship or globals . Now you need to create the conditions by which this Create NavHistory script will be performed. Here's your modified Navigate script: # # get Selected script parameter Set Field [ Nav::gNavCodeSelected; Get (ScriptParameter) ] # # trap the layout from which the script originated Set Field [ Nav::gNavOriginal; Get ( LayoutName ) ] # # go to the target layout as specified by the SelectedNav relationship Go to Layout [ Nav::gc_NavTargetLayout ] # # record the navigation in the NavHistory table If [ ( Nav::gc_NavTargetInternal The interesting thing about this script is that it required you to add only a few steps, and the system doesn't need to know anything at all about the back function you've built. It simply needs to record navigation history. You won't want to record some navigation: internal scripts that establish context and then return to an original layout, and the navigation that the Back button itself performs. If you add both a NavInternal attribute and a flag, gNavBackFlag , to your Nav table you can check against both when performing navigation routines. More specifically , you need to check these only when writing new NavHistory records. NOTE The If condition has been included in this script for clarity, but you could just as easily have included it in the _record_NavHistory sub-script. Now look at Figure 13.8 and note what happens now when you navigate the system. Figure 13.8. You'll add records to this NavHistory table at a prodigious rate. We recommend writing a clean-up script that deletes all the records for a specific Account when closing the database, unless you'd like to be able to "go back" across sessions.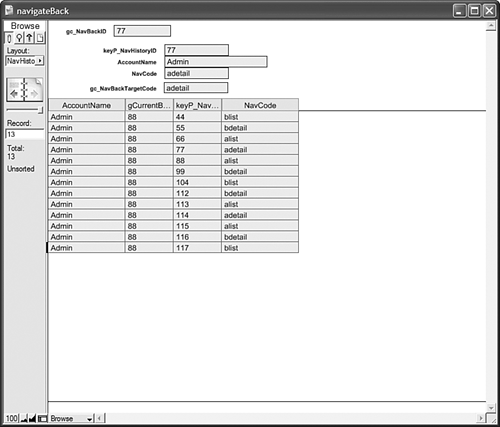 There's one last step in creating your Back button functionality. You need a Back button and script. Fortunately, you can use the same navigation script you've already written. Here's the script you'll need: Set Field [ Nav::gNavBackFlag; "yes" ] Perform Script [ "Navigate"; Parameter: NavHistory::gc_NavBackTargetCode ] Set Field [ NavHistory::gCurrentBackID; NavHistory::gc_NavBackID ] Set Field [ Nav::gNavBackFlag; "" ] Attach this script to a Back button. You don't need a script parameter. Notice that this script uses the Navigate script to control where it goes, and instead of passing a fixed, button-specific parameter, it simply passes the value from NavHistory. One big caveat with the work you've just read: It's incomplete. This script will not function correctly in multi-user situations, nor is there any error trapping going on whatsoever. We leave both in your hands.
Other Navigation TechniquesThere are many other approaches you could use for navigation, but in general they are variations on the themes we've mapped out so far in this chapter. Scripts ”however they're displayed ”call Go to Layout script steps and send the user to a new layout. In an extreme case, we once ran into a database that used the four corners and edges of the screen for navigation. A degree of luck was involved because the system lacked any labels or indication that there were actually buttons there at all. Some navigation schemes are better than others, no doubt. The following are a few other approaches than the one described here. Rather than lay buttons directly on a layout ”buttons that are always present on that layout ”some developers choose to create navigation portals . Each portal row contains a button and some attribute (the equivalent of the nav codes from the previous example) that then determines what script or layout should be the result of a button click. This could work with script parameters passing a layout name, or it would fold nicely in with the nav code approach as well. In other cases, perhaps a simple pop-up menu and Go button can be used. In this instance, a user would make a navigation choice from a menu, then click a Go button, initiating a script that would use the menu choice to determine what navigation to perform. It could make this determination using a series of If/Else statements, or the system could be set up for some kind of data-driven navigation, as in the nav example earlier in the chapter. In this case the user's choice would be a key that would point to a data record fully describing the chosen navigation option and its logic. A third idea is to establish buttons on their own layout and script the opening and maintaining of that window as a "navigation palette." The downside of this approach is that your users need to click twice to use it: once for the window to come forward, and once again to activate a navigation button/script; however, this is a great approach for people with different monitor resolutions (allowing those users with large monitors to place their navigation window wherever they choose), and makes navigations a distinct process, separate from other functions. Regardless of which visual and presentation approach you prefer, we encourage you to think ahead and try to bake in some flexibility and room to grow when dealing with navigation scripts. They are more often than not some of the most interwoven and omnipresent script routines in your solutions. |
 For discussion on scripting best practices,
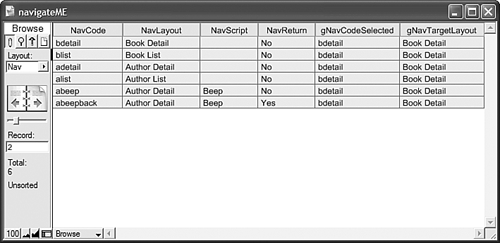
 "yes ) and ( Nav::gNavBackFlag
 | < Day Day Up > |