Modifying Resource Assignments
| < Day Day Up > |
| You have seen that you can define a resource assignment by specifying the task duration, the assignment units, and the work for the assignment. You have seen that your choice of the task type and its effort-driven status also affect resource assignments. In this section, we will examine other options for fine-tuning resource assignments. The choices include the following:
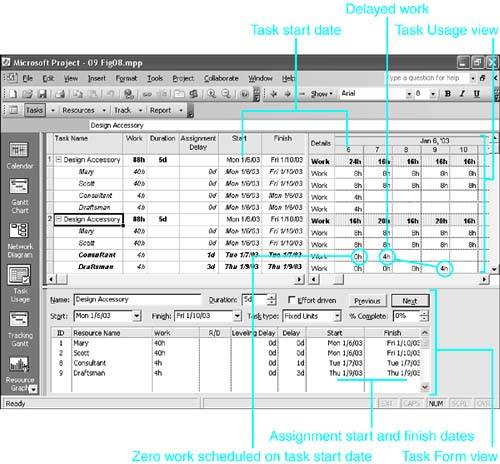
Scheduling a Late Start for an AssignmentSometimes one of the resources assigned to a task is expected to perform a function that is needed not at the beginning of the task, but only after some work on the task has been completed by others. For example, suppose that a team assigned to design a new accessory to its main product needs the opinion of an expert consultant on the feasibility of its initial design. The expert's assignment to the design task can be delayed so that it starts only after the task has been under way long enough for the team to decide the questions they need to ask. Suppose that one member of the team is a draftsman whose sole contribution will be to prepare a drawing of the design on the next -to-last day so the team can review and confirm their recommendations on the last day. The draftsman's assignment should be delayed to near the end of the task. In Figure 9.8, Mary and Scott are assigned full time to the 5-day Design Accessory task, but the Consultant and Draftsman each have only 4 hours of work assigned. As explained later on, Task 1 represents the way Project initially assigns the work, and Task 2 shows how individual assignments can be delayed. Figure 9.8. You can create a delay in an assignment to recognize the fact that the resource is not necessary at the start of the task. Figure 9.8 displays the Task Usage view, which, like the Resource Usage view, shows timephased assignment details in the grid on the right. The names of assigned resources are indented under the task names , and the assignment values are rolled up or summed on the row for the task. The Work column in the table on the left shows, for each row, the total of the timephased work details in the grid. Task 1 shows how Project, by default, schedules the hours for all assignments at the start of the task (January 6). Task 2 shows the delayed hours for the Consultant (January 7) and the Draftsman (January 9). The bottom pane shows the Task Form view, with the Resource Schedule details table at the bottom. The column titled Delay shows the amount of any assignment delay (as does the Assignment Delay column in the table in the top pane). The Start and Finish fields show the scheduled dates for the assignment. (The Leveling Delay column is a different kind of delay, and it is explained in Chapter 11, "Resolving Resource Assignment Problems.") You can create an assignment delay in one of several different ways:
This discussion about delaying assignments has been presented in terms of projects that are scheduled from a fixed start date. In those projects, Microsoft Project schedules tasks and assignments as soon as possible, calculates the start date for both tasks and assignments first, and then calculates the finish dates. A delay in an assignment is tantamount to a late start, and it offsets that assignment schedule from other resource assignment schedules on the same task. If your project is scheduled from a fixed finish date, Microsoft Project first schedules the last tasks in each chain of linked tasks to end on the project's fixed finish date. Task and assignment finish dates are calculated first, and then their start dates are calculated. Project then works backward along the chain of linked tasks, scheduling later tasks before earlier tasks until the start of the project is reached and a project start date is calculated. You cannot introduce delays (late starts) for assignments in fixed-finish-date projects because that would delay the project finish date, which is by definition fixed. You can, however, modify assignments to schedule some assignments to finish earlier than others ”in other words, you schedule an early finish instead of a late start. You can enter an early finish for an assignment in a fixed-finish-date project in the same Delay field used for late starts, but you enter it as a negative number. Alternatively, you can enter an early finish date in the assignment's Finish field, and Project calculates the (negative) Delay value as well as a new date for the Start field. If you enter a date in the assignment Start field, Project does not adjust the Delay value but calculates a new amount of work for the assignment, based on the (unchanged) finish date and the start date you enter. NOTE You can enter negative amounts in the assignment Delay field only if the project is scheduled from a fixed finish date. You can enter positive amounts only if the project is scheduled from a fixed start date. Splitting a Task AssignmentSplitting an assignment means that you schedule an interruption in the work, usually extending the duration of the assignment to make up for the time lost to the interruption. There are two basic methods for splitting a work assignment:
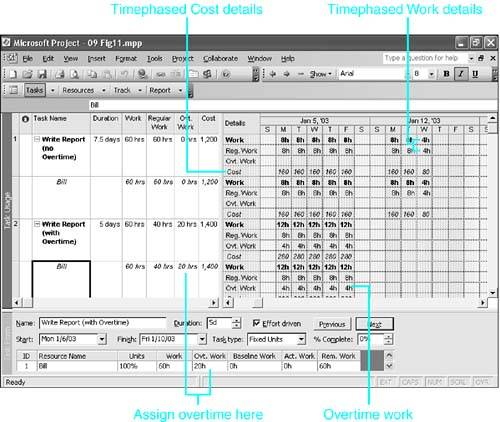
If you introduce a split in an individual resource assignment, Project does not show a split in the task unless it is the only resource assignment for the task or unless you introduce the same split in all assigned resources. Figure 9.10 shows three tasks to which both Mary and Pat are assigned. The view has the Gantt Chart view in the top pane and the Task Usage view in the bottom pane. The work detail in the bottom pane for their assignments to the Prepare for Conference task shows a split in the assignment on Wednesday. This split was the result of splitting the task; thus, the schedules of all assigned resources are split. Figure 9.10. You can introduce a split in a task assignment when the resource needs to work on another task temporarily. Pat also has a 1-day split on the following Wednesday, in his assignment to the Write Up Proceedings task. However, the Gantt bar for the task in the top pane of Figure 9.10 is not split because Mary, who is also assigned to the task, continues to work on those days, while Pat is diverted to another task. Using Overtime to Shorten DurationYou can reduce the duration for a task by scheduling some of a resource's work as overtime. Overtime work means work that is scheduled outside the resource's normal working hours. In Project that means work that is scheduled during nonworking time on the resource calendar. Assigning overtime doesn't reduce the total amount of work for an assignment, but the amount that is scheduled during regular working time is reduced by the amount of the overtime. Also, Project charges the resource's overtime rate for overtime work; cost might therefore go up, depending on your entry in the Overtime Rate field.
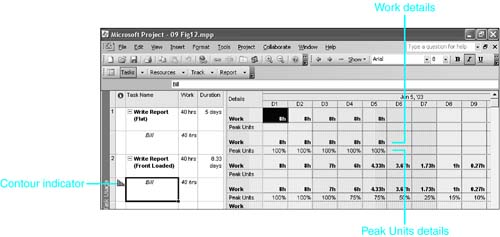
For example, suppose that Bill has been assigned full time (100% units) to write a report that is scheduled to take 60 hours of work and requires a duration of 7.5 days to complete (see Task 1 in Figure 9.11). Bill is scheduled to start on a Monday and finish at midday on Wednesday the following week. The cost of the task is $1,200 (based on Bill's standard rate of $20/ hour ). This task is illustrated as Task 1, Write Report (No Overtime), at the top of Figure 9.11. Figure 9.11. Scheduling overtime work shortens task duration but can lead to increased cost. The assignment details on the right have been augmented to show not only work (which is total work per time period), but also the regular work and overtime work components of total work, as well as the cost of the assignment. The Regular Work, Overtime Work, and Cost columns have been added to the table on the left. They and the Work column show the task totals for the corresponding timephased details in the grid. For Task 1 (No Overtime), the total work is 60 hours, which is the sum of the work hours in the grid. You can see that the total work for each day is made up of regular work only. The duration of Task 1 is 7.5 days, and that is due to the fact that there are 7 full days of work and 1 half day of 4 hours. The total cost of the task is $1,200, which is the sum of the daily Cost values in the grid. Task 2, Write Report (with Overtime), shows what would happen if Bill's manager decided that she needs the report in no more than 5 days and authorizes 20 hours of overtime work for Bill. Bill still spends a total of 60 hours on the report, but 20 hours are overtime hours and only 40 hours are regular working time. Bill now does 12 hours of work per day ”8 hours of regular work plus 4 hours of overtime. All 60 hours of work are completed in just 5 days; thus, the task duration is 5 days. The cost for each day is $280. This is made up of $160 standard-rate hours (8 hours at $20/hour) plus $120 of overtime-rate hours (4 hours at $30/hour). Note that had Bill's Overtime rate been left as the default zero, the cost for the task would actually have fallen to $160 (the cost of the regular work hours). NOTE Overtime work that is scheduled by Project cannot be adjusted manually. That is, you can't edit the cells in the grid to change the number of overtime hours scheduled on a particular day. However, when you are tracking progress on a task, you can add Actual Overtime Work to the details in the grid and enter the amount of actual overtime work in each time period to show exactly when the overtime work was performed. The bottom pane in Figure 9.11 shows the Task Form view with the resource work details displayed at the bottom. Because Task 2 is selected in the top pane, the details show the values with overtime assigned. Note that the Ovt. Work field displays 20 hours. The Work field shows the total work, 60 hours, which includes overtime. The easiest way to assign overtime hours for a resource is to display the Task Form in the bottom pane of a task view (or the Resource Form view, if the top pane is a resource view) and to display the resource work details (or work details, in the Resource Form view) at the bottom of the form. You could also add the Overtime Work column to the table in a usage view and enter the amount of overtime on the row for the assignment. To remove overtime work, you must reset the Overtime Work field to zero (it can't be "cleared"). Contouring Resource UsageThe traditional resource work pattern is the so-called flat pattern . In the flat pattern, Project schedules a resource's work to begin when the task begins, using the same units assignment every day until the assigned work is completed. Sometimes, you might want a resource to put greater effort into a task at the outset and then to taper off the daily effort until the task is finished. In that case, you want to assign more units and hours for the days at the beginning of the task and then use a reduced number of units and hours each day to complete the task. This is called front loading the work on the task. Other times, you might want to back load the work, by starting with a small number of hours and assignment units up front and then increasing the work as the task nears completion. Varied scheduling patterns like these are available in Project as work contours . The default resource schedule is the Flat contour pattern, but you can have Project modify an assignment schedule by applying one of seven predefined work contours. You can also create your own contour by editing the timephased values in the usage view grid. To change the scheduling pattern, you display either the Task Usage view or the Resource Usage view. The Resource Usage view is similar to the Task Usage view in that it displays all the resources with their assignments indented beneath them and provides assignment details for each period in the timescale in a grid of cells. Both these views enable you to apply contoured assignments, either by applying one of the built-in contours or by editing the work assigned in any given time period in the grid. To illustrate contouring, suppose that Bill is assigned to write a report that's estimated to take 40 hours to complete. At the beginning, he needs to concentrate completely on the report, but he can start spending more time on other tasks once it's underway. You could schedule his assignment like the "before and after" example in the Task Usage view in Figure 9.12. Task 1 is named Write Report (Flat), and it shows the standard assignment schedule. Figure 9.12. Contoured assignments always take longer than noncontoured assignments because part of the assigned work is shifted to later periods. Note that the grid in Figure 9.12 shows an added detail field, Peak Units. The Peak Units field shows the maximum units that are assigned to the task at any moment in time during the time period covered by the cell. You can see from the Units field in the bottom pane that Bill's initial assignment to the task was at 100%. In the standard schedule, that means his Peak Units is 100% in all 5 days and he is assigned 8 hours of work each day. Task 2 shows Bill's assignment schedule after the front-loaded contour is applied. Note the icon in the Indicator column that flags this assignment as having a front-loaded contour. Bill's assignment units start at 100% but soon drop to lower and lower levels, until all the work is completed. Consequently, the value for the hours of work scheduled for each day becomes less and less; Bill still does 40 hours of work, but now it takes more days to complete the work. Note that the duration for Task 2 is 8.33 days instead of 5 days. Figure 9.13 shows the Resource Usage view of Bill's front-loaded task. The main record is now the resource Bill instead of the task, but indented under it is the same assignment record, now labeled with the associated task name , Write Report (Front Loaded). The details in the grid are the same as those for Task 2 in Figure 9.12. Figure 9.13. The Resource Usage view displays task assignments under each resource name. The bottom pane of Figure 9.13 contains the Resource Graph view. This view displays a histogram (a vertical bar chart) to give a graphical image of the resource assignment detail that you select. In this case, the peak units detail is graphed and illustrates very nicely the declining nature of the front-loaded work contour. In fact, this graph is the source of the image that is used in the indicator for front-loaded contours. Project provides eight predefined work contour patterns that you can apply to a resource assignment. These are in addition to the default assignment pattern, the flat pattern, that is used when Project initially calculates an assignment. The contour patterns are illustrated in Figure 9.14 and are described as follows :
Figure 9.14. Work contours redistribute assigned work over a longer duration. Figure 9.14 illustrates the contour types in an actual calculation by Microsoft Project. The first row, labeled Flat, shows how the default assignment of 40 hours of work to a 5-day task was scheduled for a resource with a unit assignment of 100%. In the timephased details on the right, you can see the work and peak units for each day. The resource is assigned 100% to the task, and for all 5 days, 100% of its time is allocated to the task. Rows 2 through 8 show how Project would schedule the work if one of the predefined contours were applied. The total work remains 40 hours in all cases, as shown in the Total Work column. The work assignment for each day varies, depending on the contour pattern, as do the peak units. Each of the contours reduces the unit assignment during selected days in the assignment; the choice of which days determines the pattern that is the source of the different contour names. Because less work is scheduled on some days, the total assignment necessarily takes longer to complete. Note that the duration of the task is extended when the contours are applied. Instead of the task being completed the first week, work must continue into the following week. The last row in Figure 9.14 is labeled Contoured and is not a predefined contour pattern. That's the name Project applies when the user edits the work details for an assignment. In this case, the work is scheduled on Mondays, Wednesdays, and Fridays. In either the Task Usage or Resource Usage view, you can edit the assigned hours in the work details cells.
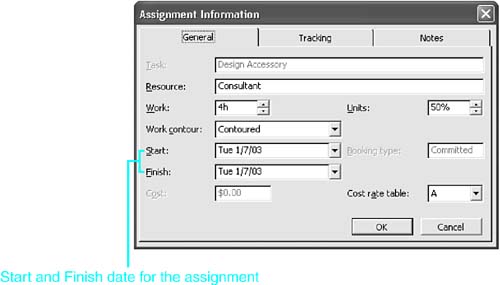
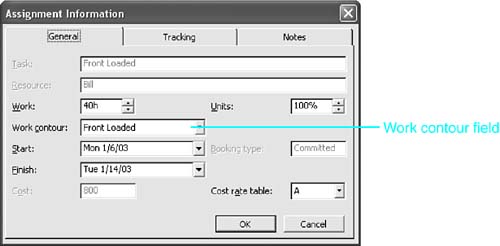
Figure 9.15. The Assignment Information dialog box displays settings that affect the scheduling of the assignment.
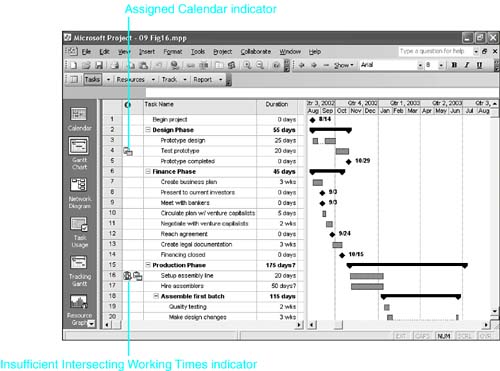
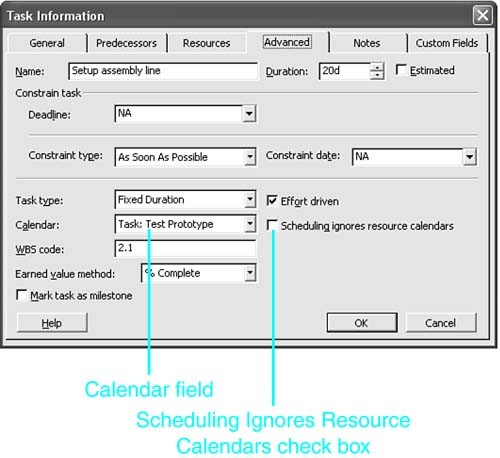
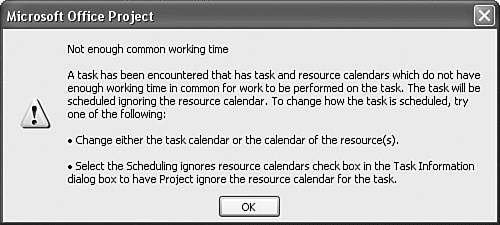
TIP If you change the work contour, it's a good idea to document why you made the choices you made in the assignment Notes field. Click the Notes tab in the Assignment Information dialog box (refer to Figure 9.15) and enter supporting documentation about an assignment, including links to external documents such as job specifications or standards. NOTE If overtime hours are assigned to a task when you apply a contour, Project spreads out the overtime evenly, over the duration of the assignment, no matter which contour is applied. TIP If you want to add a resource with a contoured assignment to an existing task that has other resources already assigned and if you don't want the task duration or the other resource schedules to change when you apply the contour to the new resource's assignment, you can make the task a Fixed Duration task and disable Effort Driven before assigning the contour. You can later return the task to its previous task type and effort-driven status. Project applies the contour but has to stop scheduling hours when it reaches the end of the task duration. As a result, the new resource has a lower total amount of work than it initially did. You will undoubtedly have to manually edit the work assignment values to get the results you want. Scheduling with Task CalendarsIf a task has its own special calendar assigned to it, by default, Project schedules work for the resources only in the times when the working times for both the task calendar and the resource calendar intersect. Project displays the Assigned Calendar indicator (see Figure 9.16) for the task. Figure 9.16. You can attach a base calendar to a task to limit the working time for scheduled work on a task. This facility is useful when there are special nonworking times associated with the task but you don't want to enter those nonworking times on the resource calendars because they would interfere with scheduling other task assignments for the resources. One application for a task calendar is when a key resource for a task has unique nonworking times, and no other resources can work when that key resource is unavailable. For example, equipment maintenance might take an assembly line offline for 4 hours every week. You could create an Assembly Line Maintenance base calendar to define these nonworking hours and assign it to the task. The alternative would be to add the nonworking times for this key resource to the calendars for all the other resources assigned to the task. Again, that could interfere with scheduling the other resources for other tasks. Another good use of task calendars is when you need to schedule a task during normally non working times. If, for example, you wanted to schedule the upgrade for a network server on a weekend to minimize user inconvenience, you could create a task calendar and assign it to the task that has working time only on the days and hours when you want the task scheduled. To assign a calendar to a task, you have to create the special base calendar first, using the Tools, Change Working Times command. Then select the task and display the Task Information dialog box. On the Advanced tab, you display the drop-down list of base calendars in the Calendar box and select the appropriate calendar (see Figure 9.17). Figure 9.17. You can assign task calendars in the Task Information dialog box. If you want Project to ignore the resource calendar working times, check the Scheduling Ignores Resource Calendars check box. When you do, the number of hours of work scheduled for a resource on any given day depends on the units assigned and the work hours defined on the task calendar, not the resource calendar. It is up to you to verify that the resources can, in fact, meet this schedule. For example, Bill gets assigned to the network server task scheduled for a Saturday using a task calendar that specifies only weekend days as working times. Bill's resource calendar is based on the standard calendar that specifies that weekend days are nonworking time. In this case, there is insufficient intersecting working time for both the task calendar and the resource calendar to be honored. If the task and resource calendars do not intersect for enough hours to complete the task, Project displays a warning to alert you that there are insufficient intersecting working times (see Figure 9.18). You then need to modify one of the calendars or tell Project to ignore the resource calendar. Figure 9.18. Project warns you when a task's resources and task calendar have insufficient overlapping working times. |
 For a complete description of the Assignment Information Dialog Box, see "Using the Assignment Information Dialog Box,"
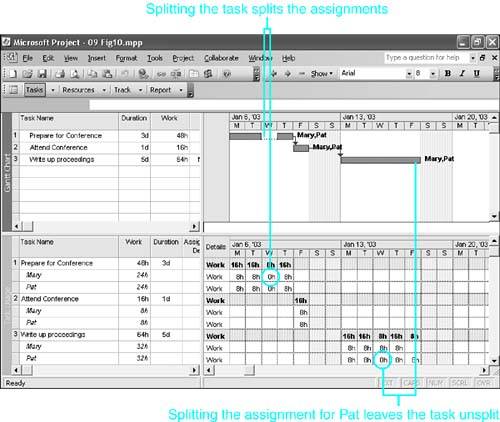


| < Day Day Up > |
EAN: 2147483647
Pages: 283