Outlining the Task List
| < Day Day Up > |
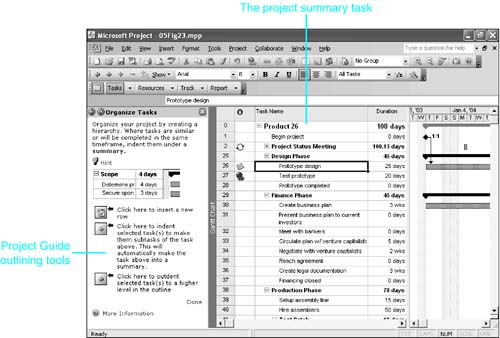
| Outlining is Microsoft Project's method of organizing the details of a project into groups of activities that correspond to the major phases of a project, and it is the equivalent of the traditional WBS (refer to Figures 5.1 and 5.2). Each task has an outline number, which Project calculates by using the legal numbering system. For example, if a task has an outline number of 2, the subtasks that are indented under it would be 2.1, 2.2, and so on. The outline number serves to identify the group containing the task in the overall structure of the project. Understanding Summary Tasks and SubtasksLike WBS, outlining organizes tasks into functional groups. Outlining is usually thought of in terms of its visual effect: You indent detail topics under major topics, creating subtasks . Figure 5.23 shows an expanded task list. The major topics, called summary tasks , control and summarize the subordinate detail tasks, called subtasks . In project scheduling, indenting atask is called demoting the task, and the task you demote becomes a subtask. The task under which the task is indented automatically becomes a summary task that both controls and summarizes the subtasks. Figure 5.23. Outlining helps you organize the details of a project. NOTE What appears to be the first task in Figure 5.23 is actually a project summary task (notice that its ID number is 0). It is useful to summarize the entire project with one task. The section "Selecting the Display Options for Outlining," later in this chapter, lists instructions for displaying a project summary. A summary task serves both to identify major groups of tasks and to summarize the duration, cost, and amount of work expended on its subtasks. When a task is transformed into a summary task, the task's start date is determined by the earliest start date of any of its subtasks, and the finish date is determined by the latest finish date of any of its subtasks. You cannot type a start date or finish date for a summary task. These dates can be calculated only from the related subtasks. The costs and amount of work associated with the subtasks are rolled up and summarized in the cost and work fields of the summary task.
Understanding Duration for Summary TasksProject calculates the duration for a summary task and does not let you modify it. The summary task start date is the earliest start date of any of its subtasks, and the summary task finish date is the latest finish date of any of its subtasks. The duration of the summary task is the amount of work time that is defined on the base calendar, between the earliest start date and the latest finish date. A summary task whose first subtask starts at 8:00 a.m. one day and whose last subtask finishes at noon the next day would have a duration of 1.5 days (that is, 12 working hours). The duration for summary tasks is always displayed with the default setting for the Duration Is Entered In option on the Schedule tab of the Options dialog box. This is true even when the subtasks are expressed in other duration units. To change the duration units for summary tasks, you must change the Duration Is Entered In setting. Indenting and Outdenting TasksThere are several methods you can use to indent (that is, demote) or outdent (that is, promote) a task or group of selected tasks. They all produce equivalent results.
If you're not using the Project Guide, you can use the Formatting toolbar, the mouse, the menu, or keyboard shortcuts to indent or outdent tasks. First, select the task or tasks you want to indent or outdent. Then do one of the following:
CAUTION If you demote a summary task, its subtasks are demoted even further. In fact, all actions you apply to a summary task also apply to its subtasks. If you delete, copy, move, promote, or demote a summary task, all the subtasksincluding subordinate summary tasks and their subtasksare deleted, copied , moved, promoted, or demoted along with the summary task. You can promote tasks that are already indented by outdenting themthat is, shifting them to the left. When you promote an indented task, the tasks immediately beneath the promoted task are affected in one of the following ways:
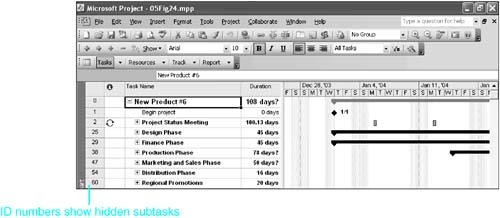
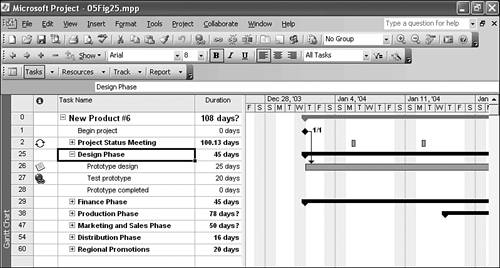
If you want to introduce a new task into the task list and make the new task a summary task, you must insert the task just above the task(s) you plan to have it summarize. You can then indent the subtasks. Or, if the new summary task is not at the first outline level, you can outdent the summary task rather than indent its subordinates. Collapsing and Expanding the OutlineA major advantage of outlining is that you can collapse the outline by hiding subtasks to view only the major components of the project (see Figure 5.24). Collapsing an outline merely suppresses the display of the subtasks; it does not delete the subtasks. Figure 5.24. You can look at the ID numbers to see which tasks are hidden; they are missing row numbers. You can also collapse an entire outline and then expand just one part to focus on the details of that part and see how they fit into the overall picture (see Figure 5.25). Figure 5.25. You can show the subtasks in one section of the plan but hide all other subtasks to highlight how those tasks fit into the overall project.
You can hide or display subtasks for a selected summary task in a variety of ways. The simplest technique is to double-click the task ID to toggle between hidden and displayed subtasks.
TIP If outline symbols are displayed (see "Selecting the Display Options for Outlining," later in this chapter), you see a small plus or minus to the left of each summary task. These outline symbols are miniature Hide Subtask and Show Subtask buttons that you can click to hide or display the subtasks. If the subtasks are currently displayed, a minus sign appears to the left of the summary task name, and clicking it hides the subtasks. If the subtasks are currently hidden, a plus sign appears to the left of the summary task name, and clicking it displays the subtasks.
Editing Outlined ProjectsIf you select a summary task and click the Task Information tool, Project displays the Summary Task Information dialog box (see Figure 5.26). Some fields (such as Duration) are grayed out because they can't be edited for summary tasks, but you can edit all the other fields. Summary tasks have their own Notes field, and you should make free use of notes to document important assumptions and background for summary tasks, just as you do for other tasks. Figure 5.26. You can control some features of summary tasks in the Summary Task Information dialog box. When you delete, copy, cut, paste, promote, or demote a summary task, all its subtasks are included in the same operation. For example, if you delete a summary task, you also delete all its subtasks. If you demote a summary task, you further demote its subtasks.
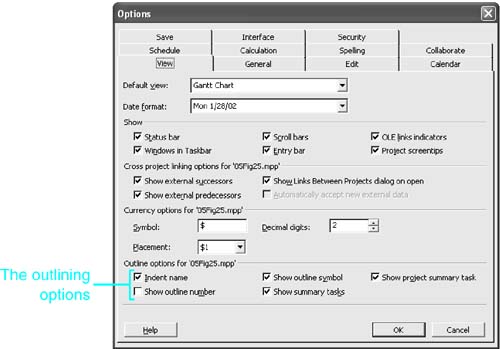
Selecting the Display Options for OutliningProject provides several display options for emphasizing the outline organization of a task list. Some of these are turned on by default. For example, by default Project displays summary tasks along with normal tasks and milestones, and it indents subtasks under their summary tasks. The formatting options for displaying the outline structure of your project are as follows :
If you want to change the outline formatting features, the active view must be a task view that must be the only pane or the top pane in the window. Follow these steps to select the outline options:
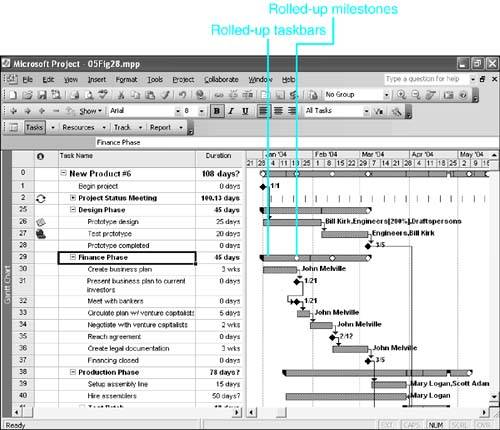
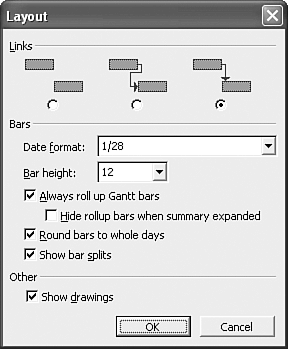
Using Rollup TaskbarsThe taskbar for the summary task spans the bars for all its subtasks and is usually a solid bar. However, you can choose to roll up the subtask taskbars to the summary taskbar. When you choose this option, each subtask's taskbar start and finish are marked on the summary taskbar. Together, the rolled-up bars produce a segmented bar that shows how long each of the subtasks lasts (see Figure 5.28). Figure 5.28. When you roll up taskbars to the summary task, you see how the summary task is divided among the subtasks. To roll up all taskbars to their summary taskbars, choose Format, Layout to display the Layout dialog box, and fill the Always Roll Up Gantt Bars check box (see Figure 5.29). The rollup bars appear in front of the standard summary taskbar. You can choose to display the rollup bars only when their subtasks are hidden. Fill the Hide Rollup Bars When Summary Expanded check box to suppress their display when the outline is expanded. Figure 5.29. The Layout command controls aspects of how the Gantt Chart view is displayed. TIP You can display the Layout dialog box by right-clicking in the bar chart area to display the shortcut menu and selecting Layout. If you just want to roll up particular taskbars and leave others alone, you have to mark each subtask you want to be rolled up and you have to mark its summary task to display the rollup. Also, you must clear the Always Roll Up Gantt Bars check box. To mark a subtask for rollup, follow these steps:
TIP You can change the display of rolled-up bars to show milestone markers at their finish date instead of showing the whole bar. If you want this format, choose Tools, Macro, Macros, select Rollup_Formatting, and click Run. Run the macro again to reverse the changes. Be warned , however, that this macro discards any custom bar styles you have created. If you have custom bar styles, you should edit the bar styles directly to change the display of rolled-up tasks. See "Formatting the Gantt Chart," in Chapter 20. |

| < Day Day Up > |
EAN: 2147483647
Pages: 283