Using Custom WBS Codes
| < Day Day Up > |
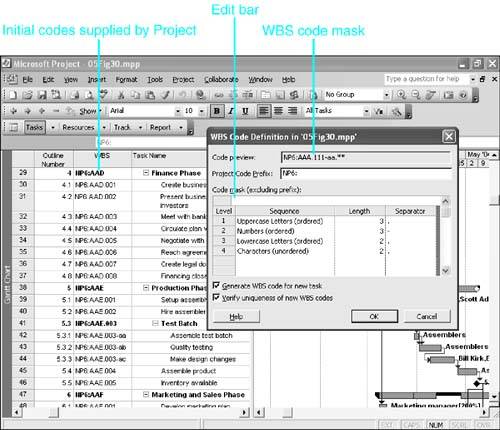
| Project automatically creates a default WBS code in the WBS field for each task. (See the beginning of this chapter for a description of WBS and the WBS codes.) The default WBS codes are identical to the outline numbers that Project generates (and that are stored in the Outline Number field). You can display the WBS field in a table by inserting the WBS column. You can also view the WBS field on the Advanced tab of the Task Information dialog box. If your organization, or a client, requires a specific format for WBS codes, you can edit the codes in either of these places, replacing the Project outline number with your own WBS codes. NOTE Editing the WBS field does not change the entry in the Outline Number field. You can define a customized format that matches a particular WBS code scheme. Project uses the custom format to generate default codes for the WBS field (instead of using the value in the Outline Number field). The custom format can include numbers, letters , and symbols (including ASCII characters ). An added advantage of using the custom format is that it enforces consistency and uniformity . TIP Don't take the time to re-create a custom WBS format if you've already defined one in another Project file. Use the Fields tab of the Organizer to copy a custom WBS format from one project file to another. Also, if you have a standard format you want to use in all projects, copy the definition to the Global template. See "Working with the Organizer," in Chapter 3. Creating Custom WBS CodesTo customize the WBS code format, you create a WBS code mask that Project can use to generate the custom codes. The mask contains numbers or characters for each outline level, starting with level one, with separator characters in between each level. You can define code segments for as many levels as you want, but the total length of the WBS code can't be greater than 255 characters. For example, if you created the code mask AAA-111.aa.** for the first four levels of the outline, it would mean the following:
You can also include a project-level code to be used as a prefix for all tasks. This would be especially helpful to distinguish tasks that are from different subprojects in a consolidated (master) project. You should display the WBS field as a column in the task table before creating the WBS mask. (Choose Insert, Column and select WBS in the Field Name box.) That way, you can see the effects of creating a WBS code mask immediately. To create the custom WBS code mask, follow these steps:
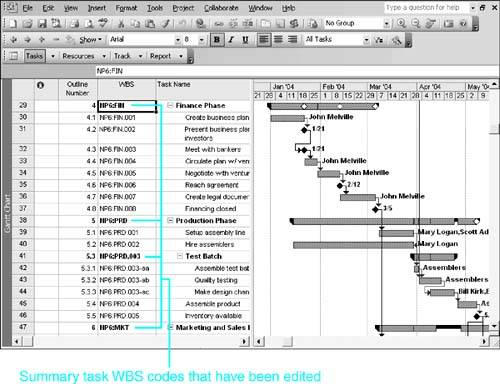
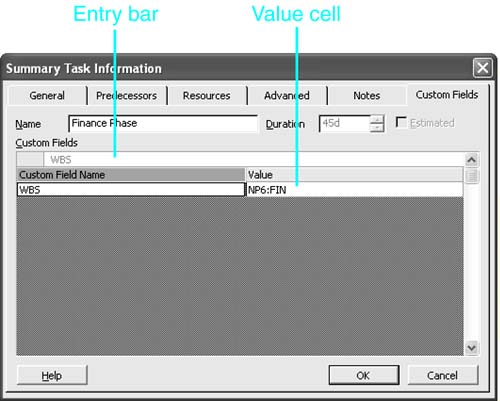
NOTE If a project has more outline levels than you have provided for in the mask, Project uses the conventional outline numbering system for the lower-level tasks that the mask doesn't define. Checking the check box to verify the uniqueness of new codes only makes Project check the code when it is created or edited. If you have a project file with custom WBS codes that have this feature disabled and then you decide to enable unique codes, Project does not check all the existing codes for uniqueness. You can force Project to renumber all the codes (that is, generate new codes from the mask) to correct nonunique codes. This also causes you to lose any codes you manually retyped. (See the section " Renumbering the Custom WBS Codes," later in this chapter.) TIP You can edit every task's code to force Project to check for each task's uniqueness. The simplest way to do this is to select the WBS column (so that all cells are selected), press F2 to edit the first cell , and then press Enter to force the uniqueness check. If the code is unique, Project moves to the next cell in the selection, and you press F2 and Enter again. You can move down the column quite rapidly this way, as long as the codes are unique. If a code is not unique, you are forced to change the code before continuing. NOTE You can delete only the bottom-most level in the Sequence table. If you want to reduce the number of defined levels in the mask, click the bottom-most level and use the Delete key; then work your way up the list, deleting from the bottom. Inserting, Deleting, and Moving Tasks with Custom WBS CodesWhen you insert a new task into a project, it is automatically given the next highest code for its level in the outline. If you delete a task, tasks below it at the same level are renumbered automatically, unless you tell Project to renumber the project (see the section "Renumbering the Custom WBS Codes," later in this chapter). If you move a task to another row within its current summary task, it keeps its custom WBS code, even if it's not now in sequence. If you move a task from under one summary task to a different summary task, it automatically acquires the correct prefix codes for its new summary task. If the final part of its code would create a duplicate in its new subtask group, it is changed to one number or letter higher than the highest existing number or letter in that subtask group . If no duplicate would be created, the final part of the code remains the same as it was before the move. Editing Custom WBS CodesAfter the custom code mask is defined and Project has provided default codes based on the mask, you can edit the last segment of any default code. Everything prior to the last segment is derived from higher-level summary tasks and can't be changed except by editing the code for the summary task itself. If you edit the final segment for a summary task, its subtasks automatically acquire the new segment as the prefix for their code. For example, in Figure 5.31 the major phases have been edited to be abbreviations or acronyms for the name of the phase. The default WBS code for the Finance phase had been AAD, but it has been changed to FIN for easier identification. This makes recognizing a task's place in the WBS much easier and is much closer to conventional practice. Figure 5.31. You can edit the default letters assigned by Project in the custom WBS codes to describe the task's place in the structure. TIP To display tasks in WBS code order, choose Project, Sort, Sort By and select the WBS field in the Sort By box. CAUTION If you edit custom codes for summary tasks and then tell Project to renumber the tasks, your edited codes will be lost. Read the troubleshooting note "Preserving Edited Custom WBS Codes" at the end of this chapter for a workaround. If the WBS column is not displayed in the table, you can edit the code in the Summary Task Information dialog box. Project 2003 displays custom fields on the Custom Fields tab (see Figure 5.32). Select the Value cell for the field you want to change and enter the change in the Entry bar, above the list of fields. Figure 5.32. You can edit the custom WBS code on the Custom Fields tab of the Summary Task Information dialog box. Renumbering the Custom WBS CodesWhen you are designing a project, you usually have to revise the task list. If you defined custom WBS codes, they might not be in sequence after all the editing. You can have Project recalculate the WBS codes for the whole project, to put them in sequence. If you've only rearranged a small segment of the project, you can select those tasks and have Project recalculate the codes just for the selected tasks. To renumber the WBS codes, follow these steps:
TIP Renumbering an entire project can change a lot of codes, and you can use Undo to restore the original codes. As always, however, you must use Undo before you make any other changes.
|
| < Day Day Up > |
EAN: 2147483647
Pages: 283