Attaching Hyperlinks to Tasks In addition to storing hyperlinks to Web sites in the Notes field, you can use the Hyperlink field for storing a hyperlink with each task. These hyperlinks are more versatile than those you can store in Notes, for three reasons: -
To click a hyperlink that is inserted in the Notes field, you must display the Notes field in the Task form or in the Task Information dialog box. If there is a link in the Hyperlink field, it appears as an icon in the Indicator column and you can click it there. -
The hyperlinks in the Notes field only jump to Internet or intranet sites. With the link in the Hyperlink field, you can do the following: -
You can jump to other files on your computer, network, and even specific locations within those files (for instance, to a specific task in another project file, a specific cell in an Excel file, a word or section in a Word document, or a slide in a PowerPoint presentation). -
You can open a file folder (presumably one that contains documents related to the task) and select a file to open. -
You can jump to another task or resource within the current project and display it in a specific view. -
You can initiate an email message to a specific addressee. -
When you define the Hyperlink field, you can browse to find the location of the targeted file or Web site. In the Notes field, you must know the URL for the site. Unfortunately , there is only one Hyperlink field per task, whereas you can store many hyperlinks in a note.  | When you attach a hyperlink to a task, the Hyperlink indicator appears in the Indicators column. Simply click the indicator to jump to the target defined by the link. | To attach a hyperlink to a task, click Tasks on the Project Guide toolbar and choose Link To or Attach More Task Information. You can then select a task and click Add a Hyperlink in the sidepane. Or, you can simply select the task and click the Insert Hyperlink tool on the Standard toolbar, choose the Hyperlink command on the Insert menu, choose the Hyperlink command on the shortcut menu when you right-click over the task, or press Ctrl+K. If you want to link to a specific location in another file, you can take a more direct route. Open the file, select the location you want to link to, and copy it to the Clipboard by using the Copy command. Then, select the task and choose Edit, Paste as Hyperlink. Attaching Hyperlinks to Existing Files or Web Pages To attach a hyperlink to a Web site or an existing file by using the Insert, Hyperlink command, follow these steps: -
Select the task you want to attach the link to. -
| | Click the Insert Hyperlink tool or choose Insert, Hyperlink from the menu (or press Ctrl+K) to display the Insert Hyperlink dialog box (see Figure 5.19). | Figure 5.19. The Insert Hyperlink dialog box helps you locate Web sites or files that you want to insert as hyperlinks. 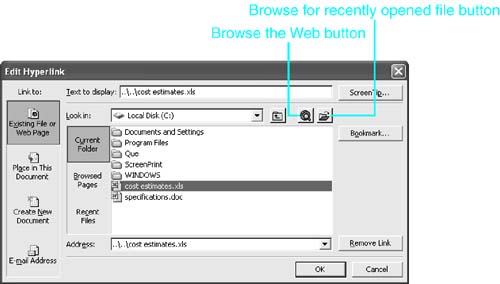 -
Click Existing File or Web Page to link to a Web site or an existing file. -
You can enter the full path and filename in the Address box or browse for the address. The Insert Hyperlink dialog box offers the following aids to help you locate the address of the filename or Web site you want to link to: -
Click the drop-down arrow in the Address box to choose from the list of recently accessed folders and Web sites. -
Click Current Folder to use this dialog box to browse the folders on your PC, starting in the folder listed in the Look In box. -
Click the Browse for File button to use Windows Explorer to browse for the file you want to link to, again starting in the folder listed in Look In. -
Click Browsed Pages to choose from the list of recently viewed Web pages. -
Click Recent Files to choose from the list of recently opened files. -
Click the Browse the Web button to open your Internet Browser to search for a Web site. -
If you have chosen a file that supports bookmarks, you can click Bookmark to see a list of bookmarks that are defined in that file. Choosing a bookmark causes the hyperlink to go directly to that part of the document. -
Change the entry in the Text to Display field if you want to display the link by using custom text. -
Click the ScreenTip button if you want to customize the ScreenTip that appears when the mouse points to the Hyperlink indicator. -
Click OK to save the link. To create a hyperlink by using the Paste as Hyperlink command, follow these steps: -
Open the document and find the specific location you want to link to. -
Select some part of the document at that location and choose the Copy command. Different applications require different selections: -
In Excel, select a cell or group of cells . -
In Word, select a word or section title. -
In Project, select a cell in a task row. -
In PowerPoint, select a word or title in a slide or in the outline. -
Return to Project and select a cell in the row for the task you want to contain the link. -
Choose Edit, Paste as Hyperlink, and the link is established. When you click the Hyperlink icon in the Indicators column, Project opens the necessary application, opens the target document, and then locates the exact word or cell you copied to paste the link (if it still exists). Attaching Hyperlinks to New Files To insert a hyperlink to a document that doesn't already exist, click the Create New Document button in the Insert Hyperlink dialog box. Enter a name in the Name of New Document box. Be sure to include the file extension so that Project knows what application to open to create the file. The default path that Project shows is the path for the active project file, but you can click Change to select a different folder. Finally, select either Edit the New Document Later or Edit the New Document Now. Attaching Hyperlinks to Tasks or Resources in the Same Project You can use the hyperlink to jump to another task or resource in the same project, and you can specify the view to use for that task or resource. To create this type of hyperlink, follow these steps: -
Find the task or resource you want the hyperlink to jump to and note its ID number. You can't browse for this information while attaching the link. -
| | Select the task you want to attach the hyperlink to and open the Insert Hyperlink dialog box (by pressing Ctrl+K). | -
Choose Place in This Document. -
Enter the ID number for the task or resource in the Enter the Task or Resource ID box. -
Select the view to be displayed for the task or resource in the Select a View in This Project box. Selecting a resource view is the clue that tells Project that the ID number is for a resource. If you don't select a view, Project assumes that you want to keep the current task view. Using Hyperlinks to Create Email Messages You can use a hyperlink to jump to an email program such as Outlook to compose a message. When you click the hyperlink, the email program opens, with a new message already addressed and waiting for you to supply the message content. | | To create an email hyperlink for the selected task, open the Insert Hyperlink dialog box and click E-mail Address. Type the address for the recipient in the E-mail Address box. Although the address is required, there is, unfortunately, no link to the address book or contacts folder to help you select an existing address. However, addresses you have used recently in this dialog box are listed in the Recently Used E-mail Addresses box for you to reuse. If you provide text in the Subject box, the message will have the subject field filled in when the message opens for you to edit it. | Editing and Deleting Hyperlinks | | To edit or delete a hyperlink, select a cell in the task and click the Insert Hyperlink tool or press Ctrl+K. The Edit Hyperlink dialog box appears, and you can make the changes you want. Click Remove Link to delete the hyperlink. | Placing Hyperlinks in the Custom Text Fields There is only one Hyperlink field for each task. However, you can use any of the 30 custom text fields to store additional hyperlinks and then use the hyperlinks to jump to the targeted site. To use the hyperlink, you have to display the text field as a column in the task table. To use the Project Guide to insert a text field, follow these steps: -
On the Tasks sidepane, choose Add Columns of Custom Information. -
Select Show Me Custom Fields. -
Choose Text as the field type. -
Choose one of Text1 through Text30 and click Insert. Scroll to the far right column in the task table to see the inserted field. You can also just click on an existing column heading and choose Insert, Column. In the Column Definition dialog box, use the list control in the Field Name box to select one of the text fields, and then click OK. There are some limitations on the use of text fields for storing hyperlinks: -
The hyperlink must be the only thing typed in the text field. -
As with task notes, there is no browse facility to help you define the hyperlink. However, if you find the site with your browser and copy the URL to the Clipboard, you can paste it into the text field. -
You must supply the complete URL. For example, www.woodyswatch.com/project/ does not work as a hyperlink in a text field, but http://www.woodyswatch.com/project/ does take you to Woody's Project Watch, and ftp://ftp.microsoft.com/deskapps/project/ takes you to the Project area of Microsoft's FTP server. For links to files stored on your local computer or network, precede the path with File:\\ and supply the complete path for local files or complete UNC for network files. For example, File:C:\My Documents\Projects\Cost Estimates.xls opens Excel and loads Cost Estimates.xls . If the file is on a local network, use a link such as File:\\ servername \ sharename \ folder \ filename.ext . |