Managing Issues
| < Day Day Up > |
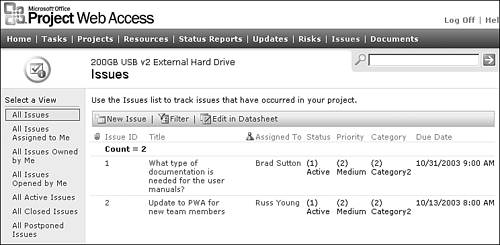
| Project Web Access 2003 provides a feature for defining and managing issues on each project in the repository. This facility includes the ability to describe the issue, categorize the impact of the issue, assign resolution to a resource, establish a due date, and set the status of the issue. Figure 28.19 is an example of issues that have been attached to a specific project. Figure 28.19. Project issues can be managed within Project Web Access. Creating and Assigning IssuesNavigate to the Issues page from the top menu. The page will display a list of projects grouped by your projects and other projects (if you have permissions to view them). Select the project that you want to create an issue for. The page will display a list of current issues. Select New Issue from the toolbar above the list. An edit form will display, where you will fill in the relevant information about the issue. These elements are
Select Save and Close from the Toolbar at the top of the form after you enter the required information. Updating and Closing IssuesIssues are updated by the responsible resource assigned to the issue, the owner, or any team members who have access and the permissions to update issues. Updates are accomplished by navigating to the issue from the Issues page and selecting the Edit icon to the left of the issue title. Select Save and Close after any updates or changes in Status. Linking Issues to TasksIssues can be linked to tasks from two different views in Project Web Access. The first method is to select a Project View to see the detail schedule. Select the Link Issues item from the toolbar at the top of the view. The second method is accomplished by navigating to the Issues page and either creating an issue or editing an existing one. Task linking selections can be found at the bottom of the creation or edit pages. Selections include affected tasks, tasks that resolve the issue, other risks, other issues, and documents. Clicking on any of these selections brings up a task dialog box with the project tasks. Multiple tasks can be selected by checking the box to the left of the task name . Select OK to complete the link. Issues icons will appear in the Project views for the tasks selected and in the Project Center for each project. Clicking on the Issues icon will navigate to the issue linked to the task. |
| < Day Day Up > |
EAN: 2147483647
Pages: 283