Creating Custom Groups
| < Day Day Up > |
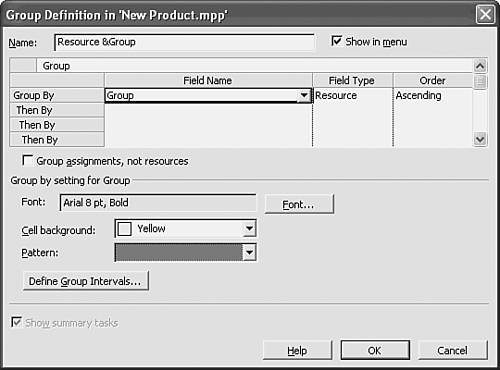
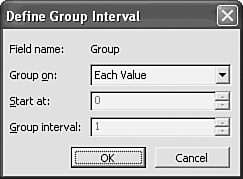
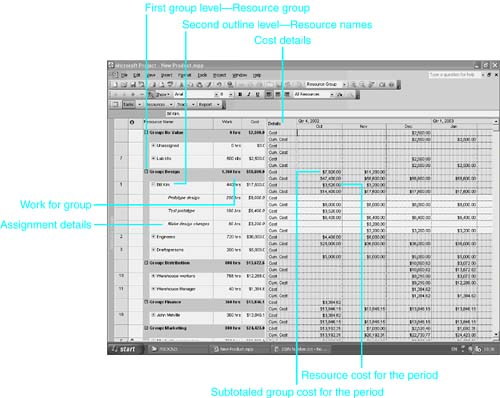
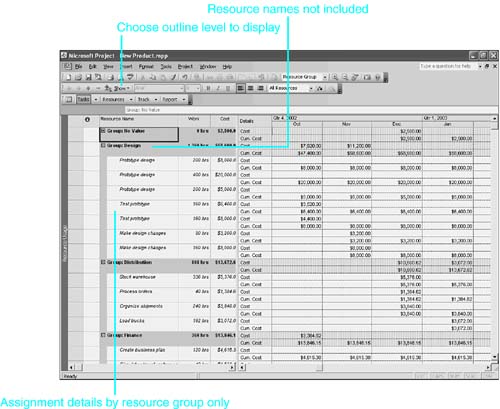
| Grouping tasks or resources is yet another way to display project data to meet your needs. A key advantage to organizing lists in groups is the ability to display subtotals for numeric data in the groups. Timephased values in the usage views, such as Work Over Time, are automatically subtotaled by time period. Project includes a number of predefined group definitions. The following sections focus on creating custom groups to meet your specific needs. The method for creating a custom group is very similar to creating a custom filter; the logic behind grouping is very similar to that behind sorting. Accessing Custom GroupsTo define and format a custom group, you must first open the Group Definition dialog box. You need to choose Project, Group By, and then select More Groups from the cascading menu. First you need to choose between group types: Select either Task or Resource. Then you need to select an existing group name and click Edit or Copy to modify an existing group or to use a group as a starting point for the new group definition. To create a custom group from scratch, select New. The Group Definition dialog box is displayed, as shown in Figure 21.34. Figure 21.34. You can create and modify groups in the Group Definition dialog box. Next , you can replace the generic Name, such as Group 1, with a descriptive name of your choosing. To have the group name appear in the Group By cascading menu, select the Show in Menu option. Finally, complete the group definition as described in the following section "Selecting Grouping Fields." The Group Definition dialog box is also available directly from the Project, Group By cascading menu. This method is a shortcut to opening the dialog box and enables you to experiment with group settings without saving a named group. However, any group you create in this way is temporary in that Microsoft Project holds the definition under the name Custom Group. Custom Group is then displayed in the More Groups list, but you can't open it for editing while you're in the More Groups list. You must access this temporary definition via Customize Group By to name it and to save it. When the data is displayed and summarized as required, you choose Project, Group By, Customize Group By and select Save to name and permanently store the group definition. Selecting Grouping FieldsThe task or resource list can be grouped by up to 10 levels. You create groups by selecting one or more fields from the database to create an outlined group structure. Groups are defined from the top down; that is, the first field in the definition represents the broadest group. Additional grouping fields refine the categorized lists into increasingly more detailed groupings. To create the group structure, access the Group Definition dialog box shown in Figure 21.35. Select one field name for the Group By line and a sort order for the field (that is, Ascending or Descending). For group refinements, move down one position and choose a Then By field (and its sort order). No preview area exists in this dialog box. Select OK when you are ready to return to the screen and view the results of your choices. Figure 21.35. Choose levels of grouping and the group order in the Group Definition dialog box. NOTE Unfortunately, the word group has two different meanings in Project. Each resource can, and should, be designated as a member of a group; this is usually entered on the Resource Sheet view. But group also refers to the grouping feature. The supplied Resource Group grouping definition is one of the most useful starting points for other groupings. Usually it is clear by the context which use of group is intended. Defining Group IntervalsFor some fields, the group interval is automatic. For example, if you're grouping on the Critical field, the only two possible values for Critical are Yes and No. In other fields, particularly date fields, the group intervals are created logically, but they might not match your requirements. In still other fields, such as costing data, a series of discrete or unique values exists, creating many groups with few entries in each. The Group Definition dialog box includes an option to control how data is grouped. In the Group Definition dialog box, select a field name that is already specified on the Group By or Then By rows, and then click Define Group Intervals. The Define Group Interval dialog box appears, as shown in Figure 21.36. By default, every data type is set to be grouped on Each Value, from the earliest (or smallest) to the latest (or largest). The Group On drop-down list offers a choice of logical groupings for the data type. Date values can be grouped by intervals of minutes up to years ; numeric data can be grouped in any intervals and can start the grouping in negative numbers ; text values can be grouped only by each value or by the first few characters . Figure 21.36. By default, unique values start new groups. When you use the grouping feature, any numeric field displayed onscreen shows the group subtotals on the line with the group label. In Project 2003, any timephased numeric values, such as scheduled cost per time period, are also subtotaled in the appropriate time period. Figure 21.37 shows the results of applying the Resource Group definition to the Resource Usage view. The timescale portion is formatted to show scheduled and cumulative costs within each month. Also, the new option Group Assignments, Not Resources is turned off by default in this grouping definition, so each task assignment for each resource can be displayed onscreen. Figure 21.37. Grouping includes subtotals for numeric data. TIP You can't change the value rollup behavior of standard fields for group displays. To see, for example, the average value of a standard field for a group, you must create a calculated custom field (as described earlier in this chapter, in the section "Creating Calculated Fields") and use a simple formula to set the custom field equal to a standard numeric field. In the Customize Fields dialog box, you can set the Calculation for Task and Group Summary Rows Rollup option to Average. Formatting Group DisplaysIn addition to specifying field group intervals, you can format the group displays. Each group displays the task or resource detail information, plus a summary bar for the group. Each group level has its own settings for font size , background color , and pattern. TIP To avoid having the grouped display cluttered with multiple types of summary bars, be sure to turn off the Show Summary Tasks option.
Figure 21.38. You use the Show Outline Levels button to hide group details. Saving Custom GroupsNamed custom group definitions are saved with a Project file. To make a group definition available to other files, you use the Groups tab in the Organizer, as described in the following section. |
 For a description of groups and their application,
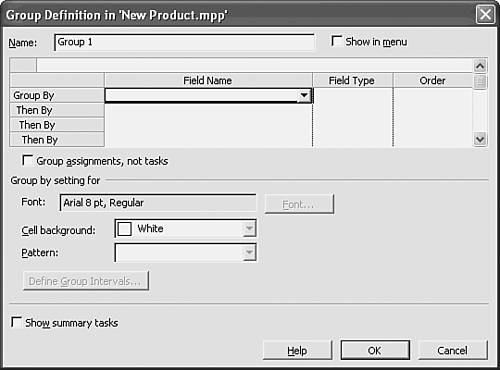
| < Day Day Up > |
EAN: 2147483647
Pages: 283
- ERP System Acquisition: A Process Model and Results From an Austrian Survey
- Enterprise Application Integration: New Solutions for a Solved Problem or a Challenging Research Field?
- Context Management of ERP Processes in Virtual Communities
- Data Mining for Business Process Reengineering
- A Hybrid Clustering Technique to Improve Patient Data Quality