Modal Dialog Boxes and the CDialog Class
Creating a modal dialog box is a three-step process:
- Create a dialog box template describing the dialog and the controls that it contains.
- Construct a CDialog object that encapsulates the dialog template.
- Call CDialog::DoModal to display the dialog box.
For very simple dialogs, you can sometimes instantiate CDialog directly. More often, however, you'll need to derive a dialog class of your own so that you can customize its behavior. Let's begin by examining the ingredients that go into a modal dialog box. After that, we'll apply what we've learned to modeless dialogs and property sheets.
The Dialog Box Template
The first step in creating a dialog box is to create a dialog box template. A template defines the fundamental properties of a dialog box, from the controls it contains to its width and height. Although it's possible to create dialog box templates programmatically by assembling DLGTEMPLATE and DLGITEMTEMPLATE structures in memory, most dialog box templates are resources compiled from statements in an application's RC file. These statements can be hand-coded, but more often they are written to the RC file by a resource editor that supports the visual editing of dialog box templates.
The following RC statements define a dialog box template whose resource ID is IDD_MYDIALOG. The dialog box described by this template contains four controls: a single-line edit control for entering text, a static text control that serves as a label for the edit control, an OK button, and a Cancel button:
IDD_MYDIALOG DIALOG 0, 0, 160, 68 STYLE DS_MODALFRAME ¦ WS_POPUP ¦ WS_VISIBLE ¦ WS_CAPTION ¦ WS_SYSMENU CAPTION "Enter Your Name" FONT 8, "MS Sans Serif" BEGIN LTEXT "&Name", -1, 8, 14, 24, 8 EDITTEXT IDC_NAME, 34, 12, 118, 12, ES_AUTOHSCROLL DEFPUSHBUTTON "OK", IDOK, 60, 34, 40, 14, WS_GROUP PUSHBUTTON "Cancel", IDCANCEL, 112, 34, 40, 14, WS_GROUP END |
The numbers on the first line specify the template's resource ID (IDD_MYDIALOG), the dialog box's default position (0,0, which would place the dialog in the upper left corner of its owner's client area save for the fact that MFC automatically centers a modal dialog box whose position is 0,0), and the dialog box's dimensions (160,68). All measurements are expressed in dialog box units. Horizontally, one dialog box unit is equal to one-fourth the average width of a character in the dialog box font. Vertically, one dialog box unit equals one-eighth the character height. Because characters are generally about twice as tall as they are wide, the distance represented by one horizontal dialog box unit is roughly equal to that of one vertical dialog box unit. Measuring distances in dialog box units rather than pixels allows you to define a dialog box's relative proportions independent of the screen resolution.
The STYLE statement in the dialog box template specifies the dialog box's window style. You should always include WS_POPUP in a dialog box's window style. You should typically include WS_VISIBLE, too, so that you don't have to call ShowWindow to make the dialog box visible on the screen. WS_CAPTION gives the dialog box a title bar, and WS_SYSMENU adds a close button to the title bar. Styles prefixed with DS_ are specific to dialog boxes. By convention, modal dialog boxes are assigned the style DS_MODALFRAME. In early versions of Windows, this style placed a thick border around the dialog box. Today, DS_MODALFRAME has subtle effects on a dialog box's behavior but does nothing to its appearance. Other interesting dialog styles include DS_CENTER, which centers a dialog box on the screen, DS_ABSALIGN, which positions a dialog relative to the upper left corner of the screen instead of the upper left corner of its owner, and DS_CONTEXTHELP, which adds a question mark button to the dialog box's title bar so that the user can get context-sensitive help regarding the dialog box's controls.
You can create a system-modal dialog box by including DS_SYSMODAL in the STYLE statement. In 16-bit Windows, a system-modal dialog box disables all other windows in the system until it is dismissed and is typically used to report critical errors that must be attended to before further processing is performed. In 32-bit Windows, where processes are physically isolated from one another by the operating system, DS_SYSMODAL simply makes the dialog box a topmost window—that is, one that is always displayed on top of other windows. The dialog box overlays all other windows, but the user is free to switch to other applications while the dialog box is displayed.
The CAPTION statement specifies the text that appears in the dialog box's title bar. You can also set the title programmatically with the SetWindowText function a CDialog object inherits from CWnd.
FONT specifies the dialog box font, which is automatically assigned to all the controls in the dialog. The statement
FONT 8, "MS Sans Serif" |
is somewhat redundant because 8-point MS Sans Serif is the default font in current versions of Windows. If your dialogs will be used in older (pre-Windows 95) versions of Windows, this statement ensures that the dialog will use 8-point MS Sans Serif. You can use CWnd::SetFont to change the fonts assigned to individual controls in a dialog box.
The statements between BEGIN and END define the dialog box's controls. Each statement defines one control, specifying its type (push button, check box, list box, and so on), its control ID, its position, its width and height, and its style. For static and button controls, you can specify the control text, too. In the example above, the LTEXT statement creates a static text control whose ID is -1, whose text is left-aligned in the control rectangle, whose upper left corner lies 8 horizontal dialog box units to the right of and 14 vertical dialog box units below the dialog box's upper left corner, and whose width and height are 24 horizontal dialog box units and 8 vertical dialog box units, respectively. The ampersand in the control text makes Alt-N a shortcut for the edit control created on the following line.
LTEXT is one of several resource statements used to define controls in dialog box templates; a complete list appears in the table below. In essence, these statements are shorthand ways of creating the same kinds of controls we created in Chapter 7 by instantiating a control class and calling the resulting object's Create or CreateEx function. Each keyword has certain default styles associated with it, and all build in the styles WS_CHILD and WS_VISIBLE. Buttons and edit controls also include the style WS_TABSTOP so that they can be tabbed to with the Tab key. If desired, you can remove an implicit style with the NOT operator. For example, the following resource statement creates an edit control minus the default WS_TABSTOP style:
EDITTEXT IDC_EDIT, 32, 16, 96, 12, NOT WS_TABSTOP |
You can also define dialog box controls with the more generic CONTROL keyword. Sometimes you'll see a dialog box template defined this way:
IDD_MYDIALOG DIALOG 0, 0, 160, 68 STYLE DS_MODALFRAME ¦ WS_POPUP ¦ WS_VISIBLE ¦ WS_CAPTION ¦ WS_SYSMENU CAPTION "Enter Your Name" BEGIN CONTROL "&Name", -1, "STATIC", SS_LEFT, 8, 14, 24, 8 CONTROL "", IDC_NAME, "EDIT", WS_BORDER ¦ ES_AUTOHSCROLL ¦ ES_LEFT ¦ WS_TABSTOP, 34, 12, 118, 12 |
Resource Statements for Creating Dialog Box Controls
| Keyword | Control Type | Default Styles |
|---|---|---|
| LTEXT | Static control with left-aligned text | SS_LEFT ¦ WS_GROUP |
| CTEXT | Static control with centered text | SS_CENTER ¦ WS_GROUP |
| RTEXT | Static control with right-aligned text | SS_RIGHT ¦ WS_GROUP |
| PUSHBUTTON | Push button | BS_PUSHBUTTON ¦ WS_TABSTOP |
| DEFPUSHBUTTON | Default push button | BS_DEFPUSHBUTTON ¦ WS_TABSTOP |
| EDITTEXT | Edit control | ES_LEFT ¦ WS_BORDER ¦ WS_TABSTOP |
| CHECKBOX | Check box | BS_CHECKBOX ¦ WS_TABSTOP |
| AUTOCHECKBOX | Automatic check box | BS_AUTOCHECKBOX ¦ WS_TABSTOP |
| STATE3 | Three-state check box | BS_3STATE ¦ WS_TABSTOP |
| AUTO3STATE | Automatic three-state check box | BS_AUTO3STATE ¦ WS_TABSTOP |
| RADIOBUTTON | Radio button | BS_RADIOBUTTON ¦ WS_TABSTOP |
| AUTORADIOBUTTON | Automatic radio button | BS_AUTORADIOBUTTON ¦ WS_TABSTOP |
| GROUPBOX | Group box | BS_GROUPBOX |
| LISTBOX | List box | LBS_NOTIFY ¦ WS_BORDER |
| COMBOBOX | Combo box | CBS_SIMPLE |
| SCROLLBAR | Scroll bar | SBS_HORZ |
| ICON | Static icon control | SS_ICON |
CONTROL "OK", IDOK, "BUTTON", BS_DEFPUSHBUTTON ¦ WS_TABSTOP ¦ WS_GROUP, 60, 34, 40, 14 CONTROL "Cancel", IDCANCEL, "BUTTON", BS_PUSHBUTTON ¦ WS_TABSTOP ¦ WS_GROUP, 112, 34, 40, 14 END |
This dialog template is equivalent to the one at the beginning of this section. The styles WS_CHILD and WS_VISIBLE are implicit in a CONTROL statement, but all other styles must be specified explicitly. The third parameter in a CONTROL statement specifies the WNDCLASS the control is based on—"BUTTON" for push buttons, radio buttons, check boxes, and group boxes; "EDIT" for edit controls; and so on. Because the WNDCLASS is specified explicitly, you can use CONTROL to create custom controls whose WNDCLASSes are registered with ::RegisterClass. It's with CONTROL statements, in fact, that you add progress bars, spin buttons, and other common controls to a dialog box. You'll learn more about the common controls in Chapter 16.
Today it's rare for programmers to create dialog box templates by hand. Using Visual C++'s Insert/Resource command, you can insert a dialog box resource into a project and edit it visually. Figure 8-1 shows the Visual C++ dialog editor at work. You add controls to a dialog box by picking them from the Controls toolbar and literally drawing them into the dialog window. (If the Controls toolbar isn't visible, you can make it visible by selecting Customize from the Tools menu, clicking the Toolbars tab, and placing a check mark next to Controls.) You modify a dialog box's properties—its STYLE, CAPTION, FONT, and so on—by making selections in the dialog box's property sheet, which you display by right-clicking the dialog box and selecting Properties from the context menu.
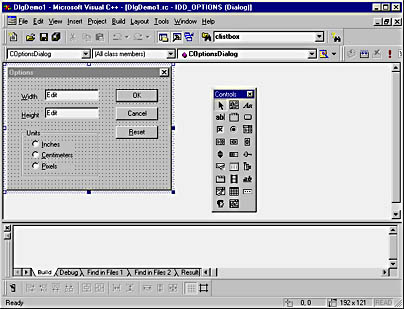
Figure 8-1. The Visual C++ dialog editor.
The Dialog Box Keyboard Interface
Windows supplies every dialog box with a keyboard interface that lets the user move the input focus among controls with the Tab key, cycle among the controls within a group using the arrow keys, and more. When you define a dialog box template in an RC file, you implicitly define the dialog box's keyboard interface, too. Here are the elements of the dialog box template that affect the keyboard interface:
- The order in which the controls are defined
- The use of ampersands in control text to designate shortcut keys
- The use of the WS_GROUP style to group controls
- The use of DEFPUSHBUTTON to designate the default push button
The order of the control-creation statements in the dialog template determines the tab order—the order in which the input focus is passed around when the user presses Tab or Shift-Tab. Most dialog editors, including the one that's built into Visual C++, let you specify the tab order visually. Under the hood, they simply reorder the resource statements to match the tab order. A control can't be tabbed to unless it includes the style WS_TABSTOP. That's why many of the resource statements discussed in the previous section include WS_TABSTOP by default.
Dialog boxes support shortcut keys for those users who prefer the keyboard over the mouse. You can create a shortcut key for a push button, a radio button, or a check box control by preceding the shortcut character in the control text with an ampersand, as in
PUSHBUTTON "&Reset", IDC_RESET, 112, 34, 40, 24, WS_GROUP |
Now presses of Alt-R (or simply R if the input focus rests on another button control) will click the Reset button unless another control has been assigned the same mnemonic, in which case repeated presses of the shortcut key will cycle the input focus between the two controls. For list boxes, edit controls, and other controls that have no control text per se, you define a shortcut key by preceding the statement that creates the control with a statement that creates a static control and including an ampersand in the static control's text. For example, the statements
LTEXT "&Name", -1, 8, 14, 24, 8 EDITTEXT IDC_NAME, 34, 12, 118, 12, ES_AUTOHSCROLL |
create a static control labeled "Name" and a single-line edit control to the right of it. Pressing Alt-N moves the input focus to the edit control.
Another element of the keyboard interface to consider when creating a dialog box template, especially if the dialog box includes radio buttons, is the grouping of the controls. Recall from Chapter 7 that BS_AUTORADIOBUTTON-style radio buttons must be grouped if Windows is to uncheck all the other buttons in the group when one of the buttons is clicked. Windows also uses radio button groupings to determine how to cycle the input focus among radio buttons when the arrow keys are pressed. To define a group of radio buttons, first make sure that the buttons occupy consecutive positions in the tab order—that is, if the first button in the group is control number 5 in the tab order, that the second button is number 6, that the third button is number 7, and so on. Then assign the style WS_GROUP to the first radio button in the group and to the first control that comes after the group in the tab order. Windows programmers often assign WS_GROUP to push buttons and check boxes, too, so that the arrow keys won't move the input focus when the input focus rests on a push button or a check box.
A final point to consider as you design a dialog box's keyboard interface is which push button should serve as the default. In most dialog boxes, you designate one push button (typically the OK button) as the default push button by creating it with a DEFPUSHBUTTON statement or assigning it the BS_DEFPUSHBUTTON style. When the Enter key is pressed, Windows simulates a click of the default push button in the dialog box. If the input focus is on a non-push-button control, the default push button is the one designated as the default in the dialog box template. As the input focus is cycled among push buttons, however, the "defaultness" moves with it. You can always tell which push button is the default by the thick border Windows draws around it.
All elements of a dialog box's keyboard interface can be specified visually in the Visual C++ dialog editor. You specify the tab order by selecting Tab Order from the Layout menu and clicking the controls in order. The dialog editor uses numbered boxes to show the tab order, as you can see in Figure 8-2. To apply the WS_GROUP style to a control, check the Group box in the control's property sheet. The property sheet is displayed by clicking the control with the right mouse button and selecting Properties. To make a push button the default push button, check the Default Button box in the button's property sheet.
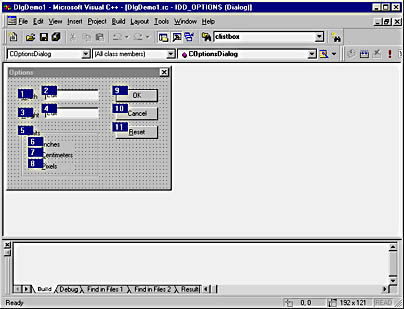
Figure 8-2. A dialog box's tab order as seen in the Visual C++ dialog editor.
The CDialog Class
For all but the most trivial dialog boxes, the next step in creating a modal dialog is to derive a class from CDialog and use it to define the dialog box's behavior. CDialog includes three key functions that you can override to initialize the dialog box and respond to clicks of the OK and Cancel buttons: OnInitDialog, OnOK, and OnCancel. Although each of these functions corresponds to a dialog box message, you don't need a message map to process them because CDialog does the message mapping for you and exposes the corresponding functions as ordinary virtual functions. CDialog also provides default implementations of all three, so you can frequently get away without overriding any of them if you take advantage of MFC's Dialog Data Exchange and Dialog Data Validation mechanisms, which we'll cover later in this chapter.
When a dialog box is created, it receives a WM_CREATE message just as any other window does. But when the WM_CREATE message arrives, the controls specified in the dialog box template have yet to be created and therefore can't be initialized. The dialog box is, in effect, empty. The internal window procedure that Windows uses to process dialog box messages responds to WM_CREATE messages by creating the dialog box's controls. After its controls are created, the dialog box receives a WM_INITDIALOG message affording it the opportunity to perform any necessary initializations, including those involving the controls. In a CDialog-derived class, the WM_INITDIALOG message activates the dialog box's OnInitDialog function, which is prototyped as follows:
virtual BOOL OnInitDialog () |
OnInitDialog is where you do anything you need to do to get the dialog box ready for action—for example, check a radio button or insert text into an edit control. At the moment OnInitDialog is called, the dialog box is extant in memory but not yet visible on the screen. The user won't see what you do in OnInitDialog, but he or she will see the results.
The value returned from OnInitDialog tells Windows what to do with the input focus. If OnInitDialog returns TRUE, Windows assigns the input focus to the first control in the tab order. To assign the input focus to a control other than the first one, call that control's SetFocus function in OnInitDialog and return FALSE from OnInitDialog to prevent Windows from setting the input focus itself. You can get a CWnd pointer through which to call SetFocus by passing the control ID to GetDlgItem, as demonstrated here:
GetDlgItem (IDC_EDIT)->SetFocus (); |
If you override OnInitDialog, you should call the base class's OnInitDialog handler for reasons that we'll get into shortly.
When the user clicks the dialog box's OK button, the dialog box receives a WM_COMMAND message reporting the button click, and MFC in turn calls the dialog's virtual OnOK function. For this mechanism to work properly, you must assign the OK button the special ID value IDOK, as shown in the following resource statement:
DEFPUSHBUTTON "OK", IDOK, 60, 34, 40, 24, WS_GROUP |
You can override OnOK to perform specialized processing before the dialog box is dismissed, which might include extracting data from the controls in the dialog box and possibly validating the data (for example, making sure that a numeric value retrieved from an edit control falls within an allowable range). If you do provide your own implementation of OnOK, be sure to close it out by calling EndDialog to dismiss the dialog box or by calling the base class's OnOK handler to dismiss it for you. Otherwise, the dialog box won't disappear when OK is clicked.
You must assign a Cancel button the predefined ID IDCANCEL for OnCancel to be called when the button is clicked. Be aware that even if your dialog box doesn't include a Cancel button, OnCancel will still be called if the Esc key is pressed or the close button in the dialog box's title bar is clicked. OnCancel isn't usually overridden because data typically doesn't need to be read from the dialog's controls if changes are canceled. CDialog::OnCancel calls EndDialog with an IDCANCEL parameter to dismiss the dialog box and inform the caller that changes in the dialog box controls should be ignored.
With the exception of the WM_INITDIALOG message, which is unique to dialog boxes, dialog boxes receive the same messages that conventional windows do. You can map any of these messages to the dialog class's member functions using a message map. For example, if your dialog box includes a Reset button whose ID is IDC_RESET and you want OnReset to be called when the button is clicked, you can use the following message-map entry to connect the two:
ON_BN_CLICKED (IDC_RESET, OnReset) |
Dialog boxes can even handle WM_PAINT messages—somewhat unusual but doable nonetheless. Most dialog boxes don't need OnPaint handlers because controls repaint themselves when the area of the dialog box that they occupy is invalidated.
Getting Help from ClassWizard
Although deriving dialog classes from CDialog by hand is perfectly acceptable, most MFC programmers today prefer to let ClassWizard do it for them. It's easy: invoke ClassWizard, click its Add Class button, select New from the menu that appears under the button, and fill in a class name, base class name (CDialog), and resource ID, as shown in Figure 8-3. The resource ID that you specify must be that of a dialog resource. If you want to override OnInitDialog, OnOK, or OnCancel in the derived class, you can do so after ClassWizard has performed the derivation.
That's one way to get to ClassWizard's New Class dialog box, but it's not the only way. In the dialog editor, double-click the body of the dialog box. Visual C++ will prompt you with a message asking if you want to create a new class. If you answer OK, ClassWizard will pop up and the New Class dialog box will appear with the name of the base class and the resource ID already filled in.
Figure 8-3. Using ClassWizard to derive from CDialog.
You can also use ClassWizard to write message handlers for a dialog's controls. Suppose you want to write a BN_CLICKED handler for a push button, and the push button's control ID is IDC_RESET. Here's how to go about it:
- Right-click the dialog class in the ClassView window.
- Select Add Windows Message Handler from the context menu.
- Select the button ID (IDC_RESET) in the Class Or Object To Handle box.
- Click BN_CLICKED in the New Windows Messages/Events box.
- Click the Add Handler button, and enter a function name.
When you're done, the function whose name you entered will be present in the dialog class and will be wired to the push button via an ON_BN_CLICKED entry in the dialog's message map.
Creating a Modal Dialog Box
Once you've defined the dialog box template and declared the dialog class, creating a modal dialog box is a simple matter of constructing an object from your CDialog-derived class and calling that object's DoModal function. DoModal doesn't return until after the dialog box is dismissed. When DoModal does return, its return value is the value that was passed to EndDialog. Applications typically test the DoModal return value and take action only if the return value is IDOK, indicating that the dialog box was dismissed with the OK button. If the return value is anything else (most likely IDCANCEL), the information entered into the dialog box is ignored.
CDialog defines two constructors: one that accepts a string dialog template resource ID and a CWnd pointer identifying the dialog box's owner, and another that accepts an integer dialog template resource ID and a CWnd pointer identifying the dialog box's owner. The CWnd pointer can be omitted, in which case the application's main window becomes the dialog's owner. To make derived dialog classes more objectlike and more self-contained, MFC programmers often provide their own constructors that build in references to the dialog templates. You could write a simple inline constructor for CMyDialog like this:
CMyDialog::CMyDialog (CWnd* pParentWnd = NULL) : CDialog (IDD_MYDIALOG, pParentWnd) {} |
This constructor simplifies the code that creates the dialog box and eliminates the possibility of inadvertently passing the constructor the wrong resource identifier:
CMyDialog dlg; dlg.DoModal (); |
When the user dismisses the dialog box by clicking OK or Cancel, DoModal returns and the function that called DoModal continues. If the action taken following the call to DoModal depends on whether the data entered in the dialog box was okayed or canceled (and it almost inevitably will), you can test the return value, like this:
CMyDialog dlg; if (dlg.DoModal () == IDOK) { // The user clicked OK; do something! } |
By default, the only values DoModal will return are IDOK and IDCANCEL. However, you can write your dialog class to return other values by calling EndDialog with a value other than IDOK or IDCANCEL. You could, for example, include an End This Application button in a dialog box and wire it into the program as follows:
// In the dialog class BEGIN_MESSAGE_MAP (CMyDialog, CDialog) ON_BN_CLICKED (IDC_ENDAPP, OnEndThisApplication) END_MESSAGE_MAP () |
When the user clicks End This Application in the dialog box, the return value IDC_ENDAPP alerts the caller that the user wants to terminate the application. Consequently, a WM_CLOSE message is posted to the message queue to initiate a shutdown. IDC_ENDAPP and other user-defined values passed to EndDialog should be assigned ID values equal to 3 or higher to avoid conflicting with the predefined IDOK and IDCANCEL button IDs.
Dialog Data Exchange and Dialog Data Validation
A typical dialog box presents a list of options to the user, gathers input regarding those options, and makes that input available to the application that created the dialog box. A convenient way to expose the input is to map it to public member variables in the dialog class. The application that uses the dialog box can then access the data by reading or writing the dialog object's member variables.
Suppose your dialog box contains two single-line edit controls in which the user enters a name and a phone number. To expose the name and number input by the user to the application that creates the dialog, declare two CString member variables in your dialog class:
class CMyDialog : public CDialog { public: CMyDialog::CMyDialog (CWnd* pParentWnd = NULL) : CDialog (IDD_MYDIALOG, pParentWnd) {} CString m_strName; CString m_strPhone; |
To solicit a name and phone number from the user, display the dialog and retrieve the values of m_strName and m_strPhone after the dialog is dismissed:
CMyDialog dlg; if (dlg.DoModal () == IDOK) { CString strName = dlg.m_strName; CString strPhone = dlg.m_strPhone; TRACE (_T ("Name=%s, Phone=%s"), strName, strPhone); } |
You could modify the code slightly to initialize the edit controls with a default name and phone number:
CMyDialog dlg; dlg.m_strName = _T ("Jeff"); dlg.m_strPhone = _T ("555-1212"); if (dlg.DoModal () == IDOK) { CString strName = dlg.m_strName; CString strPhone = dlg.m_strPhone; TRACE (_T ("Name=%s, Phone=%s"), strName, strPhone); } |
These examples assume that m_strName and m_strPhone are intrinsically linked to the dialog's edit controls—that is, that the strings assigned to these variables are magically inserted into the edit controls and that strings read from these variables are the strings the user entered into the edit controls.
The coupling of a dialog's controls and data members doesn't happen by itself; you have to make it happen. One way to perform the coupling is to override OnInitDialog and OnOK in the derived dialog class and include code that transfers data between the controls and the data members. Assuming the edit controls' IDs are IDC_NAME and IDC_PHONE, here's a revised version of CMyDialog that demonstrates this technique:
class CMyDialog : public CDialog { public: CMyDialog::CMyDialog (CWnd* pParentWnd = NULL) : CDialog (IDD_MYDIALOG, pParentWnd) {} CString m_strName; CString m_strPhone; protected: virtual BOOL OnInitDialog (); virtual void OnOK (); }; BOOL CMyDialog::OnInitDialog () { CDialog::OnInitDialog (); SetDlgItemText (IDC_NAME, m_strName); SetDlgItemText (IDC_PHONE, m_strPhone); return TRUE; } void CMyDialog::OnOK () { GetDlgItemText (IDC_NAME, m_strName); GetDlgItemText (IDC_PHONE, m_strPhone); CDialog::OnOK (); } |
Structuring CMyDialog this way ensures that strings written to m_strName and m_strPhone before the dialog is created will appear in the edit controls and that strings entered in those edit controls will be copied to m_strName and m_strPhone when the dialog is dismissed with the OK button.
Imagine how trivial the implementation of CMyDialog would be if you didn't have to initialize the controls in OnInitDialog and read them back in OnOK—that is, if you could provide a "data map" of sorts correlating controls to member variables. Sound farfetched? It's not. In fact, that's exactly what MFC's Dialog Data Exchange (DDX) mechanism is for. It's simple to use, and in many cases, it completely obviates the need to supply custom OnInitDialog and OnOK functions, even if your dialog box contains dozens of controls.
You enact DDX by overriding a virtual function named DoDataExchange in each class you derive from CDialog. In the override, you use DDX functions provided by MFC to transfer data between the dialog's controls and data members. Here's a DoDataExchange implementation that links two CString data members (m_strName and m_strPhone) to a pair of edit controls (IDC_NAME and IDC_PHONE):
void CMyDialog::DoDataExchange (CDataExchange* pDX) { DDX_Text (pDX, IDC_NAME, m_strName); DDX_Text (pDX, IDC_PHONE, m_strPhone); } |
MFC calls DoDataExchange once when the dialog is created (when the dialog box receives a WM_INITDIALOG message) and again when the OK button is clicked. The pDX parameter is a pointer to a CDataExchange object supplied by MFC. Among other things, the CDataExchange object tells DDX_Text in which direction the information is flowing—that is, whether data is being transferred from the data members to the controls or from the controls to the data members. Once it has determined the direction of data flow, DDX_Text performs the actual data transfer. Thus, one DoDataExchange function is sufficient to copy data from data members to controls when the dialog is created and from the controls to the data members when the dialog is dismissed.
DDX_Text is one of several DDX functions that MFC provides; a partial list is shown in the table below. The relationship between a control and a data member depends on the DDX function connecting the two. For example, an int variable linked to a group of radio buttons with DDX_Radio holds a 0-based index identifying one member of the group. If the int's value is 2 when the dialog is created, DDX_Radio checks the third button in the group. When the OK button is clicked, DDX_Radio copies the index of the currently selected button to the member variable. An int connected to a scroll bar with DDX_Scroll specifies the position of the scroll bar thumb, and an int associated with a check box with DDX_Check specifies the check box's state—BST_CHECKED, BST_UNCHECKED, or, for three-state check boxes, BST_INDETERMINATE. If an int is linked to an edit control with DDX_Text, MFC automatically converts the integer into a text string when transferring the value to the edit control and the string to an integer when transferring data from the edit control.
Dialog Data Exchange (DDX) Functions
| DDX Function | Description |
|---|---|
| DDX_Text | Associates a BYTE, an int, a short, a UINT, a long, a DWORD, a CString, a string, a float, a double, a COleDateTime, or a COleCurrency variable with an edit control |
| DDX_Check | Associates an int variable with a check box control |
| DDX_Radio | Associates an int variable with a group of radio buttons |
| DDX_LBIndex | Associates an int variable with a list box |
| DDX_LBString | Associates a CString variable with a list box |
| DDX_LBStringExact | Associates a CString variable with a list box |
| DDX_CBIndex | Associates an int variable with a combo box |
| DDX_CBString | Associates a CString variable with a combo box |
| DDX_CBStringExact | Associates a CString variable with a combo box |
| DDX_Scroll | Associates an int variable with a scroll bar |
A related mechanism called Dialog Data Validation (DDV) allows MFC to validate the values entered into a dialog's controls before the dialog is dismissed. DDV functions fall into two categories: those that validate numeric variables to ensure that they fall within specified limits and one that validates a CString variable to verify that its length doesn't exceed a certain value. Here's a DoDataExchange function that uses DDX_Text to connect an int member variable to an edit control and DDV_MinMaxInt to perform a range check on the value when the dialog's OK button is clicked:
void CMyDialog::DoDataExchange (CDataExchange* pDX) { DDX_Text (pDX, IDC_COUNT, m_nCount); DDV_MinMaxInt (pDX, m_nCount, 0, 100); } |
If the value displayed in the edit control is less than 0 or greater than 100 when OK is clicked, DDV_MinMaxInt transfers the input focus to the control and displays an error message. For a given data member, the DDV function call should immediately follow the DDX function call to enable MFC to set the input focus to the proper control if the validation proves negative.
DDV_MinMaxInt is one of several DDV functions that MFC provides. The following table lists the DDV functions that pertain to the classic controls. The DDV range-validation routines are not overloaded to accept multiple data types, so if you write a DoDataExchange function by hand, you must be careful to match the function to the data type.
Dialog Data Validation (DDV) Functions
| Function | Description |
|---|---|
| DDV_MinMaxByte | Verifies that a BYTE value falls within specified limits |
| DDV_MinMaxInt | Verifies that an int value falls within specified limits |
| DDV_MinMaxLong | Verifies that a long value falls within specified limits |
| DDV_MinMaxUInt | Verifies that a UINT value falls within specified limits |
| DDV_MinMaxDWord | Verifies that a DWORD value falls within specified limits |
| DDV_MinMaxFloat | Verifies that a float value falls within specified limits |
| DDV_MinMaxDouble | Verifies that a double value falls within specified limits |
| DDV_MaxChars | On entry, uses an EM_LIMITTEXT message to limit the number of characters that can be entered into an edit control; on exit, verifies that the control contains no more than the specified number of characters |
The code that drives DDX and DDV is found in CDialog. When the dialog box is created, CDialog::OnInitDialog calls the UpdateData function a dialog object inherits from CWnd with a FALSE parameter. UpdateData, in turn, creates a CDataExchange object and calls the dialog's DoDataExchange function, passing it a pointer to the CDataExchange object. Each DDX function called by DoDataExchange initializes a control using the value of a member variable. Later, when the user clicks OK, CDialog::OnOK calls UpdateData with a TRUE parameter, causing the DDX functions to do just the opposite of what they did earlier. Any DDV functions present in DoDataExchange take this opportunity to validate the user's input. Earlier I mentioned the importance of calling the base class's OnOK and OnInitDialog functions if you override them in a derived class. Now you know why. If you fail to call the base class implementations of these functions, the framework won't get the opportunity to call UpdateData and DDX and DDV won't work.
What DDX and DDV amount to is a painless way to get data in and out of dialog box controls and perform simple validation procedures on the data. In practice, DDX and DDV prevent you from having to override OnInitDialog and OnOK simply to transfer data between a dialog's controls and data members.
More Help from ClassWizard
In an application crafted with the MFC wizards, you can add DDX and DDV functions to DoDataExchange by hand, or you can let ClassWizard add them for you. ClassWizard will even add member variables to a dialog class for you. Here's the procedure for adding a data member to a dialog class and associating it with a control via DDX or DDV:
- Invoke ClassWizard, and go to the Member Variables page. (See Figure 8-4.)
- Select the dialog class's name in the Class Name box.
- Highlight the ID of the control that you want to associate with a member variable in the Control IDs box, and click the Add Variable button.
- Type the member variable name into the Add Member Variable dialog box shown in Figure 8-5, and select the variable type from the Variable Type box. Then click OK.
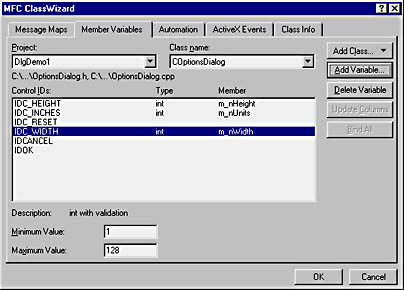
Figure 8-4. ClassWizard's Member Variables page.
If you examine the dialog class's source code after dismissing ClassWizard, you'll find that ClassWizard has added the member variable to the class declaration and also added a DDX statement to DoDataExchange connecting the member variable to a control. If the variable type is numeric, you can enter minimum and maximum values into the edit controls at the bottom of the Member Variables page and ClassWizard will add a DDV_MinMax statement, too. For string variables, you can enter a maximum character count and ClassWizard will add a DDV_MaxChars statement.
Figure 8-5. ClassWizard's Add Member Variable dialog box.
Interacting with the Controls in a Dialog
Does the presence of DDX and DDV mean that you'll never again have to write code to interact with the controls in a dialog box? Hardly. You might, for example, need to call CListBox functions on a list box control to add strings to the list box in OnInitDialog. To do that, you'll need a CListBox pointer to the list box. The question is, How do you get that pointer?
You can get a CWnd pointer to any control in a dialog with CWnd::GetDlgItem. The following code sample uses GetDlgItem and CWnd::EnableWindow to interactively enable the control whose ID is IDC_CHECK:
CWnd* pWnd = GetDlgItem (IDC_CHECK); pWnd->EnableWindow (TRUE); |
This code works fine because GetDlgItem returns a generic CWnd pointer and EnableWindow is a CWnd function. But consider the following code sample:
CListBox* pListBox = (CListBox*) GetDlgItem (IDC_LIST); pListBox->AddString (_T ("One")); pListBox->AddString (_T ("Two")); pListBox->AddString (_T ("Three")); |
This code works, but only because MFC is specifically architected to make it work. Because GetDlgItem returns a CWnd pointer, casting it to a CListBox pointer and calling a CListBox function through it is poor programming practice at best and dangerous at worst. In fact, in some situations, this technique simply won't work.
A better solution for calling non-CWnd functions on a control in a dialog box is MFC's CWnd::Attach function. With Attach, you can declare an instance of a control class (for example, CListBox) and dynamically attach it to a dialog box control. Here's how you'd use Attach to add strings to a list box.
CListBox wndListBox; wndListBox.Attach (GetDlgItem (IDC_LIST)->m_hWnd); wndListBox.AddString (_T ("One")); wndListBox.AddString (_T ("Two")); wndListBox.AddString (_T ("Three")); wndListBox.Detach (); |
When a CListBox object is declared on the stack as shown in this example, it's important to call Detach before the CListBox object goes out of scope. Otherwise, CListBox's destructor will destroy the list box and the list box will suddenly disappear from the dialog box.
MFC's DDX_Control function offers a seamless mechanism for attaching an instance of an MFC control class to a control in a dialog box. Placing the following statement in a derived dialog class's DoDataExchange function transparently connects a CListBox data member named m_wndListBox to a list box control whose ID is IDC_LIST:
DDX_Control (pDX, IDC_LIST, m_wndListBox); |
Now adding strings to the list box is a simple matter of calling AddString on m_wndListBox:
m_wndListBox.AddString (_T ("One")); m_wndListBox.AddString (_T ("Two")); m_wndListBox.AddString (_T ("Three")); |
DDX_Control offers added value because rather than simply encapsulate a control's window handle as Attach does, DDX_Control dynamically subclasses the control so that messages sent to the control first pass through the object specified in DDX_Control's third parameter. This is the easiest and most effective way to make a control in a dialog box behave like an object of a derived control class—for example, to make an edit control behave like a CNumEdit instead of an ordinary CEdit. You'll see an example demonstrating how to use a derived control class in a dialog box in the Phones application at the end of this chapter.
You can use ClassWizard to add DDX_Control statements to DoDataExchange. To do it, go to the Member Variables page and use the Add Variable button to add a member variable to the dialog class. But this time, select Control rather than Value in the Add Member Variable dialog box's Category box. Then pick a control class in the Variable Type box and click OK until you exit ClassWizard. Now, if you check the dialog class, you'll find that ClassWizard has added both the member variable and a DDX_Control statement connecting the variable to the control.
The DlgDemo1 Application
The DlgDemo1 application pictured in Figure 8-6 is a simple view-based program that draws a colored rectangle in the upper left corner of the view. The File menu features an Options command that displays a dialog box through which you can alter the rectangle's width, height, and units of measurement.
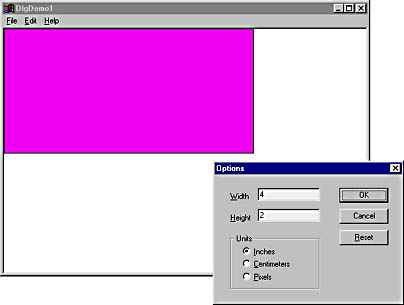
Figure 8-6. The DlgDemo1 window and dialog box.
I created DlgDemo1 with AppWizard and used ClassWizard to derive the dialog class, write message handlers, and so on. Portions of the source code are reproduced in Figure 8-7. The dialog box is an instance of COptionsDialog, which encapsulates the dialog resource IDD_OPTIONS. COptionsDialog has three public data members—m_nWidth, m_nHeight, and m_nUnits—which represent the rectangle's width, height, and units of measurement, respectively. Each data member is bound to a control (or group of controls) in the dialog box via DDX. An m_nUnits value equal to 0 represents inches, while 1 represents centimeters and 2 represents pixels. The view class CChildView contains identically named member variables that CChildView::OnPaint uses to paint the rectangle.
When the Options command is selected from the File menu, the command handler CChildView::OnFileOptions instantiates COptionsDialog; copies the current width, height, and units values to the dialog object's member variables; and displays the dialog with DoModal. If DoModal returns IDOK, OnFileOptions reads the width, height, and units values from the dialog's data members and copies them to the view's data members. Then it calls Invalidate to repaint the view, which refreshes the rectangle to conform to the new parameters.
Figure 8-7. The DlgDemo1 application.
MainFrm.h // MainFrm.h : interface of the CMainFrame class // /////////////////////////////////////////////////////////////////////////// #if !defined(AFX_MAINFRM_H__AC8095E8_902A_11D2_8E53_006008A82731__INCLUDED_) #define AFX_MAINFRM_H__AC8095E8_902A_11D2_8E53_006008A82731__INCLUDED_ #if _MSC_VER > 1000 #pragma once #endif // _MSC_VER > 1000 #include "ChildView.h" class CMainFrame : public CFrameWnd { public: CMainFrame(); protected: DECLARE_DYNAMIC(CMainFrame) // Attributes public: // Operations public: // Overrides // ClassWizard generated virtual function overrides //{{AFX_VIRTUAL(CMainFrame) virtual BOOL PreCreateWindow(CREATESTRUCT& cs); virtual BOOL OnCmdMsg(UINT nID, int nCode, void* pExtra, AFX_CMDHANDLERINFO* pHandlerInfo); //}}AFX_VIRTUAL // Implementation public: virtual ~CMainFrame(); #ifdef _DEBUG virtual void AssertValid() const; virtual void Dump(CDumpContext& dc) const; #endif CChildView m_wndView; // Generated message map functions protected: //{{AFX_MSG(CMainFrame) afx_msg void OnSetFocus(CWnd *pOldWnd); afx_msg int OnCreate(LPCREATESTRUCT lpCreateStruct); //}}AFX_MSG DECLARE_MESSAGE_MAP() }; /////////////////////////////////////////////////////////////////////////// //{{AFX_INSERT_LOCATION}} // Microsoft Visual C++ will insert additional declarations // immediately before the previous line. #endif // !defined(AFX_MAINFRM_H__AC8095E8_902A_11D2_8E53_006008A82731__INCLUDED_) |
MainFrm.cpp // MainFrm.cpp : implementation of the CMainFrame class // #include "stdafx.h" #include "DlgDemo1.h" #include "MainFrm.h" #ifdef _DEBUG #define new DEBUG_NEW #undef THIS_FILE static char THIS_FILE[] = __FILE__; #endif /////////////////////////////////////////////////////////////////////////// // CMainFrame IMPLEMENT_DYNAMIC(CMainFrame, CFrameWnd) BEGIN_MESSAGE_MAP(CMainFrame, CFrameWnd) //{{AFX_MSG_MAP(CMainFrame) ON_WM_SETFOCUS() ON_WM_CREATE() //}}AFX_MSG_MAP END_MESSAGE_MAP() /////////////////////////////////////////////////////////////////////////// // CMainFrame construction/destruction CMainFrame::CMainFrame() { } CMainFrame::~CMainFrame() { } BOOL CMainFrame::PreCreateWindow(CREATESTRUCT& cs) { if( !CFrameWnd::PreCreateWindow(cs) ) return FALSE; cs.dwExStyle &= ~WS_EX_CLIENTEDGE; cs.lpszClass = AfxRegisterWndClass(0); return TRUE; } /////////////////////////////////////////////////////////////////////////// // CMainFrame diagnostics #ifdef _DEBUG void CMainFrame::AssertValid() const { CFrameWnd::AssertValid(); } void CMainFrame::Dump(CDumpContext& dc) const { CFrameWnd::Dump(dc); } #endif //_DEBUG /////////////////////////////////////////////////////////////////////////// // CMainFrame message handlers void CMainFrame::OnSetFocus(CWnd* pOldWnd) { // forward focus to the view window m_wndView.SetFocus(); } BOOL CMainFrame::OnCmdMsg(UINT nID, int nCode, void* pExtra, AFX_CMDHANDLERINFO* pHandlerInfo) { // let the view have first crack at the command if (m_wndView.OnCmdMsg(nID, nCode, pExtra, pHandlerInfo)) return TRUE; // otherwise, do default handling return CFrameWnd::OnCmdMsg(nID, nCode, pExtra, pHandlerInfo); } int CMainFrame::OnCreate(LPCREATESTRUCT lpCreateStruct) { if (CFrameWnd::OnCreate(lpCreateStruct) == -1) return -1; if (!m_wndView.Create(NULL, NULL, AFX_WS_DEFAULT_VIEW, CRect(0, 0, 0, 0), this, AFX_IDW_PANE_FIRST, NULL)) return -1; return 0; } |
ChildView.h // ChildView.h : interface of the CChildView class // /////////////////////////////////////////////////////////////////////////// #if !defined(AFX_CHILDVIEW_H__AC8095EA_902A_11D2_8E53_006008A82731__INCLUDED_) #define AFX_CHILDVIEW_H__AC8095EA_902A_11D2_8E53_006008A82731__INCLUDED_ #if _MSC_VER > 1000 #pragma once #endif // _MSC_VER > 1000 /////////////////////////////////////////////////////////////////////////// // CChildView window class CChildView : public CWnd { // Construction public: CChildView(); // Attributes public: // Operations public: // Overrides // ClassWizard generated virtual function overrides //{{AFX_VIRTUAL(CChildView) protected: virtual BOOL PreCreateWindow(CREATESTRUCT& cs); //}}AFX_VIRTUAL // Implementation public: virtual ~CChildView(); // Generated message map functions protected: int m_nUnits; int m_nHeight; int m_nWidth; //{{AFX_MSG(CChildView) afx_msg void OnPaint(); afx_msg void OnFileOptions(); //}}AFX_MSG DECLARE_MESSAGE_MAP() }; /////////////////////////////////////////////////////////////////////////// //{{AFX_INSERT_LOCATION}} // Microsoft Visual C++ will insert additional declarations immediately // before the previous line. #endif //defined(AFX_CHILDVIEW_H__AC8095EA_902A_11D2_8E53_006008A82731__INCLUDED_) |
ChildView.cpp // ChildView.cpp : implementation of the CChildView class // #include "stdafx.h" #include "DlgDemo1.h" #include "OptionsDialog.h" #include "ChildView.h" #ifdef _DEBUG #define new DEBUG_NEW #undef THIS_FILE static char THIS_FILE[] = __FILE__; #endif /////////////////////////////////////////////////////////////////////////// // CChildView CChildView::CChildView() { m_nWidth = 4; m_nHeight = 2; m_nUnits = 0; } CChildView::~CChildView() { } BEGIN_MESSAGE_MAP(CChildView,CWnd ) //{{AFX_MSG_MAP(CChildView) ON_WM_PAINT() ON_COMMAND(ID_FILE_OPTIONS, OnFileOptions) //}}AFX_MSG_MAP END_MESSAGE_MAP() /////////////////////////////////////////////////////////////////////////// // CChildView message handlers BOOL CChildView::PreCreateWindow(CREATESTRUCT& cs) { if (!CWnd::PreCreateWindow(cs)) return FALSE; cs.dwExStyle ¦= WS_EX_CLIENTEDGE; cs.style &= ~WS_BORDER; cs.lpszClass = AfxRegisterWndClass(CS_HREDRAW¦CS_VREDRAW¦CS_DBLCLKS, ::LoadCursor(NULL, IDC_ARROW), HBRUSH(COLOR_WINDOW+1), NULL); return TRUE; } void CChildView::OnPaint() { CPaintDC dc(this); // Device context for painting. CBrush brush (RGB (255, 0, 255)); CBrush* pOldBrush = dc.SelectObject (&brush); switch (m_nUnits) { case 0: // Inches. dc.SetMapMode (MM_LOENGLISH); dc.Rectangle (0, 0, m_nWidth * 100, -m_nHeight * 100); break; case 1: // Centimeters. dc.SetMapMode (MM_LOMETRIC); dc.Rectangle (0, 0, m_nWidth * 100, -m_nHeight * 100); break; case 2: // Pixels. dc.SetMapMode (MM_TEXT); dc.Rectangle (0, 0, m_nWidth, m_nHeight); break; } dc.SelectObject (pOldBrush); } void CChildView::OnFileOptions() { COptionsDialog dlg; dlg.m_nWidth = m_nWidth; dlg.m_nHeight = m_nHeight; dlg.m_nUnits = m_nUnits; if (dlg.DoModal () == IDOK) { m_nWidth = dlg.m_nWidth; m_nHeight = dlg.m_nHeight; m_nUnits = dlg.m_nUnits; Invalidate (); } } |
OptionsDialog.h#if !defined(AFX_OPTIONSDIALOG_H__AC8095F0_902A_11D2_8E53_006008A82731__INCLUDED_) #define AFX_OPTIONSDIALOG_H__AC8095F0_902A_11D2_8E53_006008A82731__INCLUDED_ #if _MSC_VER > 1000 #pragma once #endif // _MSC_VER > 1000 // OptionsDialog.h : header file // /////////////////////////////////////////////////////////////////////////// // COptionsDialog dialog class COptionsDialog : public CDialog { // Construction public: COptionsDialog(CWnd* pParent = NULL); // standard constructor // Dialog Data //{{AFX_DATA(COptionsDialog) enum { IDD = IDD_OPTIONS }; int m_nWidth; int m_nHeight; int m_nUnits; //}}AFX_DATA // Overrides // ClassWizard generated virtual function overrides //{{AFX_VIRTUAL(COptionsDialog) protected: virtual void DoDataExchange(CDataExchange* pDX); // DDX/DDV support //}}AFX_VIRTUAL // Implementation protected: // Generated message map functions //{{AFX_MSG(COptionsDialog) afx_msg void OnReset(); //}}AFX_MSG DECLARE_MESSAGE_MAP() }; //{{AFX_INSERT_LOCATION}} // Microsoft Visual C++ will insert additional declarations immediately // before the previous line. #endif //!defined( // AFX_OPTIONSDIALOG_H__AC8095F0_902A_11D2_8E53_006008A82731__INCLUDED_) |
OptionsDialog.cpp// OptionsDialog.cpp : implementation file // #include "stdafx.h" #include "DlgDemo1.h" #include "OptionsDialog.h" #ifdef _DEBUG #define new DEBUG_NEW #undef THIS_FILE static char THIS_FILE[] = __FILE__; #endif /////////////////////////////////////////////////////////////////////////// // COptionsDialog dialog COptionsDialog::COptionsDialog(CWnd* pParent /*=NULL*/) : CDialog(COptionsDialog::IDD, pParent) { //{{AFX_DATA_INIT(COptionsDialog) m_nWidth = 0; m_nHeight = 0; m_nUnits = -1; //}}AFX_DATA_INIT } void COptionsDialog::DoDataExchange(CDataExchange* pDX) { CDialog::DoDataExchange(pDX); //{{AFX_DATA_MAP(COptionsDialog) DDX_Text(pDX, IDC_WIDTH, m_nWidth); DDV_MinMaxInt(pDX, m_nWidth, 1, 128); DDX_Text(pDX, IDC_HEIGHT, m_nHeight); DDX_Radio(pDX, IDC_INCHES, m_nUnits); //}}AFX_DATA_MAP } BEGIN_MESSAGE_MAP(COptionsDialog, CDialog) //{{AFX_MSG_MAP(COptionsDialog) ON_BN_CLICKED(IDC_RESET, OnReset) //}}AFX_MSG_MAP END_MESSAGE_MAP() /////////////////////////////////////////////////////////////////////////// // COptionsDialog message handlers void COptionsDialog::OnReset() { m_nWidth = 4; m_nHeight = 2; m_nUnits = 0; UpdateData (FALSE); } |
Here's a synopsis of the procedure I used to write DlgDemo1. You can create the application, too, by following these steps:
- Use AppWizard to create a project named DlgDemo1. In AppWizard's Step 1 dialog box, choose Single Document as the application type and uncheck the Document/View Architecture Support box. Uncheck the following boxes in the Step 3 and Step 4 dialog boxes:
- ActiveX Controls
- 3D Controls
- Docking Toolbar
- Initial Status Bar
- Add the following member variables to CChildView. Make the member variables protected, and initialize them in the view's constructor.
- Implement the view's OnPaint function.
- To compensate for a bug in Visual C++ 6.0, add a WM_CREATE message handler to the frame window class CMainFrame and add code to create the view.
- Use the Insert-Resource command to add a new dialog resource to the project. Change the dialog's resource ID to IDD_OPTIONS by right-clicking IDD_DIALOG1 in ResourceView, selecting Properties from the context menu, and entering the new ID. While you're at it, change the dialog's caption to "Options."
- Edit the dialog box so that it resembles the one in Figure 8-6. The table below lists the controls in the dialog box and their IDs. Be sure to create the radio buttons one after another so that they will be assigned consecutive control IDs. The OK and Cancel buttons are provided for you, so you don't need to add them separately.
- Select Tab Order from the Layout menu, and set the tab order shown in Figure 8-2. You can test the tab order by selecting Tab Order again to exit tab order mode, selecting Test from the Layout menu and using the Tab key to tab among the dialog box's controls. Note that you must manually select one of the radio buttons before the Tab key will move the input focus to a radio button.
- Let Windows know that the three radio buttons are a group by marking the first control in the group (the Inches radio button) and the first control in the tab order following the final control in the group (the OK button) with the style WS_GROUP. You can test the grouping by choosing Test from the Layout menu, clicking one of the radio buttons, and pressing the up or down arrow key a few times. If the radio buttons are properly grouped, the input focus will cycle among the radio buttons.
- Double-click the dialog box in the dialog editor, and use ClassWizard to derive a dialog class named COptionsDialog. After you dismiss ClassWizard, COptionsDialog should appear in the ClassView window.
- Use ClassWizard to add three int member variables to the dialog class: one (m_nUnits) that's linked to the radio button IDC_INCHES, another (m_nWidth) that's linked to the IDC_WIDTH edit control, and a third (m_nHeight) that's linked to the IDC_HEIGHT edit control. Set the minimum and maximum values for m_nWidth and m_nHeight to 1 and 128, respectively.
- Open the menu resource IDR_MAINFRAME, and add an Options command to the File menu. Enter "&Options..." for the text of the menu item and ID_FILE_OPTIONS for the command ID.
- Add the following #include to the view's CPP file:
- Add a BN_CLICKED handler named OnReset to the dialog class that sets m_nWidth to 4, m_nHeight to 2, and m_nUnits to 0 when the Reset button is clicked. Implement the handler as shown in Figure 8-7.
- Run the application, and use the File/Options command to display the Options dialog box. Test your handiwork by entering various widths and heights and selecting different units of measurement.
Accept the AppWizard defaults everywhere else.
| Variable Name | Type | Initial Value |
|---|---|---|
| m_nWidth | int | 4 |
| m_nHeight | int | 2 |
| m_nUnits | int | 0 |
| Control Type | Control Text | Control ID |
|---|---|---|
| Static | "&Width" | IDC_STATIC |
| Static | "&Height" | IDC_STATIC |
| Edit | None | IDC_WIDTH |
| Edit | None | IDC_HEIGHT |
| Group box | "Units" | IDC_STATIC |
| Radio button | "&Inches" | IDC_INCHES |
| Radio button | "&Centimeters" | IDC_CENTIMETERS |
| Radio button | "&Pixels" | IDC_PIXELS |
| Push button | "&Reset" | IDC_RESET |
| Push button | "OK" | IDOK |
| Push button | "Cancel" | IDCANCEL |
NOTE
Be sure that you create int member variables for the edit controls, not CString member variables, by selecting int in the Add Member Variable dialog box's Variable Type field. CString is the default. If you make a mistake, use the Delete Variable button to delete the member variable and try again.
#include "OptionsDialog.h" |
Then add a command handler named OnFileOptions to the view class that's called when the Options command is selected. Implement the function as shown in Figure 8-7.
Notice how COptionsDialog::OnReset is implemented. It's perfectly legal to call UpdateData yourself to transfer data between a dialog's controls and data members. In this case, UpdateData is called with a FALSE parameter to transfer data from the member variables to the controls. To read data out of the controls and into the member variables, pass UpdateData a TRUE parameter.
EAN: 2147483647
Pages: 101