6.7 Using JDeveloper to Translate and Load SQLJ Programs Oracle JDeveloper may be used to deploy SQLJ programs directly to the server without you having to use the loadjava command-line utility, and will even create the PL/SQL wrappers for you. As you will see in this section, JDeveloper can significantly reduce the amount of manual labor required to deploy SQLJ classes to the server. The examples in this section show how to deploy the ServerExample1 class to the fundamental_user schema. If you don't have JDeveloper, don't worry; this section is optional, as you can continue to use the command-line utilities that you've read about so far. If you do have JDeveloper, I have included the following files on this book's web site: If you want to follow along with the example in this section, start JDeveloper and open the workspace file sqlj_workspace.jws. To deploy a SQLJ program to the JServer using JDeveloper, you must first perform the following steps: -
Create a deployment profile that specifies the Java classes and methods you wish to deploy. -
Create a connection to the database schema into which the Java classes are to be loaded. The rest of this section guides you through the process of creating a deployment profile for the ServerExample1 class, creating a database connection to the fundamental_user schema, and, finally, deploying the ServerExample1 class to the JServer. 6.7.1 Creating a Deployment Profile To create a deployment profile, select Project  Deploy Create New Deployment Profile. This opens the Deployment Profile Wizard Welcome page shown in Figure 6-1. Deploy Create New Deployment Profile. This opens the Deployment Profile Wizard Welcome page shown in Figure 6-1. Figure 6-1. Deployment Profile Wizard Welcome page 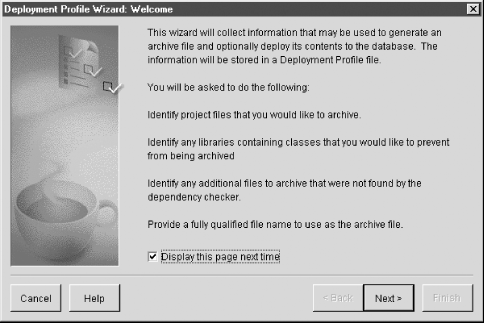 Click Next to begin creating a deployment profile. Page 1 of the wizard is displayed, as shown in Figure 6-2. Figure 6-2. Page 1 of the Deployment Profile Wizard  You are going to deploy classes and stored procedures to an Oracle8i database, so don't change the selected entry in the drop down list. Click Next to continue to Page 2 of the wizard, as shown in Figure 6-3. Figure 6-3. Page 2 of the Deployment Profile Wizard  Uncheck all the programs by deselecting the check from the checkbox to the left of the sqlj_project.jpr file. Then select only the ServerExample1.sql program by using the checkbox next to that filename, as shown in Figure 6-3. Click Next to continue. Page 3 of the wizard, shown in Figure 6-4, is displayed. This page lets you choose which methods to publish. Figure 6-4. Page 3 of the Deployment Profile Wizard  Select all methods for the ServerExample1 class using the checkboxes, as shown in Figure 6-4. If you like, you can use the Settings button to display the method signature for the currently highlighted method. The signature contains the method name and any parameters, and also indicates whether the method is a function or a procedure. If the method is a function, the signature indicates the return type for the function. Click Settings to display the method signature for the countCustomers( ) method, as shown in Figure 6-5. Figure 6-5. The Settings dialog  As you can see, the countCustomers( ) method returns a NUMBER parameter. The uppercase version of the name in the "Publish as" field in the Settings dialog will be used to create the wrapper name when JDeveloper later creates the package for the class. In this case, the wrapper name will be COUNTCUSTOMERS( ). You can change this name by modifying the field contents. Click OK to continue, and you'll return to Page 3 of the wizard. Click Next, and Page 4 of the wizard is displayed, as shown in Figure 6-6. Figure 6-6. Page 4 of the Deployment Profile Wizard  If you followed the example for creating a connection in Chapter 4, then you will see the details for the OBJECT_USER connection that you created for that chapter. That connection connects to the object_user schema. You will now create a new connection to the fundamental_user schema. Click New to create begin creating this new connection. 6.7.2 Creating a Database Connection When you click New from Page 4 of the Deployment Profile Wizard to create a new database connection, you are presented with a New Connection dialog box similar to that shown in Figure 6-7. Figure 6-7. The New Connection dialog 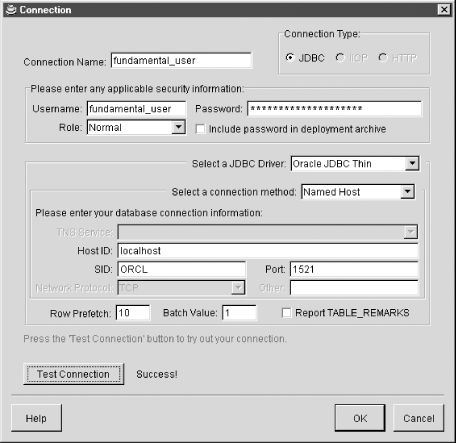 If you're following along with this example, enter the connection details as shown in Figure 6-7. Be sure that the Host ID, SID, and Port number are correct for your environment. Once you have all the connection information entered, click Test Connection to ensure that the details you have entered are correct and that a connection to the fundamental_user schema can be made. After successfully testing your connection and returning to the New Connection dialog, click OK to return to Page 4 of the wizard. From that page, click Next. The Deployment Profile Wizard Finish page is displayed, as shown in Figure 6-8. Figure 6-8. The Deployment Profile Wizard Finish dialog  At the end of the existing text, enter fundamental_user_profile.prf as the name of the profile and click Finish. JDeveloper now prompts you to confirm deployment of the selected class methods using the deployment profile you just created. This prompt is shown in Figure 6-9. Figure 6-9. Confirm Deployment 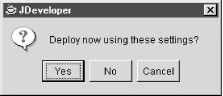 Click Yes to deploy now. You can choose to deploy later by clicking No or Cancel to dismiss the Confirm Deployment dialog, and then later selecting Project, Deploy, and then the name of the profile file saved in the previous step. When you deploy, JDeveloper loads the class into the specified schema, displaying the Deployment message shown in Figure 6-10. Figure 6-10. Deployment in Progress  Once JDeveloper has completed deployment, it writes a PL/SQL package containing wrappers for the selected methods in the classes that you chose to deploy. The following statement shows the package that JDeveloper writes for the ServerExample1 class. Notice that the package name is SQLJ_PROJECT and that the wrapper names are specified in uppercase: CREATE OR REPLACE PACKAGE SQLJ_PROJECT AUTHID CURRENT_USER AS PROCEDURE TESTMESSAGE AS LANGUAGE JAVA NAME 'ServerExample1.testMessage( )'; PROCEDURE ADDCUSTOMER ("first_name" IN VARCHAR2, "last_name" IN VARCHAR2) AS LANGUAGE JAVA NAME 'ServerExample1.addCustomer(java.lang.String, java.lang.String)'; PROCEDURE DISPLAYCUSTOMER ("id" IN NUMBER) AS LANGUAGE JAVA NAME 'ServerExample1.displayCustomer(int)'; FUNCTION COUNTCUSTOMERS RETURN NUMBER AS LANGUAGE JAVA NAME 'ServerExample1.countCustomers( ) return int'; END SQLJ_PROJECT; / The package name comes from the JDeveloper project filename, which in this case is sqlj_project.jpr. Although the package and wrapper names are created using uppercase, you don't have to use uppercase when you actually invoke the wrapper. The following example invokes the COUNTCUSTOMERS( ) method using SQL*Plus. Note that the package and wrapper names are specified in lowercase: SQL> SELECT sqlj_project.countcustomers( ) FROM dual; SQLJ_PROJECT.COUNTCUSTOMERS( ) ----------------------------- 8 As you can see, JDeveloper can be very useful in cutting down on the amount of manual work required to deploy classes to the JServer. |