Identifying IP Addressing Options
The first thing you should attempt to do when you design your IP addressing for your organization is decide which type of addressing you will use. Originally, IP addresses were grouped according to classes: Class A, Class B, Class C, Class D, and Class E. Although this worked out to be a somewhat efficient means of allocating IP addresses, as the Internet started to expand and more and more organizations needed to have addresses in order to communicate, the addresses started to become in short supply. Also, as more and more devices were introduced into the Internet, there needed to be a way to efficiently identify addresses within the routers that forwarded user requests through the Internet.
The standard classes were modified to allow for a more efficient use of network addresses. How many organizations really needed to have 65,000+, let alone 16 million, addresses within a network segment? Whereas many administrators understand how to create subnets so that they have an efficient use of their IP addresses, many others do not consider how to use variable length subnet masks (VLSM) to generate an efficient routing environment. VLSM allows you to use different subnet masks on a range of IP addresses so that you can create efficient subnets that use only the number of addresses that you need.
If you look at Figure 9.8, you can see a portion of a network where IP addresses have been configured to allow for efficient routing of information. Note that all of the addresses used within the distribution and access tiers of this design can be summarized into a range of 10.1.0.0/20. Because fewer entries are being used within the routing tables, the routing infrastructure is more efficient.
As you are developing your IP address scheme, make sure you do not have any network addresses that overlap. The best methodology to use is to consider the largest range that you need and create equal blocks of addresses. Once you have determined the largest block of addresses you need, set aside one range for the large number of hosts and then determine how many hosts you need in the next largest segment. Keep subdividing ranges until you obtain the desired number of addresses for your organization.
For example, if you look at Figure 9.8, one segment needs to have at least 500 host addresses available; 8 more need to have at least 200 addresses and 4 WAN links with 2 addresses each. If you were to determine the total number of segments required to support the number of hosts in this scenario, you would find that a 20-bit mask is most efficient. A 20-bit mask allows you to support upward of 4000 users in a single segment. This allows you to subnet the address space in order to partition the network for efficient communication and still have room for future growth.
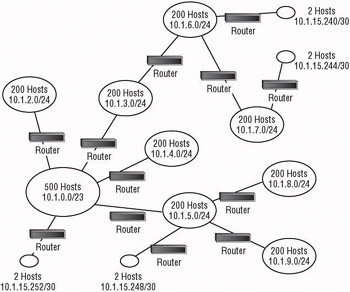
Figure 9.8: IP address allocation
The largest address space that you need is 500 hosts. You can break your address range down from the 20-bit mask to a 23-bit mask for this range, which would give you the address ranges 10.1.0.1 “10.1.1.254, or 510 effective host addresses. Doing so also gives you 7 other address ranges that will support 510 hosts. However, the remaining segments do not need to support as many hosts; remember, you only need 200 hosts on 8 other segments.
If you further break down the remaining segments into smaller units, you can create 8 segments from 4 of the segments by using a 24-bit mask. In doing so, you create the segments 10.1.2.0/24 through 10.1.9.0/24, which will host the required 200 hosts each. For the final breakdown, you need four segments that will have only two hosts each. You can accomplish this by taking one of the remaining ranges and breaking it down using a 30-bit mask. Because these are such small segments, you use addresses at the end of the address range for this purpose, and leave larger blocks of addresses available for future use.
Once you have determined the address range that you are going to use, you will need to determine how you will apply those addresses to systems within your network. The following section details the options you have available when addressing your systems.
Allocating IP Addresses
Every system that uses TCP/IP needs to have an IP address configured so that is able to talk on the network. If the network on which the device is going to communicate is the Internet, the device must have an IP address that is considered live, or one that is allowed to pass on the Internet routers. Addresses that are used on the Internet must be obtained from your ISP. You have to pay for the address in order to use it, but you should not have every device within your network directly connected to the Internet, so you will not have to purchase an address for every system. Instead, you should use private addresses that are reserved for use within an organization. These addresses are not allowed to travel through Internet routers, so you do not have to concern yourself with someone else using the same addresses.
| Note | For more information concerning the private IP address ranges, see RFC 1918. |
Configuring your systems so that they have the correct IP address for the subnet that they are on, and configuring all of the correct options that allow them to communicate with other systems throughout your infrastructure can be a daunting task. Some of your systems may be set to automatically obtain an address; others may be configured with static addressing. Your job is to make sure that all of the systems are properly configured so that all of the systems are able to reach the resources your users need to access. With Windows Server 2003, you have four IP addressing methods :
-
Static
-
Dynamic Host Configuration Protocol (DHCP)
-
Automatic private IP addressing (APIPA)
-
Alternate IP addressing
Using Static Addressing
Determine which devices need to have static addressing applied to them. You will find that certain servers, such as DNS and DCHP servers, are required to have a static address. Network infrastructure devices such as routers also require a static address. Once you have determined which devices need a static address, apply the appropriate static addresses to those devices only, leaving all other devices to use a dynamic configuration method such as DHCP.
Static addresses are more difficult to administer because you have to manually keep track of the addresses you assign, enter the addresses on each of the devices, and make sure you do not inadvertently enter a wrong number in an address. Then, if you need to move a device to another subnet, you have to manually reconfigure the address so that the device works properly on the new subnet.
Some companies have policies in place that do not allow DHCP assigned addresses for devices within a perimeter network. If this is the case, you are going to have to determine the addresses that are assigned to each of the devices, and then you ll need to maintain that list so that no other device conflicts with an existing system.
You should take a systematic approach to assigning the addresses. For example, many companies use the lower addresses within the range for static addresses only. This leaves the higher numbers available for use with DHCP.
Using DHCP
DHCP is favored by most administrators as the method of configuring addresses. Before you configure a DHCP server, you need to know the available addresses for the segment that it will be servicing . Take a look at all of the addresses that are assigned through static addressing and create your scopes to work around these addresses. If you follow the same systematic approach that we mentioned within the Using Static Addresses section earlier, you can assign the lower numbers within the address range to systems that need static address assignment and then use the upper range for DHCP. If you separate the addresses, you can minimize the need to configure exclusions within the DHCP address range.
If you do have systems that you would like to have configured with the same IP address all the time, but they are not required to have a static address, you can assign a reservation within the DHCP server so that the client s hardware address is associated with an IP address. Once configured within the DHCP server, the reservation only allows the system with the hardware address to obtain that IP address. This works out especially well for web servers or other servers that do not require a static address because you are able to change configuration options, and the system updates the setting during the next reboot or refresh interval.
You can also control how long the addresses are leased. If you have plenty of addresses to go around, you could configure the lease length to a long time frame, which would reduce the amount of DHCP related traffic on the network. If there are more than enough IP addresses for the hosts, increasing the lease length should not have any consequences for your systems with the exception of renewing the options for a client that has not rebooted recently.
On the other hand, if you are limited in the number of addresses you have available to lease, you can set a relatively short lease time, thus allowing the lease to expire more quickly and another system to use the freed-up address.
Finally, if you are using DHCP within an Active Directory environment, Windows 2000 and Windows Server 2003 “based DHCP servers will need to be authorized. If the DHCP server is not authorized within Active Directory, the DHCP service will not start. Domain admins, enterprise admins, DHCP admins and any user who has been delegated permission will be able to authorize DHCP servers within Active Directory.
Using APIPA
The automatic private IP address (APIPA) range of 169.254.0.0/16 is a range of addresses that has been identified by the Internet Assigned Numbers Authority (IANA) that is not allowed to pass across routers on the Internet. This range is used for local access within a subnet only. In a Microsoft network where client operating systems support APIPA, which includes Windows 98 and newer operating systems, if a client is configured to automatically obtain an IP address and a DHCP server is not available, or the server does not have an IP address to lease from its scope, the operating system chooses a random address from the APIPA range. This automatically generated address does not configure any of the options for default gateway, DNS server, or any other option that you can configure from a DHCP server.
If you want to allow a system to automatically configure itself with an APIPA address, remember that the system is not able to communicate with any other system except for those that are also using an APIPA-generated address and are in the same collision domain. This usually doesn t do you much good because the computer is stranded on its own island, but it does add in a troubleshooting feature.
When a client is using an APIPA-assigned address, you can determine that there is either a network issue between the client and the DHCP server or the DHCP server does not have any available leases. On the other hand, if a client is using the 0.0.0.0 address, you can assume that there was a duplication of IP addresses on the network. By leaving APIPA enabled on the client system, you benefit.
Using Alternate IP Addressing
Whereas APIPA automatically configures a system with an address that is not viable for normal network communication, alternate IP addressing allows you to assign an address to a system so that it can still communicate normally on the network even if the DHCP server is unavailable. This gives you the added benefit of having a redundant IP address mechanism to keep your systems communicating properly; however, it adds in an additional level of administration.
For each system that you want to configure to use an alternate IP address, you have to set aside an address that will work on your network and you have to manually configure that address within the TCP/IP properties for your network connection. Using alternate IP addressing does give you the best of both the static and dynamic worlds , though. You can control the addressing based on a DHCP server, but still have the system function normally in case the DHCP server fails. Most companies do not configure servers this way, however; usually this is reserved for computers that roam from one location to another, like laptops, so that the computer can use DHCP at one location, such as the office, and then use the alternate IP address on a home network.
Defining Scope Options
TCP/IP configuration options that are available from a DHCP server allow an administrator to configure the systems to communicate with the correct DNS servers, WINS servers, and routers, as well as configure settings so that the system is identified correctly and communicates in the most efficient manner. You can configure these options in several places, and you need to determine which of the levels is the correct one for the clients that the option affects. Do take note that if you set any options static on the client, then DHCP-assigned options no longer apply.
Server Options
Server options become the default settings for all of the clients that receive a lease from the DHCP server. If you have settings that apply to many clients in every subnet, you should set them at this level, thus alleviating the need to configure the same setting within multiple scopes. Options that are typically set at this level include DNS and WINS server settings.
Scope Options
Scope options are settings that need to be applied to clients that reside within a specific subnet. These options override any option that is configured at the server level. If clients within a subnet have a specific setting they need applied that overrides the server level, apply it here. Also, if a specific setting needs to be applied to clients within a subnet, it needs to be applied here. Settings that you normally configure at this level include the default gateway address for the clients and DNS or WINS server settings, if they are different for the clients on this subnet than for those that are set as the defaults at the server level.
Reserved Client Options
The reserved client options are typically inherited from the subnet where the client s IP address is reserved. If you need to change the reserved client s options, you can configure the options within the reservation setting. Any changes at this level override any options that are set at the scope or server levels. One setting that you may want to configure at this level would be specifying a DNS server that the client uses that may be different than the ones other clients within the subnet use.
Class Options
Class options apply to specific client classifications to which a system is assigned. If a system is assigned a class ID, and the class ID is configured with options within the DHCP server, the client receives the options when it requests an IP address from the DHCP server. This comes in especially handy if you have a group of computers within a subnet that need to have specific options configured. Before the class options can be used, the client system needs to be configured with a class. For user classes that the administrator wants to use for specific systems, the ipconfig command is used to set the class ID; ipconfig /setclassid classname ¢. Options at the class level override options set at the scope and server level.
Determining DHCP Server Locations
Although it would be handy to place a DHCP server within every subnet where you are assigning IP addresses, you may not have that luxury. A single DHCP server can supply IP configuration options to systems within multiple subnets. You need to determine which subnets the server will work with, the scope of addresses for each subnet, the configuration options that will be used on each subnet and the method of relaying the settings to the DHCP clients.
Two distribution methods exist that allow a DHCP server to work with client systems:
-
Connecting directly to the subnet
-
Using a DHCP relay method
Because a DHCP server can be configured to have direct access to multiple subnets, it can respond to DHCP requests from clients on each of the subnets to which it is connected. Each of the scopes needs to have their own specific options applied so that the clients are able to communicate correctly.
If the DHCP server is not directly connected to the subnet in which a DHCP client exists, you have to use a DHCP relay method, either by configuring a router that supports forwarding of DHCP/BOOTP packets, or by configuring a system to perform as a DHCP relay agent. In either case, you set the DHCP relay device to forward DHCP requests, which are broadcast based, to a DHCP server as a unicast packet. The DHCP server would then assign the client an address based upon the subnet scope for the client system. The lease information is then sent directly back to the DHCP relay device which in turn broadcasts the information back out onto the subnet for the client to discover.
If you have a large client population on a subnet, you should consider configuring your DHCP servers to communicate directly on that subnet. However, if the subnet does not contain many DHCP clients, you may consider using a relay option so that you are not investing in the hardware. Do take note that if the network links between the client and the server fail, you need to have an alternate method of configuring the client in case the client s lease expires .
EAN: 2147483647
Pages: 159