| The Windows Media Encoder can be used in conjunction with a Windows Media Server to broadcast a live event. This gives an organization the capability to use the Windows Media Server as the back-end server to publish the live content to multiple users. Also, a laptop or some other mobile or portable device can then act as the system capturing the video/audio content that will be published by the Windows Media Server. Preparing for a Live Broadcast To prepare for a live broadcast, a Windows 2000/Windows XP workstation, a Windows 2000/Windows 2003 server with compatible camera and microphone, or a system with a video/audio capture card must be configured and tested for basic functionality. The camera and audio devices should be able to capture and record video and audio content at the desired level of quality. Once the remote system is working properly, the live broadcast can be initiated. Initiating a Live Broadcast To start a live broadcast, Windows Media Encoder should be launched on the broadcasting system. Once launched, follow these steps: 1. | Select Broadcast a New Event and then click OK.
| 2. | Select the video and audio device source that will be capturing the event. Click Next when ready.
Note For systems with only a single video and audio source, the options should default to the only devices in the system. However, for systems with an audio and video capture card installed, the onboard audio might also be an option, so be certain that the right video and audio devices are selected. When choosing the audio device, you might want to click Configure and confirm that the microphone has been enabled. Many systems automatically have the microphone disabled, so although the correct device has been selected, no sound will be captured. | 3. | The next setting allows the Windows Media Encoder system to either push the video/audio stream to a Windows Media Server on the network, or allows the Windows Media Server to initiate a pull from the encoder system. Make the choice and then click Next to continue.
|
Note The choice of whether to push or pull media content depends on what you are closer to. If you are closest to the Windows Media Encoder system (you are in the room where the event is taking place), you'd probably want to push the video/audio stream to the Windows Media Server. A push from the encoder system causes the Windows Media Server to automatically start publishing the session. If the Windows Media Encoder system is set up in a room and you are with the server, but not necessarily where the encoder system is located, you can initiate the capture remotely by choosing to have the Windows Media Server initiate the session.
If you choose to push to the Windows Media Server, you will be prompted with the following steps: | | 1. | You will be prompted to enter the name of the Windows Media Server and the publishing point, and you have the option of copying the publishing point settings from another configuration. When completely filled out, the form looks similar to Figure 37.8. Click Next when ready.
Figure 37.8. Pushing a live broadcast to a media server. 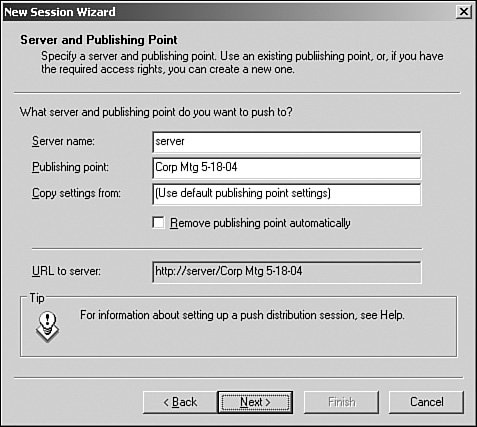
| | | 2. | The next screen will prompt for the encoding options. The various bit rate for encoding will be shown, displaying Total Bit Rate, Frame Rate, and Output Size. Choose the desired bit rate or bit rates and then click Next to continue.
Choosing the Bit Rate(s) When given the option of choosing the bit rate or bit rates supported, keep in mind the quality desired as well as the bandwidth available to publish the media files. If users are dialing in to receive the published content, you do not want a total bit rate that exceeds the available bandwidth of the dial-up modem session. Just because a user has a 56KB modem does not mean that user is getting a 56KB bit-rate speed. A bit rate lower than the available bandwidth should be chosen. Multiple bit rates can be selected for the encoding options so that a modem rate (possibly 24Kbps or 37Kbps), a DSL/cable modem rate (possibly 135Kbps or 240Kbps), or high quality rate (possibly 500Kbps or greater) can be selected. With multiple bit rates, the bit rate that meets the transmission speed of the remote client system will be used. Therefore, a user coming in over DSL might get a 135Kbps transmission, and a user coming in over a dial-up modem might get the same transmission at 24Kbps. When selecting multiple bit rates, one thing to consider is the size of the captured file. The more bit rates that are selected, the larger the file will be. Each bit-rate encoding option selected will capture a video and audio stream for that mode. So if 12 bit-rate encoding options are selected, 12 streams of the content will be stored in the file. Another point to consider is the desired available bandwidth. Even if all the users have high-speed network connections and can accept a 768Kbps bit-rate encoded stream, if the file is published using Unicast broadcasting, a network might become oversaturated with too much data. A lower captured video stream can allow more users access to the information. |
| 3. | For live broadcasts, an archive copy of the broadcast file can be captured and saved to disk. This allows for future playback of the session. Select the check box to archive the file and enter a filename to capture the session. Click Next to continue.
| | | 4. | Information can be added to the broadcast file, such as title, author, copyright information, rating, and description. This information is optional. Enter the desired information and click Next to continue.
| 5. | The next screen gives you the option to begin the broadcast when the Finish button is clicked, or to simply finish the configuration and start the session later. Make the appropriate selection and click Finish.
|
If you choose to pull where the session is initiated by the Windows Media Server from the encoder, you will be prompted with the following steps: 1. | You will be prompted to enter a free HTTP port that can be used to communicate between the Windows Media Server and the Windows Media Encoder system. Port 8080 is the default, but by clicking the Find Free Port button, you can search for an open port. Click Next to continue.
| 2. | The next screen prompts you for the encoding options. The various bit rate for encoding will be shown, displaying Total Bit Rate, Frame Rate, and Output Size. Choose the desired bit rate or bit rates. Refer to the "Choosing the Bit Rate(s)" sidebar for more details. Click Next to continue.
| 3. | For live broadcasts, an archive copy of the broadcast file can be captured and saved to disk. This allows for future playback of the session. Select the check box to archive the file and enter a filename to capture the session. Click Next to continue.
| 4. | Information can be added to the broadcast file, such as title, author, copyright information, rating, and description. This information is optional. Enter the desired information and click Next to continue.
| 5. | The next screen gives you the option to begin the broadcast when the Finish button is clicked, or to simply finish the configuration and start the session later. Make the appropriate selection and click Finish.
|
For live broadcasts, it's usually preferable to test the broadcast process to make sure that the lighting, sound quality, and video quality are at the desired level. Playing around with the different bit rates can provide better results based on the needs of the organization. Although a producer may choose a higher bit rate to get better quality, the results might not be better than those obtained at a lower bit rate and with presumably lower-quality published media. If the lower bit rate produces results that are still acceptable, lowering the bit rate can minimize bandwidth demands on the network, creating less demand on the network and allowing the organization to have more simultaneous media streams. |