Migrating Existing NT4 Domains to a New Windows Server 2003 Forest
| The second migration option allows an organization to migrate the objects (users, computers, groups, and so on) from an existing Windows NT4 domain or domains into a brand-new Active Directory forest. After installing and configuring a new Windows Server 2003 Active Directory domain with pre-Windows 2000 permissions and creating a domain trust to integrate Windows NT4 domains with Active Directory domains, you can then use the Active Directory Migration Tool to migrate any and all Windows NT4 security principles to Active Directory domains and organizational units. By using domain trusts to provide coexistence between Windows Server 2003 and Windows NT4 resources, organizations can then migrate security principles incrementally over time and still maintain shared resources located on each domain. When you use the Active Directory Migration Tool to restructure domains, all NT4 security principles are copied or cloned from the Windows NT4 domain and placed into Active Directory. When NT4 security principles are cloned, the source domain is left completely in place and uninterrupted, allowing you to easily roll back to the previous domain if required. Installing and Configuring a New Windows Server 2003 Forest and DomainInstalling a new domain requires the installation of a new domain controller and Microsoft's Active Directory. After you install a new Windows Server 2003 system, you can then use the DCPROMO command to begin installing AD. To begin the Active Directory Installation Wizard, do the following:
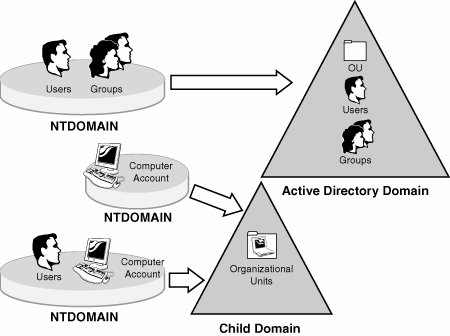
Restart the domain controller by selecting Restart Now. Log in after the server restarts and review the server's Event Viewer application and system logs to identify any errors or potential problems with your installation before continuing. Install and configure any additional domain controllers as planned in your Active Directory design and configure security as well as create all organizational units before migrating Windows NT4 security principles to Active Directory. Configuring Domain Trust Between Windows NT4 and Windows Server 2003When you're migrating existing NT4 domains to a new Active Directory forest root or child domain, you must create trust relationships between the existing Windows NT4 domains. The existing Windows NT4 domains are called the source domains, and the newly created Windows Server 2003 Active Directory domains are target domains. Begin by configuring a trust on the target domain. On the Windows Server 2003 domain controller, open the Administrator Tools and launch Active Directory Domains and Trust Manager. From the Action menu, open the property page for your Active Directory domain and select the Trust tab. Windows Server 2003 and Active Directory trusts are created using the New Trust Wizard. Select New Trust to start the wizard, which will guide you through the creation of a domain trust. Click Next at the Welcome screen. On the Trust Name page, type in the name of the Windows NT4 source domain with which you would like to create a trust. You can use both the source domain's NetBIOS and fully qualified DNS name in this configuration. This will allow Active Directory to establish connectivity with the source Windows NT4 domain. Click Next to continue. Note When you're configuring a domain trust, each domain must have the capability to resolve the domain name to a domain controller's TCP/IP address. Install the Windows Internet Naming Service (WINS) on the target domain controller and configure the TCP/IP properties on the target and source domain controllers to use the newly installed WINS service. The Windows Server 2003 forest functionality must be in Native mode to establish trust between Active Directory and Windows NT4. If you are experiencing problems creating a trust, raise the forest functional levels using the property page of the Active Directory domain. Select the type of trust you want to establish. On the Direction of Trust page, select Two-Way, which will allow connectivity and access to resources in both the target and source domains when migrating. Then click Next to continue. To configure outgoing trust properties, select Domain-wide Authentication. This option will allow Windows NT4 security principles access to all resources within the Active Directory target domain. Windows Server 2003 will automatically authenticate existing NT4 security principles within the target domain. This will allow required Administrator accounts access to each domain and domain group membership when you are ready to install the Active Directory Migration Tool and migrate security principles. Click Next to continue. The trust password is a password other than the domain administrator password. It is unique to the trust being created and will be used by both the source and target domains to authenticate the trust. The same trust password must be used on both the Windows NT4 target domain and Windows Server 2003 source domain trust configurations. Enter a password for this trust to use and click Next to continue. Review your trust configuration, select Back to modify any setting you want to change, or click Next to finish creating the trust and view the configuration changes created by the New Trust Wizard. Click Next to continue. A dialog box will appear asking for confirmation of the outgoing trust. You cannot confirm the domain trust until a successful trust has been created on the Windows NT4 source domain. Before continuing, create and establish a trust relationship on the Windows NT4 source domain's primary domain controller. At the Confirm Outgoing Trust page, select the No, Do Not Confirm the Outgoing Trust option and click Next to continue. Choose the No, Do Not Confirm the Incoming Trust option on the Confirm Incoming Trust page. Click Next to complete the trust configuration. Next, review the trust configuration and click Finish to close the New Trust Wizard. To successfully establish a trust on the Windows NT source domain, you must first configure the trusted domain. To add the target domain to the Windows NT4 trusted domains, open the User Manager for Domains on the Windows NT4 primary domain controller. Choose Policies, Trust Relationships to open the Windows NT4 Trust Relationship page. Begin by selecting the Add button under Trusted Domains. Enter the name of the target domain and a password that will be used by both domains to authenticate the trust. As mentioned earlier, this password is unique to the trust configuration and should be different from the Domain Administrator account password. This password will be used only to authenticate the domain trust between the source and target domains. After the trusted domain is established successfully, select Add under the Trusting Domain section of the page. Enter the name of the target domain and the password used to establish the trust. This will add the target domain to the Windows NT4 trusting domains and complete the configuration of the Windows NT4 trust. Click Close to close the Trust Relationships page. After you successfully create the trust between the source and target domain, the New Trust Wizard can confirm the trust for both outgoing and incoming trusts. If you choose to validate the trust, use the Administrator account name and password of the source domain to test access for both incoming and outgoing connectivity of the domain trust. Click OK to close the open dialog box. Migrating Account and Resource Domains to Windows Server 2003 and Active DirectoryUsing the option to migrate account and resource domains to Windows Server 2003 and Active Directory allows you to restructure existing Windows NT4 accounts and resources into newly created Windows Server 2003 Active Directory domains and organizational units. Before beginning your migration to Windows Server 2003, review the Active Directory design decisions you made in Chapter 5 of this book. The design decisions such as organizational unit configuration and group definition make up the framework of the Active Directory structure. When you use the Active Directory Users and Computers MMC snap-in, the creation of OUs and groups should match the OU and Group design. Migrating account domains and resource domains to Active Directory organizational units allows for enhanced security and ease of delegation within the Active Directory domain tree. After you finish configuring the Active Directory domain's organizational unit structure, you can begin migrating domain resources and security principles using the Active Directory Migration Tool, as shown in Figure 16.4. Review the "Using Microsoft Active Directory Migration Tool" section at the end of this chapter to step through the migration process. Figure 16.4. Migrating to organizational units and child domains. Implication of Migrating Security PrinciplesWhen security principles are created in a Windows NT4 domain, each individual object is assigned a unique security identifier (SID). Each security principle's SID is unique and contains information about that specific security principle's group and domain membership. When these types of security principles are migrated to Windows Server 2003 and Active Directory, each security principle is assigned a new SID with information about its new domain and group membership. Because the new SID does not contain information about the security principle's previous domain membership, when users or groups access domain resources on the old Windows NT4 domain, such as files, they may find that they no longer have permission to specific resources. To avoid these problems during and after your migration, use the Microsoft Active Directory Migration Tool to migrate the security principles' SID history. The SID history is a record of each specific security principle's previous Windows NT4 group and domain membership. The Active Directory Migration Tool can migrate the security principles' SID history for each object maintaining previous information and preventing permissions problems later in the migration. |
EAN: 2147483647
Pages: 499