Exploiting V-Tracks
| < Day Day Up > |
| We've got most of our basic tracks recorded, so now let's record a lead guitar part. The guitar player isn't exactly sure what he wants to play during the guitar solo, so he wants to record a few different takes and then decide which parts are best. Now is the time to understand how V-Tracks work. From our track sheet, you can see that every track we've recorded so far has been on V-Track 1. The VS defaults to using V-Track 1 for every track, but it's easy to change to record to any V-Track. Let's verify that recording track 6 is set up to record on V-Track 1. You can only change V-Tracks in the Track Mixer, so toggle to it and make sure you are in the Play Condition. Now, press the SELECT button above track 6, and use the Figure 4.10. The V-Track matrix display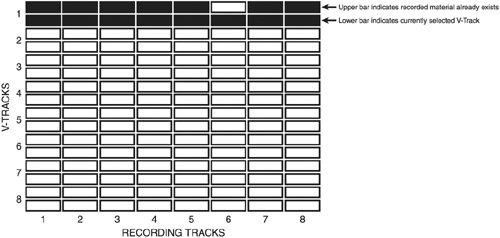 From here on out, I'll abbreviate the combination of a recording track/V-Track as "track r-v," where "r" is the recording track and "v" is the V-Track. In other words, "Track 6-1" represents recording track 6/V-Track 1. Since recording track 6-1 doesn't have any material on it, and V-Track 1 is the currently selected V-Track for recording track 6, go ahead and record the first take of the lead guitar there. For the next take, let's use recording track 6-2. Press the SELECT button above track 6 and use the In the chapter on editing and mixing, we'll see how to create composite, or "comp," tracks using multiple takes that are stored on different V-Tracks. |


| < Day Day Up > |
- Key #1: Delight Your Customers with Speed and Quality
- When Companies Start Using Lean Six Sigma
- Making Improvements That Last: An Illustrated Guide to DMAIC and the Lean Six Sigma Toolkit
- The Experience of Making Improvements: What Its Like to Work on Lean Six Sigma Projects
- Six Things Managers Must Do: How to Support Lean Six Sigma