Advanced Recording on the VS-880890 Series
| < Day Day Up > |
Advanced Recording on the VS-880/890 SeriesIn the previous section, we saw how to route tracks and do basic recording. Now let's look at some additional recording techniques. Overdubbing TracksOverdubbing is the process of recording new tracks while listening to already recorded tracks. When overdubbing, you'll set your routings and input levels the same as when you recorded the basic tracks. Since you'll want to hear the existing tracks while recording the new track, you'll want to be in the Track Mixer. Now you can adjust the playback levels of the existing recorded tracks, as well as the new track that you'll be recording. Remember, it's always best to use the Track Mixer for adjusting levels, as fader adjustments in the Input Mixer may affect the level of the signal before it gets recorded. Following our working example, we have our stereo keyboard on recording track a and our guitar on recording track 4. While you were busy reading this, I went ahead and recorded a stereo percussion track to recording track d and a bass guitar on recording track 5. Now it's up to you to record a lead vocal on recording track 3. Once you've configured the proper routing in the Input Mixer, you'll want to adjust the playback levels of all these tracks in the Track Mixer. Once you've set the playback levels, go ahead and record the lead vocal. Punch-In RecordingNow when we listen back to the guitar, keyboard, and lead vocal tracks, we realize the vocal came in a bit too late on the first line of one of the verses. We can fix this by punching in just before the verse and punching out just after the first line is sung. There are a number of different ways to punch in on the VS, so let's review them. Manual Punch-InTo do a manual punch, put the vocal track back into record mode, position the song to a location before the part you want to re-record, and press PLAY. When you get to the point where you want to punch in, press the REC button. When you do this, the REC light will be red, and the VS drops into REC mode. When you get to the point where you want to punch out, press the REC button again; the REC light will turn off, and the VS will drop out of REC mode. Footswitch Punch-In If you have a momentary-type of footswitch, you can connect it to the VS and use it to punch in. Connect the footswitch to the ¼" footswitch input jack on the back of the VS, then set up the footswitch to enable punch-in recording via SYSTEM Auto Punch-InThe VS can also be set up to automatically punch in and punch out at precise points. There are three ways to set the Auto Punch points:
When you are ready to record using Auto Punch-In, press the AUTO PUNCH button so that it lights up. Position the song to a location before the punch-in point, press REC, and then press PLAY. When the VS gets to the Auto Punch-In point, it will automatically drop into REC mode, and when it gets to the Auto Punch-Out point, it will automatically drop out of REC mode. Once you have set your Auto Punch-In and Punch-Out points, you can fine-tune these points if necessary. To do this, press the LOCATOR button multiple times until you see LOC APin and use the jogwheel to adjust the punch-in point. To change the punch-out point, press the LOCATOR button multiple times until you see LOC APOt and use the jogwheel to adjust value as necessary. Auto Punch-In with Loop PlaybackThe VS has the ability to play back in a looping capacity. You set up loop points in the same way you set up Auto Punch points, except that you hold down the LOOP button instead of the AUTO PUNCH button when setting the points. To have the VS play back in a looping mode, press the LOOP button until it lights up, position the song to a point before the start of the loop, and press PLAY. When the VS reaches the end of the loop, it will automatically jump back to the start of the loop and continue playing. The VS will continue to loop until you press STOP. You can use both LOOP and AUTO PUNCH together to practice the punch-in. To do this, make sure your LOOP points are before and after your punch-in points, as shown in Figure 4.8. Now press LOOP so that it lights up, press AUTO PUNCH so that it lights up, position the song to a point before the start of the loop, and press PLAY. The song will play the material between the loop points, allowing you to practice along with it. When you are ready to record the punch-in, press the REC button, and the VS will drop into REC mode when it reaches the punch-in point. Figure 4.8. Using loop playback with Auto Punch-In Track SheetsOK, I'll admit that track sheets aren't really an advanced recording technique, but the more you record, the more you'll appreciate them. Figure 4.9 shows the track sheet for our working example so far. Whenever I begin a recording session, I have a blank track sheet next to my VS workstation. There are two important things to keep in mind when using track sheets: Always keep it up to date, and always write in pencil. As we'll see later, you'll probably want to move some tracks around within the VS, and you'll need to reflect those changes on the track sheet as well. Figure 4.9. VS-880EX track sheet for our working example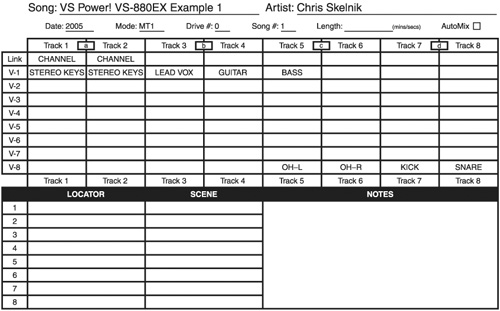 |
 SYS System PRM?
| < Day Day Up > |