| WebLogic makes it very easy to install and run this sample servlet. For test purposes, we will install this servlet into its own "Webapp" or Web Application. In our example, WebLogic Server is installed in /usr/local/bea/wlserver700 in a Unix environment or C:\bea\wlserver700 in a Windows environment. Your configuration can be different, but these directories will define the environment variable WL_HOME for WebLogic Server. To simplify our test we will put our sample servlet into a directory that ships with WebLogic 7.0. This is not required but simplifies this first Web application. Caution The example assumes that you have full control over WebLogic Server and it is not used for anything but development. Do not attempt to use these examples on a WebLogic server that is used by others or is used in a production environment.
To deploy the Sample Servlet in WebLogic 7.0, follow these steps: -
You need to set up the deployment environment. MyFirstServlet.java , the source code for the sample servlet in Listings 17.1 and 17.3, will reside in the directory samples/server/config/applications/myFirstWebApp/WEB-INF/src (from WL_HOME above). This is the code you created with the doPost() and doGet() methods . The directory firstWebApp and anything under it will not exist and will need to be created for this example. Create the file MyFirstServlet.java using the sample code and save it into the src directory. Unix: cd $WL_HOME/samples/server/config/applications mkdir p myFirstWebApp/WEB-INF/src Windows: cd %WL_HOME%\sample\server\config\applications mkdir myFirstWebApp\WEB-INF\src -
Next you need to compile the sample servlet. The compilation process requires you to have the javac command on the path of your command-line interface. The process to do this varies with your operating system. Please see the documentation that is included with your Java distribution for information on how to do this. Alternatively, a Java development kit (JDK) is shipped with WebLogic and can be used instead. To compile your servlet in Unix, use the following: cd $WL_HOME/samples/server/config/applications/myFirstWebApp/WEB-INF mkdir classes javac d classes classpath \ $WL_HOME/server/lib/weblogic.jar src/MyFirstServlet.java In Windows: cd %WL_HOME%\samples\server\config\applications\myFirstWebApp\WEB-INF mkdir classes javac d classes classpath %WL_HOME%\server\lib\weblogic.jar \ src\MyFirstServlet.java This should create a file named MyFirstServlet.class in the classes directory. -
Now you have to create the deployment descriptor for your servlet. In the same directory, ( samples/server/config/applications/myFirstWebApp/WEB-INF under the root directory of the WebLogic Server install), use a text editor to create a file named web.xml that has the contents shown in Listing 17.4. Listing 17.4 web.xml File for myFirstWebApp <!DOCTYPE Web-app PUBLIC "-//Sun Microsystems, Inc.//DTD Web Application 2.2//EN" "http://java.sun.com/j2ee/dtds/Web-app_2_2.dtd"> <Web-app> <display-name>My First Servlet</display-name> <description> This is a simple Web application to display some dynamic content via a servlet. </description> <servlet> <servlet-name>myFirstServlet</servlet-name> <servlet-class>MyFirstServlet</servlet-class> </servlet> <servlet-mapping> <servlet-name>myFirstServlet</servlet- name > <url-pattern>/myfirstservlet</url-pattern> </servlet-mapping> </Web-app> For this simple example you do not need the weblogic.xml file. -
Next, copy the HTML form code from Listing 17.2 into the myFirstWebApp directory and name it formTest.html . Do not put it into the WEB-INF directory but rather as a sibling of the WEB-INF directory. -
Now you have the files needed to run the servlet but you have to tell WebLogic that there is a new Web Application to run. It is easiest if you just let WebLogic Server find the Web Application on its own and run it. This can be done most easily by restarting the WebLogic Server. There are a variety of ways to do this that do not require restarting the server, but for this example we will try to keep it simple. If your WebLogic server is running, shut it down by killing the Java process associated with WebLogic Server. Then change to the "samples/server/config/examples" directory (again, under WL_HOME), and run ./startExamplesServer.sh (Unix) or startExamplesServer.bat (Windows). You will see messages about the server starting up and the last few lines will look similar to the following code: Starting WebLogic Server... ... <Jul 12, 2002 11:28:41 AM MDT> <Notice> <WebLogicServer> <000365> <Server state changed to RUNNING> <Jul 12, 2002 11:28:41 AM MDT> <Notice> <WebLogicServer> <000360> <Server started in RUNNING mode> Note Please see Chapter 10, "Installing and Configuring the WebLogic Server 7" for more detailed information on starting and stopping the WebLogic Server.
To exercise the doGet() method of your servlet go to the URL http://localhost:7001/myFirstWebApp/myfirstservlet . You should see output in your browser that looks like Figure 17.2. Figure 17.2. Output from the doGet() method on your sample servlet.  To exercise the doPost() method of your servlet, you will access it via the HTML file created in step 4. Go to the URL http://localhost:7001/myFirstWebApp/formTest.html . You should see output similar to that shown in Figure 17.3. Figure 17.3. Output from the doPost() method on your sample servlet. 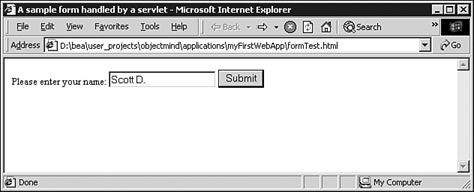 When you click the Submit button you will get something that looks like Figure 17.4. Figure 17.4. Visitors to your site who submit their names will see this greeting. 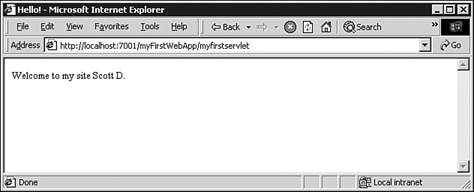  |