TIP 75: Designing with Frames
| With frames you can split up a browser window into sections, each of which can display a separate HTML page. Once a very common method of designing a Web site, frames have lost popularity somewhat due to issues that search engine spiders sometimes encounter when attempting to index framed pages. At times, though, frames can be useful, and GoLive handles them quite nicely. Many of the common configurations can be found in the Frame section of the Objects palette. To access them, choose the Frame objects from the Object sets pull-down in the objects palette To use one of the frame objects, click the Frame Editor button Figure 75a. The Frame Inspector and the Frameset Inspector offer easy ways to set the attributes for both the individual frames and the frameset itself.
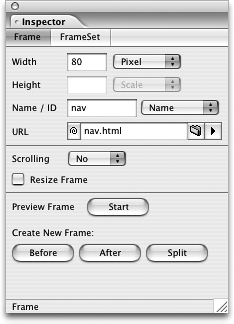
To change the size of a frame, enter pixel dimensions into the Height and Width fields of the Inspector or drag the frame separators to be larger or smaller. To add additional frames to your configuration, simply drag another Frame object into the page or use the Create New Frame button in the Inspector. Select whether or not you'd like a scrollbar to appear by choosing an option from the Scroll popup and give the user the ability to resize the frame by enabling the Resize checkbox.
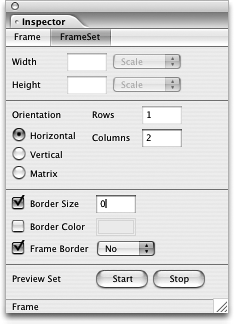
If you don't want a border to show between the sections, enable the checkbox next to Border in the Frameset Inspector and press 0; you'll also need to check the Frame Border checkbox and select No from the pull-down menu. You can set border color in the Frameset Inspector, but expect wide-ranging results in different Web browsers. The last step is to designate which pages will be shown in the sections of the frameset. To assign the pages to the frames, click in a frame and then use the URL field in the Inspector palette to link to a page in your Site window. Or drag a page from the Site window and drop it onto a frame to make the link. Give each frame in a frameset a unique name in the Name field of the Frame Inspector. Later, when you create links on pages within a frameset, use the target pull-down to select a frame name or type the frame name into the Target field in the Inspector to indicate which of the frames the link should load into (Figure 75b). Figure 75b. Be sure to select a target frame when creating links within framesets.
When you've got everything set up as you want it, you can get a temporary preview by clicking the Start button next to Preview Frame in the Frame Inspector or Preview Frameset in the Frameset Inspector. Once enabled, the button will read Stop. Click it to stop the temporary preview. |

EAN: N/A
Pages: 301