Organizing Palettes
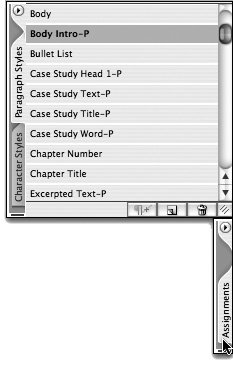
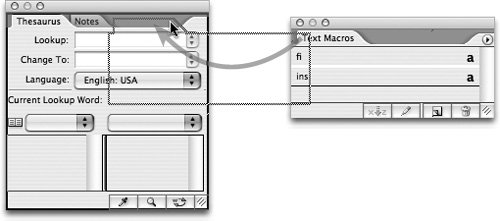
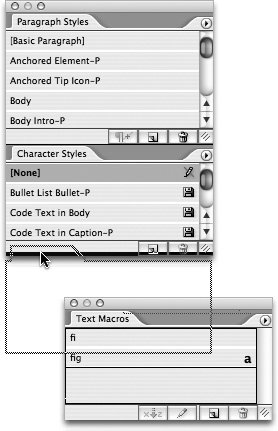
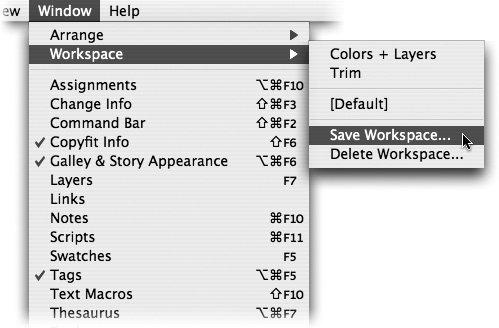
| Adobe applications are famous for their floating palettes, and InCopy is no exception. InCopy has 23 default palettes and toolbars, so organizing and managing palettes is important to working efficiently. In addition to accessing palettes from the Window menu or by using the corresponding keyboard shortcuts, you can use the many helpful user interface features that InCopy shares with its sister product, InDesign. Let's start with palette stashing, the ability to hide floating palettes vertically along the left or right edge of your screen as a way to minimize screen clutter and maximize the viewable size of your document windows (Figure 1.5). The default installation of InCopy includes five palettes on the right side of the screen. To stash or reveal these palettes, just click on the palette tab. To hide or reveal all the stashed palettes at the same time, Option/Alt-click the palette tab. Figure 1.5. Stash palettes on the left and right edges of your screen to maximize your screen real estate. If you open a new palette and want to stash it for frequent use, just click on the palette tab and drag the tab to the left or right edge of your screen. You can even stash groups of palettes by holding down the Option/Alt key as you drag the palette tab of any of the palettes in the group. Stashing palettes is a nice way to save screen real estate, but Macintosh users shouldn't stash InCopy palettes on the same screen edge as the OS X Dock. Position the Dock at the bottom of the screen or on the opposite edge from the stashed palettes, or you'll drive yourself insane with an electronic version of Whack-a-Mole. Tip You cannot stash palettes at the top or bottom of the screen, but you can convert many palettes to toolbars by dragging them near other toolbars. Grouping PalettesIn addition to stashing palettes on the edges of your screen, you can also group multiple palettes together. For example, drag a palette tab near the top of another open palette and release the mouse button (Figure 1.6). Now you have multiple palettes open, but they consume the space of a single palette. Although you can group any number of palettes together, eventually you will no longer be able to read their palette tab text labels. Group palettes that belong together logically or according to your workflow. To ungroup palettes click on a palette tab and drag it outside the perimeter of the palette. Figure 1.6. Place palettes together in logical groups. Docking PalettesOne last way to organize your palettes is to dock them together top to bottom. Drag one palette tab over the bottom of another open palette. When a thick black line appears on the target palette, release the mouse button, and the two palettes will be stuck together (Figure 1.7). When you move the top palette all the others docked below it move together. You can even dock and group multiple palettes together into one tall "super" palette. Then you don't need to select, move, hide, or stash a bunch of separate palettes. Instead, group and dock the palettes you use most frequently and manage just one item. Figure 1.7. You can create one big super palette by docking palettes together top to bottom. Managing WorkspacesOnce you position, group, dock, and stash your palettes and toolbars just how you like them, you can save the custom arrangement as a workspace. To save a custom palette arrangement, choose Window > Workspace > Save Workspace (Figure 1.8). Give the workspace a recognizable name and click OK. At different times you might use InCopy in different ways, so you can save multiple workspaces for different tasks or different users. To access a saved workspace, just choose Window > Workspace > [WorkspaceName]. Assigning custom keyboard shortcuts to your favorite workspaces makes it easy to quickly switch between the different palette configurations (see "Customizing Keyboard Shortcuts" later in this chapter). As you become more comfortable with workspaces and find new ways to use them, you might adjust an existing workspace. Instead of deleting and recreating the workspace, you can simply arrange your palettes and save with the same name. When InCopy asks you if you want to replace the existing workspace with the same name, just click OK. Figure 1.8. Save your favorite palette configurations as workspaces for easy customization. If you decide not to create your own workspaces but just want that factory-fresh feeling, choose Window > Workspace > [Default] to set things back to the original configuration. The Default workspace is a good place to start new users on learning the software. We think workspaces are really cool, but if you experiment a lot you might end up with a bunch that you don't actually use. This isn't technically a problem, but it might drive you crazy. To clean house, choose Window > Workspace > Delete Workspace, select the unwanted workspace from the pull-down menu, and click Delete. Tip You cannot delete or alter the [Default] workspace. After you've spent time customizing and saving your workspaces, it's a good idea to make a backup of your custom workspaces for safe-keeping. Each custom workspace is saved on your hard drive as a tiny XML settings file; a saved workspace called "StylingSetup" will appear as a file called StylingSetup.xml. Macintosh users can find these workspace settings files in username/Library/Preferences/Adobe InCopy/Version 4.0/Workspaces, and Windows users will find them in Documents and Settings/Username/Application Data/InCopy/InCopy 4.0/Workspaces. You can back these files up, copy them to another computer, or share them with coworkers. |
EAN: 2147483647
Pages: 122