| One of the most important factors in server security is awareness. Logging and auditing allow you to monitor suspicious activity as well as establish a normal baseline of user interaction with server resources. The standard Windows Server 2003 installation doesn't have auditing turned on by default. One reason for this is that on a busy server over-auditing can fill up event logs and drag down system resources. You need to be selective in what you choose to audit. IIS 6.0 does have logging turned on, but it might not be a suitable configuration for all cases. The default directory for log files is %winddowsroot%\system32\LogFiles. You might want to place your log files under a directory that better identifies the logs. Also, as mentioned earlier in this chapter, it's better to create the IIS data folders on a partition other than where the operating system resides. Auditing Security and Site Content You should enable both successful and failed login attempts to the IIS server that is hosting the Web sites and FTP services. This can be both a good troubleshooting tool, when the sites are first established, and a security measure over time. You should watch your Security event logs for repeated failed logon attempts. This could point out an attack or simply a user who forgot his password and needs it to be reset. Enabling Security Auditing On the Web server security auditing needs to be enabled and configured. There are two possible scenarios for enabling auditing. The first is on a standalone server that is not a member of the domain. The second is a member-server. To enable or modify auditing policy settings on a standalone Web server follow these steps: -
Click on Start, Administrative Tools and then choose Local Security Policy. -
In the console tree, click Local Policies and then click Audit Policy. -
In the Details pane, double-click on the desired event category. -
On the Properties page for that event category select both Success and Failure and then click OK. Auditing Group Policy Defining this Auditing Group Policy is performed on the domain controller.
To enable or modify the auditing policy settings for an event category on a server that is a domain member perform the following steps: -
Click on Start, Administrative Tools and then Active Directory Users and Computers. -
Right-click on the desired domain, site, or organizational unit (OU) and click Properties. -
On the Group Policy tab, select or create a Group Policy object to edit. -
In the Group Policy Object Editor console tree expand Computer Configuration, Windows Settings, Security Settings, Local Policy, and then click Audit. -
In the Details pane, double-click on the desired event category. -
If the auditing policy has not been set for this event select Define These Policy Settings check box., -
Enable auditing by clicking either Success or Failure or both and then click OK. Enabling Web Site Content Auditing Web server administrators need to be especially aware of content changes on their Web sites. Due to the fact that most Web sites, either intranet or Internet facing, contain mostly static pages or templates, content changes are usually planned events by specific users. Tracking any change attempts by un-authorized users is a good way to reduce attacks such as de- facing of the site where content is replaced by a hacker's slogan or undesired content. Auditing of file or folder objects is defined on their perspective Property pages. Before auditing becomes active it must be enabled by the administrator or a designee that has Manage auditing and security log rights. To enable object access auditing on a standalone server follow these steps: -
Click on Start, Administrative Tools, and then click Local Security Policy. -
Expand Local Policies and then click Audit Policy. -
Right-click on Audit Object Access and select Properties. -
Enable auditing by clicking either Success or Failure or both and then click OK. To enable object access auditing on a domain member server perform the following steps: -
Click on Start, Administrative Tools, and then Active Directory Users and Computers. -
Right-click on the desired domain, site, or organizational unit (OU) and click Properties. -
On the Group Policy tab, select or create a Group Policy object to edit. -
In the Group Policy Object Editor console tree expand Windows Settings, Security Settings, Local Policy, and then Audit Policy. -
Double-click on Audit Object Access. -
Ensure that the Define These Policy Settings check box has been selected. -
Enable auditing by clicking either Success or Failure or both, and then click OK. Now that the object access policy has been enabled you can define the auditing policy settings for folders or files contained in the Web site. To apply or modify auditing policy settings perform the following steps: -
Navigate in Windows Explorer to the desired folder within the Web site. -
Right-click on the folder or file that you want to audit and then select Properties. -
Select the Security tab. -
Click on the Advanced button and then select the Auditing tab. -
At this point you can either Add, Remove, or Edit Users or Groups that are being audited . -
In the Apply Onto box, indicate what actions are to be audited. -
In the Access box, indicate which actions are to be audited. -
To stop auditing on this container, click Clear All. -
If you want to audit subfolders as well as the current folder, ensure that the Apply These Auditing Entries to Objects and/or Containers Within This Container Only check box is cleared. Consolidating Log Files Administrators who have to maintain numerous Web and FTP sites will find that writing the log files of each site to a central location becomes more convenient . One way to accomplish this is by enabling centralized binary logging. The steps to accomplish this are as follows : -
At a command window, change to the following directory: c:\inetpub\AdminScripts\. -
Type cscript.exe adsutil .vbs SET W3SVC/CentralBinaryLoggingEnabled true . -
Press Enter. You will see the Windows Script Host version number and Microsoft copyright information followed by CentralBinaryLoggingEnabled: <BOOLEAN> True. -
Stop the Web services by typing net stop W3SVC and then press Enter. -
Start the Web services by typing net start W3SVC and then press Enter. For detailed output of this procedure see Figure 19.5. Figure 19.5. Consolidating log files using ADSI utilities. 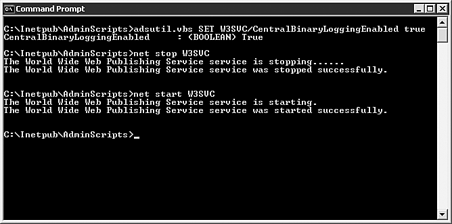 This procedure will create a new file in the C:\windows\system32\logfiles\w3svc directory with the name format of rawyymmddhh.ibl. The .ibl extension stands for Internet binary log. This extension change ensures that text editors, by default, do not attempt to open these files. You can use the Log Parsing Tool 2.1 that ships with the IIS 6.0 Resource Kit, or downloadable from Microsoft's Web site, to run queries against the .ibl files. The Microsoft script center Web site at http://www.microsoft.com/technet/scriptcenter/ has examples of how to use the Logfile Parsing Tool. Log File Definitions As mentioned previously the W3C Extended Logging offers the most comprehensive list of events occurring on the IIS 6.0 Web and FTP servers. Tables 19.1 and 19.2 contain the field name definitions and descriptions of the log file content. Table 19.1. W3C Extended Logging Prefix Definitions | Prefix | Meaning | | s- | Server actions | | c- | Client actions | | cs- | Client-to-server actions | | sc- | Server-to-client actions | Table 19.2. W3C Extended Logging Field Definitions | Field | Appears As | Description | | Date | date | Date that the activity occurred. | | Time | time | Time that the activity occurred. | | Client IP | c-ip | The IP address of the client accessing the server. | | User Name | cs-username | The name of the authenticated user who accessed the server. (Anonymous users are represented by a hyphen.) | | Service Name | s-sitename | The Internet service and instance number that was accessed by the client. | | Server Name | s- computername | The name of the server that generated the log entry. | | Server IP Address | s-ip | The IP address of the server on which the log entry was generated. | | Server Port | s-port | The port number the client connected to. | | Method | cs-method | The action the client was attempting to perform (such as GET or PUT ). | | URI Stem | cs-uri-stem | The resource access (such as default.asp). | | URI Query | cs-uri-query | The query, if any, the client was attempting to perform. | | Protocol Status | sc-status | The status of the action, in HTTP or FTP terms. | | Win32 Status | sc-win32 status | The status of the action, in terms used by Microsoft Windows. | | Bytes Sent | sc-bytes | The number of bytes sent by the server. | | Bytes Received | cs-bytes | The number of bytes received by the server. | | Time Taken | time-taken | The duration of time, in milliseconds , that the action consumed. | | Protocol Version | cs-version | The protocol (HTTP, FTP) version used by the client (Example HTTP or HTTP 1.1). | | Host | cs-host | Displays the contents of the host header that the client is requesting. | | User Agent | Cs(user-Agent) | The browser being used by the client. | | Cookie | cs (Cookie) | The content of the cookie sent or received, if any. | | Referrer | cs (Referrer) | The previous site visited by the user that provided a link to the current site. |  |