Extract Interface
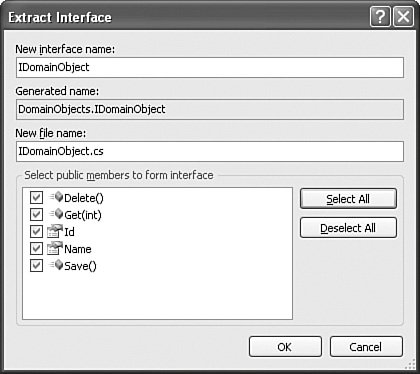
| When classes contain the same subset of members, it can be useful to define a common contract that each class shares. This, of course, is done via an interface. Some basic advantages to defining interfaces is that your code becomes more readable, is easier to maintain, and operates the same for like members. However, developers often don't realize the commonality between their classes until after those classes are coded. This makes creating interfaces sometimes a bit too painful of an operation. The C# editor in Visual Studio 2005 provides the Extract Interface refactoring operation to make this process easier. It allows you to take an existing class or struct and automatically generate a matching interface that the existing class will then implement. Accessing the Extract Interface RefactorTo access the Extract Interface refactor operation, you first must position your cursor in a class, struct, or another interface that contains the members you want to extract. You then can use the Refactor menu and select the Extract Interface menu item. You can also invoke Extract Interface from the context menu via a right-click. Tip To invoke the Extract Interface operation from the keyboard, first position your cursor in the class, struct, or interface that contains the members you want to extract. Next, play the chord Ctrl+R, Ctrl+I. Extracting InterfacesTo better understand the Extract Interface operation, let's look at an example. Suppose you review your code and notice that a number of your domain objects share similar properties and methods. Let's say the objects Customer, Vendor, Manufacturer, SalesAgent, and Product all contain properties for Id and Name and methods for Get, Save, and Delete. In this case, you should consider extracting this commonality into an interface that each object would implement. Let's look at how the Extract Interface refactoring operation aids in this regard. First, you position your cursor on the target class whose members you want to extract. In the example, choose the Customer class. Invoking the Extract Interface operation presents a dialog box named the same. Figure 8.17 shows this dialog box relative to the example. Figure 8.17. Extracting an interface. Notice that you first define a name for the interface. By default, the tool names the interface with the name of the class preceded by the letter I for interfacein this case, ICustomer. Of course, we are going to use our interface across our domain, so we will change this to IDomainObject. The Extract Interface dialog box also shows the generated name and the new filename for the interface. The generated name is simply the fully qualified name of the interface. This will be used by the class for implementation of the interface. The New File Name text box shows the C# filename for the interface. All extracted interfaces result in the creation of a new file. The tool tries to keep the filename in sync with the interface name. The last thing to do is select which members of the object you want to publish as an interface. Of course, only public members are displayed in this list. For this example, select all of the public members: Id, Name, Get, Save, and Delete. Clicking the OK button generates the interface. The only change that is made to the Customer class is that it now implements the new interface, as in the following line of code: public class Customer : DomainObjects.IDomainObject The interface is then extracted to a new file. Listing 8.4 shows the newly extracted interface. Listing 8.4. The Extracted Interface
The next step in the example is to go out to each additional domain object and implement the new interface. This has to be done without the benefit of refactoring. However, Visual Studio does provide a smart tag for implementing an interface. Figure 8.18 shows the smart tag that results from typing : IDomainObject after the Vendor class declaration. Figure 8.18. Implementing an interface.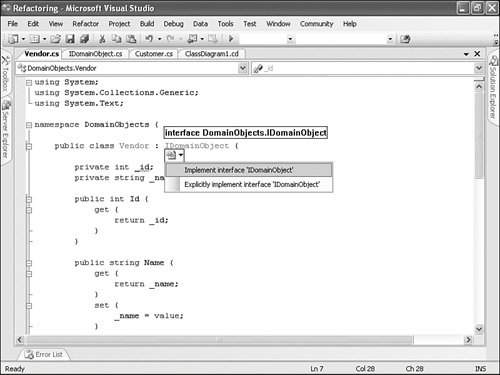 In this case you have two options: Implement the interface or explicitly implement the interface. The former checks the current class to see whether there are implementations that apply. The latter generates code that explicitly calls the interface items. It puts all this code inside a region for the given interface. This capability can be very useful if you're stubbing out a new class based on the interface. The following lines of code provide an example of an explicit interface member declaration: void IDomainObject.Get(int id) { throw new Exception("The method or operation is not implemented."); } |
EAN: 2147483647
Pages: 195
- The Effects of an Enterprise Resource Planning System (ERP) Implementation on Job Characteristics – A Study using the Hackman and Oldham Job Characteristics Model
- Distributed Data Warehouse for Geo-spatial Services
- A Hybrid Clustering Technique to Improve Patient Data Quality
- Relevance and Micro-Relevance for the Professional as Determinants of IT-Diffusion and IT-Use in Healthcare
- Development of Interactive Web Sites to Enhance Police/Community Relations