Working with SQL Statements
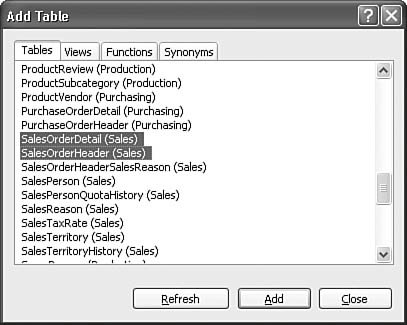
| There is full support within the Visual Database Tools set for crafting and executing SQL statements against a connected database. This includes support for compiling SQL statements as stored procedures, creating views and triggers, and writing user-defined functions. Writing a QueryThe primary tool that facilitates the development of SQL statements is the Query/View Designer, which is a graphical tool that allows you to build queries with a point-and-click interface. After a query is constructed, this tool also allows you to view and interact with any results returned as a result of executing the query. Now you're ready to put this tool through its paces. Creating a new select query against a table is as simple as selecting the database in Server Explorer and then selecting Data, New Query. An initial prompt gathers a list of the tables, views, functions, and/or synonyms to use as the target of the query (see Figure 15.13). Figure 15.13. Adding tables to the query. After you have selected the objects you want the query to target, the Query Designer will open. As Figure 15.14 illustrates, there are four separate panes to the designer:
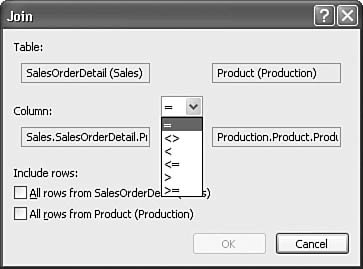
Figure 15.14. The Query/View Designer.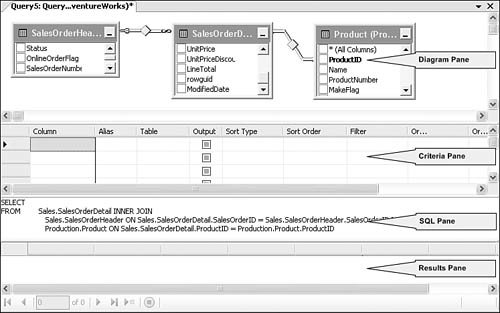 Each of these panes can be shown or hidden at will. Right-click anywhere in the designer and select the Pane fly-out menu to select or deselect the visible panes. Fine-Tuning the SQL StatementTo flesh out the select statement, you can indicate which columns from which tables you want returned by placing a check next to the column in the diagram pane. You use the criteria pane to specify a sort order, provide alias names for the return columns, and establish a filter for the resultset. As you select these different options, the designer turns them into SQL, visible in the SQL pane. Note We are using the AdventureWorks sample database in a SQL Server 2005 instance for most of this chapter. If you want to follow along, you can download a copy of this database by visiting the main Microsoft website (www.microsoft.com) and searching for "AdventureWorks." This is also the sample database used by the SQL Server 2005 Books Online help collection. Figure 15.15 shows the completed "Order" query, with results visible in the bottom pane. Figure 15.15. Querying for order information in the AdventureWorks database.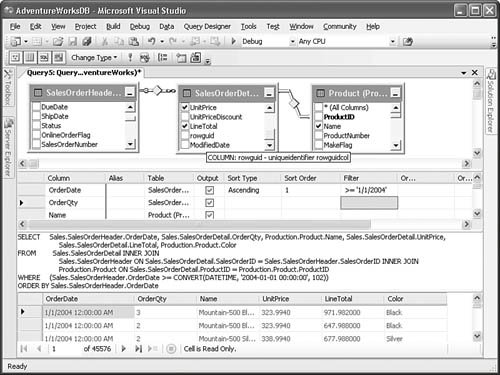 Specifying Joins and Join TypesWhen you add multiple, related tables to the Query Designer, the designer uses their key relationships to automatically build a JOIN clause for the query. You also have the option to create joins on table columns that don't have an existing relationship. You do this the same way that you specify relationships in the Database Diagram Designer: You select and drag the column from one table to another within the diagram pane. The columns to be joined must be of compatible data types; you can't join, for instance, a varchar column with an integer column. Joins are created using a comparison operator. By default, this is the equals operator; in other words, return rows where the column values are equal across the join. But you have control over the actual comparison operation used in the join. As an example, perhaps you want the resultset to include rows based on a join where the values in Table A are greater than the values in Table B on the joined columns. You can right-click the join relationship line in the diagram pane and select Properties to see the properties for the join; clicking the ellipsis button in the Join Condition and Type property will reveal the Join dialog box, depicted in Figure 15.16. Figure 15.16. Setting join type and operator. Other Query TypesBy default, creating queries from the Server Explorer will result in a select query. But the Query Designer is equally adept at building other query types. If you want, for instance, an insert query, you can change the type of the query loaded in the designer by selecting Query Design, Change Type. Table 15.1 shows the different query types supported by the designer.
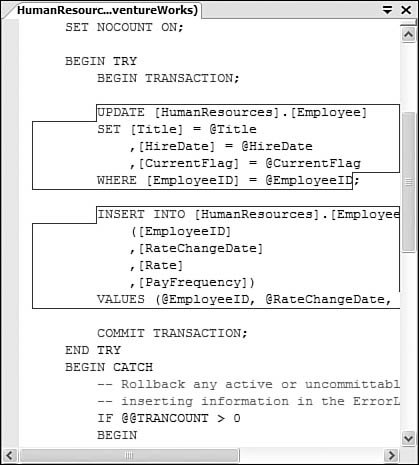
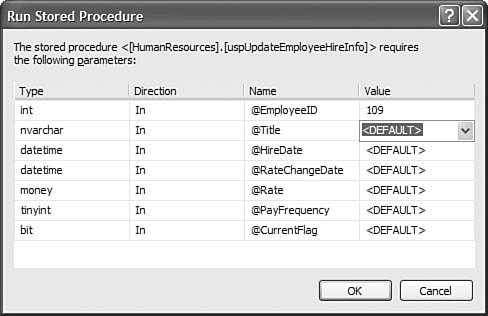
Tip If you just want to quickly see the data contents of any given table, you can right-click the table within the Server Explorer and then select Show Table Data. This will initiate a new Query/View Designer with a SELECT * statement for the given table. By default, only the results pane is visible. This functionality is ideal for testing scenarios in which you need to quickly edit data in the database or observe the effects of SQL statements on a table. Creating ViewsViews are virtual tables. They look and act just like tables in the database but are, in reality, select statements that are stored in the database. When you look at the content of a view, you are actually looking at the resultset for a select statement. Because views are implemented as select statements, you create them using the Query/View Designer tool. In Server Explorer, right-click the Views folder under the database where you want to create the view. From there, you build the select statement just as you would for any other SQL statement. Saving the view will refresh the database's copy of the view's select statement. Developing Stored ProceduresA stored procedure is a SQL statement (or series of statements) stored in a database and compiled. With SQL Server, stored procedures consist of Transact-SQL (T-SQL) code and have the capability to involve many coding constructs not typically found in ad hoc queries. For instance, you can implement error-handling routines within a stored procedure and even call into operating system functions with so-called extended stored procedures. For a given database, right-click the stored procedures folder in Server Explorer and select Add New Stored Procedure. A template for a stored procedure will open in the SQL Editor. The SQL Editor is a close sibling to Visual Studio's Code Editor; although it doesn't have IntelliSense, it does support syntax coloring, breakpoints, and the more general text-editing features (cut-copy-paste, word wrapping, and so on). Figure 15.17 shows the beginnings of a stored procedure in the SQL Editor window. Figure 15.17. The start of a new stored procedure. With the template loaded into the SQL Editor, writing a stored procedure involves typing in the lines of code and SQL that will perform the required actions. But stored procedure developers haven't been left out in the cold with regards to productivity in Visual Studio. You can leverage the power of the Query/View Designer to write portions of your stored procedure for you. Using the SQL Editor with the Query/View DesignerAs you build the body of the procedure, the editor window will highlight and box in certain parts of the procedure. These boxed-in areas represent SQL statements that can be edited using the Query Designer. Consider the stored procedure featured in Figure 15.18. Figure 15.18. SQL statements in a stored procedure. This procedure, from the AdventureWorks database, essentially consists of two update queries. Both of them are contained within a blue-bordered box in the SQL Editor window. This is the editor's way of indicating that it has recognized a SQL statement within the procedure that can be designed using the Query/View Designer. If you right-click within the boxed-in area, the shortcut menu will include an option titled Design SQL Block. If you select this option, the Query/View Designer will open in a separate dialog box. Figure 15.19 shows the first of the two update statements as they appear in the Query/View Designer. Using the same process outlined before for writing queries, you can construct the SQL within the relative luxury of the Query Designer's drag-and-drop interface. Clicking OK on the designer dialog box will save the query back into the stored procedure, updating the code in the editor window. Figure 15.19. Designing a query for a stored procedure.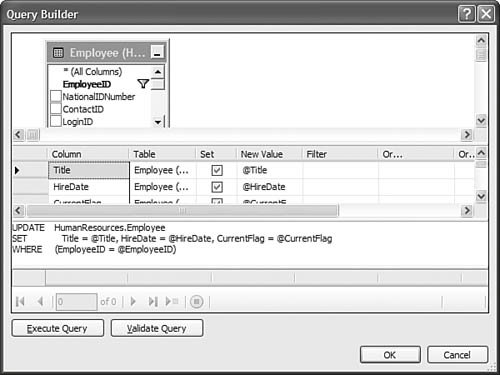 Notice that the Query Designer fully supports the use of parameters. When you fill in the parameter names in the New Value column (see the criteria pane in Figure 15.19), the designer is able to construct the appropriate SQL. Note The capability to create and edit stored procedures is supported only in Microsoft SQL Server. You cannot use the Visual Studio tools to create a procedure in, say, an Oracle database. The Query Designer can also be pressed into play for inserting new blocks of SQL into a stored procedure (as opposed to editing existing SQL statements). First, in the SQL Editor window, right-click on the line within the procedure where you want to place the new query. From the pop-up menu, select Insert SQL. The Query/View Designer can now be used to craft the appropriate SQL. After you close out the dialog box by clicking OK, the new SQL will be inserted into the procedure and can be saved into the database. Debugging Stored ProceduresIn addition to coding stored procedures, you can leverage the Server Explorer tool to help you debug them. With the stored procedure open in the SQL Editor window, set a breakpoint in the procedure by clicking in the Indicator Margin (for more details on the Indicator Margin and general editor properties, see Chapter 6, "Introducing the Editors and Designers"). With a breakpoint in place, right-click on the stored procedure's name in the Server Explorer tree and select Step Into Stored Procedure (see Figure 15.20). Figure 15.20. Debugging a stored procedure.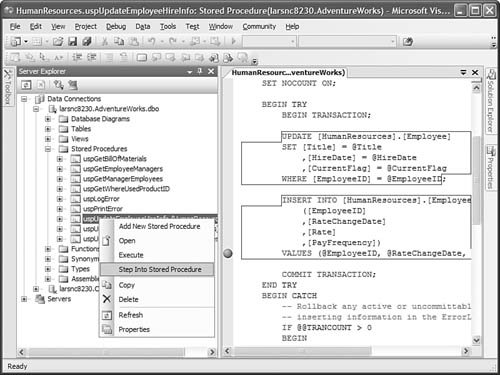 The SQL Debugger is also parameter-friendly. If the stored procedure uses any parameters, the debugger will show a dialog box to capture values for the parameters (see Figure 15.21). Figure 15.21. Entering parameter values in the SQL Debugger. You can quickly cycle through the list of parameters, supplying appropriate values. After you click OK, the stored procedure will be executed. If you have set a breakpoint, execution will pause on the breakpoint (a yellow arrow is used to indicate the current line of execution within the editor, just the same as with the code editor window). With execution stopped, you can use the Locals and Watch windows to debug the procedure's code. See Chapter 9, "Debugging with Visual Studio 2005," for a more thorough treatment of the Locals and Watch windows as debugging tools in Visual Studio. The Debug menu is used to control execution and flow. If you select Continue, the procedure will continue running up to the next breakpoint (if present). Creating TriggersTriggers are a type of stored procedure designed to run when the data in a table or view is modified. Triggers are attached to an individual table; when a queryan update, insert, or delete queryaffects data in the table, the trigger will execute. Because a trigger is really a stored procedure with a controlled execution time (hence, the name trigger), it can have quite complex SQL statements and flow execution logic. To create a trigger, use Server Explorer and locate the table to which the trigger is to be attached. Right-click the table name, select Add New Trigger, and then use the SQL Editor to write the SQL for the trigger. When the trigger is saved to the database, it will show up under its related table in Server Explorer (alongside the columns in the table). Figure 15.22 shows a simple trigger designed to raise an error if an update statement changes the Availability column in the Location table. Figure 15.22. Creating a trigger.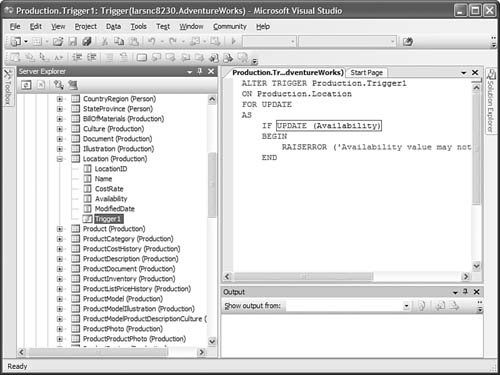 Creating User-Defined FunctionsUser-defined functions are bodies of code/SQL designed to be reusable across a variety of possible consumers: stored procedures, applications, or even other functions. In that respect, they are no different from functions written in C# or Visual Basic. They are routines that can accept parameters and return a value. User-defined functions return scalar values (for example, a single value) or a resultset containing rows and columns of data. One example of a user-defined function might be one that accepts a date and then determines whether the day is a weekday or weekend. Stored procedures or other functions in the database can then use the function as part of their processing. Because user-defined functions are T-SQL statements with a format similar to stored procedures, the SQL Editor again is the primary tool for writing them. For each data connection visible in Server Explorer, a Functions folder will contain any existing functions. To create a new function, you can right-click on this folder, select Add New, and then select the type of function to create. There are three options:
After selecting the appropriate function type, template code for the function will be delivered inside a new SQL Editor window. Feel free to use the Query/View Designer to construct any required lines of SQL within the function. For the specifics on how to write a function and put it to best use within the database, consult your database's documentation. |
EAN: 2147483647
Pages: 195