Creating Your Own Controls
| If none of the stock .NET controls will meet your specific needs, you can create your own controls for use on a Windows Form in three ways:
Subclassing an Existing ControlSubclassing an existing control is the best approach if your needs are only slightly different from one of the standard .NET Framework controls. By inheriting from an existing control class, you are riding on top of its behavior and appearance; it's up to you to then add the specialized code to your new control class. For example, suppose that you wanted a text box that would turn red any time a numeric (that is, nonalphabetic) character was entered. This is easy to do with just a few lines of code sitting in the TextBox control's TextChanged event, but consolidating this behavior into its own class will provide a reuse factor. You start by adding a new user control to the project. User controls actually inherit from the UserControl class; because you want to inherit from the TextBox class, you will need to change the class definition by using the code editor. After you do that, you can place the new component on a form and use its functionality. Working with an Inherited ControlBecause TextBox already has a UI, you don't need to do anything with regards to the appearance of the control. In fact, it will work just like any other text box control within the Windows Forms Designer (see Figure 14.31). Figure 14.31. A derived control on a form.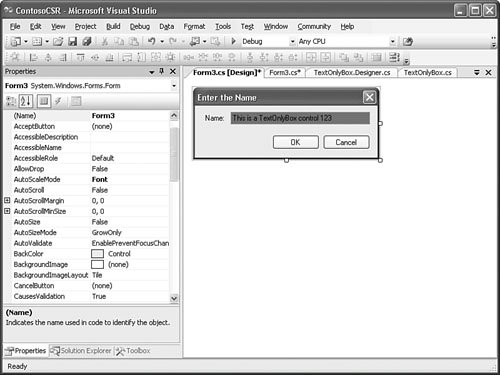 The Properties window for the control behaves as expected, and double-clicking on the control will immediately take you to an open code editor window. In short, the design-time experience remains fully functional and requires no effort on the part of the developer. Designing a User ControlA user control is technically the same as any other class that you would author as a developer; because a user control has a visual aspect to it, Visual Studio provides a designer, just as with Windows forms, to help in the drag-and-drop creation of the control. User controls are composite controls; that is, they are constructed from one or more existing .NET controls. As with a derived control, their user interfaces inherit from the native controls they are composed of, making them simple to build and use in the designer. There are two approaches to the user control creation process: You can create a separate Windows Control Library project, or you could simply add a user control class to an existing Windows Forms project. Creating a separate project would allow the user control to live in its own assembly. If it is a separate assembly, you can treat the user control as the quintessential black box, giving you greater flexibility from a source control perspective and allowing you to share the control among multiple projects. For production scenarios, this is clearly the best route. However, for simple prototyping work, as you are doing here with the CSR form application, the ease and simplicity of just adding a new class to the existing project make this approach preferable to using the separate project approach. The class would live inside the same namespace as the form class. If you were ever in a position to transition from prototyping to actual production development, nothing would preclude you from refactoring the control by simply copying the user control class file and embedding it in a separate control library project. As soon as you add the user control class to the project, you are presented with the User Control Designer (see Figure 14.32). The designer works in exactly the same way as the Windows Forms Designer; to build the user control, you drag components or controls from the Toolbox onto its surface. Figure 14.32. The User Control Designer.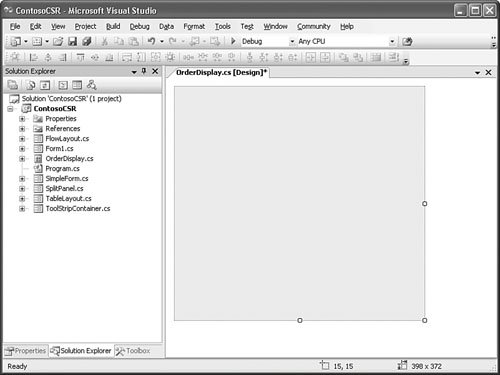 Adding ControlsObviously, the controls that you use to build your composite control will entirely depend on its envisioned functionality. As an example, to create an order display control, you need to think about the underlying data structure of an order. An order record might contain the following:
Because this is a lot of information to try to cram onto one screen, you can turn to the TabControl. A tab control is another general-purpose container control that allows you to organize content across several pages that are accessed via tabs. Within each tab, you can leverage the TableLayoutPanel and implement most of the order fields with simple label and text box pairs. The whole process of getting these controls into the user control works identically to the Windows Forms Designer: You drag and drop the controls from the Toolbox onto the user control design surface. Figure 14.33 shows the OrderDisplay user control with its user interface completed. Figure 14.33. Designing a user control.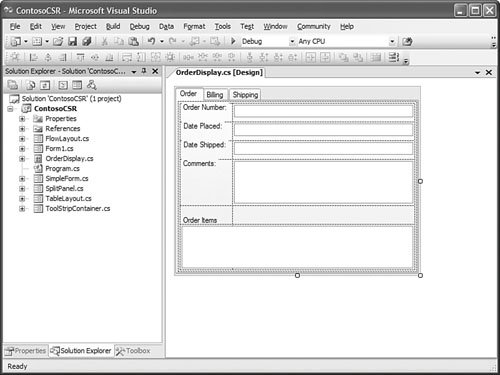 Embedding the User ControlNow that you have a completed design for your user control, the only remaining step is to embed the control into your primary form. If you compile the project, Visual Studio will automatically recognize the user control class and include an entry for the control in the Toolbox. From there, you are just a drag and drop away from implementing the OrderDisplay control. In Figure 14.34, you can see the OrderDisplay item in the Toolbox and the results of dragging it onto the form surface. Figure 14.34. The user control in the Toolbox and on the form.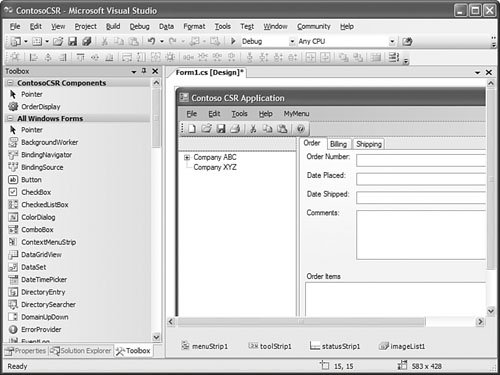 Creating a Custom ControlCustom controls represent the ultimate in extensibility because they are built from scratch. As a result, they are relatively hard to develop because they require you to worry not only about functionality but also about every single aspect of the control's visual appearance. Because the physical user interface of the custom control needs to be drawn 100% by custom code, a steep learning curve is associated with authoring a custom control. Because much of the work that goes into creating a custom control is at the code level, we won't try to tackle this subject with any useful degree of detail in this book. You should note, however, that the process starts the same way as with other control options: Visual Studio has a custom control project item template; adding this to your project will give you a baseline of code to start with. From there, it's up to you. Note The OnPaint event is where you place the code to draw your control's user interface. Although so-called "owner draw" controls can involve complex drawing code, the good news is that the Windows Forms Designer will leverage whatever code that you place in the OnPaint event in order to render the control at design time. This means that you can still rely on the Windows Forms Designer to provide you with a WYSIWYG experience even with custom controls. |
EAN: 2147483647
Pages: 195