Section B: Solutions, Classes, Items, and Help
| I l @ ve RuBoard |
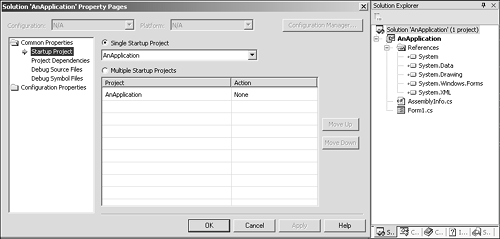
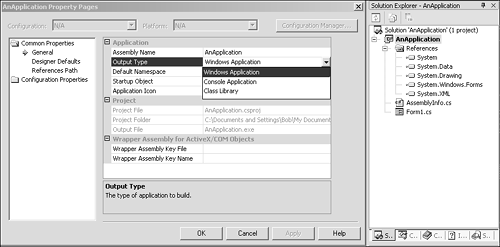
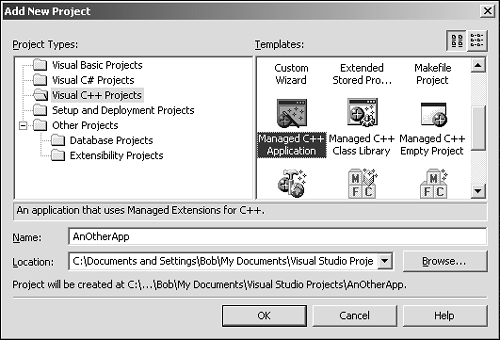
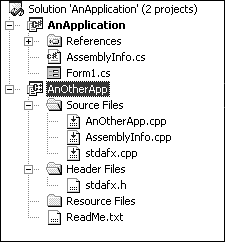
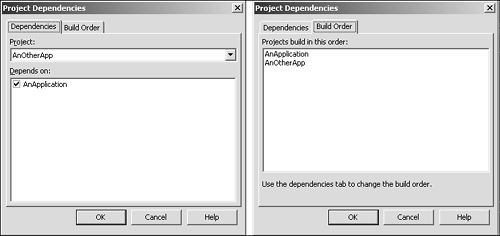
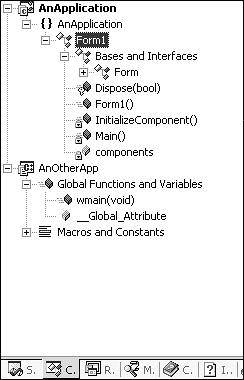
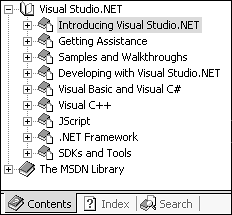
| In this portion of the IDE window, you will see another tabbed control with multiple panes. This is a recurring theme in VS.NET because the IDE is so busy that there's nowhere else to put all the information. Figure 1.5.3 shows the tabs generally contained in this panel. Figure 1.5.3. The right pane tabs. By default, this pane contains the Solution Explorer, the Class View, Help Contents, Help Index, and Help Search windows . Some other tabs appear in this pane also; we'll explain those as we go. Solutions and the Solution ExplorerThe Solution is the fundamental package of work in VS.NET. A Solution can hold projects of many different types. For example, you might want to create a complete client/server application with many individual sub-projects ranging from MFC-based client code to ASP.NET server code. The Solution is the top-level placeholder for all sub-projects associated with that application. A Solution can be built all at once and dependencies between sub-projects can be defined so that the projects contained in it are built in a particular order. Selecting the Solution Explorer tab brings up a pane with a tree of items. The tree contains projects, folders, files, resources, and other miscellaneous data that defines your current scope of work. A Solution has properties that affect all the projects within it. As with most of the other items in Visual Studio.NET, right-clicking a Solution and selecting Properties will allow you to adjust the characteristics of your solution. Figure 1.5.4 shows the solution pane and a solution properties dialog. Figure 1.5.4. The Solution and its properties. The Solution Explorer panel, far right, contains a single project called AnApplication . The solution Properties dialog, left, allows you to pick which sub-project is the startup project, how each project depends on another, where the IDE will search for source files when debugging, and where the debug symbol files are stored. These settings are common to all projects within a solution. ProjectsJust as Solutions contain projects, projects contain items. These items can be folders for organizing your source, header and resource files, references to other projects, Web services and system files, and all the source files that go to make up the project within the solution. In Figure 1.5.4, you can see that the open project has two files, Form1.cs and AssemblyInfo.cs , and a set of references. These references are analogous to the #include directive in a C++ file; they allow access to the metadata in the namespaces shown. These references are to actual files and data that exist on your machine. They could also refer to the Web Service Description Language (WSDL) description of a Web service, for example. This type of reference is called a Web reference. Each project within a solution has properties. Figure 1.5.5 shows the properties of the AnApplication project. Figure 1.5.5. The project Property dialog. In the dialog shown in Figure 1.5.5, the property that defines what type of project will be built is being used. As you can see, these properties are very easy to use and are far more concise than the old settings for VS 6.0. Project properties include build options such as optimizations, start options, including command line entries, and debugging options. Right-clicking the project will show a context menu that allows you to build the project individually, add items and folders to the project, or add references. Multiple Projects in a Single SolutionAdding a project to a solution is simple. Right-click the solution and select Add. You will be presented with the choice of creating an object, using one you already have locally on your machine, or going to get one from the Web. Adding new project brings up a dialog to select the project type. Figure 1.5.6 shows the New Project Wizard in action. In this case, we'll add a managed C++ project to the solution. Figure 1.5.6. Adding a project to a solution. After accepting the dialog, the solution contains two projects, as seen in Figure 1.5.7. The second project is of a different structure than the original. It is a managed C++ project, so it contains folders for source, header, and resource files. Figure 1.5.7. A solution with multiple projects. In both of these projects, there is a file called AssemblyInfo . This file will be in all projects that use the framework. It is analogous to the VS_VERSION_INFO resource used in Visual C++. An Assembly is the basic packaging unit of the framework. It can contain one or more executable modules and resources. It also contains an assembly "manifest." This is the metadata associated with the assembly. You can add information, such as code version numbers , trademarks, descriptions, and other data, to the manifest by filling out the contents of the AssemblyInfo file. Later, in Section 5 of this book, "Component Usage," we will explain assemblies and how to manage them. Project DependenciesNow that there are two projects in the solution, we can show how dependencies are managed. Right-clicking a project and selecting Project Dependencies from the context menu will allow you to decide which projects must be built before the selected one. The dialog shown in Figure 1.5.8 shows that AnOtherApp depends on AnApplication and that the projects will be built in the order shown. The image shows both panes of the dialog. Remember that settings are available through the Solution properties as well. Figure 1.5.8. Setting project dependencies. The Class View If you're familiar with Visual C++ 6.0, you'll feel right at home in the Class View tab. This is a multi-project class viewer that allows you to navigate your projects by class, member, and function. Clicking an entry takes you to that place in the editor. Right-clicking a class will bring up a context menu that has entries for adding methods , properties, fields, and indexers. Classes also have their bases and interfaces available for browsing. Figure 1.5.9 shows the contents of the Class View pane for our solution. Figure 1.5.9. The Class View pane. The Resource View The tab control that contains the Solution Explorer and the Class View can also host the Resource View. When you're creating a Windows Forms application, you won't see this tab, but you can explicitly request it by selecting View, Resource View from the main menu or by pressing the shortcut Crtl+Shift+E. This pane allows you to edit the old style resource files that you know from C++ and MFC development. Note that Visual Studio.NET will allow you to create and edit MFC and ATL applications alongside your .NET framework projects. The Macro Explorer It is possible to make extensive use of macros in your day-to-day development tasks . Visual Studio 7.0 has a comprehensive object model that allows scripting of just about every function you can imagine. The Macro Explorer is where you'll find all the macros associated with your own version of VS.NET. Manual HelpThere is a distinction between the help found in the remaining three tabs of this pane and the Dynamic Help system that we will show you in a moment. The Help system works pretty much as you would expect and includes a Contents, Index, and Search tab. Figure 1.5.10 shows the help system. Figure 1.5.10. The help tabs. The Index tab allows you to type in a simple phrase and the index searches to the nearest match straight away. The Search tab allows you to perform a more complex inquiry. Document entries can be searched for using search expressions. For example, "Thread AND blocking" will search for all documents containing the words thread and blocking. There is also a check box to allow searching for similar words, so in this case, threading and blocked might be found too. You can also use the word "NEAR" in the place of "AND". This ensures that the words found are within a group of eight words. You can also control the nearness of words so that they are within three words of one another, for example. Many searches will return 500 entries. To refine this, you can search again within the previous search results. Ordering the entries as they are found is also useful. For example, a search that provides 500 entries might not seem particularly useful and will have results that are from all over the help database. Ordering this search by "Location" will allow you to get an idea of what section the title was found in, so if you search for "text NEAR box," you'll get 500 entries. Only about 30 of these are in the .NET Framework Class Library, so ordering by location narrows the field substantially. |

| I l @ ve RuBoard |
EAN: 2147483647
Pages: 204