Installing Outlook 2003
| Office 2003 requires Windows 2000 Service Pack 3 or higher or Windows XP or later operating system. Although Outlook will install on an older computer with a CPU of at least a Pentium 133 and as little as 64MB of RAM, it will be very slow. You'll have a much better experience if you install Outlook on a computer with a Pentium III 400 or greater CPU and at least 256MB of RAM. (Adding more memory is usually cheaper than getting a new computer, although not nearly as fun. Memory is also easy enough to install that you can do it yourself.) You'll need at least 245MB of free hard disk space on your computer, with at least 115MB free on the same disk that Windows is installed on.
After accepting the licensing agreement in the Installation Wizard dialog, you have three choices:
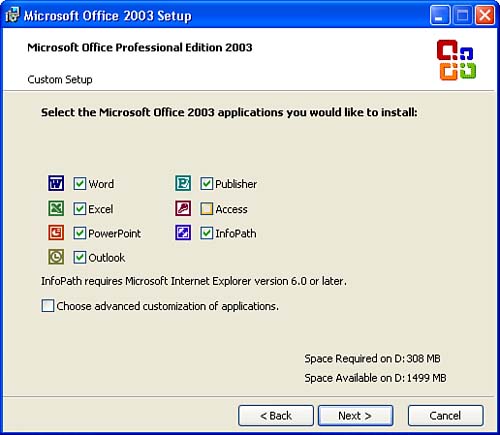
The next screen lists the Office applications and includes a check box for Choose Advanced Customization of Applications (see Figure A.2). Add a check to this option to see the installation options for a minimal installation and to add options. Uncheck any applications you don't want installed and choose N ext. Figure A.2. Click on the features you want to install to access the installation options. Your options are Run from My Computer, Run All from My Computer, Installed on First Use, and Not Available. When you aren't sure what a feature does, select it and look in the Description field (shown in Figure A.2), where you'll see a short description of each feature. The wizard displays the list of applications from which you can choose. The icons indicate what the installation settings are.
Install all options available for Outlook by clicking on the Microsoft Outlook for Windows item and choose Run All from My Computer. The dialog shows you how much space the selected options require; installing all of Outlook's options requires a grand total of 4MB additional disk space. However, the default selections are suitable for most users, with the exception that you may want to install Collaboration Data Objects (CDO) or set it to First Run; by default, it's unavailable. CDO is used by many third-party applications to access information in your mailbox. When it's set to first run, Outlook warns you when an application needs CDO and you have to provide the installation CD at that time. Browse the Office Shared Features and Office Tools sections and choose the features you need. Installing all the Office shared features requires nearly 200MB of disk space, and installing all the Office Tools requires about 30MB. Choose N ext after selecting all the options you want to install. Choose Install from the review dialog when you're ready to begin installing Office or choose Back if you want to make changes to your installation. Sit back and have a cup of tea while you wait for the installation to complete. It can take 30 minutes or more to complete the installation if you have an older, slow computer. After Office is installed, the final screen offers to check for updates online and remove cached installation files. If you have Internet connectivity, you should enable the Check the Web for Updates and Additional Downloads check box to check the Office update site for updates.
If you have plenty of free space on your hard drive, you should leave the cached installation files installed. These files are used when you need to install a Use on First Run feature or when you need to repair the installation. The cached installation files are stored in the MSOCache folder on your hard drive. If you have more than one drive, these files are placed on the drive with the most free space. Choose Finish to close the wizard and begin using Outlook. You don't have to reboot after completing the installation, but it's good practice to reboot at your earliest convenience. That's all there is to it. Office is installed and Outlook is ready for you to configure your profile. See Hour 2 to learn how to setup an Outlook profile. The first time any Office program is used, you'll be reminded that you need to activate it. Activation is an anti-piracy measure to prevent users from installing their copy on more computers than the EULA permits . Office 2003 includes a 50-use grace period before activation is required. If you don't activate after that period expires , the programs drop into reduced functionality mode and you can read documents but not edit, save, or send them. I recommend waiting until you have used Office about 40 times before activating to ensure that it works correctly and doesn't need to be reinstalled. While you are activating your copy, you'll have a chance to register your copy with Microsoft. It's up to you if you want to register it. If you choose to, you'll need to give them your name and address during registration.
|

EAN: 2147483647
Pages: 228