Using the Journal
| You can configure the journal to create journal entries for you when you work on Office documents or Outlook items. When journal items are created automatically, the amount of time the document is left open is also recorded. Not all activities you might want included in the journal can be automatically created. You'll have to create journal entries for these items if you want to track all of your activities. Creating a journal entry takes just a small amount of effort and is well worth it. For example, if you need to locate a document, it's often easier to use the journal to go back a few months and find the journal entry for the document you worked on than it is to search your computer's drive. As long as you remember approximately when you created the document, using views or Outlook's Advanced Find to find the journal entry is faster than using the Windows search utility to search your computer's hard drive for a filename you can't remember.
Configuring the JournalYou can configure the journal to track all emails you send to specific persons, record the Office documents you work on, and track meeting and task requests and responses. Journaling is disabled by default. The first time you select the Journal folder, a dialog opens asking whether you want to enable journaling. If you need to track only email and other Outlook items associated with specific contacts, the Activities tab on a contact form can be used instead of the journal and you should select N o. If you choose Y es, the Journal Options dialog opens, as shown in Figure 13.2. You can change your configuration for journal options at any time using the dialog in T ools, O ptions, Preferences tab, J ournal Options. Figure 13.2. Use the Journal Options dialog to select the activities you want to automatically record in the journal. Add a check for the contacts, document types, and meeting and task requests for the journal entries you want to create automatically.
The dialog contains three sections you'll use to configure the automatic recording of your activities. The items and contacts you choose in the top sections determine what is journaled automatically.
For example, journal entries for Automatically Record These I tems selections are created only if the contact is selected in the For These C ontacts list box, not for every person you exchange email with.
Along with the items checked in the Automatically Record These I tems list, journal entries are automatically created for phone calls to the contacts selected in the For These C ontacts list when you initiate a call to the contact using the A ctions, C a ll Contact menu on an open contacts form. The third section, A l so Record Files from, contains the list of Office document types that Outlook is capable of tracking and recording. Outlook supports the automatic journaling of documents created with Access, Excel, PowerPoint, and Word. If Project or Visio is installed, documents from those applications can be automatically journaled as well.
The remaining section found on this dialog contains the settings for the default action for opening journal entries when you double-click on an item. The choices are O pens the Journal Entry and O p ens the Item Referred to by the Journal Entry.
The last setting you need to configure from this dialog is the AutoArchive setting. You should configure A u toArchive Journal Settings if you're journaling activities for a large number of contacts; otherwise , your message store might grow too large. Task: Enable Journaling for Specific ContactsNormally, you would use the T ools, O ptions, J ournal Options dialog to enable contacts for automatic journaling. However, it's time-consuming to mark each item. You can also enable contacts for journaling from a contact form's All Fields tab or by using a Table view in the Contacts folder. Using views to enable or disable your contacts for automatic journaling is the easiest way to set or change the status for a large number of contacts:
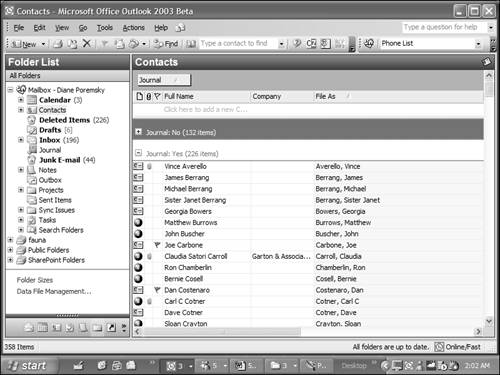
If you have a large number of contacts to change, right-click on the row of field names and choose Group B y Box and then drag the Journal field to the Group By box. You can now select and drag multiple contacts between the Journal: No and Journal: Yes groupings, as shown in Figure 13.3. Figure 13.3. Change the journal setting for many contacts at once by grouping contacts by the Journal field. Notice the different icon used on journaled items. You can also enable journaling by opening a contact, selecting the All Fields tab, finding the Journal field, and changing the entry to Yes. But that isn't an efficient way to enable journaling for your contacts. However, when you want to enable journaling for all new contacts, you can create a custom form with this field set to Yes:
Next you need to make the new form your default contact form:
All new contacts you create will use the form you published with journaling enabled. If you want to stop journaling, repeat the last two steps and select the IPM.Contacts form instead. |
EAN: 2147483647
Pages: 228