Overview of Task Features
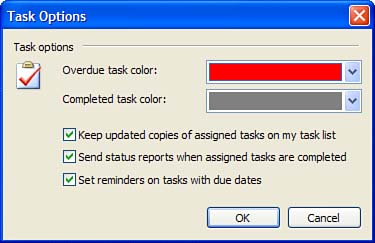
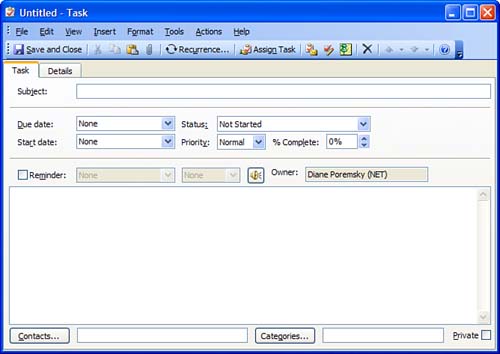
| Use tasks to track events you need to do but not during a specific time period, such as 2 p.m. Tasks can be open -ended with no start or end date, or you can assign start and due dates. Tasks are also useful for setting reminders for things that aren't necessarily tasks, but that you want to be reminded about. For example, I drag order confirmation or package tracking email messages to the Tasks folder and set a reminder time so that I know when packages are expected to arrive . Configuring Task OptionsThere aren't many options you need to configure to use tasks, and the default settings are acceptable to most users. If you'd like to look at the Task Options dialog, as shown in Figure 12.1, open it by selecting the T ools, O ptions, Preferences, T ask Options menu option. Figure 12.1. Use the Task Options dialog to choose an automatic formatting color of overdue and completed tasks, whether to use reminders on tasks with due dates, and how you want to handle assigned tasks. If Set R eminders on Tasks with Due Dates is enabled on the Task Options dialog, choose a R eminder Time setting on the T ools, O ptions, Preferences dialog. In addition to setting a default reminder time in Tools, Options, you can choose a specific date and time for your reminder on the task form. These fields accept natural language entries. Creating TasksAlthough some things can be entered as either calendar or task items, for the most part you'll want to create tasks for items that don't have a set time to be completed. You can set a due date or leave the task open-ended. To open a task form, select N ew, T ask or press the keyboard shortcut of Ctrl+Shift+K (see Figure 12.2). Figure 12.2. The task form needs only a few fields completed: Sub j ect, Sta r t and D ue Dates, Status, % Comp l ete and Re m inder times. As you complete the task, you can change the % Comp l ete and Status fields. You have to complete only the Sub j ect field for your task and save it. But in most cases you'll also want to include a D ue Date, and might want to include a Sta r t Date and Re m inder Time, or associate C ontacts with the task, and assign Cate g ories. As you work on the task, you can update the Status : and % Comp l ete fields.
You can create new tasks from email messages by dragging messages to the task button at the bottom of the Navigation Pane or to the Tasks folder. When a task is created from an email message, the Subject field is completed automatically (using the email's subject) and the message body is added to the Notes field. If you'd rather have the message on the task as an attachment, right-click and drag the message to the Task button and then drop it. A menu opens with options for creating a new task using Copy Here As Task with T ext, C opy Here As Task with Attachment, or M ove Here As Task with Attachment. In most cases, you'll want to create tasks from email with the message as text, not attachment, because it often results in a smaller file size and you can read the note in the preview pane. However, if you're creating a task to remind you to reply to a message, adding the message as an attachment means that you can open the message right from the task ”you don't have to go looking for it. Adding the message as an attachment also preserves the message source, including HTML formatting, the full Internet header, and any attachments sent with the message.
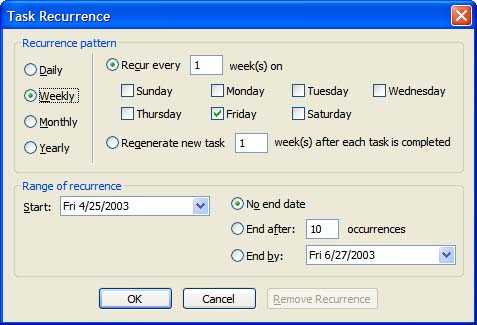
You can also create a new task by selecting and dragging text from any application to the Task icon to create a new task with the text entered into the Notes field automatically. Use the Rec u rrence button to create recurring tasks (refer to Figure 12.2). Choose the recurrence pattern, the range of recurrence , and whether there is an end date (see Figure 12.3). Click the R emove Recurrence button if you want to remove the recurrence. Figure 12.3. Use the Task Recurrence dialog to create recurring tasks. Recurring tasks must fit a pattern; you are unable to use this dialog to create tasks that don't fit a pattern.
Click the speaker button following the reminder time fields to choose a specific reminder sound for the task. You can have a different reminder sound for each task if you desire . Select a sound from C:\WINDOWS\Media\ or use sounds you get from other sources or programs.
When you work on the task, you can change the % Comp l ete field to reflect how much work you've done toward completing the task. Although it's not necessary when working tasks, if you're working on a shared task or were assigned a task by someone else, updating the % Comp l ete field helps others gauge how much is left to do. The drop-down list includes 25, 50, 75, and 100, or you can type any whole number into the field. You can also set a status for the task, choosing from
When the % Comp l ete field is changed and the Status : field is on the default of Not Started, the Status : updates to In Progress or Completed. Status selections are unchanged when another status is selected and the % Comp l ete field is updated to anything except 100 % Complete, at which time the status changes to Completed. |
EAN: 2147483647
Pages: 228