Creating a Page to View the Calendar
|
Now that you re able to enter appointments, of course you want to be able to view them, too. To accomplish this task, you ll create a page that again uses the Calendar control. Naturally, you ll be able to click a specific day in the calendar and then view the appointments you have for that day, if any. You ll also program the Calendar control so that it shows you the days on which you have appointments.
Before we launch into creating the page and programming it, let s review how the calendar display page will work. Figure 14-2 shows a picture of the page when it s running in the browser.
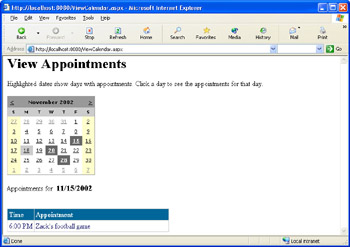
Figure 14-2: A page that uses the Calendar control to display appointment information.
Both functions of the page highlighting appointment days and displaying the appointments for a specific day involve reading appointment information from the Calendar table in the database. However, the two functions use the database in different ways, and in fact, because the two functions are essentially independent of one another, it makes sense to break down the description of how to create the Calendar viewing page into two parts. You ll start with highlighting the days on the calendar that have appointments. Before programming the calendar, however, you need to create the page.
Create the ![]() ViewCalendar.aspx page
ViewCalendar.aspx page
-
In Web Matrix, create a new page, and name it
 ViewCalendar.aspx.
 -
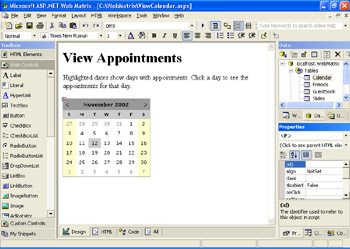
Add a heading by typing View Appointments. If you want, add explanatory text such as Highlighted dates show days with appointments. Click a day to see the appointments for that day.
-
From the Web Controls tab of the Toolbox, drag a Calendar control onto the page. In the Properties window, click the Auto Format link and select a formatting scheme that you like. When you ve finished, the page will look like this:
Now you re ready to write code to highlight appointment days in the calendar.
Highlighting Appointment Days in the Calendar
We want the days containing appointments to be displayed in some fashion in the Calendar control. As you saw earlier with the ![]() CalendarEntry.aspx page, when you click a day in the calendar, the Calendar control displays the selected day in a distinct color or font. (The exact way in which the Calendar control displays a selected day depends on the scheme you selected in the Auto Format window.) To highlight days with appointments, therefore, you ll programmatically select them in the Calendar control.
CalendarEntry.aspx page, when you click a day in the calendar, the Calendar control displays the selected day in a distinct color or font. (The exact way in which the Calendar control displays a selected day depends on the scheme you selected in the Auto Format window.) To highlight days with appointments, therefore, you ll programmatically select them in the Calendar control.
In outline, the procedure for highlighting days is as follows: You ll query the database to read all the appointments from the Calendar table. As usual, you ll have Web Matrix write the query code for you. For this example, you ll have Web Matrix use a data reader object. As I explained in Chapter 9, a data reader object allows you to read one record at a time from the result set returned by a query. Using the data reader, you ll go through the query s result set, extract each date from the appointment records, and then add that date to the list of selected dates in the calendar. To start, you ll need to have Web Matrix generate the data reader code.
Generate a data reader for reading appointments
-
Switch to Code view.
-
From the Toolbox, drag a Select Data Method element onto the page. Connect to the WebMatrix database.
-
In the Query Builder, select the Calendar table.
-
Under Columns, select CalendarDateTime. To highlight dates in the calendar, the date is the only information you need from the Calendar table. Click Next.
-
When Web Matrix prompts you for the name of the method to generate, name the method GetAppointments. Select the DataReader option button, and then click Finish. Web Matrix creates the GetAppointments method in your page.
You can call the GetAppointments method to execute the query and return a data reader object. The next step is to write code that calls this method and then loops through those appointments to select the corresponding days in the Calendar control. I recommend that you accomplish this task in a subroutine, because you ll call the code at different times in the page, as I ll explain shortly.
To track selected dates, the Calendar control supports a SelectedDates property, which is a collection. You can select a date in the calendar by adding the date to the SelectedDates collection, much the way you added items to the slideshow list box in Chapter 12. Add the following code to the page to set the Calendar control s selected dates:
Sub SetSelectedDates( Dim appointmentReader As System.Data.SqlCl ient.SqlDataReade Dim appointmentDate As DateTim appointmentReader = GetAppointments( While appointmentReader.Rea appointmentDate = appointmentReader(0 Calendar1.SelectedDates.Add(appointmen tDate End Whil End Sub
You first create a variable of type SqlDataReader, which will hold the data reader created by the generated code. When you declare a variable for a data reader that will read data from MSDE or SQL Server, you use the lengthy type System.Data.SqlClient.SqlDataReader. Unlike some data objects such as datasets, data readers are particular to the provider you re reading data from, which is why you need to declare the data reader as part of the namespace for SQL Server objects.
You execute the query and initialize the data reader by calling the GetAppointments method generated earlier. You then create a variable named appointmentReader to hold each record as you work with it. To get an individual record, you call the data reader s Read method, which loads the next record into the appointmentReader variable and moves forward in the result set. You can use a While loop with a data reader, because when the reader gets to the end of the result set, the reader returns False, and you can exit the loop.
When you generated the GetAppointments method earlier, I told you that you needed only the CalendarDateTime column from the Calendar table. As a result, the record returned by the data reader has only one value in it, which we can get by accessing value 0 of the appointmentReader variable. The last task in this part of the code is to call the Add method of the Calendar control s SelectedDates collection, as I described earlier. When the loop has finished, the SelectedDates collection will have been populated with all the dates from the Calendar table, and the Calendar control will be ready to display highlighted days for appointments.
You re still missing one small step, however. Although you ve created a subroutine to highlight days in the Calendar control, you haven t called that subroutine yet. When do you want the highlighted dates to be displayed? When the page is first displayed, of course. So you need to call the SetSelectedDates subroutine from the Page_Load handler. You need to set the selected dates only the first time the page runs, because in subsequent postbacks the Calendar control will maintain its own state. The code to set the selected dates looks like this:
Sub Page_Load( If Not Page.IsPostBack The SetSelectedDates( End I End Sub
After you enter this code, test the page. You ll see a highlighted day for any date with an appointment. You can click the month links in the calendar, too, to view highlighted days in any month.
Now that you ve completed your first task, highlighting appointment days, you can proceed to the second task, displaying appointment details when users click a day in the calendar.
Displaying Appointment Details
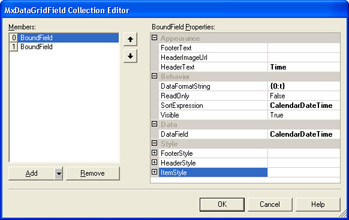
When users click a day in the calendar, you want to show them the appointments they have for that day. To do so, you ll need to query the database to get all the appointments for a specific day. (As part of the query, you ll also want to sort the appointments by time.) The easiest way to display data, as you know, is to use the MxDataGrid control, and that s the control you ll use in this page.
The query that gets the appointments for only one day must obviously be a parameterized query. You ll use the same technique that you used in Chapter 13 that is, you ll use a SqlDataSourceControl control and configure the control with a SQL Select statement containing a Where clause to find the appropriate records. Then you ll write code to pass the correct values to the SQL Select statement.
Let s start by adding controls to the page and configuring them. Figure 14-3 shows you what the page will look like in Design view when you ve finished adding the controls.
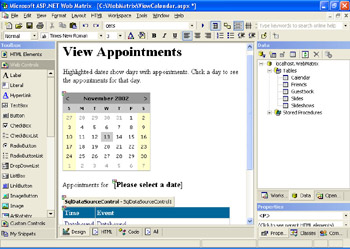
Figure 14-3: The ViewCalendar page after you ve added the controls to display appointments.