Creating a Calendar Entry Page
|
The first page you ll create will gather your appointment information: the date, the time, and a description of each appointment. The centerpiece of the page will be a Calendar control that you ll use to select dates. When the page runs, it will look something like Figure 14-1.
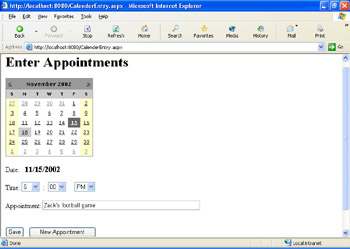
Figure 14-1: A page for entering appointments, featuring a Calendar control.
Create the CalendarEntry page
-
In Web Matrix, create a new page, named
 CalendarEntry.aspx.
 -
Add this heading to the page: Enter Appointments.
-
From the Web Control tab of the Toolbox, drag a Calendar control onto the page. If you want to change the appearance of the Calendar control, select the control, click the Auto Format link at the bottom of the Properties window, and select a format (scheme) that you like.
Tip You can change the look of calendar elements individually as well. In the Properties window, open the nodes for DayStyle, TodayDayStyle, SelectedDayStyle, and so on in other words, any property that ends in Style and set the font, color, or other properties for that style.
-
Below the calendar, add the following controls to the page and set their properties as indicated:
Control
Property Settings
Label
ID: labelDate
Text: [Please select a date]
Font.Bold: True
Font.Size: Medium
DropDownList
ID: listHours
DropDownList
ID: listMinutes
DropDownList
ID: listAMPM
TextBox
ID: textAppointment
MaxLength: 50 (or whatever length you set the Event column to in the database)
RequiredFieldValidator
ControlToValidate: textAppointment
ErrorMessage: You must enter an appointment.
Button
ID: buttonSave
Text: Save
Button
ID: buttonNewAppointment
Text: New Appointment
Label
ID: labelStatus
ForeColor: Red
Text: (empty)
When you defined the Calendar table, you created a single CalendarDateTime column. On the page, however, you have separate controls for entering the date (the Calendar control) and the time (the three drop-down lists). Having separate controls for entering the date and time makes entering those values easier and less error prone than entering them in a text box. In a few moments, I ll explain how you ll reunite the values from these controls to create a single date-time value to send to the database.
Add text to the page for captions.
You added three drop-down lists, from which users will choose the hour, minutes, and AM/PM designator for their appointments. Let s look quickly at how to populate these lists.
Populate the time drop-down lists
-
Select the listHour control, and in the Properties window, click the ellipsis button in the Items property to display the ListItem Collection Editor dialog box.
-
Click the Add button twelve times to create twelve list items.
-
In the right-hand properties grid, set the Text property to the values 12, 1, 2, 3, and so on, up to 11. (I put 12 first because it seemed more clock- like to start with 12.) When you ve finished, the dialog box will look like this:
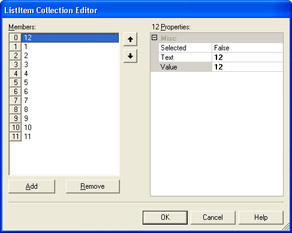
Click OK to close the dialog box.
Select the listMinutes control, and create four items for it with the text 00, 15, 30, and 45. (I m assuming that fifteen-minute increments are granular enough for our purposes.)
Select the listAMPM control, and create two items for it, with the text AM and PM.
With the page s layout in place and drop-down lists populated, we can start on the modest amount of programming required for this page. The first task is to get date selection working.
Programming Date Selection with the Calendar
In the ![]() CalendarEntry.aspx page, you use the Calendar control to allow users to pick a date. When users select a date, you want to display that date in the labelDate control, which will reinforce for users that they ll be entering an appointment for the selected date. By default, no date is selected in the Calendar control, so you ll also want to preselect a placeholder date namely, today s date.
CalendarEntry.aspx page, you use the Calendar control to allow users to pick a date. When users select a date, you want to display that date in the labelDate control, which will reinforce for users that they ll be entering an appointment for the selected date. By default, no date is selected in the Calendar control, so you ll also want to preselect a placeholder date namely, today s date.
Program the selected date
-
Double-click the Calendar control. Web Matrix switches to Code view and creates a handler for the Calendar control s SelectionChanged event, which is raised whenever users click a day in the calendar.
-
In the handler, set the text of the labelDate control to the selected date using the following boldfaced code:
Sub Calendar1_SelectionChanged(sender As Objec t, e As EventArgs labelDate.Text = Calendar1.SelectedDate End Sub
The Calendar control s SelectedDate property, as you can see, contains the value of the date that the user has clicked.
Create a Page_Load handler, and in the handler, set the Calendar control s SelectedDate property to today s date. You need to initialize the date only the first time the page runs. The code looks like this:
Sub Page_Load( If Not Page.IsPostBack The Calendar1.SelectedDate = Toda labelDate.Text = Toda End I End Sub
Notice that after I ve preselected the date in the calendar, I also display the same date in the labelDate control.
Test the page by pressing F5. Make sure that the labelDate control shows the current date. Click on different days in the calendar; as you click, the labelDate control will change to reflect the date you ve clicked. Use the month links at the top of the calendar to go to different months and click dates there.
As you click different dates, notice the status bar in Microsoft Internet Explorer. You ll see that the browser reloads the page when you click a date in other words, the page makes a round trip every time you click a date.
| Note | Clicking a date sets the Calendar control s SelectedDate property. You don t need to explicitly set the date in your code; on the contrary, you can simply read the selected date out of the calendar. The fact that the Calendar control sets the SelectedDate property automatically when you click has some implications that you ll need to accommodate in the second page of the calendar application. |
Test the drop-down lists to verify that you can set times.
Up to now, the code you ve written reads the selected date in the Calendar control. It s time now to add the code to accomplish the basic purpose of the page, which is to add a new calendar record to the database.