Chapter 14. Introduction to UNIX Performance Tools
| CONTENTS |
- Introduction
- Standard UNIX Commands
- Check Processes with ps
- Killing a Process
- Signals
- More Advanced and Graphical Performance Tools
- HP GlancePlus/UX
- HP VantagePoint Performance Agent and HP VantagePoint Performance Analyzer/UX
- Manual Pages of Some Commands Used in Chapter 14
Introduction
You can take a variety of approaches to performance analysis on your system. These choices range from quick snapshots that take but a few seconds to create, to long-range capacity planning programs that you may want to run for weeks or months before you even begin to analyze the data they produce. This chapter contains examples from a variety of systems, including HP-UX 11i systems. I left in the examples from non-HP-UX systems because some readers of my books are coming from UNIX variants other than HP-UX. Most of the HP-UX examples in this chapter have been updated to reflect 11i systems; however, I'm not aware of any differences between these performance examples on 11i vs. 11.0.
In this chapter, we'll focus on some commonly used UNIX commands and a couple of advanced tools that run on several UNIX variants. These are by no means an exhaustive list of UNIX commands and tools related to performance management; however, I provide enough good information to give you an overview. Your UNIX system may support additional commands and have advanced performance analysis tools. This chapter will give a good overview of performance analysis, including examples of the most commonly used UNIX performance-related commands.
Standard UNIX Commands
To begin, let's look at some commands you can issue from the UNIX prompt to give you some information about your system. The commands I'll cover are:
-
iostat
-
vmstat
-
netstat
-
ps
-
kill
-
showmount
-
swapinfo and swap
-
sar
We'll first look at each of these commands so that you get an understanding of the output produced by them and how this output may be used. There are manual pages for many of the commands covered at the end of this chapter.
Please keep in mind that, like all topics we have covered, the output of these commands may differ somewhat among UNIX variants. The basic information produced on most UNIX variants is the same; however, the format of the outputs may differ somewhat. This usually is not significant if you're viewing the outputs; however, if you're writing programs that accept these outputs and manipulate them in some way, then the format of the outputs is important.
I/O and CPU Statistics with iostat

The iostat command gives you an indication of the level of effort which the CPU is putting into I/O and the amount of I/O taking place among your disks and terminals. iostat provides a lot of useful information; however, it acts somewhat differently among UNIX variants. The following examples show issuing iostat on a Solaris system, an HP-UX system, and an AIX system. iostat was not supported on the Linux system I was using for this chapter. Note that on some systems, using the -t option for terminal information produces just terminal information, and on some systems it produces a full output. You will, of course, have to determine the best options for your needs on your UNIX variant. The following examples show the iostat command:
Here is a Solaris example executed ten times at five-second intervals:
# iostat 5 10 tty fd0 sd1 sd3 sd6 cpu tin tout kps tps serv kps tps serv kps tps serv kps tps serv us sy wt id 0 0 0 0 0 0 0 0 3 0 57 0 79 0 0 7 49 43 0 47 0 0 0 0 0 0 14 2 75 0 0 0 0 2 0 98 0 16 0 0 0 0 0 0 0 0 0 0 0 0 0 1 0 98 0 16 0 0 0 0 0 0 0 0 0 0 0 0 0 2 0 98 0 16 0 0 0 0 0 0 0 0 0 0 0 0 0 0 0 100 0 16 0 0 0 0 0 0 0 0 0 0 0 0 0 0 0 100 0 16 0 0 0 0 0 0 0 0 0 0 0 0 0 1 0 99 0 16 0 0 0 0 0 0 0 0 0 0 0 0 0 0 0 100 0 16 0 0 0 0 0 0 6 1 35 0 0 0 0 4 0 96 0 16 0 0 0 0 0 0 0 0 0 0 0 0 0 0 0 100 An HP-UX example includes the -t option executed five times at five-second intervals:
# iostat -t 5 5 tty cpu tin tout us ni sy id 1 58 5 1 10 84 device bps sps msps c1t2d0 0 0.0 1.0 tty cpu tin tout us ni sy id 0 30 0 2 6 72 device bps sps msps c1t2d0 484 249.6 1.0 tty cpu tin tout us ni sy id 0 31 1 3 23 73 device bps sps msps c1t2d0 517 256.1 1.0 tty cpu tin tout s ni sy id 0 35 0 2 23 75 device bps sps msps c1t2d0 456 254.4 1.0 tty cpu tin tout us ni sy id 0 744 1 6 38 55 device bps sps msps c1t2d0 155 83.1 1.0 #
Here is an AIX example executed ten times at five-second intervals:

# iostat 5 10 tty: tin tout avg-cpu: % user % sys % idle % iowait 0.0 0.0 0.3 1.0 98.4 0.3 Disks: % tm_act Kbps tps Kb_read Kb_wrtn hdisk0 0.4 2.7 0.4 2366635 959304 hdisk1 0.0 0.0 0.0 18843 37928 hdisk2 0.1 0.6 0.1 269803 423284 hdisk3 0.0 0.0 0.0 20875 172 cd0 0.0 0.0 0.0 14 0 tty: tin tout avg-cpu: % user % sys % idle % iowait 0.0 108.2 0.0 0.2 99.8 0.0 Disks: % tm_act Kbps tps Kb_read Kb_wrtn hdisk0 0.0 0.0 0.0 0 0 hdisk1 0.0 0.0 0.0 0 0 hdisk2 0.0 0.0 0.0 0 0 hdisk3 0.0 0.0 0.0 0 0 cd0 0.0 0.0 0.0 0 0 tty: tin tout avg-cpu: % user % sys % idle % iowait 0.0 108.4 0.2 0.8 99.0 0.0 Disks: % tm_act Kbps tps Kb_read Kb_wrtn hdisk0 0.0 0.0 0.0 0 0 hdisk1 0.0 0.0 0.0 0 0 hdisk2 0.0 0.0 0.0 0 0 hdisk3 0.0 0.0 0.0 0 0 cd0 0.0 0.0 0.0 0 0 tty: tin tout avg-cpu: % user % sys % idle % iowait 0.0 108.4 0.4 0.2 99.4 0.0 Disks: % tm_act Kbps tps Kb_read Kb_wrtn hdisk0 0.0 0.0 0.0 0 0 hdisk1 0.0 0.0 0.0 0 0 hdisk2 0.0 0.0 0.0 0 0 hdisk3 0.0 0.0 0.0 0 0 cd0 0.0 0.0 0.0 0 0 tty: tin tout avg-cpu: % user % sys % idle % iowait 0.0 108.2 0.4 0.6 99.0 0.0 Disks: % tm_act Kbps tps Kb_read Kb_wrtn hdisk0 0.0 0.0 0.0 0 0 hdisk1 0.0 0.0 0.0 0 0 hdisk2 0.0 0.0 0.0 0 0 hdisk3 0.0 0.0 0.0 0 0 cd0 0.0 0.0 0.0 0 0 tty: tin tout avg-cpu: % user % sys % idle % iowait 0.0 108.4 0.0 0.4 99.6 0.0 Disks: % tm_act Kbps tps Kb_read Kb_wrtn hdisk0 0.0 0.0 0.0 0 0 hdisk1 0.0 0.0 0.0 0 0 hdisk2 0.0 0.0 0.0 0 0 hdisk3 0.0 0.0 0.0 0 0 cd0 0.0 0.0 0.0 0 0 tty: tin tout avg-cpu: % user % sys % idle % iowait 0.0 108.4 0.6 0.0 99.4 0.0 Disks: % tm_act Kbps tps Kb_read Kb_wrtn hdisk0 0.0 0.0 0.0 0 0 hdisk1 0.0 0.0 0.0 0 0 hdisk2 0.0 0.0 0.0 0 0 hdisk3 0.0 0.0 0.0 0 0 cd0 0.0 0.0 0.0 0 0 tty: tin tout avg-cpu: % user % sys % idle % iowait 0.0 108.2 0.2 0.8 99.0 0.0 Disks: % tm_act Kbps tps Kb_read Kb_wrtn hdisk0 0.0 0.0 0.0 0 0 hdisk1 0.0 0.0 0.0 0 0 hdisk2 0.0 0.0 0.0 0 0 hdisk3 0.0 0.0 0.0 0 0 cd0 0.0 0.0 0.0 0 0 tty: tin tout avg-cpu: % user % sys % idle % iowait 0.0 108.4 0.4 0.0 99.6 0.0 Disks: % tm_act Kbps tps Kb_read Kb_wrtn hdisk0 0.0 0.0 0.0 0 0 hdisk1 0.0 0.0 0.0 0 0 hdisk2 0.0 0.0 0.0 0 0 hdisk3 0.0 0.0 0.0 0 0 cd0 0.0 0.0 0.0 0 0 tty: tin tout avg-cpu: % user % sys % idle % iowait 0.0 108.4 0.4 0.4 99.2 0.0 Disks: % tm_act Kbps tps Kb_read Kb_wrtn hdisk0 0.0 0.0 0.0 0 0 hdisk1 0.0 0.0 0.0 0 0 hdisk2 0.0 0.0 0.0 0 0 hdisk3 0.0 0.0 0.0 0 0 cd0 0.0 0.0 0.0 0 0
Here are descriptions of the reports you receive with iostat for terminals, the CPU, and mounted file systems. Because the reports are somewhat different, I have included detailed information from the HP-UX output. A more detailed description of these fields is included in the iostat manual page at the end of this chapter. Most of the fields appear in the outputs; however, the outputs of the commands differ somewhat among UNIX variants.
For every terminal you have connected (tty), you seea "tin" and "tout," which represent the number of characters read from your terminal and the number of characters written to your terminal, respectively.
For your CPU, you see the percentage of time spent in user mode ("us"), the percentage of time spent running user processes at a low priority called nice ("ni"), the percentage of time spent in system mode ("sy"), and the percentage of time the CPU is idle ("id").
For every locally mounted file system, you receive information on the kilobytes transferred per second ("bps"), number of seeks per second ("sps"), and number of milliseconds per average seek ("msps"). For disks that are NFS-mounted or disks on client nodes of your server, you will not receive a report; iostat reports only on locally mounted file systems.
When viewing the output of iostat, there are some parameters to take note of.
First, note that the time that your CPU is spending in the four categories shown. The CPU report is produced with the -t option. I have worked on systems with poor performance that the administrator assumed to be a result of a slow CPU because the "id" number was very high, indicating that the CPU was actually idle most of the time. If the CPU is mostly idle, the chances are that the bottleneck is not the CPU, but may be I/O, memory, or networking. If the CPU is indeed busy most of the time ("id" is very low), see whether any processes are running "nice" (check the "ni" number). It may be that there are some background processes consuming a lot of CPU time that can be changed to run "nice."
Second, compare the number of transfers taking place. These are usually indicated by something like blocks per second (bps), transfers per second (tps), or seeks per second (sps). These numbers give an indication of the amount of activity taking place on a disk. If one volume is consistently much higher than other volumes, then it may be performing an inordinate amout of the workload. Notice on HP-UX that the milliseconds per average seek (msps) for all disks is always equal to one.
Virtual Memory Statistics with vmstat

vmstat provides virtual memory statistics. It provides information on the status of processes, virtual memory, paging activity, faults, and a breakdown of the percentage of CPU time. vmstat acts somewhat differently among UNIX variants. The following examples show issuing vmstat on a Solaris system, an HP-UX system, an AIX system, and a Linux system. You will, of course, have to determine the best options for your needs on your UNIX variant. In the following examples, the output was produced nine times at five-second intervals. The first argument to the vmstat command is the interval; the second is the number of times you would like to have the output produced.
Solaris example:
# vmstat 5 9 procs memory page disk faults cpu r b w swap free re mf pi po fr de sr f0 s1 s3 s6 in sy cs us sy id 0 0 0 4480 4696 0 0 1 0 0 0 0 0 0 0 79 864 130 297 0 7 92 0 0 0 133020 5916 0 3 0 0 0 0 0 0 0 3 0 102 42 24 0 2 98 0 0 0 133020 5916 0 0 0 0 0 0 0 0 0 0 0 70 48 24 0 0 100 0 0 0 133020 5916 0 0 0 0 0 0 0 0 0 0 0 74 42 24 0 0 100 0 0 0 133020 5916 0 0 0 0 0 0 0 0 0 0 0 35 45 23 0 0 99 0 0 0 133020 5916 0 0 0 0 0 0 0 0 0 0 0 65 66 26 0 0 100 0 0 0 133020 5916 0 0 0 0 0 0 0 0 0 0 0 52 44 23 0 1 99 0 0 0 133020 5916 0 0 0 0 0 0 0 0 0 0 0 53 54 24 0 1 99 0 0 0 133020 5916 0 0 0 0 0 0 0 0 0 1 0 60 53 25 0 2 98 HP-UX example:
# vmstat 5 9 procs memory page faults cpu r b w avm free re at pi po fr de sr in sy cs us sy id 5 240 0 17646 3979 2 0 0 0 0 0 0 0 778 193 17 3 80 4 242 0 16722 4106 0 0 0 0 0 0 0 814 20649 258 89 10 2 4 240 0 16649 4106 0 0 0 0 0 0 0 83 18384 218 91 9 0 4 240 0 16468 4106 0 0 0 0 0 0 0 792 19552 273 89 11 1 5 239 0 15630 4012 9 0 0 0 0 0 0 804 18295 270 93 8 -1 5 241 0 16087 3934 6 0 0 0 0 0 0 920 21044 392 89 10 0 5 241 0 15313 3952 11 0 0 0 0 0 0 968 20239 431 90 10 0 4 242 0 16577 4043 3 0 0 0 0 0 0 926 19230 409 89 10 0 6 238 0 17453 4122 0 0 0 0 0 0 0 837 19269 299 89 9 2 AIX example:
martyp $ vmstat 5 9 kthr memory page faults cpu ----- ----------- ------------------------ ------------ ----------- r b avm fre re pi po fr sr cy in sy cs us sy id wa 0 0 16604 246 0 0 0 0 2 0 149 79 36 0 1 98 0 0 0 16604 246 0 0 0 0 0 0 153 125 41 0 0 99 0 0 0 16604 246 0 0 0 0 0 0 143 83 33 0 0 99 0 0 0 16604 246 0 0 0 0 0 0 140 94 35 0 1 99 0 0 0 16604 246 0 0 0 0 0 0 166 62 32 0 0 99 0 0 0 16604 246 0 0 0 0 0 0 150 102 38 1 0 99 0 0 0 16604 246 0 0 0 0 0 0 183 78 34 0 0 99 0 0 0 16604 246 0 0 0 0 0 0 132 87 33 0 1 99 0 0 0 16604 246 0 0 0 0 0 0 147 84 38 0 0 99 0
Linux example:
# vmstat 5 5 procs memory swap io system cpu r b w swpd free buff cache si so bi bo in cs us sy id 1 0 0 9432 1160 656 12024 1 2 14 1 138 274 3 1 96 1 0 0 9684 828 652 12148 0 50 0 14 205 8499 82 18 0 1 0 0 9684 784 652 11508 0 0 0 1 103 8682 81 19 0 1 0 0 9684 800 652 10996 0 0 0 0 101 8683 80 20 0 0 0 0 9772 796 652 9824 12 18 3 4 160 6577 66 17 18
You certainly get a lot for your money from the vmstat command. Here is a brief description of the categories of information produced by vmstat. I have included a description of the fields in the HP-UX example because of the manual page that appears at the end of this chapter for HP-UX. You can see, however, that the outputs are very similar.
Processes are classified into one of three categories: runnable ("r"), blocked on I/O or short-term resources ("b"), or swapped ("w"). Next you will see information about memory. "avm" is the number of virtual memory pages owned by processes that have run within the last 20 seconds. If this number is roughly the size of physical memory minus your kernel, then you are near forced paging. The "free" column indicates the number of pages on the system's free list. It doesn't mean that the process is finished running and these pages won't be accessed again; it just means that they have not been accessed recently. I suggest that you ignore this column.
Next is paging activity. The first field ("re") shows the pages that were reclaimed. These pages made it to the free list but were later referenced and had to be salvaged.
Next you see the number of faults in three categories: interrupts per second, which usually come from hardware ("in"), system calls per second ("sy"), and context switches per second ("cs").
The final output is CPU usage percentage for user ("us"), system ("sy"), and idle ("id"). This is not as complete as the iostat output, which also shows nice entries.
If you are running an I/O intensive workload, you may indeed see a lot of activity in runnable processes ("r"), blocked processes("b"), and the runnable but swapped ("w") processes. If you have many runnable but swapped processes, then you probably have an I/O bottleneck.
Network Statistics with netstat

netstat provides information related to network statistics. Because network bandwidth has as much to do with performance as the CPU and memory in some networks, you want to get an idea of the level of network traffic you have.
I use two forms of netstat to obtain network statistics. The first is netstat -i, which shows the state of interfaces that are autoconfigured. Although netstat -i gives a good rundown of the primary LAN interface, such as the network it is on, its name, and so on, it does not show useful statistical information.
The following shows the output of netstat -i:
# netstat -i | Name | Mtu | Network | Address | Ipkts | Ierrs | Opkts | Oerrs | Col |
|---|---|---|---|---|---|---|---|---|
| lan0 | 1497 | 151.150 | a4410.e.h.c | 242194 | 120 | 107665 | 23 | 19884 |

netstat provides a concise output. Put another way, most of what you get from netstat is useful. Here is a description of the nine fields in the netstat example:
| Name | The name of your network interface (Name), in this case, "lan0." |
| Mtu | The "maximum transmission unit," which is the maximum packet size sent by the interface card. |
| Network | The network address of the LAN to which the interface card is connected (151.150). |
| Address | The host name of your system. This is the symbolic name of your system as it appears in the /etc/hosts file if your networking is configured to use /etc/hosts. |
Below is the statistical information. Depending on the system you are using, or revision of OS, you may not see some of these commands:
| Ipkts | The number of packets received by the interface card, in this case, "lan0." |
| Ierrs | The number of errors detected on incoming packets by the interface card. |
| Opkts | The number of packets transmitted by the interface card. |
| Oerrs | The number of errors detected during the transmission of packets by the interface card. |
| Col | The number of collisions that resulted from packet traffic. |
netstat provides cumulative data since the node was last powered up; therefore, you might have a long elapsed time over which data was accumulated. If you are interested in seeing useful statistical information, you can use netstat with different options. You can also specify an interval to report statistics. I usually ignore the first entry, because it shows all data since the system was last powered up. This means that the data includes non-prime hours when the system was idle. I prefer to view data at the time the system is working its hardest. The following examples show running netstat -I and specifying the lan interface for Solaris, HP-UX, and AIX. These outputs are nearly identical, although the name of the network interface does vary among UNIX variants. The netstat command is run at an interval of five seconds. The Linux version of this command, which is not shown, does not allow me to specify an interval.
Solaris example:
# netstat -I le0 5 input le0 output input (Total) output packets errs packets errs colls packets errs packets errs colls 116817990 0 3299582 11899 1653100 116993185 0 3474777 11899 1653100 185 0 3 0 0 185 0 3 0 0 273 0 8 0 0 273 0 8 0 0 153 0 3 0 0 153 0 3 0 0 154 0 3 0 0 154 0 3 0 0 126 0 3 0 0 126 0 3 0 0 378 0 2 0 0 378 0 2 0 0 399 0 4 0 0 399 0 4 0 0 286 0 2 0 0 286 0 2 0 0 HP-UX example (10.x):
# netstat -I lan0 5 (lan0)-> input output (Total)-> input output packets errs packets errs colls packets errs packets errs colls 269841735 27 256627585 1 5092223 281472199 27 268258048 1 5092223 1602 0 1238 0 49 1673 0 1309 0 49 1223 0 1048 0 25 1235 0 1060 0 25 1516 0 1151 0 42 1560 0 1195 0 42 1553 0 1188 0 17 1565 0 1200 0 17 2539 0 2180 0 44 2628 0 2269 0 44 3000 0 2193 0 228 3000 0 2193 0 228 2959 0 2213 0 118 3003 0 2257 0 118 2423 0 1981 0 75 2435 0 1993 0 75 AIX example:
# netstat -I en0 5 input (en0) output input (Total) output packets errs packets errs colls packets errs packets errs colls 46333531 0 1785025 0 0 47426087 0 2913405 0 0 203 0 1 0 0 204 0 2 0 0 298 0 1 0 0 298 0 1 0 0 293 0 1 0 0 304 0 12 0 0 191 0 1 0 0 191 0 1 0 0 150 0 2 0 0 151 0 3 0 0 207 0 3 0 0 218 0 15 0 0 162 0 3 0 0 162 0 4 0 0 120 0 2 0 0 120 0 2 0 0 With this example, you get multiple outputs of what is taking place on the LAN interface, including the totals on the right side of the output. As I mentioned earlier, you may want to ignore the first output, because it includes information over a long time period. This may include a time when your network was idle, and therefore the data may not be important to you.
You can specify the network interface on which you want statistics reported by using -I interface; in the case of the example, it was -I and either le0, lan0, or en0. An interval of five seconds was also used in this example.
Analyzing netstat statistical information is intuitive. You want to verify that the collisions (Colls) are much lower than the packets transmitted (Opkts). Collisions occur on output from your LAN interface. Every collision your LAN interface encounters slows down the network. You will get varying opinions about what is too many collisions. If your collisions are less than five percent of "Opkts," you're probably in good shape and better off spending your time analyzing some other system resource. If this number is high, you may want to consider segmenting your network in some way such as installing networking equipment between portions of the network that don't share a lot of data.
As a rule of thumb, if you reduce the number of packets you are receiving and transmitting ("Ipkts" and "Opkts"), then you will have less overall network traffic and fewer collisions. Keep this in mind as you plan your network or upgrades to your systems. You may want to have two LAN cards in systems that are in constant communication. That way, these systems have a "private" LAN over which to communicate and do not adversely affect the performance of other systems on the network. One LAN interface on each system is devoted to intra-system communication. This provides a "tight" communication path among systems that usually act as servers. The second LAN interface is used to communicate with any systems that are usually clients on a larger network.
You can also obtain information related to routing with netstat (see Chapter 12). The -r option to netstat shows the routing tables, which you usually want to know about, and the -n option can be used to print network addresses as numbers rather than as names. In the following examples, netstat is issued with the -r option (this will be used when describing the netstat output) and the -rn options, so that you can compare the two outputs:
$ netstat-r
Routing tables
| Destination | Gateway | Flags | Refs | Use | Interface | Pmtu |
|---|---|---|---|---|---|---|
| hp700 | localhost | UH | 0 | 28 | lo0 | 4608 |
| default | router1 | UG | 0 | 0 | lan0 | 4608 |
| 128.185.61 | system1 | U | 347 | 28668 | lan0 | 1500 |
$ netstat -rn Routing tables
| Destination | Gateway | Flags | Refs | Use | Interface | Pmtu |
|---|---|---|---|---|---|---|
| 127.0.0.1 | 127.0.0.1 | UH | 0 | 28 | lo0 | 4608 |
| default | 128.185.61.1 | UG | 0 | 0 | lan0 | 4608 |
| 128.185.61 | 128.185.61.2 | U | 347 | 28668 | lan0 | 1500 |
With netstat, some information is provided about the router, which is the middle entry. The -r option shows information about routing, but there are many other useful options to this command are available. Of particular interest in this output is "Flags," which defines the type of routing that takes place. Here are descriptions of the most common flags, which may be different among UNIX variants, from the manual page at the end of this chapter.
| 1= U | Route to a network via a gateway that is the local host itself. |
| 3= UG | Route to a network via a gateway that is the remote host. |
| 5= UH | Route to a host via a gateway that is the local host itself. |
| 7= UGH | Route to a host via a remote gateway that is a host. |
The first line is for the local host, or loopback interface called, lo0 at address 127.0.0.1 (you can see this address in the netstat -rn example). The UH flags indicate that the destination address is the local host itself. This Class A address allows a client and server on the same host to communicate with one another via TCP/IP. A datagram sent to the loopback interface won't go out onto the network; it will simply go through the loopback.
The second line is for the default route. This entry says to send packets to Router 1 if a more specific route can't be found. In this case, the router has a UG under Flags. Some routers are configured with a U; others, such as the one in this example, are configured with a UG. I've found that I usually end up determining through trial and error whether a U or UG is required. If there is a U in Flags and I am unable to ping a system on the other side of a router, a UG entry usually fixes the problem.
The third line is for the system's network interface, lan0. This means to use this network interface for packets to be sent to 128.185.61.
Check Processes with ps
Knowing about the processes running on your system, and knowing how to stop them, are important to both system administration and performance.

To find the answer to "What is my system doing?" use ps -ef. This command provides information about every running process on your system. If, for instance, you want to know whether NFS is running, you simply type ps -ef and look for NFS daemons. Although ps tells you every process that is running on your system, it doesn't provide a good summary of the level of system resources being consumed. I would guess that ps is the most frequently issued system administration command. There are a number of options you can use with ps. I normally use e and f, which provide information about every ("e") running process and lists this information in full ("f"). ps outputs are almost identical from system to system. The following three examples are from Solaris, AIX, and HP-UX systems, respectively:
Solaris example:
martyp $ ps -ef UID PID PPID C STIME TTY TIME CMD root 0 0 0 Feb 18 ? 0:01 sched root 1 0 0 Feb 18 ? 1:30 /etc/init - root 2 0 0 Feb 18 ? 0:02 pageout root 3 0 1 Feb 18 ? 613:44 fsflush root 3065 3059 0 Feb 22 ? 5:10 /usr/dt/bin/sdtperfmeter -f -H -r root 88 1 0 Feb 18 ? 0:01 /usr/sbin/in.routed -q root 478 1 0 Feb 18 ? 0:00 /usr/lib/saf/sac -t 300 root 94 1 0 Feb 18 ? 2:50 /usr/sbin/rpcbind root 150 1 0 Feb 18 ? 6:03 /usr/sbin/syslogd root 96 1 0 Feb 18 ? 0:00 /usr/sbin/keyserv root 144 1 0 Feb 18 ? 50:37 /usr/lib/autofs/automountd root 1010 1 0 Apr 12 ? 0:00 /opt/perf/bin/midaemon root 106 1 0 Feb 18 ? 0:02 /usr/lib/netsvc/yp/ypbind -broadt root 156 1 0 Feb 18 ? 0:03 /usr/sbin/cron root 176 1 0 Feb 18 ? 0:00 /usr/lib/lpsched root 129 1 0 Feb 18 ? 0:00 /usr/lib/nfs/lockd daemon 130 1 0 Feb 18 ? 0:01 /usr/lib/nfs/statd root 14798 1 0 Mar 09 ? 31:10 /usr/sbin/nscd root 133 1 0 Feb 18 ? 0:10 /usr/sbin/inetd -s root 197 1 0 Feb 18 ? 0:00 /usr/lib/power/powerd root 196 1 0 Feb 18 ? 0:35 /etc/opt/licenses/lmgrd.ste -c /d root 213 1 0 Feb 18 ? 4903:09 /usr/sbin/vold root 199 196 0 Feb 18 ? 0:03 suntechd -T 4 -c /etc/optd root 219 1 0 Feb 18 ? 0:08 /usr/lib/sendmail -bd -q15m root 209 1 0 Feb 18 ? 0:05 /usr/lib/utmpd root 2935 266 0 Feb 22 ? 48:08 /usr/openwin/bin/Xsun :0 -nobanna root 16795 16763 1 07:51:34 pts/4 0:00 ps -ef root 2963 2954 0 Feb 22 ? 0:17 /usr/openwin/bin/fbconsole root 479 1 0 Feb 18 console 0:00 /usr/lib/saf/ttymon -g -h -p sunc root 10976 1 0 Jun 01 ? 0:00 /opt/perf/bin/ttd root 7468 1 0 Feb 24 ? 0:13 /opt/perf/bin/pvalarmd root 266 1 0 Feb 18 ? 0:01 /usr/dt/bin/dtlogin -daemon martyp 16763 16761 0 07:46:46 pts/4 0:01 -ksh root 10995 1 0 Jun 01 ? 0:01 /opt/perf/bin/perflbd root 484 478 0 Feb 18 ? 0:00 /usr/lib/saf/ttymon root 58 1 0 Feb 18 ? 20:06 /usr/lib/snmp/snmpdx -y -c /etc/f root 16792 3059 0 07:50:37 ? 0:00 /usr/dt/bin/dtscreen -mode blank root 471 1 0 Feb 18 ? 0:07 /usr/lib/dmi/dmispd root 474 1 0 Feb 18 ? 0:00 /usr/lib/dmi/snmpXdmid -s root 485 458 0 Feb 18 ? 739:44 mibiisa -r -p 32874 root 2954 2936 0 Feb 22 ? 0:01 /bin/ksh /usr/dt/bin/Xsession root 2936 266 0 Feb 22 ? 0:00 /usr/dt/bin/dtlogin -daemon root 3061 3059 0 Feb 22 ? 1:32 dtwm root 3058 1 0 Feb 22 pts/2 0:01 /usr/dt/bin/ttsession root 712 133 0 Feb 18 ? 0:01 rpc.ttdbserverd root 11001 11000 0 0:01 <defunct> root 2938 1 0 Feb 22 ? 0:00 /usr/openwin/bin/fbconsole -d :0 root 2999 2954 0 Feb 22 pts/2 0:16 /usr/dt/bin/sdt_shell -c unt root 3059 3002 0 Feb 22 pts/2 283:35 /usr/dt/bin/dtsession root 3063 3059 0 Feb 22 ? 0:03 /usr/dt/bin/dthelpview -helpVolur root 3099 3062 0 Feb 22 ? 0:13 /usr/dt/bin/dtfile -geometry +700 root 11000 10995 0 Jun 01 ? 0:02 /opt/perf/bin/agdbserver -t alar/ root 3002 2999 0 Feb 22 pts/2 0:01 -ksh -c unset DT; DISPLg root 730 133 0 Feb 18 ? 1:37 rpc.rstatd root 3062 3059 0 Feb 22 ? 2:17 /usr/dt/bin/dtfile -geometry +700 root 3067 1 0 Feb 22 ? 0:00 /bin/ksh /usr/dt/bin/sdtvolcheckm root 3000 1 0 Feb 22 ? 0:00 /usr/dt/bin/dsdm root 3078 3067 0 Feb 22 ? 0:00 /bin/cat /tmp/.removable/notify0 root 10984 1 0 Jun 01 ? 12:42 /opt/perf/dce/bin/dced -b root 16761 133 0 07:46:45 ? 0:00 in.telnetd martyp $ AIX example:
martyp $ ps -ef UID PID PPID C STIME TTY TIME CMD root 1 0 0 Feb 24 - 5:07 /etc/init root 2208 15520 0 Feb 24 - 8:21 dtwm root 2664 1 0 Feb 24 - 0:00 /usr/dt/bin/dtlogin -daemon root 2882 1 0 Feb 24 - 158:41 /usr/sbin/syncd 60 root 3376 2664 5 Feb 24 - 3598:41 /usr/lpp/X11/bin/X -D /usr/lib/ root 3624 2664 0 Feb 24 - 0:00 dtlogin <:0> -daemon root 3950 1 6 Feb 24 - 5550:30 /usr/lpp/perf/bin/llbd root 4144 1 0 Feb 24 - 0:00 /usr/lpp/perf/bin/midaemon root 4490 1 0 Feb 24 - 0:48 /usr/lpp/perf/bin/perflbd root 4906 1 0 Feb 24 - 0:00 /usr/lib/errdemon root 5172 1 0 Feb 24 - 0:00 /usr/sbin/srcmstr root 5724 5172 0 Feb 24 - 9:54 /usr/sbin/syslogd root 6242 5172 0 Feb 24 - 0:00 /usr/sbin/biod 6 root 6450 5172 0 Feb 24 - 0:02 sendmail: accepting connections root 6710 5172 0 Feb 24 - 7:34 /usr/sbin/portmap root 6966 5172 0 Feb 24 - 0:23 /usr/sbin/inetd root 7224 5172 0 Feb 24 - 1:09 /usr/sbin/timed -S root 7482 5172 0 Feb 24 - 11:55 /usr/sbin/snmpd root 8000 1 0 Feb 24 - 9:17 ovspmd root 8516 8782 0 Feb 24 - 0:00 netfmt -CF root 8782 1 0 Feb 24 - 0:00 /usr/OV/bin/ntl_reader 0 1 1 1 root 9036 8000 0 Feb 24 - 10:09 ovwdb -O -n5000 root 9288 8000 0 Feb 24 - 0:44 pmd -Au -At -Mu -Mt -m root 9546 8000 0 Feb 24 - 20:05 trapgend -f root 9804 8000 0 Feb 24 - 0:28 trapd root 10062 8000 0 Feb 24 - 0:47 orsd root 10320 8000 0 Feb 24 - 0:33 ovesmd root 10578 8000 0 Feb 24 - 0:30 ovelmd root 10836 8000 0 Feb 24 - 13:12 ovtopmd -O root 11094 8000 0 Feb 24 - 17:50 netmon -P root 11352 8000 0 Feb 24 - 0:02 snmpCollect root 11954 1 0 Feb 24 - 1:22 /usr/sbin/cron root 12140 5172 0 Feb 24 - 0:01 /usr/lib/netsvc/yp/ypbind root 12394 5172 0 Feb 24 - 1:39 /usr/sbin/rpc.mountd root 12652 5172 0 Feb 24 - 0:29 /usr/sbin/nfsd 8 root 12908 5172 0 Feb 24 - 0:00 /usr/sbin/rpc.statd root 13166 5172 0 Feb 24 - 0:29 /usr/sbin/rpc.lockd root 13428 1 0 Feb 24 - 0:00 /usr/sbin/uprintfd root 14190 5172 0 Feb 24 - 72:59 /usr/sbin/automountd root 14452 5172 0 Feb 24 - 0:17 /usr/sbin/qdaemon root 14714 5172 0 Feb 24 - 0:00 /usr/sbin/writesrv root 14992 1 0 Feb 24 - 252:26 /usr/lpp/perf/bin/scopeux root 15520 3624 1 Feb 24 - 15:29 /usr/dt/bin/dtsession root 15742 1 0 Feb 24 - 0:00 /usr/lpp/diagnostics/bin/diagd root 15998 1 0 Feb 24 lft0 0:00 /usr/sbin/getty /dev/console root 16304 18892 0 Feb 24 pts/0 0:00 /bin/ksh root 16774 1 0 Feb 24 - 0:00 /usr/lpp/perf/bin/ttd root 17092 4490 0 Feb 24 - 68:54 /usr/lpp/perf/bin/rep_server -t root 17370 19186 3 0:00 <defunct> root 17630 15520 0 Mar 25 - 0:00 /usr/dt/bin/dtexec -open 0 -ttp root 17898 15520 0 Mar 20 - 0:00 /usr/dt/bin/dtexec -open 0 -ttp root 18118 19888 0 Feb 24 pts/1 0:00 /bin/ksh root 18366 6966 0 Feb 24 - 0:00 rpc.ttdbserver 100083 1 root 18446 15520 0 Mar 15 - 0:00 /usr/dt/bin/dtexec -open 0 -ttp root 18892 15520 0 Feb 24 - 3:46 /usr/dt/bin/dtterm root 19186 16304 0 Feb 24 pts/0 0:01 /usr/lpp/X11/bin/msmit root 19450 1 0 Feb 24 - 26:53 /usr/dt/bin/ttsession -s root 19684 2208 0 Feb 24 - 0:00 /usr/dt/bin/dtexec -open 0 -ttp root 19888 19684 0 Feb 24 - 0:00 /usr/dt/bin/dtterm root 20104 15520 0 Feb 27 - 0:00 /usr/dt/bin/dtexec -open 0 -ttp root 20248 20104 0 Feb 27 - 0:03 /usr/dt/bin/dtscreen root 20542 29708 0 May 14 - 0:03 /usr/dt/bin/dtscreen root 20912 26306 0 Apr 05 - 0:03 /usr/dt/bin/dtscreen root 33558 1 0 May 18 - 3:28 /usr/atria/etc/lockmgr -a /var/ root 33834 6966 3 07:55:49 - 0:00 telnetd root 34072 1 0 May 18 - 0:00 /usr/atria/etc/albd_server martyp 36296 36608 13 07:56:07 pts/2 0:00 ps -ef martyp 36608 33834 1 07:55:50 pts/2 0:00 -ksh root 37220 15520 0 May 28 - 0:00 /usr/dt/bin/dtexec -open 0 -ttp martyp $ HP-UX example (partial listing):
martyp $ ps -ef UID PID PPID C STIME TTY TIME COMMAND root 0 0 0 Mar 9 ? 107:28 swapper root 1 0 0 Mar 9 ? 2:27 init root 2 0 0 Mar 9 ? 14:13 vhand root 3 0 0 Mar 9 ? 114:55 statdaemon root 4 0 0 Mar 9 ? 5:57 unhashdaemon root 7 0 0 Mar 9 ? 154:33 ttisr root 70 0 0 Mar 9 ? 0:01 lvmkd root 71 0 0 Mar 9 ? 0:01 lvmkd root 72 0 0 Mar 9 ? 0:01 lvmkd root 13 0 0 Mar 9 ? 9:54 vx_sched_thread root 14 0 0 Mar 9 ? 1:54 vx_iflush_thread root 15 0 0 Mar 9 ? 2:06 vx_ifree_thread root 16 0 0 Mar 9 ? 2:27 vx_inactive_cache_thread root 17 0 0 Mar 9 ? 0:40 vx_delxwri_thread root 18 0 0 Mar 9 ? 0:33 vx_logflush_thread root 19 0 0 Mar 9 ? 0:07 vx_attrsync_thread . . . root 69 0 0 Mar 9 ? 0:09 vx_inactive_thread root 73 0 0 Mar 9 ? 0:01 lvmkd root 74 0 19 Mar 9 ? 3605:29 netisr root 75 0 0 Mar 9 ? 0:18 netisr root 76 0 0 Mar 9 ? 0:17 netisr root 77 0 0 Mar 9 ? 0:14 netisr root 78 0 0 Mar 9 ? 0:48 nvsisr root 79 0 0 Mar 9 ? 0:00 supsched root 80 0 0 Mar 9 ? 0:00 smpsched root 81 0 0 Mar 9 ? 0:00 smpsched root 82 0 0 Mar 9 ? 0:00 sblksched root 83 0 0 Mar 9 ? 0:00 sblksched root 84 0 0 Mar 9 ? 0:00 strmem root 85 0 0 Mar 9 ? 0:00 strweld root 3730 1 0 16:39:22 console 0:00 /usr/sbin/getty console console root 404 1 0 Mar 9 ? 3:57 /usr/sbin/swagentd oracle 919 1 0 15:23:23 ? 0:00 oraclegprd (LOCAL=NO) root 289 1 2 Mar 9 ? 78:34 /usr/sbin/syncer root 426 1 0 Mar 9 ? 0:10 /usr/sbin/syslogd -D root 576 1 0 Mar 9 ? 0:00 /usr/sbin/portmap root 429 1 0 Mar 9 ? 0:00 /usr/sbin/ptydaemon root 590 1 0 Mar 9 ? 0:00 /usr/sbin/biod 4 root 442 1 0 Mar 9 ? 0:00 /usr/lbin/nktl_daemon 0 0 0 0 0 1-2 oracle 8145 1 0 12:02:48 ? 0:00 oraclegprd (LOCAL=NO) root 91 1 0 Mar 9 ? 0:00 /usr/sbin/biod 4 root 589 1 0 Mar 9 ? 0:00 /usr/sbin/biod 4 root 592 1 0 Mar 9 ? 0:00 /usr/sbin/biod 4 root 604 1 0 Mar 9 ? 0:00 /usr/sbin/rpc.lockd root 598 1 0 Mar 9 ? 0:00 /usr/sbin/rpc.statd root 610 1 0 Mar 9 ? 0:16 /usr/sbin/automount -f /etc/auto_master root 638 1 0 Mar 9 ? 0:06 sendmail: accepting connections root 618 1 0 Mar 9 ? 0:02 /usr/sbin/inetd root 645 1 0 Mar 9 ? 5:01 /usr/sbin/snmpdm root 661 1 0 Mar 9 ? 11:28 /usr/sbin/fddisubagtd root 711 1 0 Mar 9 ? 30:59 /opt/dce/sbin/rpcd root 720 1 0 Mar 9 ? 0:00 /usr/sbin/vtdaemon root 867 777 1 Mar 9 ? 0:00 <defunct> lp 733 1 0 Mar 9 ? 0:00 /usr/sbin/lpsched root 777 1 0 Mar 9 ? 8:55 DIAGMON root 742 1 0 Mar 9 ? 0:15 /usr/sbin/cron oracle 7880 1 0 11:43:47 ? 0:00 oraclegprd (LOCAL=NO) root 842 1 0 Mar 9 ? 0:00 /usr/vue/bin/vuelogin oracle 5625 1 0 07:00:14 ? 0:01 ora_smon_gprd root 781 1 0 Mar ? 0:00 /usr/sbin/envd root 833 777 0 Mar 9 ? 0:00 DEMLOG DEMLOG;DEMLOG;0;0; root 813 1 0 Mar 9 ? 0:00 /usr/sbin/nfsd 4 root 807 1 0 Mar 9 ? 0:00 /usr/sbin/rpc.mountd root 815 813 0 Mar 9 ? 0:00 /usr/sbin/nfsd 4 root 817 813 0 Mar 9 ? 0:00 /usr/sbin/nfsd 4 root 835 777 0 Mar 9 ? 0:13 PSMON PSMON;PSMON;0;0; Here is a brief description of the headings:
| UID | The user ID of the process owner. |
| PID | The process ID (you can use this number to kill the process). |
| PPID | The process ID of the parent process. |
| C | Processor utilization. On a multi-processor system, you may see this number go beyond 100%. It could potentially go to 100% per processor, so a two-processor system may show 200% utilization. This varies among UNIX variants. |
| STIME | Start time of the process. |
| TTY | The controlling terminal for the process. |
| TIME | The cumulative execution time for the process. |
| COMMAND | The command name and arguments. |
ps gives a quick profile of the processes running on your system. To get more detailed information, you can include the "l" option, which includes a lot of useful additional information, as shown in the following example:
martyp $ ps -efl F S UID PID PPID C PRI NI ADDR SZ WCHAN STIME TTY D 19 T root 0 0 0 0 SY f026f7f0 0 Feb 18 ? d 8 S root 1 0 0 41 20 f5b90808 175 f5b90a30 Feb 18 ? - 19 S root 2 0 0 0 SY f5b90108 0 f0283fd0 Feb 18 ? t 19 S root 3 0 0 0 SY f5b8fa08 0 f0287a44 Feb 18 ? 6h 8 S root 3065 3059 0 40 20 f626d040 1639 f62aab96 Feb 22 ? c 8 S root 88 1 0 40 20 f5b8d708 377 f5b59df6 Feb 18 ? q 8 S root 478 1 0 41 20 f5b8ec08 388 f5b51bb8 Feb 18 ? 0 8 S root 94 1 0 41 20 f5b8d008 527 f5b59e46 Feb 18 ? d 8 S root 150 1 0 41 20 f5da1a10 808 f5b59806 Feb 18 ? d 8 S root 96 1 0 67 20 f5da2810 535 f5b59ad6 Feb 18 ? v 8 S root 144 1 0 41 20 f5da0c10 2694 ef69f61c Feb 18 ? 5d 8 S root 1010 1 0 0 RT f61da330 496 f5dbec1c Apr 12 ? n 8 S root 106 1 0 41 20 f5da1310 485 f5b59e96 Feb 18 ? s 8 S root 156 1 0 51 20 f5b8de08 446 f5b51eb8 Feb 18 ? n 8 S root 176 1 0 53 20 f5da2110 740 f5b59036 Feb 18 ? d 8 S root 129 1 0 56 20 f5d9fe10 447 f5b59cb6 Feb 18 ? d 8 S daemon 130 1 0 41 20 f5d9f710 564 f5b59b76 Feb 18 ? d 8 S root 14798 1 0 45 20 f5b8e508 616 f5b8e730 Mar 09 ? 3d 8 S root 133 1 0 51 20 f5e18818 507 f5b59c66 Feb 18 ? s 8 S root 197 1 0 63 20 f5e15e18 284 f5e16040 Feb 18 ? d 8 S root 196 1 0 41 20 f5da0510 429 f5c68f8e Feb 18 ? c 8 S root 213 1 0 41 20 f5e16518 586 f5c68b2e Feb 18 ? 4d 8 S root 199 196 0 41 20 f5e16c18 451 f5b59f86 Feb 18 ? i 8 S root 219 1 0 41 20 f5e17318 658 f5b59d06 Feb 18 ? m 8 S root 209 1 0 41 20 f5e18118 234 f5c68e4e eb 18 ? d 8 S root 2935 266 0 40 20 f61db130 2473 f62aaa56 Feb 22 ? 4 8 S root 16800 3059 1 81 30 f626f340 1466 f61b345e 07:59:40 ? k 8 S root 2963 2954 0 40 20 f5f52028 513 f61b313e Feb 22 ? e 8 S root 479 1 0 55 20 f5ee7120 407 f5fde2c6 Feb 18 console g 8 S root 10976 1 0 65 20 f5f55828 478 f5c6853e Jun 01 ? d 8 S root 7468 1 0 46 20 f621da38 2851 8306c Feb 24 ? d 8 S root 266 1 0 41 20 f5ee5520 1601 f5c6858e Feb 18 ? n 8 S martyp 16763 16761 0 51 20 f6270140 429 f62701ac 07:46:46 pts/ h 8 S root 10995 1 0 41 20 f5b8f308 2350 f5fde5e6 Jun 01 ? d 8 S root 484 478 0 41 20 f5ee4e20 408 f5ee5048 Feb 18 ? n 8 S root 458 1 0 41 20 f5f54a28 504 f5fde906 Feb 18 ? 2m 8 O root 16802 16763 1 61 20 f5ee7820 220 08:00:05 pts/4 l 8 S root 471 1 0 41 20 f5f53c28 658 f5fde726 Feb 18 ? d 8 S root 474 1 0 51 20 f5f53528 804 f61a58b6 Feb 18 ? g 8 S root 485 458 0 40 20 f5f52e28 734 f607ecde Feb 18 ? 74 8 S root 2954 2936 0 40 20 f626e540 433 f626e5ac Feb 22 ? n 8 S root 2936 266 0 66 20 f5ee4720 1637 f5ee478c Feb 22 ? n 8 S root 3061 3059 0 40 20 f5e17a18 2041 f61b359e Feb 22 ? m 8 S root 3058 1 0 40 20 f61daa30 1067 f62aadc6 Feb 22 pts/2 n 8 S root 712 133 0 41 20 f61d8e30 798 f61b390e Feb 18 ? d 8 Z root 11001 11000 0 0 > 8 S root 2938 1 0 60 20 f5ee6320 513 f601bfb6 Feb 22 ? 0 8 S root 2999 2954 0 40 20 f621e138 1450 f61b33be Feb 22 pts/2 t 8 S root 3059 3002 1 51 20 f626de40 4010 f62aafa6 Feb 22 pts/2 2n 8 S root 3063 3059 0 50 20 f621e838 1952 f62aa556 Feb 22 ? 8 S root 3099 3062 0 40 20 f5f52728 2275 f60a1d18 Feb 22 ? 0 8 S root 11000 10995 0 48 20 f626d740 2312 55694 Jun 01 ? e 8 S root 3002 2999 0 43 20 f61d8730 427 f61d879c Feb 22 pts/2 = 8 S root 730 133 0 40 20 f61d9530 422 f62aa9b6 Feb 18 ? d 8 S root 3062 3059 0 61 20 f621b738 2275 f62aa506 Feb 22 ? 0 8 S root 3067 1 0 40 20 f5ee5c20 424 f5ee5c8c Feb 22 ? d 8 S root 3000 1 0 40 20 f61d8030 518 f62aa8c6 Feb 22 ? m 8 S root 3078 3067 0 40 20 f61d9c30 211 f5b512b8 Feb 22 ? 0 8 S root 10984 1 0 41 20 f5f54328 2484 eee46e84 Jun 01 ? 1b 8 S root 16761 133 0 44 20 f5ee4020 411 f5c6894e 07:46:45 ? d martyp $ In this example, the first column is F for flags. F provides octal information about whether the process is swapped, in core, a system process, and so on. The octal value sometimes varies from system to system, so check the manual pages for your system to see the octal value of the flags.
S is for state. The state can be sleeping, as indicated by S for most of the processes shown in the example, waiting, running, intermediate, terminated, and so on. Again, some of these values may vary from system to system, so check your manual pages.
Some additional useful information in this output are: NI for the nice value, ADDR for the memory address of the process, SZ for the size of the process in physical pages, and WCHAN, which is the event for which the process is waiting.
Killing a Process

If you issue the ps command and find that one of your processes is hung, or if you started a large job that you wish to stop, you can do so with the kill command. kill is a utility that sends a signal to the process you identify. You can kill any process that you own. In addition, the superuser can kill almost any process on the system.
To kill a process that you own, simply issue the kill command and the Process ID (PID). The following example shows issuing the ps command to find all processes owned by martyp, killing a process, and checking to see that it has disappeared:

martyp $ ps -ef | grep martyp martyp 19336 19334 0 05:24:32 pts/4 0:01 -ksh martyp 19426 19336 0 06:01:01 pts/4 0:00 grep martyp martyp 19424 19336 5 06:00:48 pts/4 0:01 find / -name .login martyp $ kill 19424 martyp $ ps -ef | grep martyp martyp 19336 19334 0 05:24:32 pts/4 0:01 -ksh martyp 19428 19336 1 06:01:17 pts/4 0:00 grep martyp [1] + Terminated find / -name .login & martyp $
The example shows killing process 19424, which is owned by martyp. We confirm that the process has indeed been killed by re-issuing the ps command. You can also use the -u option to ps to list processes with the login name you specify.
You can kill several processes on the command line by issuing kill followed by a space-separated list of all the process numbers you wish to kill.
Take special care when killing processes if you are logged in as superuser. You may adversely affect the way the system runs and have to manually restart processes or reboot the system.
Signals

When you issue the kill command and process number, you are also sending a signal associated with the kill. We did not specify a signal in our kill example; however, the default signal of 15, or SIGTERM, was used. These signals are used by the system to communicate with processes. The signal of 15 which we used to terminate our process is a software termination signal that is usually enough to terminate a user process such as the find we had started. A process that is difficult to kill may require the SIGKILL, or 9 signal. This signal causes an immediate termination of the process. I use this only as a last resort because processes killed with SIGKILL do not always terminate smoothly. To kill such processes as the shell, you sometimes have to use SIGKILL.
You can use either the signal name or number. These signal numbers sometimes vary from system to system, so view the manual page for signal, usually in section 5, to see the list of signals on your system. A list of some of the most frequently used signal numbers and corresponding signals follows:
| Signal Number | Signal |
|---|---|
| 1 | SIGHUP |
| 2 | SIGINT |
| 3 | SIGQUIT |
| 9 | SIGKILL |
| 15 | SIGTERM |
| 24 | SIGSTOP |
To kill a process with id 234 with SIGKILL, you would issue the following command:
$ kill -9 234 | | | | | |> process id (PID) | |> signal number |> kill command to terminate the process Show Remote Mounts with showmount

showmount is used to show all remote systems (clients) that have mounted a local file system. showmount is useful for determining the file systems that are most often mounted by clients with NFS. The output of showmount is particularly easy to read because it lists the host name and directory that was mounted by the client.
NFS servers often end up serving many NFS clients that were not originally intended to be served. This situation ends up consuming additional UNIX system resources on the NFS server, as well as additional network bandwidth. Keep in mind that any data transferred from an NFS server to an NFS client consumes network bandwidth, and, in some cases, may be a substantial amount of bandwith if large files or applications are being transferred from the NFS server to the client. The following example is a partial output of showmount taken from a system. showmount runs on the HP-UX, AIX, and Linux systems I have been using throughout this chapter, but not on the Solaris system:
# showmount -a sys100.ct.mp.com:/applic sys101.ct.mp.com:/applic sys102.cal.mp.com:/applic sys103.cal.mp.com:/applic sys104.cal.mp.com:/applic sys105.cal.mp.com:/applic sys106.cal.mp.com:/applic sys107.cal.mp.com:/applic sys108.cal.mp.com:/applic sys109.cal.mp.com:/applic sys200.cal.mp.com:/usr/users sys201.cal.mp.com:/usr/users sys202.cal.mp.com:/usr/users sys203.cal.mp.com:/usr/users sys204.cal.mp.com:/usr/users sys205.cal.mp.com:/usr/users sys206.cal.mp.com:/usr/users # showmount -a sys207.cal.mp.com:/usr/users sys208.cal.mp.com:/usr/users sys209.cal.mp.com:/usr/users
The three following options are available for the showmount command:
| -a | prints output in the format "name:directory," as shown above. | |
| -d | lists all the local directories that have been remotely | mounted by clients. |
| -e | prints a list of exported file systems. |
The following are examples of showmount -d and showmount -e:
# showmount -d /applic /usr/users /usr/oracle /usr/users/emp.data /network/database /network/users /tmp/working # showmount -e export list for server101.cal.mp.com /applic /usr/users /cdrom Show System Swap
If your system has insufficient main memory for all the information it needs to work with, it will move pages of information to your swap area or swap entire processes to your swap area. Pages that were most recently used are kept in main memory, and those not recently used will be the first to be moved out of main memory.
System administrators spend a lot of time determining the right amount of swap space for their systems. Insufficient swap space may prevent a system from starting additional processes, may hang applications, or may not permit additional users to get access to the system. Having sufficient swap space prevents these problems from occurring. System administrators usually go about determining the right amount of swap space by considering many important factors, including the following:
-
How much swap is recommended by the application(s) you run? Use the swap size recommended by your applications. Application vendors tend to be realistic when recommending swap space. There is sometimes competition among application vendors to claim the lowest memory and CPU requirements in order to keep the overall cost of solutions as low as possible, but swap space recommendations are usually realistic.
-
How many applications will you run simultaneously? If you are running several applications, sum the swap space recommended for each application you plan to run simultaneously. If you have a database application that recommends 200 MBytes of swap and a development tool that recommends 100 MBytes of swap, then configure your system with 300 MBytes of swap, minimum.
-
Will you be using substantial system resources on peripheral functionality such as NFS? The nature of NFS is to provide access to file systems, some of which may be very large, so this use may have an impact on your swap space requirements.
Swap is listed and manipulated on different UNIX variants with different commands. The following example shows listing the swap area on a Solaris system with swap -l:
# swap -l swapfile dev swaplo blocks free /dev/dsk/c0t3d0s1 32,25 8 263080 209504 These values are all in 512 KByte blocks. In this case, the free blocks are 209504, which is a significant amount of the overall swap space allocated on the system.

You can view the amount of swap space being consumed on your HP-UX system with swapinfo. The following is an example output of swapinfo:
# swapinfo Kb Kb b PCT START/ Kb TYPE AVAIL USED FREE USED LIMIT RESERVE PRI NAME dev 49152 10532 38620 21% 0 - 1 /dev/vg00/lvol2 dev 868352 10888 759160 1% 0 - 1 /dev/vg00/lvol8 reserve - 532360 -532360 memory 816360 469784 346576 58% Following is a brief overview of what swapinfo gives you.
In the previous example, the "TYPE" field indicated whether the swap was "dev" for device, "reserve" for paging space on reserve, or "memory." Memory is a way to allow programs to reserve more virtual memory than you have hard disk paging space setup for on your system.
"Kb AVAIL" is the total swap space available in 1024-byte blocks. This includes both used and unused swap space.
"Kb USED" is the current number of 1024-byte blocks in use.
"Kb FREE" is the difference between "Kb AVAIL" and "Kb USED."
"PCT USED" is "Kb USED" divided by "Kb AVAIL."
"START/LIMIT" is the block address of the start of the swap area.
"Kb RESERVE" is "-" for device swap or the number of 1024-byte blocks for file system swap.
"PRI" is the priority given to this swap area.
"NAME" is the device name of the swap device.
You can also issue the swapinfo command with a series of options. Here are some of the options you can include:
| -m | to display output of swapinfo in MBytes rather than in 1024-byte blocks. |
| -d | prints information related to device swap areas only. |
| -f | prints information about file system swap areas only. |
sar: The System Activity Reporter

sar is another UNIX command for gathering information about activities on your system. You can gather data over an extended time period with sar and later produce reports based on the data. sar is similar among UNIX variants in that the options and outputs are similar. The Linux system I was using for the examples did not support sar, but the Solaris, HP-UX, and AIX systems had the same options and nearly identical outputs. The following are some useful options to sar, along with examples of reports produced with these options where applicable:
| sar -o | Saves data in a file specified by "o." After the file name, you would usually also enter the time interval for samples and the number of samples. The following example shows saving the binary data in file /tmp/sar.data at an interval of 60 seconds 300 times: # sar -o /tmp/sar.data 60 300 The data in/tmp/sar.data can later be extracted from the file. |
| sar -f | Specify a file from which you will extract data. |
| sar -u | Report CPU utilization with the headings %usr, %sys, %wio, and %idle with some processes waiting for block I/O, %idle. This report is similar to the iostat and vmstat CPU reports. You extract the binary data saved in a file to get CPU information, as shown in the following example. The following is a sar -u example: |
# sar -u -f /tmp/sar.data Header Information for your system 12:52:04 %usr %sys %wio %idle 12:53:04 62 4 5 29 12:54:04 88 5 3 4 12:55:04 94 5 1 0 12:56:04 67 4 4 25 12:57:04 59 4 4 32 12:58:04 61 4 3 32 12:59:04 65 4 3 28 13:00:04 62 5 16 17 13:01:04 59 5 9 27 13:02:04 71 4 3 22 13:03:04 60 4 4 32 13:04:04 71 5 4 20 13:05:04 80 6 8 7 13:06:04 56 3 3 37 13:07:04 57 4 4 36 13:08:04 66 4 4 26 13:09:04 80 10 2 8 13:10:04 73 10 2 15 13:11:04 64 6 3 28 13:12:04 56 4 3 38 13:12:04 56 4 3 38 13:13:04 55 3 3 38 13:14:04 57 4 3 36 13:15:04 70 4 5 21 13:16:04 65 5 9 21 13:17:04 62 6 2 30 13:18:04 60 5 3 33 13:19:04 77 3 4 16 13:20:04 76 5 3 15 . . . 14:30:04 50 6 6 38 14:31:04 57 12 19 12 14:32:04 51 8 20 21 14:33:04 41 4 9 46 14:34:04 43 4 9 45 14:35:04 38 4 6 53 14:36:04 38 9 7 46 14:37:04 46 3 11 40 14:38:04 43 4 7 46 14:39:04 37 4 5 54 14:40:04 33 4 5 58 14:41:04 40 3 3 53 14:42:04 44 3 3 50 14:43:04 27 3 7 64 Average 57 5 8 30
| sar -b | Report buffer cache activity. A database application such as Oracle would recommend that you use this option to see the effectiveness of buffer cache use. You extract the binary data saved in a file to get CPU information, as shown in the following example: |
# sar -b -f /tmp/sar.data Header information for your system 12:52:04 bread/s lread/s %rcache bwrit/s lwrit/s %wcache pread/s pwrit/s 12:53:04 5 608 99 1 11 95 0 0 12:54:04 7 759 99 0 14 99 0 0 12:55:04 2 1733 100 4 24 83 0 0 12:56:04 1 836 100 1 18 96 0 0 12:57:04 0 623 100 2 21 92 0 0 12:58:04 0 779 100 1 16 96 0 0 12:59:04 0 1125 100 0 14 98 0 0 13:00:04 2 1144 100 9 89 89 0 0 13:01:04 10 898 99 11 76 86 0 0 13:02:04 0 1156 100 0 14 99 0 0 13:03:04 1 578 100 2 22 88 0 0 13:04:04 5 1251 100 0 12 99 0 0 13:05:04 3 1250 100 0 12 97 0 0 13:06:04 1 588 100 0 12 98 0 0 13:07:04 1 649 100 2 15 86 0 0 13:08:04 1 704 100 2 15 86 0 0 13:09:04 1 1068 100 0 18 100 0 0 13:10:04 0 737 100 1 44 99 0 0 13:11:04 0 735 100 1 13 95 0 0 13:12:04 0 589 100 1 15 93 0 0 13:13:04 0 573 100 0 16 99 0 0 13:14:04 1 756 100 1 16 91 0 0 13:15:04 1 1092 100 9 49 81 0 0 13:16:04 2 808 100 6 82 93 0 0 13:17:04 0 712 100 1 9 93 0 0 13:18:04 1 609 100 0 13 97 0 0 13:19:04 1 603 100 0 10 99 0 0 13:20:04 0 1127 100 0 14 98 0 0 . . . 14:30:04 2 542 100 1 22 94 0 0 14:31:04 10 852 99 12 137 92 0 0 14:32:04 2 730 100 10 190 95 0 0 14:33:04 4 568 99 2 26 91 0 0 14:34:04 4 603 99 1 13 91 0 0 14:35:04 1 458 100 1 13 89 0 0 14:36:04 13 640 98 1 24 98 0 0 14:37:04 21 882 98 1 18 95 0 0 14:38:04 7 954 99 0 19 98 0 0 14:39:04 3 620 100 1 11 94 0 0 14:40:04 3 480 99 2 15 85 0 0 14:41:04 1 507 100 0 9 98 0 0 14:42:04 1 1010 100 1 10 91 0 0 14:43:04 5 547 99 1 9 93 0 0 Average 3 782 100 3 37 91 0 0
| sar -d | Report disk activity. You get the device name, percent that the device was busy, average number of requests outstanding for the device, number of data transfers per second for the device, and other information. You extract the binary data saved in a file to get CPU information, as shown in the following example: |
# sar -d -f /tmp/sar.data Header information for your system 12:52:04 device %busy avque r+w/s blks/s avwait avserv 12:53:04 c0t6d0 0.95 1.41 1 10 16.76 17.28 c5t4d0 100.00 1.03 20 320 8.36 18.90 c4t5d1 10.77 0.50 13 214 5.02 18.44 c5t4d2 0.38 0.50 0 3 4.61 18.81 12:54:04 c0t6d0 0.97 1.08 1 11 10.75 14.82 c5t4d0 100.00 1.28 54 862 9.31 20.06 c4t5d1 12.43 0.50 15 241 5.21 16.97 c5t4d2 0.37 0.50 0 3 3.91 18.20 12:55:04 c0t6d0 1.77 1.42 1 22 13.32 14.16 c5t4d0 100.00 0.79 26 421 8.33 16.00 c4t5d1 14.47 0.51 17 270 5.30 13.48 c5t4d2 0.72 0.50 0 7 4.82 15.69 12:56:04 c0t6d0 1.07 21.57 1 22 72.94 19.58 c5t4d0 100.00 0.60 16 251 6.80 13.45 c4t5d1 8.75 0.50 11 177 5.05 10.61 c5t4d2 0.62 0.50 0 6 4.79 15.43 12:57:04 c0t6d0 0.78 1.16 1 9 13.53 14.91 c5t4d0 100.00 0.66 15 237 7.60 13.69 c4t5d1 9.48 0.54 13 210 5.39 13.33 c5t4d2 0.87 0.50 1 10 4.86 14.09 12:58:04 c0t6d0 1.12 8.29 1 17 54.96 14.35 c5t4d0 100.00 0.60 11 176 7.91 14.65 c4t5d1 5.35 0.50 7 111 5.23 10.35 c5t4d2 0.92 0.50 1 10 4.63 16.08 12:59:04 c0t6d0 0.67 1.53 1 8 18.03 16.05 c5t4d0 99.98 0.54 11 174 7.69 14.09 c4t5d1 3.97 0.50 5 83 4.82 9.54 c5t4d2 1.05 0.50 1 11 4.69 16.29 13:00:04 c0t6d0 3.22 0.67 3 39 8.49 16.53 c5t4d0 100.00 0.60 65 1032 8.46 14.83 c4t5d1 21.62 0.50 31 504 5.30 8.94 c5t4d2 6.77 0.50 5 78 4.86 14.09 13:01:04 c0t6d0 4.45 3.08 5 59 25.83 11.49 c5t4d0 100.00 0.65 42 676 7.85 14.52 c4t5d1 21.34 0.55 30 476 5.87 18.49 c5t4d2 4.37 0.50 3 51 5.32 13.50 . . . 14:42:04 c0t6d0 0.53 0.83 0 7 12.21 16.33 c5t4d0 100.00 0.56 7 107 6.99 14.65 c4t5d1 6.38 0.50 7 113 4.97 15.18 c5t4d2 0.15 0.50 0 2 4.53 16.50 14:43:04 c0t6d0 0.52 0.92 0 7 11.50 15.86 c5t4d0 99.98 0.92 17 270 8.28 18.64 c4t5d1 10.26 0.50 9 150 5.35 16.41 c5t4d2 0.12 0.50 0 1 5.25 14.45 Average c0t6d0 1.43 108.80 2 26 0.00 14.71 Average c5t4d0 100.00 0.74 25 398 7.83 -10.31 Average c4t5d1 19.11 0.51 25 399 5.26 -13.75 Average c5t4d2 1.71 0.53 1 21 5.29 13.46
| sar -q | Report average queue length. You may have a problem any time the run queue length is greater than the number of processors on the system: |
# sar -q -f /tmp/sar.data Header information for your system 12:52:04 runq-sz %runocc swpq-sz %swpocc 12:53:04 1.1 20 0.0 0 12:54:04 1.4 51 0.0 0 12:55:04 1.3 71 0.0 0 12:56:04 1.1 22 0.0 0 12:57:04 1.3 16 0.0 0 12:58:04 1.1 14 0.0 0 12:59:04 1.2 12 0.0 0 13:00:04 1.2 21 0.0 0 13:01:04 1.1 18 0.0 0 13:02:04 1.3 20 0.0 0 13:03:04 1.2 15 0.0 0 13:04:04 1.2 20 0.0 0 13:05:04 1.2 43 0.0 0 13:06:04 1.1 14 0.0 0 13:07:04 1.2 15 0.0 0 13:08:04 1.2 26 0.0 0 13:09:04 1.5 38 0.0 0 13:10:04 1.5 30 0.0 0 13:11:04 1.2 23 0.0 0 13:12:04 1.3 11 0.0 0 13:13:04 1.3 12 0.0 0 13:14:04 1.4 16 0.0 0 13:15:04 1.4 27 0.0 0 13:16:04 1.5 20 0.0 0 13:17:04 1.3 21 0.0 0 13:18:04 1.1 15 0.0 0 13:19:04 1.2 19 0.0 0 13:20:04 1.4 22 0.0 0 . . . 14:30:04 1.5 5 0.0 0 14:31:04 1.6 12 0.0 0 14:32:04 1.4 9 0.0 0 14:33:04 1.1 6 0.0 0 14:34:04 1.3 3 0.0 0 14:35:04 1.1 4 0.0 0 14:36:04 1.2 6 0.0 0 14:37:04 1.4 5 0.0 0 14:38:04 1.2 10 0.0 0 14:39:04 1.3 4 0.0 0 14:40:04 1.1 3 0.0 0 14:41:04 1.6 3 0.0 0 14:42:04 1.1 4 0.0 0 14:43:04 1.3 1 0.0 0 Average 1.3 17 1.2 0 | sar -w | Report system swapping activity. |
# sar -w -f /tmp/sar.data Header information for your system 12:52:04 swpin/s bswin/s swpot/s bswot/s pswch/s 12:53:04 1.00 0.0 1.00 0.0 231 12:54:04 1.00 0.0 1.00 0.0 354 12:55:04 1.00 0.0 1.00 0.0 348 12:56:04 1.00 0.0 1.00 0.0 200 12:57:04 1.00 0.0 1.00 0.0 277 12:58:04 1.00 0.0 1.00 0.0 235 12:59:04 1.02 0.0 1.02 0.0 199 13:00:04 0.78 0.0 0.78 0.0 456 13:01:04 1.00 0.0 1.00 0.0 435 13:02:04 1.02 0.0 1.02 0.0 216 13:03:04 0.98 0.0 0.98 0.0 204 13:04:04 1.02 0.0 1.02 0.0 239 13:05:04 1.00 0.0 1.00 0.0 248 13:06:04 0.97 0.0 0.97 0.0 170 13:07:04 1.00 0.0 1.00 0.0 166 13:08:04 1.02 0.0 1.02 0.0 209 13:09:04 0.98 0.0 0.98 0.0 377 13:10:04 1.00 0.0 1.00 0.0 200 13:11:04 1.00 0.0 1.00 0.0 192 13:12:04 0.87 0.0 0.87 0.0 187 13:13:04 0.93 0.0 0.93 0.0 172 13:14:04 1.00 0.0 1.00 0.0 170 13:15:04 1.00 0.0 1.00 0.0 382 13:16:04 1.00 0.0 1.00 0.0 513 13:17:04 1.00 0.0 1.00 0.0 332 13:18:04 1.00 0.0 1.00 0.0 265 13:19:04 1.02 0.0 1.02 0.0 184 13:20:04 0.98 0.0 0.98 0.0 212 . . . 14:30:04 0.00 0.0 0.00 0.0 301 14:31:04 0.00 0.0 0.00 0.0 566 14:32:04 0.00 0.0 0.00 0.0 539 14:33:04 0.00 0.0 0.00 0.0 400 14:34:04 0.00 0.0 0.00 0.0 242 14:35:04 0.00 0.0 0.00 0.0 286 14:36:04 0.00 0.0 0.00 0.0 295 14:37:04 0.00 0.0 0.00 0.0 249 14:38:04 0.00 0.0 0.00 0.0 300 14:39:04 0.00 0.0 0.00 0.0 296 14:40:04 0.00 0.0 0.00 0.0 419 14:41:04 0.00 0.0 0.00 0.0 234 14:42:04 0.00 0.0 0.00 0.0 237 14:43:04 0.00 0.0 0.00 0.0 208 Average 0.70 0.0 0.70 0.0 346 timex to Analyze a Command
If you have a specific command you want to find out more about, you can use timex, which reports the elapsed time, user time, and system time spent in the execution of any command you specify.

timex is a good command for users because it gives you an idea of the system resources that you are consuming when issuing a command. The following two examples show issuing timex with no options to get a short output of the amount of cpu consumed; the second example shows issuing timex -s to report "total" system activity on a Solaris system:
martyp $ timex listing real 0.02 user 0.00 sys 0.02 martyp $ timex -s listing real 0.02 user 0.00 sys 0.01 SunOS 5.7 Generic sun4m 08/21 07:48:30 %usr %sys %wio %idle 07:48:31 32 68 0 0 07:48:30 bread/s lread/s %rcache bwrit/s lwrit/s %wcache pread/s pwrit/s 07:48:31 0 0 100 0 0 100 0 0 Average 0 0 100 0 0 100 0 0 07:48:30 device %busy vque r+w/s blks/s avwait avserv 07:48:31 fd0 0 0.0 0 0 0.0 0.0 nfs1 0 0.0 0 0 0.0 0.0 nfs219 0 0.0 0 0 0.0 0.0 sd1 0 0.0 0 0 0.0 0.0 sd1,a 0 0.0 0 0 0.0 0.0 sd1,b 0 0.0 0 0 0.0 0.0 sd1,c 0 0.0 0 0 0.0 0.0 sd1,g 0 0.0 0 0 0.0 0.0 sd3 0 0.0 0 0 0.0 0.0 sd3,a 0 0.0 0 0 0.0 0.0 sd3,b 0 0.0 0 0 0.0 0.0 sd3,c 0 0.0 0 0 0.0 0.0 sd6 0 0.0 0 0 0.0 0.0 Average fd0 0 0.0 0 0 0.0 0.0 nfs1 0 0.0 0 0 0.0 0.0 nfs219 0 0.0 0 0 0.0 0.0 sd1 0 0.0 0 0 0.0 0.0 sd1,a 0 0.0 0 0 0.0 0.0 sd1,b 0 0.0 0 0 0.0 0.0 sd1,c 0 0.0 0 0 0.0 0.0 sd1,g 0 0.0 0 0 0.0 0.0 sd3 0 0.0 0 0 0.0 0.0 sd3,a 0 0.0 0 0 0.0 0.0 sd3,b 0 0.0 0 0 0.0 0.0 sd3,c 0 0.0 0 0 0.0 0.0 sd6 0 0.0 0 0 0.0 0.0 07:48:30 rawch/s canch/s outch/s rcvin/s xmtin/s mdmin/s 07:48:31 0 0 147 0 0 0 Average 0 0 147 0 0 0 07:48:30 scall/s sread/s swrit/s fork/s exec/s rchar/s wchar/s 07:48:31 2637 0 95 15.79 15.79 0 19216 Average 2637 0 95 15.79 15.79 19216 07:48:30 swpin/s bswin/s swpot/s bswot/s pswch/s 07:48:31 0.00 0.0 0.00 0.0 116 Average 0.00 0.0 0.00 0.0 116 07:48:30 iget/s namei/s dirbk/s 07:48:31 0 195 121 Average 0 195 121 07:48:30 runq-sz %runocc swpq-sz %swpocc 07:48:31 2.0 526 Average 2.0 526 07:48:30 proc-sz ov inod-sz ov file-sz ov lock-sz 07:48:31 45/986 0 973/4508 0 357/357 0 0/0 07:48:30 msg/s sema/s 07:48:31 0.00 0.00 Average 0.00 0.00 07:48:30 atch/s pgin/s ppgin/s pflt/s vflt/s slock/s 07:48:31 0.00 0.00 0.00 505.26 1036.84 0.00 Average 0.00 0.00 0.00 505.26 1036.84 0.00 07:48:30 pgout/s ppgout/s pgfree/s pgscan/s %ufs_ipf 07:48:31 0.00 0.00 0.00 0.00 0.00 Average 0.00 0.00 0.00 0.00 0.00 07:48:30 freemem freeswap 07:48:31 15084 1224421 Average 15084 1224421 07:48:30 sml_mem alloc fail lg_mem alloc fail ovsz_alloc fail 07:48:31 2617344 1874368 0 17190912 10945416 0 3067904 0 Average 186953 133883 0 1227922 781815 0 219136 0
More Advanced and Graphical Performance Tools
The command line is a way of life when working with UNIX. UNIX grew out of the command line and is still primarily command line-based. Although you need to know a lot when issuing commands, especially when it comes to system performance, you can dig deeply very quickly with many of the commands I just covered.
You have the option with most UNIX variants to buy graphical performance tools. Some systems come with basic graphical performance tools, but you will usually end up buying an advaced performance analysis tool if you want to perform advanced performance analysis. We'll take a quick look at a few performance tools in upcoming sections.
Figure 14-1 shows three performance tools that came with the Red Hat Linux system I used for many of the examples in this chapter:
Figure 14-1. Red Hat Linux Performance Tools Screen Shot
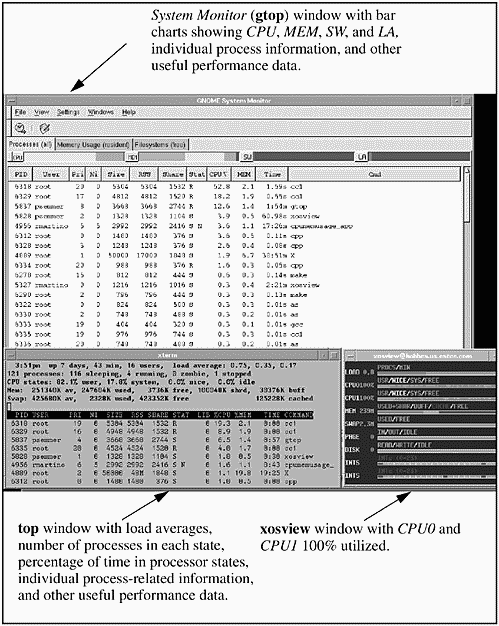

The three performance tools shown in this diagram are xosview in the lower right, the System Monitor across the top of the screen, and top shown in the lower left. The System Monitor provides bar charts across the top of the screen that indicate the amount of CPU, Memory, Swap, and LAN utilization taking place. There is then tabular data supplied for every process on the system. The System Monitor is a graphical version of top that I invoked with the command gtop for graphical top. xosview is a small load meter that you can keep run-ning that provides bar charts of system activity shown in the bottom right window. This is the X Windows operating system view program, hence the name xosview. You can't see the bar charts clearly in this diagram, because this is a color-based application and the book is printed in only black and white. The bar charts are, however, clear on the computer screen. The final, and most often used, tool on UNIX systems is the character version of top that is running in the bottom left xterm. top is found on many UNIX variants and supplies a lot of useful system information.
Among the useful top system data displayed is the following:
| - | Load averages in the last one, five, and fifteen minutes. |
| - | Number of existing processes and the number of processes in each state. |
| - | Percentage of time spent in each of the processor states per processor on the system. |
This same information is included in the bottom of the System Monitor window, which is covered by the top and xosview windows.
Next in the top window are memory data, including used, free, and shared.
Data is also provided for individual processes in a format similar to ps, including the following:
PID Process ID number.
USER Name of the owner of the process.
PRI Current priority of the process.
NI Nice value, ranging from -20 to +20.
SIZE Total size of the process in kilobytes.
RSS Resident size of the process in kilobytes.
STATE Current state of the process.
TIME Number of system and CPU seconds the process has consumed.
%CPU CPU percentage.
%MEM Memory percentage.
COMMAND Name of the command the process is currently running.
As with most of the commands we have been covering, top is different among UNIX variants. You may see some different fields on the different UNIX variants. I am usually confident when I sit down at any UNIX system that I can run top and quickly see how the system is running. Most versions of top I have run are character-based applications, so you don't even need a graphics terminal to run them. I have run top in this example in character mode within an X terminal.
The system used in this example has two CPUs. If you look carefully in the xosview window, you'll see that both CPU0 and CPU1 are 100 percent used. At the time this screen shot was obtained, I was compiling the Linux kernel on this system, which consumed all the CPU resources on the system for a short period of time. You can see from both the top and System Monitor windows that the program cc1, used to compile the kernel, was consuming a substantial amount of the CPU resources on the system.
Figure 14-1 helps illustrate how different tools can help with viewing how system resources are consumed. xosview provides a quick reference, graphical overview of how many system resources are being consumed. top and System Monitor can then be used to determine the specific process consuming the most system resources.
HP GlancePlus/UX
Using UNIX commands to get a better understanding of what your system is doing requires you to do a lot of work. In the first case, issuing UNIX commands gives you the advantage of obtaining data about what is taking place on your system that very second. Unfortunately, you can't always issue additional commands to probe more deeply into an area, such as a process, about which you want to know more.
Now I'll describe another technique - a tool that can help get useful data in real time, will allow you to investigate a specific process, and not bury you in reports. This tool is HP GlancePlus/UX (GlancePlus). This tool runs on several UNIX variants, including Solaris, HP-UX, and AIX.
GlancePlus can be run in character mode or in graphic mode. I chose to use the character-based version of GlancePlus, because this will run on any display, either graphics- or character-based, and the many colors used by the Motif version of GlancePlus do not show up well in a book. My examples are displayed much more clearly in the book when using the character mode. I recommend that you try both versions of GlancePlus to see which you prefer.
The system used in the examples has eight processors, 4 GBytes of RAM, and a substantial amount of EMC Symmetrix disk connected to it.
Figure 14-2 shows one of several interactive screens of GlancePlus. This one is the Process List screen, also referred to as theGlobal screen. This is the default screen when bringing up GlancePlus.
Figure 14-2. HP GlancePlus/UX Process List Screen Shot
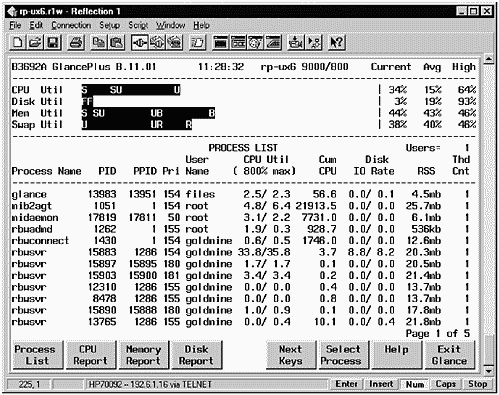
Two features of the screen shown in Figure 14-2 are worth noticing immediately:
-
Four histograms at the top of the screen give you a graphical representation of your CPU, Disk, Memory, and Swap Utilization in a format much easier to assimilate than a column of numbers.
-
The "Process Summary" has columns similar to ps -ef, with which many system administrators are familiar and comfortable. GlancePlus, however, gives you the additional capability of filtering out processes that are using very few resources by specifying thresholds.
Using GlancePlus, you can take a close look at your system in many areas, including the following:
-
Process List
-
CPU Report
-
Memory Report
-
Swap Space
-
Disk Report
-
LANDetail
-
NFSbySystem
-
PRM Summary (Process Resource Manager)
-
I/O by File System
-
I/ObyDisk
-
I/O by Logical Volume
-
System Tables
Figure 14-2 is a GlancePlus screen shot.
Because the Process List shown in the example tells you where your system resources are going at the highest level, I'll start my description here. I am using a terminal emulator on my portable computer to display GlancePlus. I find that many system administrators use a PC and a terminal emulator to perform UNIX management functions. Keep in mind that the information shown on this screen can be updated at any interval you choose. If your system is running in a steady-state mode, you may want to have a long interval because you don't expect things to much change. On the other hand, you may have a dynamic environment and want to see the histograms and other information updated every few seconds. In either case, you can change the update interval to suit your needs. You can use the function keys at the bottom of the screen to go into other functional areas.
Process List Description
The Process List screen provides an overview of the state of the system resources and active processes.
The top section of the screen (the histogram section) is common to the many screens of GlancePlus. The bottom section of the screen displays a summary of active processes.
Line 1 provides the product and version number of GlancePlus, the time, the name of your system, and system type. In this case, we are running version 11.01 of GlancePlus.
Line 3 provides information about the overall state of the CPU. This tends to be the single most important piece of information that administrators want to know about their system: Is my CPU over-worked?
The CPU Utilization bar is divided into the following parts:
-
"S" indicates the amount of time spent on "system" activities such as context switching and system calls.
-
"N" indicates the amount of time spent running "nice" user processes (those run at a low priority).
-
"U" indicates the amount of time spent running user processes.
-
"R" indicates real-time processes.
-
"A" indicates the amount of time spent running processes at a negative "nice" priority.
The far right of line 3 shows the percentage of CPU utilization. If your system is "CPU-Bound," you will consistently see this number near 100 percent. You get statistics for Current, Average (since analysis was begun), and High.
Line 4 shows Disk Utilization for the busiest mounted disk. This bar indicates the percentage of File System and Virtual Memory disk I/O over the update interval. This bar is divided into two parts:
-
"F" indicates the amount of file system activity of user reads and writes and other non-paging activities.
-
"V" indicates the percentage of disk I/O devoted to paging virtual memory.
The Current, Avg, and High statistics have the same meaning as in the CPU Utilization description.
Line 5 shows the system memory utilization. This bar is divided into three parts:
-
"S" indicates the amount of memory devoted to system use.
-
"U" indicates the amount of memory devoted to user programs and data.
-
"B" indicates the amount of memory devoted to buffer cache. The Current, Avg, and High statistics have the same meaning as in the CPU Utilization description.
Line 6 shows Swap Util information, which is divided into two parts:
-
"R" indicates reserved, but not in use.
-
"U" indicates swap space in use.
All three of these areas (CPU, Memory, and Disk) may be further analyzed by using the F2, F3, and F4 function keys, respectively. Again, you may see different function keys, depending on the version of GlancePlus you are running. When you select one of these keys, you move from the Process List screen to a screen that provides more in-depth functions in the selected area. In addition, more detailed screens are available for many other system areas. Because most investigation beyond the Process List screen takes place on the CPU, Memory, and Disk screens, I'll describe these in more detail shortly.
The bottom of the Process List screen shows the active processes running on your system. Because there are typically many processes running on a UNIX system, you may want to consider using the o command to set a threshold for CPU utilization. If you set a threshold of five percent, for instance, then only processes that exceed the average CPU utilization of five percent over the interval will be displayed. There are other types of thresholds that can be specified, such as the amount of RAM used (Resident Size). If you specify thresholds, you see only the processes you're most interested in, that is, those consuming the greatest system resources.
There is a line for each active process that meets the threshold requirements you defined. There may be more than one page of processes to display. The message in the bottom-right corner of the screen indicates which page you are on. You can scroll forward to view the next page with f and backwards with b. Usually only a few processes consume most of your system resources, so I recommend setting the thresholds so that only one page of processes is displayed. There are a whole series of commands you can issue in GlancePlus. The final figure in this section shows the commands recognized by GlancePlus.
Here is a brief summary of the process headings:
Process Name The name or abbreviation used to load the executable program.
| PID | The process identification number. |
| PPID | The PID of the parent process. |
| Pri | The priority of the process. The lower the number, the higher the priority. System-level processes usually run between 0 and 127. Other processes usually run between 128 and 255. "Nice" processes are those with the lowest priority and they have the largest number. |
| User Name | Name of the user who started the process. |
| CPU Util | The first number is the percentage of CPU utilization that this process consumed over the update interval. Note that this is 800% maximum for our eight-processor system. The second number is the percentage of CPU utilization that this process consumed since GlancePlus was invoked. Most system administrators leave GlancePlus running continuously on their systems with a low update interval. Since GlancePlus uses very little system overhead, there is virtually no penalty for this. |
| Cum CPU | The total CPU time used by the process. GlancePlus uses the "midaemon" to gather information. If the midaemon started before the process, you will get an accurate measure of cumulative CPU time used by the process. |
| Disk IO Rate | The first number is the average disk I/O rate per second over the last update interval. The second number is the average disk I/O rate since GlancePlus was started or since the process was started. Disk I/O can mean a lot of different things. Disk I/O could mean taking blocks of data off the disk for the first time and putting them in RAM, or it could be entirely paging and swapping. Some processes will simply require a lot more Disk I/O than others. When this number is very high, however, take a close look at whether or not you have enough RAM. Keep in mind that pageout activity, such as deactivation and swapping, are attributed to the vhand process. |
| RSS Size | The amount of RAM in KBytes that is consumed by the process. This is called the Resident Size. Everything related to the process that is in RAM is included in this column, such as the process's data, stack, text, and shared memory segments. This is a good column to inspect. Because slow systems are often erroneously assumed to be CPU-bound, I always make a point of looking at this column to identify the amount of RAM that the primary applications are using. This is often revealing. Some applications use a small amount of RAM but use large data sets, a point often overlooked when RAM calculations are made. This column shows all the RAM that your process is currently using. |
| Block On | The reason the process was blocked (unable to run). If the process is currently blocked, you will see why. If the process is running, you will see why it was last blocked. There are many reasons why a process could be blocked. After Thd Cnt is a list of the most common reasons for the process being blocked. |
| Thd Cnt | The total number of threads for this current process. |
| Abbreviation | Reason for the Blocked Process |
|---|---|
| CACHE | Waiting for a cache buffer to become available |
| DISK | Waiting for a disk operation to complete |
| INODE | Waiting for an inode operation to complete |
| IO | Waiting for a non-disk I/O to complete |
| IPC | Waiting for a shared memory operation to complete |
| LAN | Waiting for a LAN operation to complete |
| MESG | Waiting for a message queue operation to complete |
| NFS | Waiting for an NFS request to complete |
| PIPE | Waiting for data to or from a pipe |
| PRI | Waiting because a higher-priority process is running |
| RFA | Waiting for a Remote File Access to complete |
| SEM | Waiting for a semaphore to become available |
| SLEEP | Waiting because the process called sleep or wait |
| SOCKT | Waiting for a socket operation to complete |
| SYS | Waiting for system resources |
| TERM | Waiting for a terminal transfer |
| VM | Waiting for a virtual memory operation to complete |
| OTHER | Waiting for a reason that GlancePlus can't determine |
CPU Report Screen Description
If the Process List screen indicates that the CPU is overworked, you'll want to refer to the CPU Report screen shown in Figure 14-3. It can provide useful information about the seven types of states on which GlancePlus reports.
Figure 14-3. HP GlancePlus/UX CPU Report Screen Shot
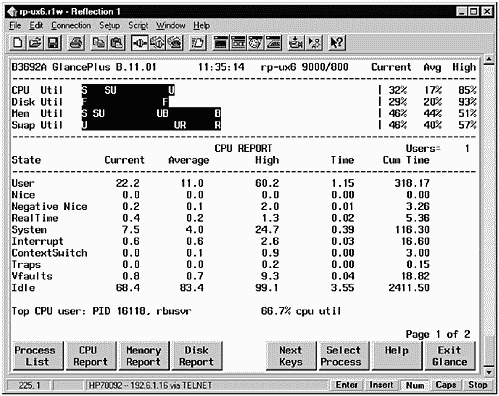
For each of the seven types of states, there are columns that provide additional information. Following is a description of the columns:
| Current | Displays the percentage of CPU time devoted to this state over the last time interval. |
| Average | Displays the average percentage of CPU time spent in this state since GlancePlus was started. |
| High | Displays the highest percentage of CPU time devoted to this state since GlancePlus was started. |
| Time | Displays the CPU time spent in this state over the last interval. |
| Cum | Time Displays the total amount of CPU time spent in this state since GlancePlus was started. |
A description of the seven states follows:
| User | CPU time spent executing user activities under normal priority. |
| Nice | CPU time spent running user code in nice mode. |
| Negative Nice | CPU time spent running code at a high priority. |
| Realtime | CPU time spent executing real-time processes that run at a high priority. |
| System | CPU time spent executing system calls and programs. |
| Interrupt | CPU time spent executing system interrupts. A high value here may indicate of a lot of I/O, such as paging and swapping. |
| ContSwitch | CPU time spent context switching between processes. |
| Traps | CPU time spent handling traps. |
| Vfaults | CPU time spent handling page faults. |
| Idle | CPU time spent idle. |
The CPU Report screen also shows your system's run queue length or load average. This is displayed on the second page of the CPU Report screen. The Current, Average, and High values for the number of runnable processes waiting for the CPU are shown. You may want to get a gauge of your system's run queue length when the system is mostly idle and compare these numbers with those you see when your system is in normal use.
The final area reported on the CPU Report screen is load average, system calls, interrupts, and context switches. I don't inspect these too closely, because if one of these is high, it is normally the symptom of a problem and not the cause of a problem. If you correct a problem, you will see these numbers reduced.
You can use GlancePlus to view all the CPUs in your system, as shown in Figure 14-4. This is an eight-processor system.
Figure 14-4. All CPUs Screen in GlancePlus
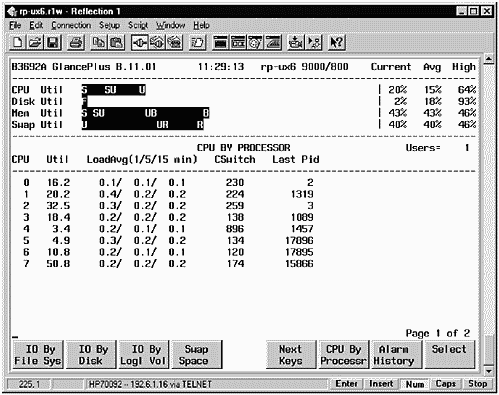
Memory Report Screen Description
The Memory Report Screen, shown in Figure 14-15 provides information on several types of memory management events. The statistics shown are in the form of counts, not percentages. You may want to look at these counts for a mostly idle system and then observe what takes place as the load on the system is incrementally increased. My experience has been that many more memory bottlenecks occur than CPU bottlenecks, so you may find this screen revealing.
Figure 14-5. HP GlancePlus/UX Memory Report Screen Shot
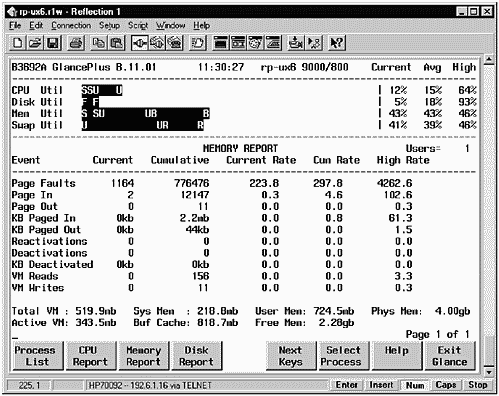
The following five statistics are shown for each memory management event:
| Current | The number of times an event occurred in the last interval. The count changes if you update the interval, so you may want to select an interval you are comfortable with and stick with it. |
| Cumulative | The sum of all counts for this event since GlancePlus was started. |
| Current Rate | The number of events per second. |
| Cum Rate | Average of the rate over the cummulative collection interval. |
| High Rate | The highest rate recorded. |
Following are brief descriptions of the memory management events for which statistics are provided:
| Page Faults | Any address translation fault such as reclaims, pid faults, and so on. |
| Page In/Page | Out Pages of data moved from virtual memory (disk) to physical memory (page in), or vice versa. |
| KB Paged In | The amount of data paged in because of page faults. |
| KB Paged Out | The amount of data paged out to disk. |
| Reactivations/Deactivations | |
| The number of processes swapped in and out of memory. A system low on RAM will spend a lot of time swapping processes in and out of RAM. If a lot of this type of swapping is taking place, you may high CPU utilization and see some other statistics may increase as well. These may only be symptoms that a lot of swapping is taking place. | |
| KB Reactivated | The amount of information swapped into RAM as a result of processes having been swapped out earlier due to insufficient RAM. |
| KB Deactivated | The amount of information swapped out when processes are moved to disk. |
| VM Reads | The total count of the number of vitual memory reads to disk. The higher this number, the more often your system is going to disk. |
| VM Writes | The total count of memory management I/O. |
The following values are also on the Memory screen:
| Total VM | The amount of total virtual memory used by all processes. |
| Active VM | The amount of virtual memory used by all active processes. |
| Sys Mem | The amount of memory devoted to system use. |
| Buf Cache Size | The current size of buffer cache. |
| User Mem | The amount of memory devoted to user use. |
| Free Memory | The amount of RAM not currently allocated for use. |
| Phys Memory | The total RAM in your system. |
This screen gives you a lot of information about how your memory subsystem is being used. You may want to view some statistics when your system is mostly idle and when it is heavily used and compare the two. Some good numbers to record are "Free Memory" (to see whether you have any free RAM under either condition) and "Total VM" (to see how much virtual memory has been allocated for all your processes). A system that is RAM-rich will have available memory; a system that is RAM-poor will allocate a lot of virtual memory.
Disk Report Screen Description
The Disk Report screen appears in Figure 14-6. You may see groupings of "local" and "remote" information.
Figure 14-6. HP GlancePlus/UX Disk Report Screen Shot
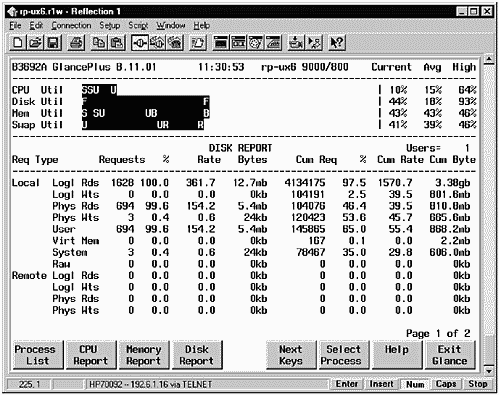
There are eight disk statistics provided for eight events related to logical and physical accesses to all the disks mounted on the local system. These events represent all the disk activity taking place on the system.
Here are descriptions of the eight disk statistics provided:
| Requests | The total number of requests of that type over the last interval. |
| % | The percentage of this type of disk event relative to other types. |
| Rate | The average number of requests of this type per second. |
| Bytes | The total number of bytes transferred for this event over the last interval. |
| Cum Req | The cumulative number of requests since GlancePlus started. |
| % | The relative percentage of this type of disk event since GlancePlus started. |
| Cum Rate | Average of the rate over the cummulative collection interval. |
| Cum Bytes | The total number of bytes transferred for this type of event since GlancePlus started. |
Next are descriptions of the disk events for which these statistics are provided, which may be listed under "Local" on your system:
| Logl Rds and Logl Wts | |
| The number of logical reads and writes to a disk. Because disks normally use memory buffer cache, a logical read may not require physical access to the disk. | |
| Phys Rds | The number of physical reads to the disk. These physical reads may be due to either file system logical reads or to virtual memory management. |
| Phys Wts | The number of physical writes to the disk. This may be due to file system activity or virtual memory management. |
| User | The amount of physical disk I/O as a result of user file I/O operations. |
| Virtual Mem | The amount of physical disk I/O as a result of virtual memory management activity. |
| System | Housekeeping I/O such as inode updates. |
| Raw | The amount of raw mode disk I/O. |
A lot of disk activity may also take place as a result of NFS mounted disks. Statistics are provided for "Remote" disks as well.
Disk access is required on all systems. The question to ask is: What disk activity is unnecessary and is slowing down my system? A good place to start is to compare the amount of "User" disk I/O with "Virtual Mem" disk I/O. If your system is performing much more virtual memory I/O than user I/O, you may want to investigate your memory needs.
GlancePlus Summary
In addition to the Process List, or Global, screen and the CPU, Memory, and Disk screens described earlier, there are many other useful screens, including the following:
| Swap Space | Shows details of all swap areas. May be called by another name in other releases. |
| Netwk By Intrface | Gives details about each LAN card configured on your system. This screen may have another name in other releases. |
| NFS Global | Provides details on inbound and outbound NFS-mounted file systems. May be called by another name in other releases. |
| Select Process | Allows you to select a single process to investigate. May be called by another name in other releases. |
| I/O By File Sys | Shows details of I/O for each mounted disk partition. |
| I/O By Disk | Shows details of I/O for each mounted disk. |
| I/O By Logl Vol | Shows details of I/O for each mounted logical volume. |
| System Tables | Shows details of internal system tables. |
| Process Threshold | Defines which processes will be displayed on the Process List screen. May be called by another name, such as the Global screen, in other releases. |
As you can see, although I described the four most commonly used screens in detail, you can use many others to investigate your system further.
There are also many commands you can issue within GlancePlus. Figures 14-7 and 14-8 show the Command List screens in GlancePlus.
Figure 14-7. HP GlancePlus/UX Command List Screen 1

Figure 14-8. HP GlancePlus/UX Command List Screen 2
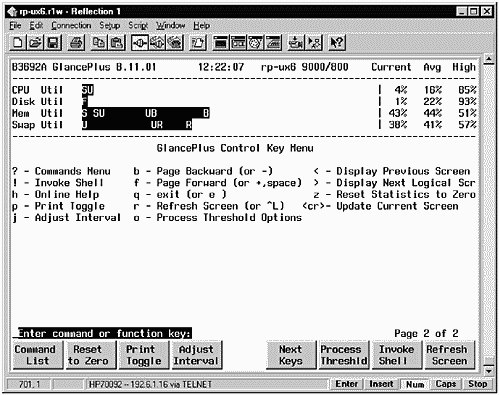
Using VantagePoint Performance Agent to Identify Bottlenecks
VantagePoint Performance Agent allows you to view many metrics related to system performance that can help you identify the source of bottlenecks in your system. You can use the graphical version of GlancePlus, called gpm, to specify the metrics you want to keep track of. You can then view them in the gpm interface and sort them in a variety of different ways.
The following are the most important types of bottlenecks you can encounter on a system and the metrics associated with each type of bottleneck. This information was provided by Doug Grumann and Stephen Ciullo of Hewlett Packard, who are two performance experts.
-
CPU bottleneck Using VantagePoint Performance Agent:
-
Consistent High global CPU utilization with GBL_CPU_TOTAL_UTIL>90% and next bullet.
-
Significant Run Queue or Load Average indicated by GBL_PRI_QUEUE or GBL_RUN_QUEUE>3.
-
Look for processes blocked on priority with PROC_STOP_REASON=PRI.
-
-
System CPU bottleneck using VantagePoint Performance Agent (same as 1 with addition of first bullet):
-
Most of the CPU time spent in kernel mode with GBL_CPU_SYS_MODE_UTIL>50%.
-
Consistent High global CPU utilization with GBL_CPU_TOTAL_UTIL>90% and next bullet.
-
Significant Run Queue or Load Average indicated by GBL_PRI_QUEUE or GBL_RUN_QUEUE>3.
-
Look for processes blocked on priority with PROC_STOP_REASON=PRI.
-
-
Context switching bottleneck using VantagePoint Performance Agent (same as 2 with addition of first bullet):
-
Significant CPU time spent switching with GBL_CPU_CSWITCH>30%.
-
Most of the CPU time spend in kernel mode with GBL_CPU_SYS_MODE_UTIL>50%.
-
Consistent High global CPU utilization with GBL_CPU_TOTAL_UTIL>90% and next bullet.
-
Significant Run Queue or Load Average indicated by GBL_PRI_QUEUE or GBL_RUN_QUEUE>3.
-
Look for processes blocked on priority with PROC_STOP_REASON=PRI.
-
-
User CPU bottleneck Using VantagePoint Performance Agent (same as 1 with addition of first bullet):
-
Most of the CPU time spent in user mode with GBL_CPU_USER_MODE_UTIL>50%.
-
Consistent High global CPU utilization with GBL_CPU_TOTAL_UTIL>90% and next bullet.
-
Significant Run Queue or Load Average indicated by GBL_PRI_QUEUE or GBL_RUN_QUEUE>3.
-
Look for processes blocked on priority with PROC_STOP_REASON=PRI.
-
-
Disk bottleneck Using VantagePoint Performance Agent:
-
At least one disk device with consistently high utilization with BYDSK_UTIL>50%.
-
Queue lengths greater than zero with BYDSK_QUEUE>0.
-
Processes or threads blocked on I/O for a variety of reasons with PROC_STOP_REASON=CACHE, DISK or IO.
-
Look for processes blocked on priority with PROC_STOP_REASON=PRI.
-
-
Buffer Cache bottleneck Using VantagePoint Performance Agent:
-
Moderate utilization of at least one disk with BYDSK_UTIL>25%.
-
Queue lengths greater than zero with BYDSK_QUEUE>0.
-
Low Buffer cache read hit percentage with GBL_MEM_CACHE_HIT_PCT<90%.
-
Processes or threads blocked on cache with PROC_STOP_REASON=CACHE.
-
-
Memory bottleneck Using VantagePoint Performance Agent:
-
High physical memory utiliztion with GBL_MEM_UTIL>95%.
-
Significant pageouts or any deactivations with GBL_MEM_PAGEOUT_RATE>1 or GBL_MEM_SWAPOUT_RATE>0.
-
vhand processes consistently active with vhand's PROC_CPU_TOTAL_UTIL>5%.
-
Processes or threads blocked on virtual memory with PROC_STOP_REASON=VM.
-
-
Networking bottleneck Using VantagePoint Performance Agent:
-
High network packet rates with GBL_NET_PACKET_RATE>2 average. Keep in mind this varies greatly depending on configuration.
-
Any output queuing taking place with GBL_NET_OUTQUEUE>0.
-
Higher than normal number of processes or threads blocked on networking with PROC_STOP_REASON=NFS, LAN, RPC or SOCKET GBL_NETWORK_SUBSYSTEM_QUEUE>average.
-
One CPU with a high system mode CPU utilization while other CPUs are mostly idle with BYCPU_CPU_INTERRUPT_TIME>30.
-
Using lanadmin, check for frequent incrementing of Outbound Discards or excessive Collisions.
-
In order to identify a problem on your system, you must first characterize your system when it is running smoothly and has no problems. Should your system start to perform poorly in some respect or another, you can compare the performance data of a smoothly running system to one with potential problems.
HP VantagePoint Performance Agent and HP VantagePoint Performance Analyzer/UX
There are performance tools that track and chart data over a long period of time. System Administrators often call this exercise "capacity planning." The goal of capacity planning is to view what system resources have been consumed over a long period of time and determine what adjustments or additions can be made to the system to improve performance and plan for the future. We'll use HP VantagePoint Performance Agent (which was formerly MeasureWare Agent) and HP VantagePoint Performance Analyzer/UX (what used to be PerfView Analyzer) together to take a look at the performance of a system. These tools run on HP-UX and are similar to many advanced tools that run on other UNIX variants.
The VantagePoint Performance Agent is installed on individual systems throughout a distributed environment. It collects resource and performance measurement data on the individual systems. The VantagePoint Performance Analyzer/UX management console, which you would typically install on a management system, is then used to display the historical VantagePoint Performance Agent data. You could also set alarms to be triggered off by exception conditions using the VantagePoint Performance agent. For instance, if the VantagePoint Performance agent detects an exception condition, such as CPU utilization greater than 90%, it produces an alarm message. The alarm messages are then displayed with VantagePoint Performance Analyzer/UX. We're going to use the VantagePoint Performance Analyzer/UX in our upcoming examples; however, there are really three VantagePoint Performance components:
| Monitor | Provides alarm monitoring capability by accepting alarms from VantagePoint Performance and displays alarms. |
| Planner | Provides forecasting capability by extrapolating VantagePoint Performance data for forecasts. |
| Analyzer | Analyzes VantagePoint Performance data from multiple systems and displays data. You can view the data from multiple systems simultaneously. |
In our example, we will be working with a single system. We'll take the VantagePoint Performance data, collected over roughly a one-week period, and display some of it. In this example, we won't take data from several distributed systems and we'll use only one server in the example.
HP VantagePoint Performance Agent produces log files that contain information about the system resource consumption. The longer HP VantagePoint Performance Agent runs, the longer it records data in the log files. I am often called to review systems that are running poorly to propose system upgrades. I usually run HP VantagePoint Performance Agent for a minimum of a week so that I obtain log information over a long enough period of time to obtain useful data.
For some systems, this time period is months. For other systems with a regular load, a week may be enough time.
After having run VantagePoint Performance for a week, I invoked VantagePoint Performance Analyzer/UX to see the level of system resource utilization that took place over the week. The graphs we'll review are CPU, Memory, and Disk. Figure 14-9 shows Global CPU Summary for the week:
Figure 14-9. Global CPU Summary Screen
You can adjust every imaginable feature of this graph with VantagePoint Performance Analyzer/UX. Unfortunately, the color in this graph is lost in the book. The colors used allow you to discern the parameters when viewing the graph on the computer screen. Total CPU utilization is always the top point in the graph and it is the sum of system and user mode utilization.
Figure 14-9 shows classic CPU utilization with prime hours reflecting high CPU utilization and non-prime hours reflecting low CPU utilization. In some respects, however, this graph can be deceiving. Because there is a data point occurs every three hours, hence the eight ticks per 24-hour period, you don't get a view of the actual CPU utilization during a much smaller window of time. We can't, for instance, see precisely what time in the morning the CPU becomes heavily used. We can see that it is between the second and third tick, but this is a long time period - between 6:00 and 9:00 am. The same lack of granularity is true at the end of the day. We see a clear fall-off in CPU utilization between the fifth and seventh ticks, but this does not give us a well-defined view. Figure 14-10 shows CPU utilization during a much shorter time window.
Figure 14-10. Global CPU Summary - Short Time Period
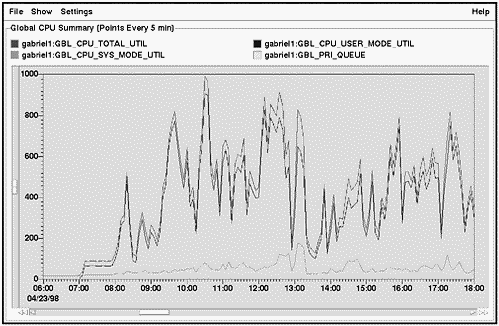
Figure 14-10 shows a finer granularity of CPU utilization during the shorter time window. The much finer granularity of this window makes clear the activity spikes that occur throughout the day. For instance, a clear login spike occurs at 8:30 am.
Memory utilization can also be graphed over the course of the week, as shown in Figure 14-11.
Figure 14-11. Global Memory Summary

The user memory utilization is the bottom line of the graph, which roughly corresponds to the CPU utilization shown earlier. User memory utilization is low during non-prime hours and high during prime hours.
System memory utilization is the middle line of the graph, which remains fairly steady throughout the week.
Total memory utilization is always the top line of the graph, and it is the sum of system and user utilization. It rises and drops with user utilization, because system memory utilization remains roughly the same.
The three-hour interval between data points on this graph may not give us the granularity we require. Figure 14-12 shows memory utilization during a much shorter time window.
Figure 14-12. Global Memory Summary - Short Time Period
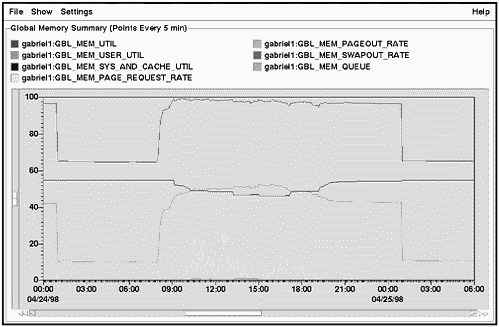
Figure 14-12 shows a finer granularity of memory utilization during the shorter time window. You can now see precisely how memory utilization is changing over roughly one day.
Disk utilization can also be graphed over the course of the week, as shown in Figure 14-13.
Figure 14-13. Global Disk Summary
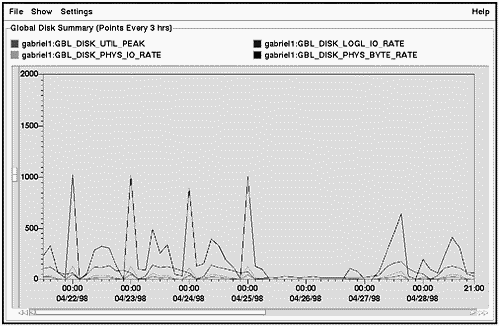
Like the CPU and memory graph, this is an entire week of disk usage. Because many spikes occur on this graph, we would surely want to view and analyze much shorter time windows.
Figure 14-14 shows disk utilization during a much shorter time window.
Figure 14-14. Global Disk Summary - Short Time Period
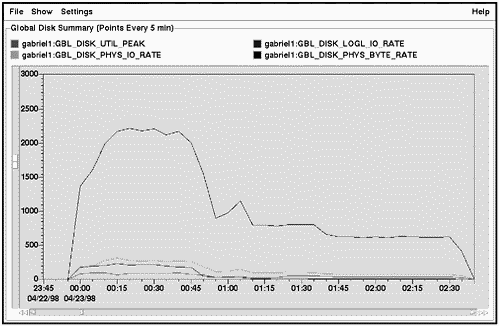
This much shorter time window, of roughly three hours, shows a lot more detail. There are tremendous spikes in disk activity occurring in the middle of the night. These could take place for a variety of reasons, including batch job processing or system backup.
You are not limited to viewing parameters related to only one systemresourceatatime. Youcan also view theway many system resources are used simultaneously, as shown in Figure 14-15.
Figure 14-15. Global Summary History Screen
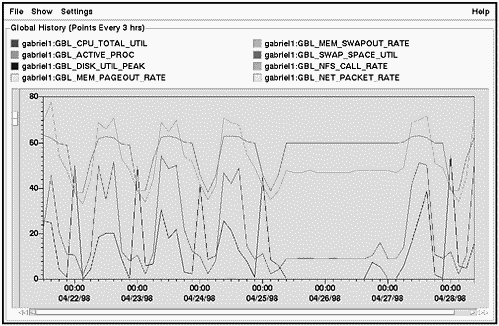
Many system resources are present on this graph, including CPU, disk, and memory. You would surely want to view a much shorter time period when displaying so many system resources simultaneously.
Figure 14-16 shows the same parameters during a much shorter time window.
Figure 14-16. Global Summary - Short Time Period
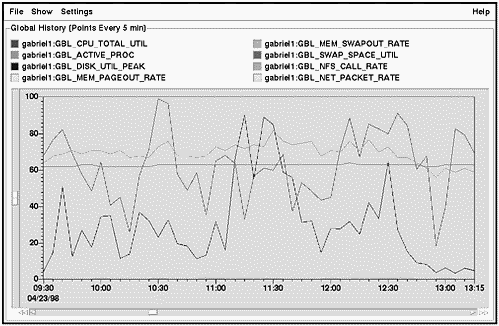
Figure 14-16 shows a finer granularity of the utilization of many system resources during the shorter time window. You can now view the ways in which various system resources are related to other system resources.
You can find the status of VantagePoint Performance Analyzer/ UX running on your system with a useful command called perfstat. The following example shows issuing the perfstat command with the -? option to see all perfstat options:
# perfstat -? usage: perfstat [options] Unix option Function ----------- -------- -? List all perfstat options. -c Show system configuration information. -e Search for warnings and errors from performance tool status files. -f List size of performance tool status files. -p List active performance tool processes. -t Display last few lines of performance tool status files. -v List version strings for performance tool files. -z Dump perfstat info to a file and tar tape. Using the -c option, you get information about your system configuration, as shown in the following listing:
# perfstat -c ********************************************************** ** perfstat for rp-ux6 on Fri May 15 12:20:06 EDT ********************************************************** system configuration information: uname -a: HP-UX ux6 B.11.00 E 9000/800 71763 8-user license mounted file systems with disk space shown: Filesystem kbytes used avai %used Mounted on /dev/vg00/lvol3 86016 27675 54736 34% / /dev/vg00/lvol1 67733 44928 16031 74% /stand /dev/vg00/lvol8 163840 66995 90927 42% /var /dev/vg00/lvol7 499712 358775 132155 73% /usr /dev/rp06vgtmp/tmp 4319777 1099297 3134084 26% /tmp /dev/vg00/lvol6 270336 188902 76405 71% /opt /dev/vgroot1/var 640691 15636 605834 3% /newvar /dev/vgroot1/usr 486677 356866 115210 76% /newusr /dev/vgroot1/stand 67733 45109 15850 74% /newstand /dev/vgroot1/root 83733 21181 54178 28% /newroot /dev/vgroot1/opt 263253 188109 67246 74% /newopt /dev/vg00/lvol5 20480 1109 18168 6% /home LAN interfaces: Name Mtu Network Address Ipkts Opkts lo0 4136 127.0.0.0 localhost 7442 7442 lan0 1500 192.60.11.0 rp-ux6 7847831 12939169 ************* (end of perfstat -c output) **************** Using the -f option shows the size of the performance tools status files, as shown in the following listing:
# perfstat -f ********************************************************** ** perfstat for ux6 on Fri May 15 12:20:08 EDT ********************************************************** ls -l list of performance tool status files in /var/opt/perf: -rw-rw-rw- 1 root root 7812 May 10 19:35 status.alarmgen -rw-r--r-- 1 root root 0 May 10 02:40 status.mi -rw-rw-rw- 1 root root 3100 May 10 02:40 status.perflbd -rw-rw-rw- 1 root root 3978 May 10 02:40 status.rep_server -rw-r--r-- 1 root root 6079 May 11 23:30 status.scope -rw-r--r-- 1 root root 0 Mar 31 07:26 status.ttd ************* (end of perfstat -f output) **************** Using the -v option displays the version strings for the performance tools running, as shown in the following listing:
# perfstat -v ********************************************************** ** perfstat for ux6 on Fri May 15 12:20:08 EDT ********************************************************** listing version strings for performance tool files: NOTE: The following software version information can be com pared with the version information shown in the /opt/perf/ReleaseNotes file(s). MeasureWare executables in the directory /opt/perf/bin scopeux C.01.00 12/17/97 HP-UX 11.0+ ttd A.11.00.15 12/15/97 HP-UX 11.00 perflbd C.01.00 12/17/97 HP-UX 11.0+ alarmgen C.01.00 12/17/97 HP-UX 11.0+ agdbserver C.01.00 12/17/97 HP-UX 11.0+ agsysdb C.01.00 12/17/97 HP-UX 11.0+ rep_server C.01.00 12/17/97 HP-UX 11.0+ extract C.01.00 12/17/97 HP-UX 11.0+ utility C.01.00 12/17/97 HP-UX 11.0+ mwa A.10.52 12/05/97 perfstat A.11.01 11/19/97 dsilog C.01.00 12/17/97 HP-UX 11.0+ sdlcomp C.01.00 12/17/97 HP-UX 11.0+ sdlexpt C.01.00 12/17/97 HP-UX 11.0+ sdlgendata C.01.00 12/17/97 HP-UX 11.0+ sdlutil C.01.00 12/17/97 HP-UX 11.0+ Measureware libraries in the directory /opt/perf/lib libmwa.sl C.01.00 12/17/97 HP-UX 11.0+ libarm.a A.11.00.15 12/15/97 HP-UX 11.00 libarm.sl A.11.00.15 12/15/97 HP-UX 11.00 Measureware metric description file in the directory /var/opt/ perf metdesc C.01.00 12/17/97 All critical MeasureWare files are accessible libnums.sl B.11.00.15 12/15/97 HP-UX 11.00 midaemon B.11.00.15 12/15/97 HP-UX 11.00 glance B.11.01 12/16/97 HP-UX 11.00 gpm B.11.01 12/16/97 HP-UX 11.00 ************* (end of perfstat -v output) **************** Manual Pages of Some Commands Used in Chapter 14
Many useful commands are in this chapter. I provided a brief description of many of the commands along with some of the examples. The following are the HP-UX manual pages for many of the commands used in this chapter. The manual pages are thorough and provide much more detailed description of each of the commands.
iostat

iostat - Interactively report I/O and CPU statistics.
iostat(1) iostat(1) NAME iostat - report I/O statistics SYNOPSIS iostat [-t] [interval [count]] DESCRIPTION iostat iteratively reports I/O statistics for each active disk on the system. Disk data is arranged in a four-column format: Column Heading Interpretation device Device name bps Kilobytes transferred per second sps Number of seeks per second msps Milliseconds per average seek If two or more disks are present, data is presented on successive lines for each disk. To compute this information, seeks, data transfer completions, and the number of words transferred are counted for each disk. Also, the state of each disk is examined HZ times per second (as defined in <sys/param.h>) and a tally is made if the disk is active. These numbers can be combined with the transfer rates of each device to determine average seek times for each device. With the advent of new disk technologies, such as data striping, where a single data transfer is spread across several disks, the number of milliseconds per average seek becomes impossible to compute accurately. At best it is only an approximation, varying greatly, based on several dynamic system conditions. For this reason and to maintain backward compatibility, the milliseconds per average seek ( msps ) field is set to the value 1.0. Options iostat recognizes the following options and command-line arguments: -t Report terminal statistics as well as disk statistics. Terminal statistics include: tin Number of characters read from terminals. tout Number of characters written to terminals. us Percentage of time system has spent in user mode. ni Percentage of time system has spent in user mode running low-priority (nice) processes. sy Percentage of time system has spent in system mode. id Percentage of time system has spent idling. interval Display successive lines which are summaries of the last interval seconds. The first line reported is for the time since a reboot and each subsequent line is for the last interval only. count Repeat the statistics count times. EXAMPLES Show current I/O statistics for all disks: iostat Display I/O statistics for all disks every 10 seconds until INTERRUPT or QUIT is pressed: iostat 10 Display I/O statistics for all disks every 10 seconds and terminate after 5 successive readings: iostat 10 5 Display I/O statistics for all disks every 10 seconds, also show terminal and processor statistics, and terminate after 5 successive readings: iostat -t 10 5 WARNINGS Users of iostat must not rely on the exact field widths and spacing of its output, as these will vary depending on the system, the release of HP-UX, and the data to be displayed. AUTHOR iostat was developed by the University of California, Berkeley, and HP. FILES /usr/include/sys/param.h SEE ALSO vmstat(1).
sar
sar - System activity reporter.
sar(1M) sar(1M) NAME sar - system activity reporter SYNOPSIS sar [-ubdycwaqvmAMS] [-o file] t [n] sar [-ubdycwaqvmAMS] [-s time] [-e time] [-i sec] [-f file] DESCRIPTION In the first form above, sar samples cumulative activity counters in the operating system at n intervals of t seconds. If the -o option is specified, it saves the samples in file in binary format. The default value of n is 1. In the second form, with no sampling interval specified, sar extracts data from a previously recorded file, either the one specified by -f option or, by default, the standard system activity daily data file /var/adm/sa/sadd for the current day dd. The starting and ending times of the report can be bounded via the -s and -e time arguments of the form hh[:mm[:ss]]. The -i option selects records at sec-second intervals. Otherwise, all intervals found in the data file are reported. In either case, subsets of data to be printed are specified by option: -u Report CPU utilization (the default); portion of time running in one of several modes. On a multi-processor system, if the -M option is used together with the -u option, per-CPU utilization as well as the average CPU utilization of all the processors are reported. If the -M option is not used, only the average CPU utilization of all the processors is reported: cpu cpu number (only on a multi-processor system with the -M option); %usr user mode; %sys system mode; %wio idle with some process waiting for I/O (only block I/O, raw I/O, or VM pageins/swapins indicated); %idle otherwise idle. -b Report buffer activity: bread/s Number of physical reads per second from the disk (or other block devices) to the buffer cache; bwrit/s Number of physical writes per second from the buffer cache to the disk (or other block device); lread/s Number of reads per second from buffer cache; lwrit/s Number of writes per second to buffer cache; %rcache Buffer cache hit ratio for read requests e.g.,1 -bread/lread; %wcache Buffer cache hit ratio for write requests e.g.,1 -bwrit/lwrit; pread/s Number of reads per second from character device using the physio() (raw I/O) mechanism; pwrit/s Number of writes per second to character device using the physio() (i.e., raw I/O) mechanism; mechanism. -d Report activity for each block device, e.g., disk or tape drive. One line is printed for each device that had activity during the last interval. If no devices were active, a blank line is printed. Each line contains the following data: device Logical name of the device and its corresponding instance. Devices are categorized into the following four device types: disk1 - HP-IB disks (CS/80) disk2 - CIO HP-FL disks (CS/80) disk3 - SCSI and NIO FL disks sdisk - SCSI disks; %busy Portion of time device was busy servicing a request; avque Average number of requests outstanding for the device; r+w/s Number of data transfers per second (read and writes) from and to the device; blks/s Number of bytes transferred (in 512- byte units) from and to the device; avwait Average time (in milliseconds) that transfer requests waited idly on queue for the device; avserv Average time (in milliseconds) to service each transfer request (includes seek, rotational latency, and data transfer times) for the device. -y Report tty device activity: rawch/s Raw input characters per second; canch/s Input characters per second processed by canon(); outch/s Output characters per second; rcvin/s Receive incoming character interrupts per second; xmtin/s Transmit outgoing character interrupts per second; mdmin/s Modem interrupt rate (not supported; always 0). -c Report system calls: scall/s Number of system calls of all types per second; sread/s Number of read() and/or readv() system calls per second; swrit/s Number of write() and/or writev() system calls per second; fork/s Number of fork() and/or vfork() system calls per second; exec/s Number of exec() system calls per second; rchar/s Number of characters transferred by read system calls block devices only) per second; wchar/s Number of characters transferred by write system calls (block devices only) per second. -w Report system swapping and switching activity: swpin/s Number of process swapins per second; swpot/s Number of process swapouts per second; bswin/s Number of 512-byte units transferred for swapins per second; bswot/s Number of 512-byte units transferred for swapouts per second; pswch/s Number of process context switches per second. -a Report use of file access system routines: iget/s Number of file system iget() calls per second; namei/s Number of file system lookuppn() (pathname translation) calls per second; dirblk/s Number of file system blocks read per second doing directory lookup. -q Report average queue length while occupied, and percent of time occupied. On a multi-processor machine, if the -M option is used together with the -q option, the per-CPU run queue as well as the average run queue of all the processors are reported. If the -M option is not used, only the average run queue information of all the processors is reported: cpu cpu number (only on a multi-processor system and used with the -M option) runq-sz Average length of the run queue(s) of processes (in memory and runnable); %runocc The percentage of time the run queue(s) were occupied by processes (in memory and runnable); swpq-sz Average length of the swap queue of runnable processes (processes swapped out but ready to run); %swpocc The percentage of time the swap queue of runnable processes (processes swapped out but ready to run) was occupied. -v Report status of text, process, inode and file tables: text-sz (Not Applicable); proc-sz The current-size and maximum-size of the process table; inod-sz The current-size and maximum-size of the inode table (inode cache); file-sz The current-size and maximum-size of the system file table; text-ov (Not Applicable); proc-ov The number of times the process table overflowed (number of times the kernel could not find any available process table entries) between sample points; inod-ov The number of times the inode table (inode cache) overflowed (number of times the kernel could not find any available inode table entries) between sample points; file-ov The number of times the system file table overflowed (number of times the kernel could not find any available file table entries) between sample points. -m Report message and semaphore activities: msg/s Number of System V msgrcv() second; sema/s Number of System V semop() calls per second; select/s Number of System V select() calls per second This value will only be reported if the "-S" option is also explicitly specified. -A Report all data Equivalent to -udqbwcayvm. -M Report the per-processor data on a multi-processor system when used with -q and/or -u options. If the -M option is not used on a multi-processor system, the output format of the -u and -q options is the same as the uni-processor output format and the data reported is the average value of all the processors. EXAMPLES Watch CPU activity evolve for 5 seconds: sar 15 Watch CPU activity evolve for 10 minutes and save data: sar -o temp 60 10 Review cpu utilization on a multi-processor system later: sar -d -f temp Review disk and tape activity from that period later: sar -u -M -f temp WARNINGS Users of sar must not rely on the exact field widths and spacing of its output, as these will vary depending on the system, the release of HP-UX, and the data to be displayed. FILES /var/adm/sa/sadd daily data file, where dd is two digits representing the day of the month. SEE ALSO sa1(1M). STANDARDS CONFORMANCE sar: SVID2, SVID3
showmount
showmount Show all remote mounts.
showmount(1M) showmount(1M) NAME showmount - show all remote mounts SYNOPSIS /usr/sbin/showmount [-a] [-d] [-e] [host] DESCRIPTION showmount lists all clients that have remotely mounted a filesystem from host. This information is maintained by the mountd server on host (see mountd(1M)). The default value for host is the value returned by hostname (see hostname(1)). Options -a Print all remote mounts in the format name:directory where hostname is the name of the client, and directory is the directory or root of the file system that was mounted. -d List directories that have been remotely mounted by clients. -e Print the list of exported file systems. WARNINGS If a client crashes, executing showmount on the server will show that the client still has a file system mounted. In other words, the client's entry is not removed from /etc/rmtab until the client reboots and executes: umount -a Also, if a client mounts the same remote directory twice, only one entry appears in /etc/rmtab. Doing a umount of one of these directories removes the single entry and showmount no longer indicates that the remote directory is mounted. AUTHOR showmount was developed by Sun Microsystems, Inc. SEE ALSO hostname(1), exportfs(1M), mountd(1M), exports(4), rmtab(4).
swapinfo
swapinfo Report system paging information.
swapinfo(1M) swapinfo(1M) NAME swapinfo - system paging space information SYNOPSIS /usr/sbin/swapinfo [-mtadfnrMqw] DESCRIPTION swapinfo prints information about device and file system paging space. (Note: the term `swap' refers to an obsolete implementation of virtual memory; HP-UX actually implements virtual memory by way of paging rather than swapping. This command and others retain names derived from `swap' for historical reasons.) By default, swapinfo prints to standard output a two line header as shown here, followed by one line per paging area: Kb Kb Kb PCT START/ Kb TYPE AVAIL USED FREE USED LIMIT RESERVE PRI NAME The fields are: TYPE One of: dev Paging space residing on a mass storage device, either taking up the entire device or, if the device contains a file system, taking up the space between the end of the file system and the end of the device. This space is exclusively reserved for paging, and even if it is not being used for paging, it cannot be used for any other purpose. Device paging areas typically provide the fastest paging. fs Dynamic paging space available from a file system. When this space is needed, the system creates files in the file system and uses them as paging space. File system paging is typically slower than device paging, but allows the space to be used for other things (user files) when not needed for paging. localfs File system paging space (see fs above) on a file system residing on a local disk. network File system paging space (see fs above) on a file system residing on another machine. This file system would have been mounted on the local machine via NFS. reserve reserve Paging space on reserve. This is the amount of paging space that could be needed by processes that are currently running, but that has not yet been allocated from one of the above paging areas. See "Paging Allocation" below. memory Memory paging area (also known as pseudo-swap). This is the amount of system memory that can be used to hold pages in the event that all of the above paging areas are used up. See "Paging Allocation" below. This line appears only if memory paging is enabled. Kb AVAIL The total available space from the paging area, in blocks of 1024 bytes (rounded to nearest whole block if necessary), including any paging space already in use. For file system paging areas the value is not necessarily constant. It is the current space allocated for paging (even if not currently used), plus the free blocks available on the file system to ordinary users, minus RESERVE (but never less than zero). AVAIL is never more than LIMIT if LIMIT is non-zero. Since paging space is allocated in large chunks, AVAIL is rounded down to the nearest full allocation chunk. For the memory paging area this value is also not necessarily constant, because it reflects allocation of memory by the kernel as well as by processes that might need to be paged. Kb USED The current number of 1-Kbyte blocks used for paging in the paging area. For the memory paging area, this count also includes memory used for other purposes and thus unavailable for paging. Kb FREE The amount of space that can be used for future paging. Usually this is the difference between Kb AVAIL and Kb USED. There could be a difference if some portion of a device paging area is unusable, perhaps because the size of the paging area is not a multiple of the allocation chunk size, or because the tunable parameter maxswapchunks is not set high enough. PCT USED The percentage of capacity in use, based on Kb USED divided by Kb AVAIL; 100% if Kb AVAIL is zero. START/LIMIT For device paging areas, START is the block address on the mass storage device of the start of the paging area. The value is normally 0 for devices dedicated to paging, or the end of the file system for devices containing both a file system and paging space. For file system paging areas, LIMIT is the maximum number of 1-Kbyte blocks that will be used for paging, the same as the limit value given to swapon. A file system LIMIT value of none means there is no fixed limit; all space is available except that used for files, less the blocks represented by minfree (see fs(4)) plus RESERVE. RESERVE For device paging areas, this value is always ``-''. For file system paging areas, this value is the number of 1- Kbyte blocks reserved for file system use by ordinary users, the same as the reserve value given to swapon. PRI The same as the priority value given to swapon. This value indicates the order in which space is taken from the devices and file systems used for paging. Space is taken from areas with lower priority values first. priority can have a value between 0 and 10. See "Paging Allocation" below. NAME For device paging areas, the block special file name whose major and minor numbers match the device's ID. The swapinfo command searches the /dev tree to find device names. If no matching block special file is found, swapinfo prints the device ID (major and minor values), for example, 28,0x15000. For file system swap areas, NAME is the name of a directory on the file system in which the paging files are stored. Paging Allocation Paging areas are enabled at boot time (for device paging areas configured into the kernel) or by the swapon command (see swapon(1M)), often invoked by /sbin/init.d/swap_start during system initialization based on the contents of /etc/fstab. When a paging area is enabled, some portion of that area is allocated for paging space. For device paging areas, the entire device is allocated, less any leftover fraction of an allocation chunk. (The size of an allocation chunk is controlled by the tunable parameter swchunk, and is typically 2 MB.) For file system paging areas, the minimum value given to swapon (rounded up to the nearest allocation chunk) is allocated. When a process is created, or requests additional space, space is reserved for it by increasing the space shown on the reserve line above. When paging activity actually occurs, space is used in one of the paging areas (the one with the lowest priority number that has free space available, already allocated), and that space will be shown as used in that area. The sum of the space used in all of the paging areas, plus the amount of space reserved, can never exceed the total amount allocated in all of the paging areas. If a request for more memory occurs which would cause this to happen, the system tries several options: 1. The system tries to increase the total space available by allocating more space in file system paging areas. 2. If all file system paging areas are completely allocated and the request is still not satisfied, the system will try to use memory paging as described on the memory line above. (Memory paging is controlled by the tunable parameter swapmem_on, which defaults to 1 (on). If this parameter is turned off, the memory line will not appear.) 3. If memory paging also cannot satisfy the request, because it is full or turned off, the request is denied. Several implications of this procedure are noteworthy for understanding the output of swapinfo: - Paging space will not be allocated in a file system paging area (except for the minimum specified when the area is first enabled) until all device paging space has been reserved, even if the file system paging area has a lower priority value. - When paging space is allocated to a file system paging area, that space becomes unavailable for user files, even if there is no paging activity to it. - Requests for more paging space will fail when they cannot be satisfied by reserving device, file system, or memory paging, even if some of the reserved paging space is not yet in use. Thus it is possible for requests for more paging space to be denied when some, or even all, of the paging areas show zero usage - space in those areas is completely reserved. - System available memory is shared between the paging subsystem and kernel memory allocators. Thus, the system may show memory paging usage before all available disk paging space is completely reserved or fully allocated. Options swapinfo recognizes the following options: -m Display the AVAIL, USED, FREE, LIMIT, and RESERVE values in Mbytes instead of Kbytes, rounding off to the nearest whole Mbyte (multiples of 1024^2). The output header format changes from Kb to Mb accordingly. -t Add a totals line with a TYPE of total. This line totals only the paging information displayed above it, not all paging areas; this line might be misleading if a subset of -dfrM is specified. -a Show all device paging areas, including those configured into the kernel but currently disabled. (These are normally omitted.) The word disabled appears after the NAME, and the Kb AVAIL, Kb USED, and Kb FREE values are 0. The -a option is ignored unless the -d option is present or is true by default. -d Print information about device paging areas only. This modifies the output header appropriately. -f Print information about file system paging areas only. This modifies the output header appropriately. -n Categorize file system paging area information into localfs areas and network areas, instead of calling them both fs areas. -r Print information about reserved paging space only. -M Print information about memory paging space only. The -d, -f, -n, -r and -M options can be combined. The default is -dfnrM. -q Quiet mode. Print only a total "Kb AVAIL" value (with the -m option, Mb AVAIL); that is, the total paging space available on the system (device, file system, reserve, or memory paging space only if -d, -f, -r, or -M is specified), for possible use by programs that want a quick total. If -q is specified, the -t and -a options are ignored. -w Print a warning about each device paging area that contains wasted space; that is, any device paging area whose allocated size is less than its total size. This option is effective only if -d is also specified or true by default. RETURN VALUE swapinfo returns 0 if it completes successfully (including if any warnings are issued), or 1 if it reports any errors. DIAGNOSTICS swapinfo prints messages to standard error if it has any problems. EXAMPLES List all file system paging areas with a totals line: swapinfo -ft WARNINGS swapinfo needs kernel access for some information. If the user does not have appropriate privileges for kernel access, swapinfo will print a warning and assume that the defaults for that information have not been changed. Users of swapinfo must not rely on the exact field widths and spacing of its output, as these will vary depending on the system, the release of HP-UX, and the data to be displayed. The information in this manual page about paging allocation and other implementation details may change without warning; users should not rely on the accuracy of this information. AUTHOR swapinfo was developed by HP. SEE ALSO swapon(1M), swapon(2), fstab(4), fs(4).
timex
timex Time a command and produce a system activity report.
timex(1) timex(1) NAME timex - time a command; report process data and system activity SYNOPSIS timex [-o] [-p[fhkmrt]] [-s] command DESCRIPTION timex reports in seconds the elapsed time, user time, and system time spent in execution of the given command. Optionally, process accounting data for command and all its children can be listed or summarized, and total system activity during the execution interval can be reported. The output of timex is written on the standard error. Options -o Report the total number of blocks read or written and total characters transferred by command and all its children. -p[fhkmrt] List process accounting records for command and all its children. The suboptions f, h, k, m, r, and t modify the data items reported. They behave as defined in acctcom(1M). The number of blocks read or written and the number of characters transferred are always reported. -s Report total system activity (not just that due to command) that occurred during the execution interval of command. All the data items listed in sar(1) are reported. EXAMPLES A simple example: timex -ops sleep 60 A terminal session of arbitrary complexity can be measured by timing a sub-shell: timex -opskmt sh session commands EOT WARNINGS Process records associated with command are selected from the accounting file /var/adm/pacct by inference, since process genealogy is not available. Background processes having the same user-ID, terminal-ID, and execution time window are spuriously included. SEE ALSO sar(1), acctcom(1M). STANDARDS CONFORMANCE timex: SVID2, SVID3
top
top Provide information about top processes on the system.
top(1) top(1) NAME top - display and update information about the top processes on the system SYNOPSIS top [-s time] [-d count] [-q] [-u] [-n number] DESCRIPTION top displays the top processes on the system and periodically updates the information. Raw CPU percentage is used to rank the processes. Options top recognizes the following command-line options: -s time Set the delay between screen updates to time seconds. The default delay between updates is 5 seconds. -d count Show only count displays, then exit. A display is considered to be one update of the screen. This option is used to select the number of displays to be shown before the program exits. -q This option runs the top program at the same priority as if it is executed via a nice -20 command so that it will execute faster (see nice(1)). This can be very useful in discovering any system problem when the system is very sluggish. This option is accessibly only to users who have appropriate privileges. -u User ID (uid) numbers are displayed instead of usernames. This improves execution speed by eliminating the additional time required to map uid numbers to user names. -n number Show only number processes per screen. Note that this option is ignored if number is greater than the maximum number of processes that can be displayed per screen. Screen-Control Commands When displaying multiple-screen data, top recognizes the following keyboard screen-control commands: j Display next screen if the current screen is not the last screen. k Display previous screen if the current screen is not the first screen. t Display the first (top) screen. Program Termination To exit the program and resume normal user activities, type q at any time. Display Description Three general classes of information are displayed by top: System Data: The first few lines at the top of the display show general information about the state of the system, including: - System name and current time. - Load averages in the last one, five, and fifteen minutes. - Number of existing processes and the number of processes in each state (sleeping, waiting, running, starting, zombie, and stopped). - Percentage of time spent in each of the processor states (user, nice, system, idle, interrupt and swapper) per processor on the system. - Average value for each of the processor states (only on multi-processor systems). Memory Data Includes virtual and real memory in use (with the amount of memory considered "active" in parentheses) and the amount of free memory. Process Data Information about individual processes on the system. When process data cannot fit on a single screen, top divides the data into two or more screens. To view multiple-screen data, use the j, k, and t commands described previously. Note that the system- and memory-data displays are present in each screen of multiple-screen process data. Process data is displayed in a format similar to that used by ps(1): CPU Processor number on which the process is executing (only on multi-processor systems). TTY Terminal interface used by the process. PID Process ID number. USERNAME Name of the owner of the process. When the -u option is specified, the user ID (uid) is displayed instead of USERNAME. PRI Current priority of the process. NI Nice value ranging from -20 to +20. SIZE Total size of the process in kilobytes. This includes text, data, and stack. RES Resident size of the process in kilobytes. The resident size information is, at best, an approximate value. STATE Current state of the process. The various states are sleep, wait, run, idl, zomb, or stop. TIME Number of system and CPU seconds the process has consumed. %WCPU Weighted CPU (central processing unit) percentage. %CPU Raw CPU percentage. This field is used to sort the top processes. COMMAND Name of the command the process is currently running. EXAMPLES top can be executed with or without command-line options. To display five screens of data at two-second intervals then automatically exit, use: top -s2 -d5 AUTHOR top was developed by HP and William LeFebvre of Rice University.
vmstat
vmstat Report process, virtual memory, trap, and CPU activity.
vmstat(1) vmstat(1) NAME vmstat - report virtual memory statistics SYNOPSIS vmstat [-dnS] [interval [count]] vmstat -f | -s | -z DESCRIPTION The vmstat command reports certain statistics kept about process, virtual memory, trap, and CPU activity. It also can clear the accumulators in the kernel sum structure. Options vmstat recognizes the following options: -d Report disk transfer information as a separate section, in the form of transfers per second. -n Provide an output format that is more easily viewed on an 80-column display device. This format separates the default output into two groups: virtual memory information and CPU data. Each group is displayed as a separate line of output. On multiprocessor systems, this display format also provides CPU utilization on a per CPU basis. -S Report the number of processes swapped in and out (si and so) instead of page reclaims and address translation faults (re and at). interval Display successive lines which are summaries over the last interval seconds. If interval is zero, the output is displayed once only. If the -d option is specified, the column headers are repeated. If -d is omitted, the column headers are not repeated. The command vmstat 5 prints what the system is doing every five seconds. This is a good choice of printing interval since this is how often some of the statistics are sampled in the system; others vary every second. count Repeat the summary statistics count times. If count is omitted or zero, the output is repeated until an interrupt or quit signal is received. From the terminal, these are commonly ^C and ^\, respectively (see stty(1)). -f Report on the number of forks and the number of pages of virtual memory involved since boot-up. -s Print the total number of several kinds of paging- related events from the kernel sum structure that have occurred since boot-up or since vmstat was last executed with the -z option. -z Clear all accumulators in the kernel sum structure. This requires write file access permission on /dev/kmem. This is normally restricted to users with appropriate privileges. If none of these options is given, vmstat displays a one-line summary of the virtual memory activity since boot-up or since the -z option was last executed. Column Descriptions The column headings and the meaning of each column are: procs Information about numbers of processes in various states. r In run queue b Blocked for resources (I/O, paging, etc.) w Runnable or short sleeper (< 20 secs) but swapped memory Information about the usage of virtual and real memory. Virtual pages are considered active if they belong to processes that are running or have run in the last 20 seconds. avm Active virtual pages free Size of the free list page Information about page faults and paging activity. These are averaged each five seconds, and given in units per second. re Page reclaims (without -S) at Address translation faults (without -S) si Processes swapped in (with -S) so Processes swapped out (with -S) pi Pages paged in po Pages paged out fr Pages freed per second de Anticipated short term memory shortfall sr Pages scanned by clock algorithm, per second faults Trap/interrupt rate averages per second over last 5 seconds. in Device interrupts per second (nonclock) sy System calls per second cs CPU context switch rate (switches/sec) cpu Breakdown of percentage usage of CPU time us User time for normal and low priority processes sy System time id CPU idle EXAMPLES The following examples show the output for various command options. For formatting purposes, some leading blanks have been deleted. 1. Display the default output. vmstat procs memory page faults cpu r b w avm free re at pi po fr de sr in sy cs us sy id 0 0 0 1158 511 0 0 0 0 0 0 0 111 18 7 0 0 100 2. Add the disk tranfer information to the default output. vmstat -d procs memory page faults cpu r b w avm free re at pi po fr de sr in sy cs us sy id 0 0 0 1158 511 0 0 0 0 0 0 0 111 18 7 0 0 100 Disk Transfers device xfer/sec c0t6d0 0 c0t1d0 0 c0t3d0 0 c0t5d0 0 3. Display the default output in 80-column format. vmstat -n VM memory page faults avm free re at pi po fr de sr in sy cs 1158 430 0 0 0 0 0 0 0 111 18 7 CPU cpu procs us sy id r b w 0 0 100 0 0 0 4. Replace the page reclaims and address translation faults with process swapping in the default output. vmstat -S procs memory page faults cpu r b w avm free si so pi po fr de sr in sy cs us sy id 0 0 0 1158 430 0 0 0 0 0 0 0 111 18 7 0 0 100 5. Display the default output twice at five-second intervals. Note that the headers are not repeated. vmstat 5 2 procs memory page faults cpu r b w avm free re at pi po fr de sr in sy cs us sy id 0 0 0 1158 456 0 0 0 0 0 0 0 111 18 7 0 0 100 0 0 0 1221 436 5 0 5 0 0 0 0 108 65 18 0 1 99 6. Display the default output twice in 80-column format at five- second intervals. Note that the headers are not repeated. vmstat -n 5 2 VM memory page faults avm free re at pi po fr de sr in sy cs 1221 436 0 0 0 0 0 0 0 111 18 7 CPU cpu procs us sy id r b w 0 0 100 0 0 0 1221 435 2 0 2 0 0 0 0 109 35 17 0 1 99 0 0 0 7. Display the default output and disk transfers twice in 80-column format at five-second intervals. Note that the headers are repeated. vmstat -dn 5 2 VM memory page faults avm free re at pi po fr de sr in sy cs 1221 435 0 0 0 0 0 0 0 111 18 7 CPU cpu procs us sy id r b w 0 0 100 0 0 0 Disk Transfers device xfer/sec c0t6d0 0 c0t1d0 0 c0t3d0 0 c0t5d0 0 VM memory page faults avm free re at pi po fr de sr in sy cs 1219 425 0 0 0 0 0 0 0 111 54 15 CPU cpu procs us sy id r b w 1 8 92 0 0 0 Disk Transfers device xfer/sec c0t6d0 0 c0t1d0 0 c0t3d0 0 c0t5d0 0 8. Display the number of forks and pages of virtual memory since boot-up. vmstat -f 24558 forks, 1471595 pages, average= 59.92 9. Display the counts of paging-related events. vmstat -s 0 swap ins 0 swap outs 0 pages swapped in 0 pages swapped out 1344563 total address trans. faults taken 542093 page ins 2185 page outs 602573 pages paged in 4346 pages paged out 482343 reclaims from free list 504621 total page reclaims 124 intransit blocking page faults 1460755 zero fill pages created 404137 zero fill page faults 366022 executable fill pages created 71578 executable fill page faults 0 swap text pages found in free list 162043 inode text pages found in free list 196 revolutions of the clock hand 45732 pages scanned for page out 4859 pages freed by the clock daemon 36680636 cpu context switches 1497746186 device interrupts 1835626 traps 87434493 system calls WARNINGS Users of vmstat must not rely on the exact field widths and spacing of its output, as these will vary depending on the system, the release of HP-UX, and the data to be displayed. AUTHOR vmstat was developed by the University of California, Berkeley and HP. FILES /dev/kmem SEE ALSO iostat(1).
| CONTENTS |
EAN: 2147483647
Pages: 34