Chapter 13. Introduction to System Administration
| CONTENTS |
- System Administration
- Check Processes with ps
- Killing a Process
- Signals
- System Startup and Shutdown Scripts
- An Alternative Startup and Shutdown Method
- System Shutdown
- Users and Groups
- Disk-Related Concepts
- Viewing Mounted Filesystems and Swap
- Determining Disk Usage
- System Backup
- Scheduling Cron Jobs
- Networking
- syslog and Log Files
- dmesg
- The Kernel
- Device Files
- Software Management
- Printing
- Manual Pages of Some Commands Used in Chapter 13
System Administration
We have been dancing around system administration throughout this book. We have touched on a lot of system administration, such as listing and killing processes in the shell programming chapter, viewing available disk space, and so on. In this chapter, we'll look at many unintrusive system administration commands. By unintrusive, I mean commands that do not alter the setup of your system and commands that a user may typically run.
Your system adminsitrator is responsible for the setup and operation of your system; however, there are many aspects of system setup in which users may be interested. We'll cover many of the most commonly used commands related to system setup and how your system is running. As a user, you may be interested in the way in which your system operates and administration-related commands. In addition, there are some commands directly related to the work you are performing, such as listing the processes you are running and how to kill them, that you can run as a user.
At the end of the chapter, I also provide manual pages for many of the commands used in this chapter. Much of what takes place in system administration can only be covered at a cursory level in a user book, and the manual pages provide additional detail but still won't make you a system administration expert.
The examples in this chapter were performed on Solaris, HP-UX, AIX, and Linux systems; however, the commands and files are similar from one system to another, so you should be able to relate the information in this chapter to your UNIX variant.
Most UNIX variants come with a system adminsitration tool. This tool provides a menu-driven way of performing common system administration tasks such as managing the following: users and groups; disks and file systems; networking; printers; and so on. There is no widely used standard for such management tools, so they are different for each UNIX variant. These tools usually require superuser access to run, because the user has control over the most important and critical aspects of the system. Some of these tools allow users other than superuser to perform a subset of tasks as defined by superuser. I do not cover system administration tools, because they are peculiar to the UNIX variant on which they run and are used mostly by the system administrator. I'll cover many of the files used by system administrators and some of the more commonly used unintrusive commands. Some of the following sections also appear in other chapters.
Check Processes with ps

To find the answer to "What is my system doing?" use ps -ef. This command provides information about every running process on your system. If, for instance, you want to know whether NFS is running, you simply type ps -ef and look for NFS daemons. Although ps tells you every process that is running on your system, it doesn't provide a good summary of the level of system resources being consumed. I would guess that ps is the most often issued system administration command. There are a number of options you can use with ps. I normally use e and f, which provide information about every ("e") running process and list this information in full ("f"). ps outputs are almost identical going from system to system. The following three examples are from a Solaris, AIX, and HP-UX system, respectively:
Solaris example:
martyp $ ps -ef UID PID PPID C STIME TTY TIME CMD root 0 0 0 Feb 18 ? 0:01 sched root 1 0 0 Feb 18 ? 1:30 /etc/init - root 2 0 0 Feb 18 ? 0:02 pageout root 3 0 1 Feb 18 ? 613:44 fsflush root 3065 3059 0 Feb 22 ? 5:10 /usr/dt/bin/sdtperfmeter -f -H -r root 88 1 0 Feb 18 ? 0:01 /usr/sbin/in.routed -q root 478 1 0 Feb 18 ? 0:00 /usr/lib/saf/sac -t 300 root 94 1 0 Feb 18 ? 2:50 /usr/sbin/rpcbind root 150 1 0 Feb 18 ? 6:03 /usr/sbin/syslogd root 96 1 0 Feb 18 ? 0:00 /usr/sbin/keyserv root 144 1 0 Feb 18 ? 50:37 /usr/lib/autofs/automountd root 1010 1 0 Apr 12 ? 0:00 /opt/perf/bin/midaemon root 106 1 0 Feb 18 ? 0:02 /usr/lib/netsvc/yp/ypbind -broadt root 156 1 0 Feb 18 ? 0:03 /usr/sbin/cron root 176 1 0 Feb 18 ? 0:00 /usr/lib/lpsched root 129 1 0 Feb 18 ? 0:00 /usr/lib/nfs/lockd daemon 130 1 0 Feb 18 ? 0:01 /usr/lib/nfs/statd root 14798 1 0 Mar 09 ? 31:10 /usr/sbin/nscd root 133 1 0 Feb 18 ? 0:10 /usr/sbin/inetd -s root 197 1 0 Feb 18 ? 0:00 /usr/lib/power/powerd root 196 1 0 Feb 18 ? 0:35 /etc/opt/licenses/lmgrd.ste -c /d root 213 1 0 Feb 18 ? 4903:09 /usr/sbin/vold root 199 196 0 Feb 18 ? 0:03 suntechd -T 4 -c /etc/optd root 219 1 0 Feb 18 ? 0:08 /usr/lib/sendmail -bd -q15m root 209 1 0 Feb 18 ? 0:05 /usr/lib/utmpd root 2935 266 0 Feb 22 ? 48:08 /usr/openwin/bin/Xsun :0 -nobanna root 16795 16763 1 07:51:34 pts/4 0:00 ps -ef root 2963 2954 0 Feb 22 ? 0:17 /usr/openwin/bin/fbconsole root 479 1 0 Feb 18 console 0:00 /usr/lib/saf/ttymon -g -h -p sunc root 10976 1 0 Jun 01 ? 0:00 /opt/perf/bin/ttd root 7468 1 0 Feb 24 ? 0:13 /opt/perf/bin/pvalarmd root 266 1 0 Feb 18 ? 0:01 /usr/dt/bin/dtlogin -daemon martyp 16763 16761 0 07:46:46 pts/4 0:01 -ksh root 10995 1 0 Jun 01 ? 0:01 /opt/perf/bin/perflbd root 484 478 0 Feb 18 ? 0:00 /usr/lib/saf/ttymon root 458 1 0 Feb 18 ? 20:06 /usr/lib/snmp/snmpdx -y -c /etc/f root 16792 3059 0 07:50:37 ? 0:00 /usr/dt/bin/dtscreen -mode blank root 471 1 0 Feb 18 ? 0:07 /usr/lib/dmi/dmispd root 474 1 0 Feb 18 ? 0:00 /usr/lib/dmi/snmpXdmid -s root 485 458 0 Feb 18 ? 739:44 mibiisa -r -p 32874 root 2954 2936 0 Feb 22 ? 0:01 /bin/ksh /usr/dt/bin/Xsession root 2936 266 0 Feb 22 ? 0:00 /usr/dt/bin/dtlogin -daemon root 3061 3059 0 Feb 22 ? 1:32 dtwm root 3058 1 0 Feb 22 pts/2 0:01 /usr/dt/bin/ttsession root 712 133 0 Feb 18 ? 0:01 rpc.ttdbserverd root 11001 11000 0 0:01 <defunct> root 2938 1 0 Feb 22 ? 0:00 /usr/openwin/bin/fbconsole -d :0 root 2999 2954 0 Feb 22 pts/2 0:16 /usr/dt/bin/sdt_shell -c unt root 3059 3002 0 Feb 22 pts/2 283:35 /usr/dt/bin/dtsession root 3063 3059 0 Feb 22 ? 0:03 /usr/dt/bin/dthelpview -helpVolur root 3099 3062 0 Feb 22 ? 0:13 /usr/dt/bin/dtfile -geometry +700 root 11000 10995 0 Jun 01 ? 0:02 /opt/perf/bin/agdbserver -t alar/ root 3002 2999 0 Feb 22 pts/2 0:01 -ksh -c unset DT; DISPLg root 730 133 0 Feb 18 ? 1:37 rpc.rstatd root 3062 3059 0 Feb 22 ? 2:17 /usr/dt/bin/dtfile -geometry +700 root 3067 1 0 Feb 22 ? 0:00 /bin/ksh /usr/dt/bin/sdtvolcheckm root 3000 1 0 Feb 22 ? 0:00 /usr/dt/bin/dsdm root 3078 3067 0 Feb 22 ? 0:00 /bin/cat /tmp/.removable/notify0 root 10984 1 0 Jun 01 ? 12:42 /opt/perf/dce/bin/dced -b root 16761 133 0 07:46:45 ? 0:00 in.telnetd martyp $ AIX example:
martyp $ ps -ef UID PID PPID C STIME TTY TIME CMD root 1 0 0 Feb 24 - 5:07 /etc/init root 2208 15520 0 Feb 24 - 8:21 dtwm root 2664 1 0 Feb 24 - 0:00 /usr/dt/bin/dtlogin -daemon root 2882 1 0 Feb 24 - 158:41 /usr/sbin/syncd 60 root 3376 2664 5 Feb 24 - 3598:41 /usr/lpp/X11/bin/X -D /usr/lib/ root 3624 2664 0 Feb 24 - 0:00 dtlogin <:0> -daemon root 3950 1 6 Feb 24 - 5550:30 /usr/lpp/perf/bin/llbd root 4144 1 0 Feb 24 - 0:00 /usr/lpp/perf/bin/midaemon root 4490 1 0 Feb 24 - 0:48 /usr/lpp/perf/bin/perflbd root 4906 1 0 Feb 24 - 0:00 /usr/lib/errdemon root 5172 1 0 Feb 24 - 0:00 /usr/sbin/srcmstr root 5724 5172 0 Feb 24 - 9:54 /usr/sbin/syslogd root 6242 5172 0 Feb 24 - 0:00 /usr/sbin/biod 6 root 6450 5172 0 Feb 24 - 0:02 sendmail: accepting connections root 6710 5172 0 Feb 24 - 7:34 /usr/sbin/portmap root 6966 5172 0 Feb 24 - 0:23 /usr/sbin/inetd root 7224 5172 0 Feb 24 - 1:09 /usr/sbin/timed -S root 7482 5172 0 Feb 24 - 11:55 /usr/sbin/snmpd root 8000 1 0 Feb 24 - 9:17 ovspmd root 8516 8782 0 Feb 24 - 0:00 netfmt -CF root 8782 1 0 Feb 24 - 0:00 /usr/OV/bin/ntl_reader 0 1 1 1 root 9036 8000 0 Feb 24 - 10:09 ovwdb -O -n5000 root 9288 8000 0 Feb 24 - 0:44 pmd -Au -At -Mu -Mt -m root 9546 8000 0 Feb 24 - 20:05 trapgend -f root 9804 8000 0 Feb 24 - 0:28 trapd root 10062 8000 0 Feb 24 - 0:47 orsd root 10320 8000 0 Feb 24 - 0:33 ovesmd root 10578 8000 0 Feb 24 - 0:30 ovelmd root 10836 8000 0 Feb 24 - 13:12 ovtopmd -O root 11094 8000 0 Feb 24 - 17:50 netmon -P root 11352 8000 0 Feb 24 - 0:02 snmpCollect root 11954 1 0 Feb 24 - 1:22 /usr/sbin/cron root 12140 5172 0 Feb 24 - 0:01 /usr/lib/netsvc/yp/ypbind root 12394 5172 0 Feb 24 - 1:39 /usr/sbin/rpc.mountd root 12652 5172 0 Feb 24 - 0:29 /usr/sbin/nfsd 8 root 12908 5172 0 Feb 24 - 0:00 /usr/sbin/rpc.statd root 13166 5172 0 Feb 24 - 0:29 /usr/sbin/rpc.lockd root 13428 1 0 Feb 24 - 0:00 /usr/sbin/uprintfd root 14190 5172 0 Feb 24 - 72:59 /usr/sbin/automountd root 14452 5172 0 Feb 24 - 0:17 /usr/sbin/qdaemon root 14714 5172 0 Feb 24 - 0:00 /usr/sbin/writesrv root 14992 1 0 Feb 24 - 252:26 /usr/lpp/perf/bin/scopeux root 15520 3624 1 Feb 24 - 15:29 /usr/dt/bin/dtsession root 15742 1 0 Feb 24 - 0:00 /usr/lpp/diagnostics/bin/diagd root 15998 1 0 Feb 24 lft0 0:00 /usr/sbin/getty /dev/console root 16304 18892 0 Feb 24 pts/0 0:00 /bin/ksh root 16774 1 0 Feb 24 - 0:00 /usr/lpp/perf/bin/ttd root 17092 4490 0 Feb 24 - 68:54 /usr/lpp/perf/bin/rep_server -t root 17370 19186 3 0:00 <defunct> root 17630 15520 0 Mar 25 - 0:00 /usr/dt/bin/dtexec -open 0 -ttp root 17898 15520 0 Mar 20 - 0:00 /usr/dt/bin/dtexec -open 0 -ttp root 18118 19888 0 Feb 24 pts/1 0:00 /bin/ksh root 18366 6966 0 Feb 24 - 0:00 rpc.ttdbserver 100083 1 root 18446 15520 0 Mar 15 - 0:00 /usr/dt/bin/dtexec -open 0 -ttp root 18892 15520 0 Feb 24 - 3:46 /usr/dt/bin/dtterm root 19186 16304 0 Feb 24 pts/0 0:01 /usr/lpp/X11/bin/msmit root 19450 1 0 Feb 24 - 26:53 /usr/dt/bin/ttsession -s root 19684 2208 0 Feb 24 - 0:00 /usr/dt/bin/dtexec -open 0 -ttp root 19888 19684 0 Feb 24 - 0:00 /usr/dt/bin/dtterm root 20104 15520 0 Feb 27 - 0:00 /usr/dt/bin/dtexec -open 0 -ttp root 20248 20104 0 Feb 27 - 0:03 /usr/dt/bin/dtscreen root 20542 29708 0 May 14 - 0:03 /usr/dt/bin/dtscreen root 20912 26306 0 Apr 05 - 0:03 /usr/dt/bin/dtscreen root 33558 1 0 May 18 - 3:28 /usr/atria/etc/lockmgr -a /var/ root 33834 6966 3 07:55:49 - 0:00 telnetd root 34072 1 0 May 18 - 0:00 /usr/atria/etc/albd_server martyp 36296 36608 13 07:56:07 pts/2 0:00 ps -ef martyp 36608 33834 1 07:55:50 pts/2 0:00 -ksh root 37220 15520 0 May 28 - 0:00 /usr/dt/bin/dtexec -open 0 -ttp martyp $ HP-UX example (partial listing):
# ps -ef UID PID PPID C STIME TTY TIME COMMAND root 0 0 0 Mar 9 ? 107:28 swapper root 1 0 0 Mar 9 ? 2:27 init root 2 0 0 Mar 9 ? 14:13 vhand root 3 0 0 Mar 9 ? 114:55 statdaemon root 4 0 0 Mar 9 ? 5:57 unhashdaemon root 7 0 0 Mar 9 ? 154:33 ttisr root 70 0 0 Mar 9 ? 0:01 lvmkd root 71 0 0 Mar 9 ? 0:01 lvmkd root 72 0 0 Mar 9 ? 0:01 lvmkd root 13 0 0 Mar 9 ? 9:54 vx_sched_thread root 14 0 0 Mar 9 ? 1:54 vx_iflush_thread root 15 0 0 Mar 9 ? 2:06 vx_ifree_thread root 16 0 0 Mar 9 ? 2:27 vx_inactive_cache_thread root 17 0 0 Mar 9 ? 0:40 vx_delxwri_thread root 18 0 0 Mar 9 ? 0:33 vx_logflush_thread root 19 0 0 Mar 9 ? 0:07 vx_attrsync_thread . . . root 69 0 0 Mar 9 ? 0:09 vx_inactive_thread root 73 0 0 Mar 9 ? 0:01 lvmkd root 74 0 19 Mar 9 ? 3605:29 netisr root 75 0 0 Mar 9 ? 0:18 netisr root 76 0 0 Mar 9 ? 0:17 netisr root 77 0 0 Mar 9 ? 0:14 netisr root 78 0 0 Mar 9 ? 0:48 nvsisr root 79 0 0 Mar 9 ? 0:00 supsched root 80 0 0 Mar 9 ? 0:00 smpsched root 81 0 0 Mar 9 ? 0:00 smpsched root 82 0 0 Mar 9 ? 0:00 sblksched root 83 0 0 Mar 9 ? 0:00 sblksched root 84 0 0 Mar 9 ? 0:00 strmem root 85 0 0 Mar 9 ? 0:00 strweld root 3730 1 0 16:39:22 console 0:00 /usr/sbin/getty console console root 404 1 0 Mar 9 ? 3:57 /usr/sbin/swagentd oracle 919 1 0 15:23:23 ? 0:00 oraclegprd (LOCAL=NO) root 289 1 2 Mar 9 ? 78:34 /usr/sbin/syncer root 426 1 0 Mar 9 ? 0:10 /usr/sbin/syslogd -D root 576 1 0 Mar 9 ? 0:00 /usr/sbin/portmap root 429 1 0 Mar 9 ? 0:00 /usr/sbin/ptydaemon root 590 1 0 Mar 9 ? 0:00 /usr/sbin/biod 4 root 442 1 0 Mar 9 ? 0:00 /usr/lbin/nktl_daemon 0 0 0 0 0 1 -2 oracle 8145 1 0 12:02:48 ? 0:00 oraclegprd (LOCAL=NO) root 591 1 0 Mar 9 ? 0:00 /usr/sbin/biod 4 root 589 1 0 Mar 9 ? 0:00 /usr/sbin/biod 4 root 592 1 0 Mar 9 ? 0:00 /usr/sbin/biod 4 root 604 1 0 Mar 9 ? 0:00 /usr/sbin/rpc.lockd root 598 1 0 Mar 9 ? 0:00 /usr/sbin/rpc.statd root 610 1 0 Mar 9 ? 0:16 /usr/sbin/automount -f /etc/auto_master root 638 1 0 Mar 9 ? 0:06 sendmail: accepting connections root 618 1 0 Mar 9 ? 0:02 /usr/sbin/inetd root 645 1 0 Mar 9 ? 5:01 /usr/sbin/snmpdm root 661 1 0 Mar 9 ? 11:28 /usr/sbin/fddisubagtd root 711 1 0 Mar 9 ? 30:59 /opt/dce/sbin/rpcd root 720 1 0 Mar 9 ? 0:00 /usr/sbin/vtdaemon root 867 777 1 Mar 9 ? 0:00 <defunct> lp 733 1 0 Mar 9 ? 0:00 /usr/sbin/lpsched root 777 1 0 Mar 9 ? 8:55 DIAGMON root 742 1 0 Mar 9 ? 0:15 /usr/sbin/cron oracle 7880 1 0 11:43:47 ? 0:00 oraclegprd (LOCAL=NO) root 842 1 0 Mar 9 ? 0:00 /usr/vue/bin/vuelogin oracle 5625 1 0 07:00:14 ? 0:01 ora_smon_gprd root 781 1 0 Mar 9 ? 0:00 /usr/sbin/envd root 833 777 0 Mar 9 ? 0:00 DEMLOG DEMLOG;DEMLOG;0;0; root 813 1 0 Mar 9 ? 0:00 /usr/sbin/nfsd 4 root 807 1 0 Mar 9 ? 0:00 /usr/sbin/rpc.mountd root 815 813 0 Mar 9 ? 0:00 /usr/sbin/nfsd 4 root 817 813 0 Mar 9 ? 0:00 /usr/sbin/nfsd 4 root 835 777 0 Mar 9 ? 0:13 PSMON PSMON;PSMON;0;0; Here is a brief description of the headings:
| UID | The user ID of the process owner. |
| PID | The process ID (you can use this number to kill the process). |
| PPID | The process ID of the parent process. |
| C | Process utilization for scheduling. |
| STIME | Start time of the process. |
| TTY | The controlling terminal for the process, if any. |
| TIME | The cumulative execution time for the process. |
| COMMAND | The command name and arguments. |
ps gives a quick profile of the processes running on your system. To get more detailed information, you can include the "l" option, which includes a lot of useful additional information, as shown in the following example:
martyp $ ps -efl F S UID PID PPID C PRI NI ADDR SZ WCHAN STIME TTY D 19 T root 0 0 0 0 SY f026f7f0 0 Feb 18 ? d 8 S root 1 0 0 41 20 f5b90808 175 f5b90a30 Feb 18 ? - 19 S root 2 0 0 0 SY f5b90108 0 f0283fd0 Feb 18 ? t 19 S root 3 0 0 0 SY f5b8fa08 0 f0287a44 Feb 18 ? 6h 8 S root 3065 3059 0 40 20 f626d040 1639 f62aab96 Feb 22 ? c 8 S root 88 1 0 40 20 f5b8d708 377 f5b59df6 Feb 18 ? q 8 S root 478 1 0 41 20 f5b8ec08 388 f5b51bb8 Feb 18 ? 0 8 S root 94 1 0 41 20 f5b8d008 527 f5b59e46 Feb 18 ? d 8 S root 150 1 0 41 20 f5da1a10 808 f5b59806 Feb 18 ? d 8 S root 96 1 0 67 20 f5da2810 535 f5b59ad6 Feb 18 ? v 8 S root 144 1 0 41 20 f5da0c10 2694 ef69f61c Feb 18 ? 5d 8 S root 1010 1 0 0 RT f61da330 496 f5dbec1c Apr 12 ? n 8 S root 106 1 0 41 20 f5da1310 485 f5b59e96 Feb 18 ? s 8 S root 156 1 0 51 20 f5b8de08 446 f5b51eb8 Feb 18 ? n 8 S root 176 1 0 53 20 f5da2110 740 f5b59036 Feb 18 ? d 8 S root 129 1 0 56 20 f5d9fe10 447 f5b59cb6 Feb 18 ? d 8 S daemon 130 1 0 41 20 f5d9f710 564 f5b59b76 Feb 18 ? d 8 S root 14798 1 0 45 20 f5b8e508 616 f5b8e730 Mar 09 ? 3d 8 S root 133 1 0 51 20 f5e18818 507 f5b59c66 Feb 18 ? s 8 S root 197 1 0 63 20 f5e15e18 284 f5e16040 Feb 18 ? d 8 S root 196 1 0 41 20 f5da0510 429 f5c68f8e Feb 18 ? c 8 S root 213 1 0 41 20 f5e16518 586 f5c68b2e Feb 18 ? 4d 8 S root 199 196 0 41 20 f5e16c18 451 f5b59f86 Feb 18 ? i 8 S root 219 1 0 41 20 f5e17318 658 f5b59d06 Feb 18 ? m 8 S root 209 1 0 41 20 f5e18118 234 f5c68e4e Feb 18 ? d 8 S root 2935 266 0 40 20 f61db130 2473 f62aaa56 Feb 22 ? 4 8 S root 16800 3059 1 81 30 f626f340 1466 f61b345e 07:59:40 ? k 8 S root 2963 2954 0 40 20 f5f52028 513 f61b313e Feb 22 ? e 8 S root 479 1 0 55 20 f5ee7120 407 f5fde2c6 Feb 18 console g 8 S root 10976 1 0 65 20 f5f55828 478 f5c6853e Jun 01 ? d 8 S root 7468 1 0 46 20 f621da38 2851 8306c Feb 24 ? d 8 S root 266 1 0 41 20 f5ee5520 1601 f5c6858e Feb 18 ? n 8 S martyp 16763 16761 0 51 20 f6270140 429 f62701ac 07:46:46 pts/4 h 8 S root 10995 1 0 41 20 f5b8f308 2350 f5fde5e6 Jun 01 ? d 8 S root 484 478 0 41 20 f5ee4e20 408 f5ee5048 Feb 18 ? n 8 S root 458 1 0 41 20 f5f54a28 504 f5fde906 Feb 18 ? 2m 8 O root 16802 16763 1 61 20 f5ee7820 220 08:00:05 pts/4 l 8 S root 471 1 0 41 20 f5f53c28 658 f5fde726 Feb 18 ? d 8 S root 474 1 0 51 20 f5f53528 804 f61a58b6 Feb 18 ? g 8 S root 485 458 0 40 20 f5f52e28 734 f607ecde Feb 18 ? 74 8 S root 2954 2936 0 40 20 f626e540 433 f626e5ac Feb 22 ? n 8 S root 2936 266 0 66 20 f5ee4720 1637 f5ee478c Feb 22 ? n 8 S root 3061 3059 0 40 20 f5e17a18 2041 f61b359e Feb 22 ? m 8 S root 3058 1 0 40 20 f61daa30 1067 f62aadc6 Feb 22 pts/2 n 8 S root 712 133 0 41 20 f61d8e30 798 f61b390e Feb 18 ? d 8 Z root 11001 11000 0 0 > 8 S root 2938 1 0 60 20 f5ee6320 513 f601bfb6 Feb 22 ? 0 8 S root 2999 2954 0 40 20 f621e138 1450 f61b33be Feb 22 pts/2 t 8 S root 3059 3002 1 51 20 f626de40 4010 f62aafa6 Feb 22 pts/2 2n 8 S root 3063 3059 0 50 20 f621e838 1952 f62aa556 Feb 22 ? 8 S root 3099 3062 0 40 20 f5f52728 2275 f60a1d18 Feb 22 ? 0 8 S root 11000 10995 0 48 20 f626d740 2312 55694 Jun 01 ? e 8 S root 3002 2999 0 43 20 f61d8730 427 f61d879c Feb 22 pts/2 = 8 S root 730 133 0 40 20 f61d9530 422 f62aa9b6 Feb 18 ? d 8 S root 3062 3059 0 61 20 f621b738 2275 f62aa506 Feb 22 ? 0 8 S root 3067 1 0 40 20 f5ee5c20 424 f5ee5c8c Feb 22 ? d 8 S root 3000 1 0 40 20 f61d8030 518 f62aa8c6 Feb 22 ? m 8 S root 3078 3067 0 40 20 f61d9c30 211 f5b512b8 Feb 22 ? 0 8 S root 10984 1 0 41 20 f5f54328 2484 eee46e84 Jun 01 ? 1b 8 S root 16761 133 0 44 20 f5ee4020 411 f5c6894e 07:46:45 ? d martyp $ In this example, the first column is F for flags. F provides octal information about whether the process is swapped, in core, a system process, and so on. The octal value sometimes varies from system to system, so check the manual pages for your system to see the octal value of the flags.
S is for state. The state can be sleeping, as indicated by S for most of the processes shown in the example, waiting, running, intermediate, terminated, and so on. Again, some of these values may vary from system to system, so check your manual pages.
Some additional useful information in this output is: NI for the nice value; ADDR for the memory address of the process; SZ for the size in physical pages of the process; and WCHAN, which is the event for which the process is waiting.
Killing a Process

If you issue the ps command and find that one of your processes is hung or if you start a large job that you wish to stop, you can do so with the kill command. kill is a utility that sends a signal to the process you identify. You can kill any process that you own. In addition, superuser can kill almost any process on the system.
To kill a process that you own, simply issue the kill command and the Process ID (PID). The following example shows issuing the ps command to find allprocesses ownedbymartyp, killing a process, and checking to see that it has disappeared:
martyp $ ps -ef | grep martyp martyp 19336 19334 0 05:24:32 pts/4 0:01 -ksh martyp 19426 19336 0 06:01:01 pts/4 0:00 grep martyp martyp 19424 19336 5 06:00:48 pts/4 0:01 find / -name .login martyp $ kill 19424 martyp $ ps -ef | grep martyp martyp 19336 19334 0 05:24:32 pts/4 0:01 -ksh martyp 19428 19336 1 06:01:17 pts/4 0:00 grep martyp [1] + Terminated find / -name .login & martyp $
The example shows killing process 19424, which is owned by martyp. We confirm that the process has indeed been killed by reissuing the ps command.
You can kill several processes on the command line by issuing kill followed by a space-separated list of all of the process numbers you wish to kill.
Take special care when killing processes, if you are logged in as superuser. You may adversely affect the way the system runs and have to manually restart processes or reboot the system.
Signals
When you issue the kill command and process number, you are also sending a signal associated with the kill. We did not specify a signal in our kill example; however, the default signal of 15, or SIGTERM, was used. These signals are used by the system to communicate with processes. The signal of 15 which we used to terminate our process is a software termination signal that is usually enough to terminate a user process such as the find we had started. A process that is difficult to kill may require the SIGKILL, or 9signal. This signal causes an immediate termination of the process. I use this only as a last resort because processes killed with SIGKILL do not always terminate smoothly. To kill such processes as the shell, you sometimes have to use SIGKILL.

You can use either the signal name or number. These signal numbers sometimes vary from system to system, so view the manual page for signal, usually in section 5, to see the list of signals on your system. A list of some of the most frequently used signal numbers and corresponding signals follows:
| Signal number | Signal |
| 1 | SIGHUP |
| 2 | SIGINT |
| 3 | SIGQUIT |
| 9 | SIGKILL |
| 15 | SIGTERM |
| 24 | SIGSTOP |
As I had explained earlier earlier in the book, you can view an on-line manual page from a specific section by using the "-s" option with the section number. To view the signal man pagein section5, you would issue the following command:
$ man -s 5 signal Your UNIX variant, such as Linux, may require a capital S for the section number option.
To kill a process with id 234 with SIGKILL, you would issue the following command:
$ kill -9 234 | | | | | |> process id (PID) | |> signal number |> kill command to terminate the process

Using ps and kill as we have covered in these sections works on every UNIX variant. Keep in mind that the signal definitions differ among UNIX variants. There are also two commands that may be supported on your UNIX variant called pgrep and pkill. pgrep finds a process by name or other attributes. We earlier issued ps combined with grep to find processes owned by user martyp. pgrep is kind of a combination of these two commands and will find a process based on the name or other attribute you specify. Similarly, pkill identifies a process by the attribute you specify and kills it.
System Startup and Shutdown Scripts
Startup and shutdown scripts for newer releases of UNIX variants are based on a mechanism that separates the actual startup and shutdown scripts from configuration information. In order to modify the way your system starts or stops, you don't have to modify scripts, a task that in general is considered somewhat risky; you can instead modify configuration variables. The startup and shutdown sequence is based on an industry standard that is similar on most UNIX variants.
As always, however, there are implementation differences ongoing from one UNIX variant to another. What I'll describe here is an implementation that is probably similar to the implementation on your UNIX system.
Startup and shutdown become important if you take on any system administration responsibility. As you load and customize more applications, you will need more startup and shutdown knowledge. What I do in this section is give you an overview of startup and shutdown and the commands you can use to shut down your system.
The following components are in the startup and shutdown model:
| Execution Scripts | |
| Execution scripts read variables from configuration variable scripts and run through the startup or shutdown sequence. These scripts are usually located in /sbin/init.d. (These scripts are found in /etc/init.d on some systems.) | |
| Configuration Variable Scripts | |
| These are the files you would modify to set variables that are used to enable or disable a subsystem or perform some other function at the time of system startup or shutdown. These are located in /etc/rc.config.d. (These files do not exist on some systems.) | |
| Link Files | These files are used to control the order in which scripts execute. These are actually links to execution scripts to be executed when moving from one run level to another. These files are located in the directory for the appropriate run level, such as /sbin/rc0.d for run level 0, /sbin/rc1.d for run level 1, and so on. The files in this directory that begin with an "S" are startup scripts, and those that end in a "K" are shutdown scripts. (These links are found in /etc instead of / sbin on some systems.) |
| Sequencer Script | |
| This script invokes execution scripts based on run-level transition. This script is usually /sbin/rc. |
Figure 13-1 shows a commonly used directory structure for startup and shutdown scripts.
Figure 13-1. Typical Organization of Startup and Shutdown Files
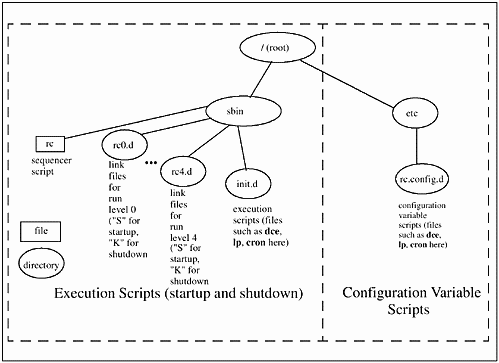
Execution scripts perform startup and shutdown tasks. /sbin/rc invokes the execution script, with the appropriate start or stop arguments, and you can view the appropriate start or stop messages on the console. The messages you see will have one of the three following values:
| OK | This indicates that the execution script started or shut down properly. |
| FAIL | A problem occurred at startup or shutdown. |
| N/A | The script was not configured to start. |
In order to start up a subsystem, you would simply edit the appropriate configuration file in /etc/rc.config.d. An example showing /etc/rc.config.d/audio is shown with the AUDIO_SERVER variable set to 1.
# *********** File: /etc/rc.config.d/audio ************** # Audio server configuration. See audio(5) # # AUDIO_SER: Set to 1 to start audio server daemon # AUDIO_SERVER=1
This example results in the following message being shown at the time the system boots:
Start audio server daemon .........................[ OK ]
and this message at the time the system is shut down:
Stopping audio server daemon ........................OK
I have mentioned run levels several times in this discussion. Both the startup and shutdown scripts described here, as well as the /etc/ inittab file, depend on run levels. Run levels are different among UNIX variants. I have never seen all the same run-level definitions for different UNIX variants. In general, the lower run levels are used for lower-level functionality, and you initiate more advanced capabilities as the run levels increase. This generalization is not always true, so you want to check for the UNIX variant you are using. The following is a list of run levels and how they are used:
| 0 | Halted run level. |
| s, S | Run level s, also known as single-user mode, is used to ensure that no one else is on the system so that you can proceed with system administration tasks. |
| 0 | PROM monitor level on some systems. |
| 1 | Run level 1 starts various basic processes for single-user mode. |
| 2 | Run level 2 allows users to access the system. This is also known as multi-user mode. |
| 3 | Run level 3 is for exporting NFS file systems and sharing other resources on many UNIX variants. |
| 4 | Run level 4 starts the graphical manager, including Common Desktop Environment (HP CDE), on some UNIX variants and is not used on other UNIX variants. |
| 5 | Not used on some UNIX variants and instead used for "HALT" state on other UNIX variants. |
| 6 | Not used on some UNIX variants and is used to reboot to run level 3 on some UNIX variants. |
You can see that run levels differ greatly among UNIX variants, so you'll want to check the run levels and their associated functions for you UNIX variant.
/etc/inittab is also used to define a variety of processes that will be run, and is used by /sbin/init. The/sbin/init process ID is 1. It is the first process started on your system and it has no parent. The init process looks at /etc/inittab to determine the run level of the system.
Entries in the /etc/inittab file have the following format:
id:run state:action:process
| id: | The name of the entry. The id is up to four characters long and must be unique in the file. If the line in /etc/inittab is preceded by a "#," the entry is treated as a comment. |
| run state: | Specifies the run level at which the command is executed. More than one run level can be specified. The command is executed for every run level specified. |
| action: | Defines which of 11 actions will be taken with this process. The 11 choices for action are initdefault, sysinit, boot, bootwait, wait, respawn, once, powerfail, powerwait, ondemand, andoff. |
| process: | The shell command to be executed if the run level and/or action field so indicates. |
Here is an example of an /etc/inittab entry:
cons:123456:respawn:/usr/sbin/getty console console
| | | | | | | |> process | | |> action | |> run state |> id
This is in the /etc/inittab file, as opposed to being defined as a startup script, because the console may be killed and have to be restarted whenever it dies, even if no change has occurred in the run level. respawn starts a process if it does not exist and restarts the process after it dies. This entry shows all run states, because you want the console to be activated at all times.
Another example is one of the first lines from /etc/inittab:
init:3:initdefault:
The default run level of the system is defined as 3. On some UNIX variants, this line will look like the following:
is:3:initdefault:
The only difference between these two examples is the id of the run level. The run level itself and initdefault are the same. initdefault is an action that is used when init is initially invoked.
An Alternative Startup and Shutdown Method
There is another similar startup and shutdown arrangement found on some UNIX variants. I'll first describe the procedure verbally; however, Figure 13-2 depicts it graphically. The /sbin directory contains a file for each run level, such as rcS through rc6. These files contain variables, test conditions, and calls to files that stop and start services. The scripts that are run by rcS through rc6 are under the appropriate run-level directory, such as /etc/rcS.d through /etc/rc6.d. As in the previous description, files in /etc/rcS.d through /etc/rc6.d that start with an S are used to start processes, and files that start with a K are used to stop processes. The directory /etc/init.d contains run-control scripts used by the start and kill scripts located in /etc/rcS.d through /etc/rc6.d. The scripts in /etc/rcS.d through /etc/rc6.d are links to programs in /etc/init.d, meaning that the control scripts in /etc/init.d are used in /etc/rcS.d through /etc/rc6.d by creating links to /etc/ init.d. You have one version of the script in /etc/init.d that is used in many other directories by linking to the script in /etc/init.d. You can use the control files in /etc/init.d to start and stop programs from this directory. To stop the lp service, for instance, you could issue the following command:
Figure 13-2. Another Organization of Startup and Shutdown Files

# /etc/init.d/lp stop The startup files to be run at boot are called from /etc/inittab in this startup arrangement. /etc/inittab defines the default run level called initdefault and the appropriate run files in /sbin.
Figure 13-2 shows the organization of the startup and shutdown files discussed in this section.
The basics of system startup and shutdown described here are important to understand. You may be starting up and shutting down your system and possibly even modifying some of the files described here. Please take a close look at the startup and shutdown files before you begin to modify these. These files and procedures differ enough among UNIX variants to make this process dangerous if you are not careful.
Now let's take a look at the command you can issue to shut down your system.
System Shutdown
What does it mean to shut down the system? Well, in its simplest form, a shutdown of the system simply means issuing the shutdown command. The shutdown command is used to terminate all processing. It has many options, including the following:

| -r | Automatically reboots the system, that is, brings it down and brings it up. This is available on only some UNIX variants. |
| -h | Halts the system completely. This is available on only some UNIX variants. |
| -y | Completes the shutdown without asking you any questions it would normally ask. |
| grace or -g | Specifies the number of seconds you wish to wait before the system is shut down, in order to give your users time to save files, quit applications, and log out. This is a -g in some UNIX variants. |
| -i | Specifies the state to which the system will transition. |
To shut down and automatically reboot the system, you would type:
$ shutdown -r To halt the system, you would type:
$ shutdown -h You will be asked whether you want to type a message to users informing them of the impending system shutdown. After you type the message, it is immediately sent to all users. After the specified time elapses (60 seconds is the default), the system begins the shutdown process. After you receive a message that the system is halted, you can power off all your system components.
To shut down the system in two minutes without being asked any questions, type:
$ shutdown -h -y 120 At times, you will need to go into single-user mode with shutdown, to perform some task such as a backup or to expand a logical volume, and then reboot the system to return it to its original state.
To shut down the system into single-user mode, you would type:
$ shutdown This command also differs among UNIX variants. Some implementations do not allow you to specify the state; others do not support the -r and -y options and instead want you to specify the state. Be sure of all the options before you issue this command. This is a high-risk command. You must be sure of such information as who is using the system at the time you wish to shut down. You must exercise great caution in general when using commands that require superuser access.
Users and Groups
Your system administrator considers many options before setting up a user. Once set up, however, user administration is not typically a function that system administrators spend a lot of time managing.
Your system administrator needs to make some basic decisions about every user they set up. Where should users' data be located? Who needs to access data from whom, thereby defining "groups" of users? What kind of particular startup is required by users and applications? Is there a shell that your users will prefer? Then the customization of the graphical user interface used on your system is another consideration.
Among the most important considerations your system administrator has is related to user data. A big system administration headache is rearranging user data, for several reasons. It doesn't fit on a whole disk (and not all UNIX variants have a volume manager that supports volumes spanning multiple disks), users can't freely access one another's data, or even worse, users can access one another's data too freely.
We will consider these questions, but first, let's look at the basic steps to adding a user. Here is a list of activities:
-
Select a user name to add
-
Select a user ID number
-
Select a group for the user
-
Createan/etc/passwd entry
-
Assign a user password (including expiration options)
-
Select and create a home directory for user
-
Select the shell the user will run (there are bash, ksh, and csh chapters in this book)
-
Place startup files in the user's home directory
-
Test the user account
Most of what you do is entered in the /etc/passwd file, where information about all users is stored. You can make these entries to the /etc/passwd file with the vipw command. Figure 13-3 is a sample / etc/passwd entry.
Figure 13-3. Sample /etc/passwd Entry
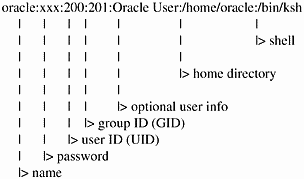

Here is a description of each of these fields:
name. This is the user name you assign. This name should be easy for the user and other users on the system to remember. When sending electronic mail or copying files from one user to another, the more easily you can remember the user name, the better. If a user has a user name on another system, you may want to assign the same user name on your UNIX system. Some systems don't permit nice, easy user names, so you may want to break the tie with the old system and start using sensible, easy-to-remember user names on your UNIX system. Remember, no security is tied to the user name; security is handled through the user's password and the file permissions.
password. This is the user's password in encrypted form. If an asterisk appears in this field, the account can't be used. If it is empty, the user has no password assigned and can log in by typing only his or her user name. I strongly recommend that each user have a password that he or she changes periodically. Every system has different security needs, but at a minimum, every user on every system should have a password. When setting up a new user, you can force the user to create a password at first login by putting a,.. in the password field.
Some features of a good password are:
-
A minimum of six characters that should include special characters such as a slash (/), a dot (.), or an asterisk (*).
-
No words should be used for a password.
-
Don't make the password personal such as name, address, favorite sports team, etc.
-
Don't usesomething easy to typesuchas123456 or qwerty.
-
Some people say that misspelled words are acceptable, but I don't recommend using them. Spell check programs that match misspelled words to correctly spelled words can be used to guess at words that might be misspelled for a password.
-
A password generator that produces unintelligible passwords works the best.
user ID (UID). The identification number of the user. Every user on your system should have a unique UID. Conventions for UIDs are different among UNIX variants. I recommend that you reserve UIDs less than 100 for system-level users. Some UNIX variants recommend that UIDs for general users begin at 1000.
group ID (GID). The identification number of the group. The members of the group and their GID are in the /etc/group file. The system administrator can change the GID assigned if they don't like it, but they may also have to change the GID of many files. As a user creates a file, his or her UID is assigned to the file as well as the GID. This means that if the system administrator changes the GID well after users of the same group have created many files and directories, they may have to change the GID of all these. I usually save GIDs less than 10 for system groups.
optional user info. In this space, you can make entries, such as the user's phone number or full name. You can leave this blank, but if you manage a system or network with many users, you may want to add the user's full name and extension so that if you need to get in touch with him or her, you'll have the information at your fingertips. (This field is sometimes referred to as the GECOs field.)
home directory. The home directory defines the default location for all the users' files and directories. This is the present working directory at the time of login.
shell. This is the startup program that the user will run at the time of login. The shell is really a command interpreter for the commands the user issues from the command line. The system administrator usually decides what shells are supported based on the setup files they have developed. In general, though, most shells are supported on most systems. See the shell chapters for a description of some of the most commonly used shells.
The location of the user's home directory is another important entry in the /etc/passwd file. You have to select a location for the user's "home" directory in the file system where the user's files will be stored. With some of the advanced networking technology that exists, such as NFS, the user's home directory does not even have to be on a disk that is physically connected to the computer he or she is using! The traditional place to locate a user's home directory on a UNIX system is the /home directory such as /home/martyp.
The /home directory is typically the most dynamic in terms of growth. Users create and delete files in their home directory on a regular basis. So, you have to do more planning related to your user area than in more static areas, such as the root file system and application areas. You would typically load UNIX and your applications and then perform relatively few accesses to these in terms of adding and deleting files and directories. The user area is continuously updated, making it more difficult to maintain.

The passwd file has a way of getting out-of-date on a regular basis. Users come and go, and in general there are continuous changes made to this file. There is a program on most UNIX variants called pwck that checks the integrity of the passwd file. Interestingly, this program is often accessible to users as well as the system administrator. The following example shows running pwck on the default file used for passwords:
martyp $ pwck webuser:x:80:80::/usr/local/etc/httpd/htdocs:/bin/sh Login directory not found teacher:x:8057:80:Desktop Classroom Teacher:/usr/local/etc/ pwserver/www/:/bin/kh Login directory not found oracle:x:200:201:Oracle User:/home/oracle:/bin/ksh Login directory not found opc_op:x:777:77:OpC default operator:/export/home/opc_op:/bin/ sh Login directory not found denise - Login name not found on system martyp $
This example shows that the login directory for several users does not exist. This absence may not be a problem, because some applications require a login name but no home directory is required. On the other hand, there are usually users on the system for which there is no login directory because the directory was removed when the user left the company but their entry in passwd was not removed. The last problem, with user denise, is a user for whom no files or directories exist on the system. pwck validates the following information in the password file you specify (this is passwd by default):
-
Correct number of fields
-
Login name
-
User ID
-
Group ID
-
Login directory exists
-
User's default shell exists
pwck is a useful program that is underused. I often run audits for system administrators to check the health of their systems and include this program under the many security checks. There is no response if pwck finds no errors or warnings to report.
Assigning Users to Groups
After defining all user-related information, the system administrator needs to consider groups. Groups are often overlooked in the UNIX environment until the system administrator finds that all his or her users are in the very same group, even though from an organizational standpoint they are in different groups. Before I cover the groups in general, let's look at a file belonging to a user and the way access is defined for a file:

$ ls -l -rwxr-x--x 1 donna users 120 Jul 26 10:20 sort For every file on the system, UNIX supports three classes of access:
-
User access (u). Access granted to the owner of the file
-
Group access (g). Access granted to members of the same group as the owner of the file
-
Other access (o). Access granted to everyone else
These access rights are defined by the settings on the permissions of r (read), write (w), and execute (x) when the long listing command is issued. For the long listing (ls-l) above, you see the permissions in Table 13-1.
| Access | User Access | Group Access | Other |
|---|---|---|---|
| Read | r | r | - |
| Write | w | - | - |
| Execute | x | x | x |
You can see that access rights are arranged in groups of three. Three groups of permissions exist with three access levels each. The owner, in this case, donna, is allowed read, write, and execute permissions on the file. Anyone in the group users is permitted read and execute access to the file. Others are permitted only execute access of the file.
These permissions are important to consider as you arrange your users into groups. If several users require access to the same files, then the system administrator will want to put those users in the same group. The trade-off here is that you can give all users within a group rwx access to files, but then you run the risk of several users editing a file without other users knowing it, thereby causing confusion. On the other hand, you can make several copies of a file so that each user has his or her personal copy, but then you have multiple versions of a file. If possible, assign users to groups based on their work.
The /etc/group file contains the group name, an encrypted password (which is rarely used), a group ID, and a list of users in the group. Here is an example of an /etc/group file:
root::0:root other::1:root, hpdb bin::2:root,bin sys::3:root,uucp adm::4:root,adm daemon::5:root,daemon mail::6:root lp::7:root,lp tty::10: nuucp::11:nuucp military::25:jhunt,tdolan,vdallesandro commercial::30:ccascone,jperwinc,devers nogroup:*:-2:
This /etc/group file shows two different groups of users. Although all users run the same application, a desktop publishing tool, some work on documents of "commercial" products while others work on only "military" documents. It made sense for the system administrator to create two groups, one for commercial document preparation and the other for military document preparation. All members of a group know what documents are current and respect one another's work and its importance. System administrators will have few problems among group members who know what each other is doing, and you will find that these members don't delete files that shouldn't be deleted. If you put all users into one group, however, you may find that you spend more time restoring files because users in this broader group don't find files that are owned by other members of their group to be important. Users can change group with the newgrp command.

The group file also has a way of getting out-of-date on a regular basis. As users come and go there are both changes to the passwd and group files required. There is a program on most UNIX variants called grpck that checks the integrity of the group file. Interestingly, this program is often accessible to users as well as the system administrator. The following example shows running grpck on the default file used for passwords:
martyp $ grpck database:10: No users in this group development1:*:200:nadmin,charles,william william - Login name not found in password file bin::2:root,bin,daemon bin - Duplicate logname entry (gid first occurs in passwd entry) sys::3:root,bin,sys,adm sys - Duplicate logname entry (gid first occurs in passwd entry) adm::4:root,adm,daemon adm - Duplicate logname entry (gid first occurs in passwd entry) uucp::5:root,uucp uucp - Duplicate logname entry (gid first occurs in passwd entry) tty::7:root,tty,adm tty - Logname not found in password file lp::8:root,lp,adm lp - Duplicate logname entry (gid first occurs in passwd entry) nuucp::9:root,nuucp nuucp - Duplicate logname entry (gid first occurs in passwd entry) martyp $ This example shows that there are a variety of potential group-related problems on this system. They include: no users in the group database; a user in a group for which there is no entry in the passwd file; and several duplicate entries. Some of these may not be a problem. However, a typical problem revealed by grpck is a user who has been removed from the system but has not been removed from the group of which they were a member. grpck validates the following information in the group file you specify (this is group by default):
-
Correct number of fields
-
Group name
-
Group ID
-
Login name exceeds maximum number of groups
-
Login names appear in password file
grpck is a useful program that is underused. I often run audits for system administrators to check the health of their systems and include this program under the many security checks.
Disk-Related Concepts
System administrators typically spend a great deal of time setting up, managing, and monitoring disks and file systems. I'll cover the basics here; however, I don't want to cover any setup procedures, because users typically aren't permitted access to the commands used to set up disks, filesystems, and so on. Some commands associated with initial disk and file system setup are: newfs, dd, fsck, mknod, and others. If you see these commands in the user material you use to learn UNIX you can immediately associate this with disk and file system setup and maitenance. It is still very useful, however, to be abe to view they way your system and environment have been set up.
We'll cover a variety of topics in this section including: viewing file systems; viewing swap space; viewing some setup files; and a review of Network File System (NFS) covered in the networking chapter.
Viewing Mounted Filesystems and Swap
One of the first activities you would perform when interested in file systems is to see what file systems are currently mounted on your system and their characteristics. The df command produces a listing of mounted file systems and some space-related information on each. The following is an example df output from a Solaris system:

martyp $ df /proc (/proc ): 0 blocks 927 files / (/dev/dsk/c0t3d0s0 ) 2284464 blocks 438864 files /dev/fd (fd ): 0 blocks 0 files /tmp (swap ): 116584 blocks 10390 files /home/ptc-nfs (ptc-nfs:/export/users2/home):22467786 blocks -1 files /opt/local (ptc-nfs:/export/opt/local): 1292902 blocks -1 files martyp $ Issuing the df command with no options produces this output. All currently mounted file systems are listed along with capacity information for each. I like to issue df with the -t option, which produces totals for the file systems and includes the output for swap on most systems. The following is an example or running df -t:
martyp $ df -t /proc (/proc ): 0 blocks 927 files total: 0 blocks 988 files / (/dev/dsk/c0t3d0s0 ): 2284464 blocks 438864 files total: 3806172 blocks 476288 files /dev/fd (fd ): 0 blocks 0 files total: 0 blocks 6 files /tmp (swap ): 116600 blocks 10390 files total: 197104 blocks 10455 files /home/ptc-nfs (ptc-nfs:/export/users2/home): 22448064 blocks -1 files total: 139264000 blocks -1 files /opt/local (ptc-nfs:/export/opt/local): 1292900 blocks -1 files total: 31866880 blocks -1 files martyp $
Included in this output are totals related to swap space, which is a very important aspect of your system. When the entire real memory (RAM) of your system is consumed, some information is moved to the swap area. The information that is moved is different among UNIX variants. Some UNIX variants move idle processes and all their associatedinformation to swap space. Othersmoveonly blocks of information that are idle. The important thing to know is that swap is a partition or volume on disk used for this purpose.
One of the most difficult tasks for a system administrator is to determine the amount of swap space required on a system. The rule of thumb most often used is to have swap space equal to twice the amount of RAM on a system.
Most systems also have an area of dump space that is used to hold the contents of RAM should a system crash occur. In the event of a system crash, it can take a long time for all of RAM to be written to disk. Some UNIX variants support writing only the area of RAM that was active to dump space at the time of a crash in order to get the system up and running more quickly.
Getting back to our df example, the -t option allows you to view all of the file systems, including swap.
You can view information specifically related to swap space with the swap command. The two following examples show issuing the swap command with the -l option, to list information about swap areas, and the -s option, to produce a summary of swap areas:
martyp $ swap -l swapfile dev swaplo blocks free /dev/dsk/c0t3d0s1 32,25 8 263080 74200 martyp $ swap -s total: 99104k bytes allocated + 10200k reserved = 109304k used, 63252k available martyp $
We'll cover device files later in this chapter. For the purpose of covering this example, however, it is sufficient to know that there is a portion of a disk named /dev/dsk/c0t3d0s1 that is used for swap. There is a slice of disk c0t3d0 called s1 that is reserved for swap, as shown with swap -l.
In addition to the list and summary outputs, swap can be used to add and delete swap space. Because this is exclusively the domain of the system adminstrator, I won't cover these options.

You can quickly view mounted file systems any time you wish with the mount command. This is normally available to users to view mounted file systems; however, as a user, you probably cannot manipulate file systems in any way such as mounting and unmounting them. Most of the commands we have covered in the book produce somewhat different results among UNIX variants. The mount command is no exception. The following examples show issuing the mount command on Solaris, AIX, and HP-UX, respectively:
sun1 $ mount /proc on /proc read/write/setuid on Thu Feb 18 11:09:14 / on /dev/dsk/c0t3d0s0 read/write/setuid/largefiles on Thu Feb 18 11:09:14 /dev/fd on fd read/write/setuid on Thu Feb 18 11:09:14 /tmp on swap read/write on Thu Feb 18 11:09:16 /opt/local on ptc-nfs:/export/opt/local read/write/intr/soft/remote on Sun Jul 9 sun1 $ ibm1 $ mount node mounted mounted over vfs date options -------- --------------- --------------- ------ ------------ ---------------- /dev/hd4 / jfs Jul 02 19:02 rw,log=/dev/hd8 /dev/hd2 /usr jfs Jul 02 19:02 rw,log=/dev/hd8 /dev/hd9var /var jfs Jul 02 19:02 rw,log=/dev/hd8 /dev/hd3 /tmp jfs Jul 02 19:02 rw,log=/dev/hd8 /dev/hd10 /usr/sys/inst.images jfs Jul 02 19:03 rw,log=/dev/ /dev/lv00 /opt jfs Jul 02 19:03 rw,log=/dev/hd8 /dev/bakup /home.bak jfs Jul 02 19:03 rw,log=/dev/logl0 /dev/cd0 /usr/lpp/info/data/techlib cdrfs Jul 02 19:03 ro /dev/lv01 /root/users jfs Jul 02 19:03 rw,log=/dev/hd8 -hosts /net autofs Jul 02 19:04 ignore auto.users /users autofs Jul 02 19:04 ignore auto.ptc /ptc_mnt autofs Jul 02 19:04 ignore auto.indirect /local_mnt autofs Jul 02 19:04 ignore auto.direct /home/ptc-nfs autofs Jul 02 19:04 ignore auto.direct /opt/local autofs Jul 02 19:04 ignore ibm1 $ hp1 22: mount / on /dev/vg00/lvol3 log on Wed Jun 16 11:20:07 /stand on /dev/vg00/lvol1 defaults on Wed Jun 16 11:20:10 /var on /dev/vg00/lvol8 delaylog on Wed Jun 16 11:20:21 /usr on /dev/vg00/lvol7 delaylog on Wed Jun 16 11:20:21 /tmp on /dev/vg00/lvol6 delaylog on Wed Jun 16 11:20:22 /opt on /dev/vg00/lvol5 delaylog on Wed Jun 16 11:20:22 /home on /dev/vg00/lvol4 delaylog on Wed Jun 16 11:20:22 hp1 23:
Although I haven't been in the habit of showing commands with examples of many different UNIX variants, I decided to include the output of the mount command. This is because the three outputs are sufficiently different to illustrate that, although generally the same information is provided, the format of the outputs are different. This fact is especially true of system administration-related commands, which are the area where UNIX variants differ the most. The concepts are the same, but the location of files, their options, and of course the format may differ. As long as you know this information going from one UNIX variant to another, you'll be ready to change your thinking just enough to get you through the possible variations in commands.
The file systems that are mounted at the time of boot are in the /etc/vfstab or /etc/fstab files on most UNIX variants. This file contains information related to the devices to be mounted, mount point, file system type, mount options, and other important mounting information. You can view this file on your system to see what your system administrator has set up as the default file systems.
Determining Disk Usage

System administrators like to know the amount of disk space consumed on their system by users, applications, groups, and so on. It's a good idea to know the disk hogs on a system. The du command helps with this determination. With du, you specify a file for which you want to view disk usage. For the home directory martyp, you would issue the following du command:
martyp $ du 2 ./test 60 ./shellprogs 1366 ./.trash 6024 . martyp $ This output shows that this directory consumes 6024 KBytes or about 6 MBytes. For large directories with many entries in them, this can be a lot of output. For a summary only, you could issue the du command with the -s option and receive the following result for the entire home directory:
martyp $ du -s /home/nfs/* 0 /home/nfs-home/Mail 0 /home/nfs-home/SomeResults 1 /home/nfs-home/admin 30285 /home/nfs-home/achil 18079 /home/nfs-home/admin1 12 /home/nfs-home/aguaris 1262210 /home/nfs-home/alfonso 8 /home/nfs-home/amand 395838 /home/nfs-home/andre 28 /home/nfs-home/andrej 94448 /home/nfs-home/annelora 605738 /home/nfs-home/annetest 15 /home/nfs-home/badmin 448544 /home/nfs-home/barryworgo 7 /home/nfs-home/bbnuser 0 /home/nfs-home/bdonalla 0 /home/nfs-home/benilla 2565325 /home/nfs-home/benranos 3 /home/nfs-home/besinerro . . . 273936 /home/nfs-home/thalla 6814 /home/nfs-home/timk 8 /home/nfs-home/tobbaa 298160 /home/nfs-home/tomphon 20 /home/nfs-home/tompsoca 5856 /home/nfs-home/vanhall 657543 /home/nfs-home/verdera 79248 /home/nfs-home/vobollas 24552 /home/nfs-home/waldok martyp $
This is much more managable for large directories. I never would have been able to include the output for home in this book without using the summary, because there are roughly 1000 users in this directory.
I encourage users to issue this command on their home directories occasionally so that they'll know the amount of disk space they're consuming. In a development environment, it is common for a directory in which you are working to grow very quickly with copies of a code. du shows exactly the space your directories are consuming so that you know the significant ones from the insignficant ones in terms of space consumed.
System Backup
System administrators spend a lot of time worrying about system backup and recovery. I'll talk about some backup and recovery concepts in this section and then cover some backup commands found on most UNIX variants. These commands are widely used because they are available on most systems. In very sophisticated UNIX environments, however, there are very elaborate backup and recovery programs which provide advanced functionality. At some point, these programs usually end up calling one of the common programs I'll cover in this section.
To begin, let's consider why you perform backups. A backup is a means of recovering from any system-related problem. System-related problems range from a disk hardware problem that ruins every byte of data on your disk to a user who accidentally deletes a file he or she really needs. The disk hardware problem is a worst-case scenario: You will need an entire (full) backup of your system performed regularly in order to recover from this. The minor problem that your user has created can be recovered from with regular incremental backups. This means you need to perform full system backups regularly and incremental backups as often as possible. Depending on the amount of disk space you have and the backup device you will use, you may be in the comfortable position of performing backups as often as you want. Assuming that you have the backup device, what is the full and incremental backup technique you should employ? I am a strong advocate of performing a full backup, and then performing incremental backups of every file that has changed since the last full backup. This means that to recover from a completely "hosed" (a technical term meaning destroyed) system, you need your full backup tape and only one incremental tape. If, for instance, you performed a full backup on Sunday and an incremental backup on Monday through Friday, you would need to load only Sunday's full backup tape and Friday's incremental backup tape to completely restore your system.
Here is a brief overview of some commonly used backup programs:
| tar | tar is the most popular generic backup utility. You will find that many applications are shipped on tar tapes. This is the most widely used format for exchanging data with other UNIX systems. tar is the oldest UNIX backup method and therefore runs on all UNIX systems. You can append files to the end of a tar tape. When sending files to another UNIX user, I would strongly recommend tar. tar is as slow as molasses, so you won't want to use it for your full or incremental backups. One highly desirable aspect of tar is that when you load files onto a tape with tar and then restore them onto another system, the original users and groups are retained. For instance, to back up all files belonging to frank and load them onto another system, you would use the following commands: $ cd /home/frank $ tar -cvf /dev/rmt/0m . The c option creates a new tar file, the v option produces a verbose output, and the f option indicates the file or device to be used for the backup, which is the device file /dev/rmt/0m. The dot indicates that the backup will start in the present working directory. You could then load frank's files on another system even if the user frank and his group don't yet exist on that system. |
| cpio | cpio is also portable and easy to use, like tar. In addition, cpio is much faster than tar. cpio is good for replicating directory trees. cpio supports the incremental backup discussed earlier. You simply give cpio a list of files and it will perform a backup. |
| dd | This is a bit-for-bit copy. It is not smart in the sense that it does not copy files and ownerships; it just copies bits. You could not, therefore, select only a file from a dd tape as you could with tar or cpio. dd is widely used for copying data from one disk to another to create a mirror image of the first disk. |
| dump and ufsdump | dump and ufsdump (depending on your UNIX variant) are programs for producing full or incremental backups. You can specify "levels" of dump which specify the type of incremental backup. You can perform an incremental backup since the last full backup, since the last incremental backup, and so on. There are as many as 10 levels of backup you can specify with these commands. Level 0 is the lowest level which is a full backup. You can also specify that a dump record be updated so that you can keep track of when full and incremental backups were performed. You can specify the tape device to which you want to dump information or use a file as the dump destination. Files can later be recoverd with restore or ufsrestore, again depending on which command is supported by your UNIX variant. |
Scheduling Cron Jobs

You can schedule periodic execution of tasks using the cron daemon. The cron daemon starts when the system boots and remains running.
cron works by reading configuration files and acting on their contents. A typical configuration would have in it the command to be run, the day and time to run the command, and the username under which the command should be run. You can look at this scheduling of jobs as a way of issuing commands at a specific time. The configuration files are called crontab files.
The crontab file is used to schedule jobs that are automatically executed by cron. crontab files are usually in the /var/spool/cron/ crontabs directory. The Red Hat Linux system on which some of the upcoming examples were run are in /var/spool/cron.
The format of entries in the crontab file are as follows:
minute hour monthday month weekday user name command minute - the minute of the hour, from 0-59
hour - the hour of the day, from 0-23
monthday - the day of the month, from 1-31
month - the month of the year, from 1-12
weekday - the day of the week, from 0 (Sunday) - 6 (Saturday)
user name - the user who will run the command if necessary (not used in the example)
command - specifies the command line or script file to run
Please be sure to check your UNIX variant to ensure that crontab entries are in the same format and that the entries are in the same order.
You have many options in the crontab file for specifying the minute, hour, monthday, month, and weekday to perform a task. You could list one entry in a field and then a space, several entries in any field separated by a comma, two entries separated by a dash indicating a range, or an asterisk, which corresponds to all possible entries for the field.
Let's create the simplest imaginable example to see how cron works. We'll create a file called listing with the following contents in our home directory (/root on a Linux system):
***** ls-l />/root/listing.out
This file will produce a long listing of the root directory every minute and send the output to listing.out in our home directory.
To "activate" or "install" the crontab, we simply issue the crontab command and the name of the file. We could also specify a username if you wanted to associate the file with a specific user. After installing the crontab file, we can issue crontab -l to view the installed crontab files. The following example shows the process of working with our crontab file called listing:

[root@linux1 /root]# cat listing * * * * * ls -l / > /root/listing.out [root@linux1 /root]# crontab listing [root@linux1 /root]# crontab -l # DO NOT EDIT THIS FILE - edit the master and reinstall. # (listing installed on Fri Aug 6 10:40:03 ) # (Cron version -- $Id: crontab.c,v 2.13 03:20:37 vixie Exp $) * * * * * ls -l / > /root/listing.out [root@linux1 /root]# ls -l total 640 -rw------- 1 root root 647168 Aug 5 23:22 core -rw------- 1 root root 7 Aug 6 10:14 dead.letter -rw-r--r-- 1 root root 39 Aug 6 10:16 listing -rw-r--r-- 1 root root 909 Aug 6 10:41 listing.out -rw------- 1 root root 516 Aug 6 10:15 mbox -rw-r--r-- 1 root root 0 Aug 6 10:39 typescript [root@linux1 /root]# cat listing.out total 1182 drwxr-xr-x 2 root root 2048 Jun 18 19:38 bin drwxr-xr-x 2 root root 1024 Jun 18 19:41 boot -rw------- 1 root root 1138688 Aug 5 23:21 core drwxr-xr-x 5 root root 34816 Aug 6 09:21 dev drwxr-xr-x 29 root root 3072 Aug 6 09:21 etc drwxr-xr-x 3 root root 1024 Jun 18 19:36 home drwxr-xr-x 4 root root 3072 Jun 18 19:36 lib drwxr-xr-x 2 root root 12288 Jun 18 19:26 lost+found drwxr-xr-x 4 root root 1024 Jun 18 19:27 mnt dr-xr-xr-x 56 root root 0 Aug 6 05:20 proc drwxr-x--- 9 root root 1024 Aug 6 10:39 root drwxr-xr-x 3 root root 2048 Jun 18 19:39 sbin drwxrwxrwt 6 root root 1024 Aug 6 10:15 tmp drwxr-xr-x 20 root root 1024 Jun 18 19:33 usr drwxr-xr-x 15 root root 1024 Jun 18 19:39 var [root@linux1 /root]# crontab -r [root@linux1 /root]# crrontab -l no crontab for root [root@linux1 /root]#
The first command shows the contents of the file listing that we created. Next we issue the crontab command to install listing. Next we issue crontab -l to see the file we have installed. Next is a long listing of our home directory, which shows that the file listing.out has indeed been produced. Then we cat the file to see its contents. Then we remove the installed file with crontab -r. Issuing crontab -l as the last command shows that there are no crontab files installed for the user root.
System administrators get a lot of use out of cron by scheduling many time- and resource-consuming jobs during off hours. A typical task that is scheduled at night are backups.
The following hybrid example shows how a system administrator would schedule the full backup on day 6 and the incremental backup on other days. This is a hybrid example whereby you would substitute actual commands for the "full backup command" and "incremental backup commands":
$ crontab -l 00 2 * * 6 full backup command 15 12 * * 1-5 incremental backup command The first entry is the full backup, and the second entry is the incremental backup. In the first entry, the minute is 00; in the second entry, the minute is 15. In the first entry, the hour is 2; in the second entry, the hour is 12. In both entries, the monthday and month are all legal values (*), meaning every monthday and month. In thefirst entry, the weekday is 6 for Saturday (0 is Sunday); in the second entry, the weekdays are 1-5, or Monday through Friday. The optional username is not specified in either example. And finally, the backup command is provided.
| minute | hour | monthday | month | weekday | user name | command |
|---|---|---|---|---|---|---|
| 00 | 2 | all | all | 6 | n/a | full backup |
| 15 | 12 | all | all | 1-5 | n/a | incremental |
Another common use of cron for system administrators is to find core files on a daily or weekly basis. Core files are images of memory written to disk when a problem of some kind is encountered on the system. They can be written in a variety of places on the system depending on the problem. These files can sometimes be used to identify the source of the problem, so system administrators like to keep track of them. The following find command will be run once a week to find core files that have not been accessed in a week and writes the core file names to a file in the home directory of root:
00 2 * * 6 find / -name core -atime 7 > /root/core.files
The system administrator will check this file on Monday to see what core files have been produced over the last week. Like our backup example, this check is run every Saturday at 2:00.
Users sometimes set up cron entries to invoke large compilations or large batch jobs during the night when the system is not heavily used. As long as your system administrator has not denied you access to running cron jobs, you are free to set up your own jobs. Your system administrator can list users who are permitted to use cron in the cron.allow file. If you are not listed in this file, the format of which is one user per line, then you cannot run the crontab program. If cron.allow does not exist, then cron.deny is checked to see whether there are any users who have been explicitly denied access to crontab.
cron is very easy to use. Simply create your file, such I as had done with listing in the earlier example, and run crontab against the file. If you have jobs you would like to see run on a regular basis, such as running your make at night, cron is a useful tool.
If you have a command you wish to schedule to run only one time, you can use the at command. You can specify the at command, the time at which you want a command executed, and then at the "at>" prompt, the command to execute. The following shows an example to remove all core files in /home/martyp at 9:00 P.M.:
$ at 9:00PM at> find /home/martyp -name core exec rm {} \; at> type ^d (control d) $
After issuing at and the time the "at>" prompt appears for you to issue the command. You then press ^d (control d) at the next prompt to return to your usual shell prompt.
Networking


Networking is covered extensively in Chapter 11. This is a topic on which system administrators spend a great deal of time both in setup and maintenance, so much so that there are books devoted to networking topics. Chapter 11 covers networking from a user perspective but has more of a system administration tone to it than the other chapters, because many important networking commands are covered, including ping, route, ifconfig, netstat, and others. Your system administrator has undoubtedly spent a lot of time planning how your systems fit into the network and configuring them to support this plan. You reap the benefits of this work by having the use of remote file systems mounted as if they were local to your system with NFS, by accessing other systems through remote login with rlogin, and many other important network functions. Please see the Networking chapter to view how many important networking commands are used.
syslog and Log Files
When your system administrator encounters a problem of some type on your system, they immediately start looking through system log files. Log files are produced from a variety of sources, including utilities and the kernel. There are many log files on a typical UNIX system, but we'll take a look at the most commonly used log file in this section called syslog.
Most log files appear in /var/log, one of its subdirectories, /var/ adm, or one of its subdirectories. Unfortunately there is usually a little hunting around required to find log files. Almost all UNIX variants put log files somewhere under /var, so at least you have a place to start your search. Some log files require superuser rights to access, so you cannot read all log files on your system.
The most often used log file is syslog. It is called thesystem event logger because it is a comprehensive logging utility. It includes many facilities, so the kernel, mail system, printer spooler, cron, and many other programs can use it.
syslog consists of several parts, including a daemon, library routines, and a logger. In all likelihood, your system is running the daemon called syslogd. You can check this with ps.
The result of using syslog is a log file that you can view should you encounter a problem with your system. You'll get messages of varying degrees of importance in syslog ranging from nothing more than informational messages to panic situations.
dmesg
Another tool used to report system information is dmesg. It looks in the system buffer for recently printed diagnostic messages. It is most often used to print messages produced at the time of system boot. This capability is very helpful in determining what hardware exists on your system. You don't normally have to be superuser to run this command.
The Kernel
The kernel is the heart of the UNIX system. Its configuration and maintenance are the domain of the system administrator. In this section, I'll give a description of the kernel, including the important functionality it provides that is often taken for granted by system users.
In very general terms, the UNIX operating system consists of three levels: hardware, UNIX kernel, and user-level programs.
In this book, we have not discussed hardware, because UNIX is a highly versatile operating system that runs on such a wide variety of hardware that no one could cover it in a book. The vast majority of what we are covering in this book takes place at the user level. Even the commands normally associated with system administration work take place at the user level. The kernel takes care of the interface between all the user-level commands and programs we run and the hardware.
An example of the way in which the kernel handles this interface between hardware and user-level programs is the file system. Every time you make a request to read a file, the kernel handles the interface between the hardware you are accessing to view the file and the user request to read the file.
Another example of functionality provided by the kernel is the illusion that you, as a user, have exclusive use of the system. On most UNIX systems, only a small number of programs can be executing at one time; however, your system may have many programs that need to be run simultaneously. The kernel manages which processes will be using the system CPU(s) at a given time and controls the passing of the CPU(s) from one process to another. This context switching takes place many times per second and is one of the most complex functions of the kernel.
System administrators typically update the kernel on a regular basis. There are parameters in the kernel which may need to be tuned in order to improve system performance. There are kernel modules, such as those required to support specific hardware, that may need to be included in the kernel.
Many advanced UNIX systems allow modules to be loaded dynamically, while the system is running, without disrupting the users on the system.
To support dynamically loadable kernel modules, there is usually an infrastructure providing for a separate system file for each module. Specially created modules can be loaded or unloaded into the kernel without having to reboot the system. This is advanced functionality that is finding its way into more and more UNIX variants.
Your system administrator is solely responsible for the maintaining the kernel; however, all users on the system interact with the kernel with nearly every command you execute.
Device Files
Device files on UNIX systems allow programs to communicate with system hardware. In the previous section covering the kernel, I talked about the way in which the kernel supports the hardware on your UNIX system. A device driver is loaded into the kernel to ensure that the hardware with which you need to communicate will be handled by the kernel.
Generally speaking, device files on UNIX systems are character or block devices. Character devices expect the driver and other aspects of the UNIX system to manage input and output buffering of data. Block devices expect the filesystem and kernel to perform buffering for them. Most hard disk drives have both a block and a character device file. This provides flexibility in the way in which the hardware is used.
A device file provides the UNIX kernel with important information about a specific device. The UNIX kernel needs to know a lot about a device before input/output operations can be performed. Device files are normally found in the /dev directory. There may also be a subdirectory under /dev used to further categorize the device files. An example of a subdirectory would be /dev/dsk, where disk device files are usually located, and /dev/rmt, where tape drive device files are located. To give you an idea of what a device file looks like, I have included Figure 13-4, which shows an HP-UX example that is a common device file naming convention.
Figure 13-4. Common Device File Naming Convention
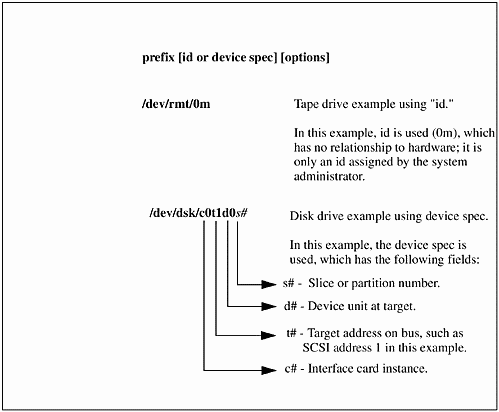
Notice that the disk description for /dev/dsk/c0t1d0 has a slice, or partition, number appearing at the very end of the device file. Some UNIX systems slice up a disk into sections and others use a high-level volume manager to control the way in which disks are used. You may or may not see section numbers on your disks, depending on the way in which disk management takes place.
The following two examples show long listings of the devices from Figure 13-4. The first long listing is that of the tape drive, and the second is the disk:
$ ls -l /dev/rmt/0m crw-rw-rw- 2 bin bin 205 0x003000 Feb 12 03:00 /dev/rmt/0m $ ls -l /dev/dsk/c0t1d0 brw-r----- 1 bin sys 31 0x001000 Feb 12 03:01 /dev/dsk/ c0t1d0
Notice in the device file long listing that there is not a slice, or partition, number in the /dev/dsk/c0t1d0 listing. The system from which this long listing was obtained employs a volume manager solution that handles the way in which disks are configured and managed. The disks are not sliced in this arrangement; therefore, no disk slices are shown in the example.
There are some important components of which every device file is comprised on UNIX systems. The first is the major number and the second is the minor number. The major number refers to the device driver that the kernel will use for accessing the device. The minor number informs the kernel and device driver what physical unit connected to the system to address. In the disk example above, we have a major number of 31 for the disk driver and a minor number of 0x001000. These numbers may very well look much different on your UNIX variant.
The tape drive device file, /dev/rmt/0m, shows a major number of 205 corresponding to that shown for the character device driver stape. The disk drive device file, /dev/dsk/c0t6d0, shows a major number of 31 corresponding to the block device driver sdisk. Because the tape drive requires only a character device file, this is the only device file that exists for the tape drive. The disk, on the other hand, may be used as either a block device or a character device (also referred to as the raw device). Therefore, we should see a character device file, /dev/rdsk/c0t6d0, with a major number of 188, as shown in the following example:
$ ls /dev/rdsk/c0t0d0 crw-r----- 1 root sys 188 0x001000 Feb 12 03:01 /dev/rdsk/c0t1d0 The major and minor numbers, as well as the device file naming convention, are different among UNIX variants. In general, though, you will see a major number and minor number associated with device files on all UNIX variants. As a user, you will probably not interact with device files names and numbers; however, this background is good to know.
Software Management
Most UNIX variants have a means of managing software that consists of a series of related commands that allow you to work with software. The basis for software management is software packages. Software packages are typically a group of related files, and the commands are a set of utilities that allow you to work with the packages. Although software packages are conceptually somewhat similar, the names of the utilities and their specific operation is different among UNIX variants.
The utilities allow you to perform a lot of useful tasks related to software packages, such as: getting information about packages; adding and removing packages; checking packages; and so on.
System administrators usually have to become intimately familar with software management, because the operating system, applications, patches, and other software are loaded and maintained from the software utilities running on the UNIX variant.
The names of software management utilities usually give a good indication of the function of the utility. The following examples list some of the software utilities from Solaris and HP-UX:
Solaris pkg commands:
martyp $ ls -l /usr/sbin/pkg* -r-xr-xr-x 2 root sys 102980 Oct 6 1998 /usr/sbin/pkgadd -r-xr-xr-x 2 root sys 102980 Oct 6 1998 /usr/sbin/pkgask -r-xr-xr-x 1 root sys 157836 Oct 6 1998 /usr/sbin/pkgchk -r-xr-xr-x 1 root sys 51084 Oct 6 1998 /usr/sbin/pkgmv -r-xr-xr-x 1 root sys 81296 Oct 6 1998 /usr/sbin/pkgrm martyp $ ls -l /usr/bin/pkg* -r-xr-xr-x 1 bin sys 97108 Oct 6 1998 /usr/bin/pkginfo -r-xr-xr-x 1 bin bin 118348 Oct 6 1998 /usr/bin/pkgmk -r-xr-xr-x 1 bin sys 84356 Oct 6 1998 /usr/bin/pkgparam -r-xr-xr-x 1 bin bin 29848 Oct 6 1998 /usr/bin/pkgproto -r-xr-xr-x 1 bin bin 68112 Oct 6 1998 /usr/bin/pkgtrans
HP-UX sw commands:
martyp $ ls -l /usr/sbin/sw* -r-sr-xr-x 11 root bin 1609728 Dec 15 1998 /usr/sbin/swacl -r-xr-xr-x 1 bin bin 446464 Dec 15 1998 /usr/sbin/swagentd -r-xr--r-- 1 bin bin 16384 Jun 10 1996 /usr/sbin/swapinfo -r-xr-xr-x 1 bin bin 24576 Jun 10 1996 /usr/sbin/swapon -r-xr-xr-x 1 bin bin 71992 May 30 1996 /usr/sbin/swcluster -r-sr-xr-x 11 root bin 1609728 Dec 15 1998 /usr/sbin/swconfig -r-sr-xr-x 11 root bin 1609728 Dec 15 1998 /usr/sbin/swcopy -r-sr-xr-x 11 root bin 1609728 Dec 15 1998 /usr/sbin/swdepot -r-sr-xr-x 11 root bin 1609728 Dec 15 1998 /usr/sbin/swinstall -r-sr-xr-x 11 root bin 1609728 Dec 15 1998 /usr/sbin/swjob -r-sr-xr-x 11 root bin 1609728 Dec 15 1998 /usr/sbin/swlist -r-sr-xr-x 2 root bin 770048 Nov 24 1998 /usr/sbin/swmodify -r-sr-xr-x 2 root bin 770048 Nov 24 1998 /usr/sbin/swpackage -r-sr-xr-x 11 root bin 1609728 Dec 15 1998 /usr/sbin/swreg -r-sr-xr-x 11 root bin 1609728 Dec 15 1998 /usr/sbin/swremove -r-sr-xr-x 11 root bin 1609728 Dec 15 1998 /usr/sbin/swverify AIX software management-related commands include lslpp, installp, and lppchk.
Most UNIX variants also supply a graphical interface through which software management can be performed. This interface can usually be invoked from the primary system administration manager running on the system as well. Figure 13-5 shows a screen shot of the graphical utility on Red Hat Linux called rpm.
Figure 13-5. Red Hat Linux Gnome RPM Window
The left side of the Gnome RPM window shows the categories of software packages. The package categories are: Amusements, Applications, Development, System Environment, and User Interface. I have selected Tools under Development. The right side of the window shows the tool packages that are loaded with make selected. You can see in the top of this window that after selecting a package, we can perform a variety of tasks such as Insall, Upgrade, Unselect, andso on. If we select Query, the window shown in Figure 13-6 appears:
Figure 13-6. Red Hat Linux Package Info Window
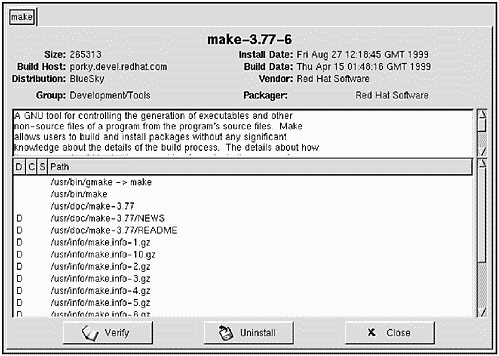
Figure 13-6 contains a lot of useful information about the make package we have selected, such as the revision of the software package, its size, and so on.
We could have obtained much of the same information using rpm at the command line. The following example shows issuing the rpm command with options to produce information about make:
[root@linux1 /root]# rpm --query -qiv make Name : make Relocations: /usr Version : 3.77 Vendor: Red Hat Software Release : 6 Build Date: Thu Apr 15 09:48:16 1999 Install date: Fri Aug 27 08:18:45 1999 Build Host: porky.devel.redhat.com Group : Development/Tools Source RPM: make-3.77-6.src.rpm Size : 265313 License: GPL Packager : Red Hat Software <http://developer.redhat.com/bugzilla> Summary : A GNU tool which simplifies the build process for users. Description : A GNU tool for controlling the generation of executables and other non-source files of a program from the program's source files. Make allows users to build and install packages without any significant knowledge about the details of the build process. The details about how the program should be built are provided for make in the program's makefile. The GNU make tool should be installed on your system because it is commonly used to simplify the process of installing programs. Some system administrators prefer to work with the command line vs. the graphical version of tools such as rpm. Most other UNIX variants also include graphical interfaces to software managment tools as well as general management tools, as we had seen earlier in the chapter. In any event, you can usually achieve the same result on UNIX systems in a variety of different ways, and when it comes to system administration in particular, the method you use is purely a matter of preference.
Printing
UNIX systems run a variety of programs related to printing called lp (for line printing). These programs work together to support printing of text files, formatted documents, graphics files, and so on. We'll cover the basics of printing in this section, including some of the basics of printer administration.
To simply print a file called mbox, you would use the lp command, as shown in the following example:
martyp $ lp mbox Job number is: 1 martyp $ In this example, we have requested that the file mbox be printed. You receive a return message from lp, indicating the request identification number. You can print multiple files with one lp request, as shown in the following example:
martyp $ ls -l total 80 -rw------- 1 martyp usr 350 Sep 27 07:22 dead.letter -rw-rw-r-- 1 martyp usr 24576 Sep 6 07:07 inst.out -rw-rw-r-- 1 martyp usr 0 Aug 21 06:45 lanadmin.list -rw------- 1 martyp usr 1485 Sep 27 08:20 mbox -rw-rw-r-- 1 martyp usr 353 Sep 29 04:57 trip -rw-rw-r-- 1 martyp perf 635 Mar 21 1999 typescript martyp $ lp t* Job number is: 2 martyp $
In this example, both files beginning with "t" were printed, and one job number is associated with the printing of both files.
Many UNIX systems have multiple printers connected. You can specify the printer you want to send the file(s) to with the -d option followed by the printer name. In the previous examples, we went to the default system printer. We can specify the printer device to which our earlier print of mbox will go with the -d option, as shown in the following example:
martyp $ lp -d ros2228 mbox Job number is: 3 martyp $ This output sends the file test to the printer we have specified, and again the job number is specified.
You can specify a default printer, which will be used when you do not specify a printer name, as shown in the following example:
martyp $ LPDEST=ros2228 martyp $ export LPDEST martyp $ lp mbox Job number is: 4 martyp $
The LPDEST environment variable is normally associated with a user's default printer. You can also specify the default printer in your startup file.
Print jobs are spooled to a printer so that you can proceed with other work. You don't have to wait until a print job completes without a problem before you move on. You can receive an electronic mail message if there was any problem with your print job using the -m option, as shown in the following example:
martyp $ lp -m t* Job number is: 5 martyp $ In this case, we have again sent the two files beginning with "t" to the default printer we earlier set up. You can assume that this print job will complete without any problem unless you receive an electronic mail message informing you otherwise.
You would sometimes like to see the status of printers. The spooling functionality means that several files may be spooled to the printer, which means that you may have to wait for your file to print. There may only be one file ahead of yours in the print queue; however, it may be a very large file such as a report from an ERP system. To obtain the status of printers you use the lpstat command. I normally issue this with the -t option to obtain a long status listing, as shown in the following example:
martyp $ lpstat -t Queue Dev Status Job Name From To Submitted Rnk Pri Blks Cp PP % ------- ----- --------- --------- --- --- ----- --- ---- -- a464 a464d READY a464: no entries a438 a438d READY a438: no entries a570 a570d READY a570: no entries a654 a654d READY a654: no entries a662 a662d READY a662: a662: a662: a662: a662: a946 a946d READY a946: no entries a956 a956d READY a956: no entries a732 a732d READY a732: ros-ps4: Warning: a732 is down a732: ros-ps4: Warning: a732 is down a732: ros-ps4: Warning: a732 is down a732: ros-ps4: Warning: a732 is down a732: ros-ps4: Warning: a732 is down a732: ros-ps4: Warning: a732 is down a732: ros-ps4: Warning: a732 is down a732: ros-ps4: Warning: a732 is down a732: ros-ps4: Warning: a732 is down a732: ros-ps4: Warning: a732 is down a732: ros-ps4: Warning: a732 is down ros2227 ros22 READY ros2227: no entries ros2228 ros22 READY ros2228: ros2228: ros2228: ros2228: ros2228: ros2228: ros2228: ros2228: ros2228: ros2228: ros2228: ros2228: ros2228: ros2228: ros2228: martyp $ The output shows the status of all printers. You can see in this example that there are many printers connected to this system. I removed several printers from this output, because it was too long to include in the book. Several of the printers report warning messages indicating that they are "down," which of course means that they are unable to print. We won't get into the troubleshooting of such problems here, because this is almost exclusively a problem that would be handled by the system administrator. If you wish to obtain the status of a the default printer, which we just set up, you can do so with the -d option, as shown in the following example:
martyp $ lpstat -d Queue Dev Status Job Files User PP % Blks Cp Rnk ------- ----- --------- --- ------------------ ---------- ---- -- ----- --- --- ros2228 ros22 READY ros2228: ros2228: ros2228: ros2228: ros2228: ros2228: martyp $ I often pull the trigger too quickly on a print job and need to cancel it. After a job is submitted, you can remove it with the cancel command, along with the job id. You can use the job number shown in earlier examples, along with the cancel command, or use the printer name along with cancel. Small print jobs will normally be processed and printed too quickly to cancel. Large print jobs, however, may be canceled before they are complete.
The lpstat command can be used to obtain the job number, in the event that you did not write it down when you submitted the job.
Table 13-2 lists some of the most commonly used lp-related commands. Keep in mind that some of these are associated with system administration work, such as configuring printers, and are not normally used by users.
| Command | Description |
|---|---|
| /usr/sbin/accept | Start accepting jobs to be queued |
| /usr/bin/cancel | Cancel a print job that is queued |
| /usr/bin/disable | Disable a device for printing |
| /usr/bin/enable | Enable a device for printing |
| /usr/sbin/lpfence | Set minimum priority for spooled file to be printed (not available on all UNIX variants) |
| /usr/bin/lp | Queue a job or jobs for printing |
| /usr/sbin/lpadmin | Configure the printing system with the options provided |
| /usr/sbin/lpmove | Move printing jobs from one device to another |
| /usr/sbin/lpsched | Start the lp scheduling daemon |
| /usr/sbin/lpshut | Stop the lp scheduling daemon |
| /usr/bin/lpstat | Show the status of printing based on the options provided |
| /usr/sbin/reject | Stop accepting jobs to be queued |
Graphical-Based Management Tools
Most UNIX variants come with a graphical-based system management tool. More precisely, these are menu-driven tools that have both a character and graphical interface, although some come in graphical-only form. Almost any system administration function can be performed with a graphical tool, including the topics covered in this chapter. There is no standard for such tools, so you'll find that they are different among UNIX variants. Some system administrators perform all their work at the command line, others will perform basic tasks with a graphical tool, and others will perform all but a few system administration tasks with a graphical tool. The method depends on the preference of the system administrator. I have found in 20 years of UNIX use that these tools have gone from non-existent to satisfactory. Many system administrators with whom I work like graphical system administration tools and use them frequently.
The following Figures show the top-level interface that you see when using the graphical system administration tools on Solaris, HP-UX, AIX, and Red Hat Linux, respectively. You really can't gauge much from only a screen shot of the top level other than to see the categories of tasks you can perform. You need to use a tool and find its nuances to determine whether or not it is useful. In general, I think that most UNIX variants have done a good job supplying such tools.
Figure 13-7. Solaris Graphical System Administration Tool - Users Top, Software Bottom. Browse Categories Are: Users, Groups, Hosts, Printers, Serial Ports, and Software.
Figure 13-8. HP-UX Graphical System Administration Tool
Figure 13-9. AIX Graphical System Administration Tool

Figure 13-10. Red Hat Linux Graphical System Administration Tool - 1 of 3
Figure 13-11. Red Hat Linux Graphical System Administration Tool - 2 of 3

Figure 13-12. Red Hat Linux Graphical System Administration Tool - 3 of 3
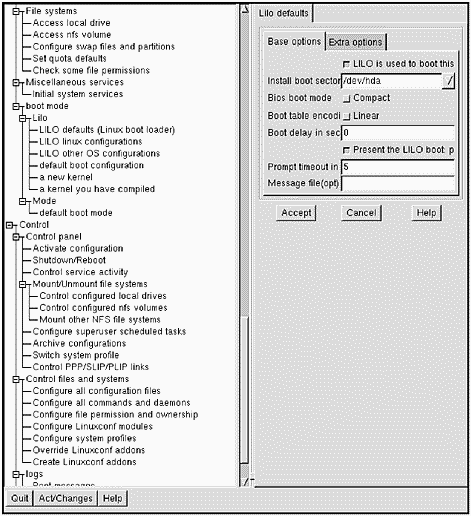
As a user, you won't be able to use such a tool. You need special permission, usually superuser, to run a system administration tool. Some of these tools allow specified users to run a subset of the overall functionality, such as initiating backups and adding users, but prevent access to disk configuration and system shutdown.
Some of the tools provide control over many categories, and others are somewhat limited about what system administration tasks they allow you to control. You'll have to manually perform any system administration functions not automated as part of your UNIX variant's administration tool.
Manual Pages of Some Commands Used in Chapter 13
The following are the HP-UX manual pages for many of the commands used in the chapter. Commands often differ among UNIX variants, so you may find differences in the options or other areas for some commands; however, the following manual pages serve as an excellent reference.
cron
cron - Execute commands at specific dates and times.
.
cron(1M) cron(1M) NAME cron - timed-job execution daemon SYNOPSIS /usr/sbin/cron DESCRIPTION cron executes commands at specified dates and times. Regularly scheduled commands can be specified according to instructions placed in crontab files. Users can submit their own crontab files with a crontab command (see crontab(1)). Users can submit commands that are to be executed only once with an at or batch command. Since cron never exits, it should be executed only once. This is best done by running cron from the initialization process with the startup script /sbin/init.d/cron (see init(1M)). cron only establishes a schedule for crontab files and at/batch command files during process initialization and when it is notified by at, batch, or crontab that a file has been added, deleted, or modified. When cron executes a job, the job's user and group IDs are set to those of the user who submitted the job. Spring and Autumn Time Transitions On the days of daylight savings (summer) time transition (in time zones and countries where daylight savings time applies), cron schedules commands differently from normal. In the following description, an ambiguous time refers to an hour and minute that occurs twice in the same day because of a daylight savings time transition (usually on a day during the Autumn season). A nonexistent time refers to an hour and minute that does not occur because of a daylight savings time transition (usually on a day during the Spring season). DST-shift refers to the offset that is applied to standard time to result in daylight savings time. This is normally one hour, but can be any combination of hours and minutes up to 23 hours and 59 minutes (see tztab(4)). When a command is specified to run at an ambiguous time, the command is executed only once at the first occurrence of the ambiguous time. When a command is specified to run at a nonexistent time, the command is executed after the specified time by an amount of time equal to the DST-shift. When such an adjustment would conflict with another time specified to run the command, the command is run only once rather than running the command twice at the same time. Commands that are scheduled to run during all hours (there is a * is in the hour field of the crontab entry) are scheduled without any adjustment. EXTERNAL INFLUENCES Environment Variables LANG determines the language in which messages are displayed. If LANG is not specified or is set to the empty string, it defaults to "C" (see lang(5)). If any internationalization variable contains an invalid setting, all internationalization variables default to "C" (see environ(5)). DIAGNOSTICS A history of all actions taken by cron is recorded in /var/adm/cron/log. EXAMPLES The following examples assume that the time zone is MST7MDT. In this time zone, the DST transition occurs one second before 2:00 a.m. and the DST-shift is 1 hour. Consider the following entries in a crontab file: # Minute Hour Month Day Month Weekday Command # ---------------------------------------------------------- 0 01 * * * Job_1 0 02 * * * Job_2 0 03 * * * Job_3 0 04 * * * Job_4 0 * * * * Job_hourly 0 2,3,4 * * * Multiple_1 0 2,4 * * * Multiple_2 For the period of 1:00 a.m. to 4:00 a.m. on the days of DST transition, the results will be: Job Times Run in Fall Times Run in Spring ____________________________________________________ Job_1 01:00 MDT 01:00 MST Job_2 02:00 MDT 03:00 MDT Job_3 03:00 MST 03:00 MDT Job_4 04:00 MST 04:00 MDT Job_hourly 01:00 MDT 01:00 MST 02:00 MDT 02:00 MST 03:00 MST 03:00 MDT 04:00 MST 04:00 MDT Multiple_1 02:00 MDT 03:00 MST 03:00 MDT 04:00 MST 04:00 MDT Multiple_2 02:00 MDT 03:00 MDT 04:00 MST 04:00 MDT WARNINGS In the Spring, when there is a nonexistent hour because of daylight savings time, a command that is scheduled to run multiple times during the nonexistent hour will only be run once. For example, a command scheduled to run at 2:00 and 2:30 a.m. in the MST7MDT time zone will only run at 3:00 a.m. The command that was scheduled at 2:30 a.m. will not be run at all, instead of running at 3:30 a.m. DEPENDENCIES HP Process Resource Manager If the optional HP Process Resource Management (PRM) software is installed and configured, jobs are launched in the initial process resource group of the user that scheduled the job. The user's initial group is determined at the time the job is started, not when the job is scheduled. If the user's initial group is not defined, the job runs in the user default group (PRMID=1). See prmconfig(1) for a description of how to configure HP PRM, and prmconf(4) for a description of how the user's initial process resource group is determined. AUTHOR cron was developed by AT&T and HP. FILES /var/adm/cron Main cron directory /var/spool/cron/atjobs Directory containing at and batch job files /var/spool/cron/crontabs Directory containing crontab files /var/adm/cron/log Accounting information SEE ALSO at(1), crontab(1), sh(1), init(1M), cdf(4), queuedefs(4), tztab(4). HP Process Resource Manager: prmconfig(1), prmconf(4) in HP Process Resource Manager User's Guide. STANDARDS CONFORMANCE cron: SVID2, SVID3
df
df - Report the amount of free disk blocks.
.
df(1M) df(1M) NAME df (generic) - report number of free file system disk blocks SYNOPSIS /usr/bin/df [-F FStype] [-befgiklnv] [-t|-P] [-o specific_options] [-V] [special|directory]... DESCRIPTION The df command displays the number of free 513-byte blocks and free inodes available for file systems by examining the counts kept in the superblock or superblocks. If a special or a directory is not specified, the free space on all mounted file systems is displayed. If the arguments to df are path names, df reports on the file systems containing the named files. If the argument to df is a special of an unmounted file system, the free space in the unmounted file system is displayed. Options df recognizes the following options: -b Report only the number of kilobytes (KB) free. -e Report the number of files free. -f Report only the actual count of the blocks in the free list (free inodes are not reported). -F FStype Report only on the FStype file system type (see fstyp(1M)). -g Report the entire structure described in statvfs(2). -i Report the total number of inodes, the number of free inodes, number of used inodes, and the percentage of inodes in use. -k Report the allocation in kilobytes (KB). -l Report on local file systems only. -n Report the file system name. If used with no other options, display a list of mounted file system types. -o specific_options Specify options specific to each file system type. specific_options is a comma-separated list of suboptions intended for a specific FStype module of the command. See the file-system-specific manual entries for further details. -P Report the name of the file system, the size of the file system, the number of blocks used, the number of blocks free, the percentage of blocks used and the directory below which the file system hierarchy appears. -t Report the total allocated block figures and the number of free blocks. -v Report the percentage of blocks used, the number of blocks used, and the number of blocks free. This option cannot be used with other options. -V Echo the completed command line, but perform no other action. The command line is generated by incorporating the user-specified options and other information derived from /etc/fstab. This option allows the user to verify the command line. EXTERNAL INFLUENCES Environment Variables LC_MESSAGES determines the language in which messages are displayed. If LC_MESSAGES is not specified in the environment or is set to the empty string, the value of LANG is used as a default for each unspecified or empty variable. If LANG is not specified or is set to the empty string, a default of "C" (see lang(5)) is used instead of LANG. If any internationalization variable contains an invalid setting, df behaves as if all internationalization variables are set to "C". See environ(5). International Code Set Support Single-byte and multi-byte character code sets are supported. EXAMPLES Report the number of free disk blocks for all mounted file systems: df Report the number of free disk blocks for all mounted HFS file systems: df -F hfs Report the number of free files for all mounted NFS file systems: df -F nfs -e Report the total allocated block figures and the number of free blocks, for all mounted file systems: df -t Report the total allocated block figures and the number of free blocks, for the file system mounted as /usr: df -t /usr FILES /dev/dsk/* File system devices /etc/fstab Static information about the file systems /etc/mnttab Mounted file system table SEE ALSO du(1), df_FStype(1M), fsck(1M), fstab(4), fstyp(1M), statvfs(2), mnttab(4). STANDARDS CONFORMANCE df: SVID2, SVID3, XPG2, XPG3, XPG4
du
du - Report the amount of free disk blocks.
.
du(1) du(1) NAME du - summarize disk usage SYNOPSIS du [-a|-s] [-brx] [-t type] [name ...] DESCRIPTION The du command gives the number of 513-byte blocks allocated for all files and (recursively) directories within each directory and file specified by the name operands. The block count includes the indirect blocks of the file. A file with two or more links is counted only once. If name is missing, the current working directory is used. By default, du generates an entry only for the name operands and each directory contained within those hierarchies. Options The du command recognizes the following options: -a Print entries for each file encountered in the directory hierarchies in addition to the normal output. -b For each name operand that is a directory for which file system swap has been enabled, print the number of blocks the swap system is currently using. -r Print messages about directories that cannot be read, files that cannot be accessed, etc. du is normally silent about such conditions. -s Print only the grand total of disk usage for each of the specified name operands. -x Restrict reporting to only those files that have the same device as the file specified by the name operand. Disk usage is normally reported for the entire directory hierarchy below each of the given name operands. -t type Restrict reporting to file systems of the specified type. (Example values for type are hfs, cdfs, nfs, etc.) Multiple -t type options can be specified. Disk usage is normally reported for the entire directory hierarchy below each of the given name operands. EXAMPLES Display disk usage for the current working directory and all directories below it, generating error messages for unreadable directories: du -r Display disk usage for the entire file system except for any cdfs or nfs mounted file systems: du -t hfs / Display disk usage for files on the root volume (/) only. No usage statistics are collected for any other mounted file systems: du -x / WARNINGS Block counts are incorrect for files that contain holes. SEE ALSO df(1M), bdf(1M), quot(1M). STANDARDS CONFORMANCE du: SVID2, SVID3, XPG2, XPG3, XPG4
group

group - File that contains information about groups.
.
group(4) group(4) NAME group, logingroup - group file, grp.h DESCRIPTION group contains for each group the following information: - group name - encrypted password - numerical group ID - comma-separated list of all users allowed in the group This is an ASCII file. Fields are separated by colons, and each group is separated from the next by a new-line. No spaces should separate the fields or parts of fields on any line. If the password field is null, no password is associated with the group. There are two files of this form in the system, /etc/group and /etc/logingroup. The file /etc/group exists to supply names for each group, and to support changing groups by means of the newgrp utility (see newgrp(1)). /etc/logingroup provides a default group access list for each user via login and initgroups() (see login(1) and initgroups(3C)). The real and effective group ID set up by login for each user is defined in /etc/passwd (see passwd(4)). If /etc/logingroup is empty or non-existent, the default group access list is empty. If /etc/logingroup and /etc/group are links to the same file, the default access list includes the entire set of groups associated with the user. The group name and password fields in /etc/logingroup are never used; they are included only to give the two files a uniform format, allowing them to be linked together. All group IDs used in /etc/logingroup or /etc/passwd should be defined in /etc/group. No user should be associated with more than NGROUPS (see setgroups(2)) groups in /etc/logingroup. These files reside in directory /etc. Because of the encrypted passwords, these files can and do have general read permission and can be used, for example, to map numerical group IDs to names. The group structure is defined in <grp.h> and includes the following members: char *gr_name; /* the name of the group */ char *gr_passwd; /* the encrypted group password */ gid_t gr_gid; /* the numerical group ID */ char **gr_mem; /* null-terminated array of pointers to member names */ NETWORKING FEATURES NIS The /etc/group file can contain a line beginning with a plus (+), which means to incorporate entries from Network Information Services (NIS). There are two styles of + entries: + means to insert the entire contents of NIS group file at that point, and +name means to insert the entry (if any) for name from NIS at that point. If a + entry has a non-null password or group member field, the contents of that field overide what is contained in NIS. The numerical group ID field cannot be overridden. A group file can also have a line beginning with a minus (-), these entries are used to disallow group entries. There is only one style of - entry; an entry that consists of -name means to disallow any subsequent entry (if any) for name. These entries are disallowed regardless of whether the subsequent entry comes from the NIS or the local group file. WARNINGS Group files must not contain any blank lines. Blank lines can cause unpredictable behavior in system administration software that uses these files. Group ID (gid) 9 is reserved for the Pascal Language operating system and the BASIC Language operating system. These are operating systems for Series 300/400 computers that can co-exist with HP-UX on the same disk. Using this gid for other purposes can inhibit file transfer and sharing. The length of each line in /etc/group is limited to LINE_MAX, as defined in <limits.h>. The maximum number of users per group is (LINE_MAX - 50)/9. If /etc/group is linked to /etc/logingroup, group membership for a user is managed by NIS, and no NIS server is able to respond, that user cannot log in until a server does respond. DEPENDENCIES NIS EXAMPLES Here is a sample /etc/group file: other:*:1:root,daemon,uucp,who,date,sync -oldproj bin:*:2:root,bin,daemon,lp +myproject:::bill,steve +: Group other has a gid of 1 and members root, daemon, uucp, who, date, and sync. The group oldproj is ignored since it appears after the entry -oldproj. Also, the group myproject has members bill and steve, and the password and group ID of the NIS entry for the group myproject. All groups listed in the NIS are pulled in and placed after the entry for myproject. WARNINGS The plus (+) and minus (-) features are part of NIS. Therefore if NIS is not installed, these features cannot work. FILES /etc/group /etc/logingroup SEE ALSO groups(1), newgrp(1), passwd(1), setgroups(2), crypt(3C), getgrent(3C), initgroups(3C), passwd(4). WARNINGS There is no single tool available to completely ensure that /etc/passwd, /etc/group, and /etc/logingroup are compatible. However, pwck and grpck can be used to simplify the task (see pwck(1M) and grpck(1M)). There is no tool for setting group passwords in /etc/group. STANDARDS CONFORMANCE group: SVID2, SVID3, XPG2
inittab

inittab - File used by init daemon.
inittab(4) inittab(4) NAME inittab - script for the boot init process DESCRIPTION The /etc/inittab file supplies the script to the boot init daemon in its role as a general process dispatcher (see init(1M)). The process that constitutes the majority of boot init's process dispatching activities is the line process /usr/sbin/getty that initiates individual terminal lines. Other processes typically dispatched by boot init are daemons and shells. The inittab file is composed of entries that are position-dependent and have the following format: id:rstate:action:process Each entry is delimited by a newline; however, a backslash (\) preceding a newline indicates a continuation of the entry. Up to 1024 characters per entry are permitted. Comments can be inserted in the process field by starting a "word" with a # (see sh(1)). Comments for lines that spawn gettys are displayed by the who command (see who(1)). It is expected that they will contain some information about the line such as the location. There are no limits (other than maximum entry size) imposed on the number of entries within the inittab file. The entry fields are: id A one- to four-character value used to uniquely identify an entry. Duplicate entries cause an error message to be issued, but are otherwise ignored. The use of a four-character value to identify an entry is strongly recommended (see WARNINGS below). rstate Defines the run level in which this entry is to be processed. Run levels correspond to a configuration of processes in the system where each process spawned by boot init is assigned one or more run levels in which it is allowed to exist. Run levels are represented by a number in the range 0 through 6. For example, if the system is in run level 1, only those entries having a 1 in their rstate field are processed. When boot init is requested to change run levels, all processes that do not have an entry in the rstate field for the target run level are sent the warning signal (SIGTERM) and allowed a 20-second grace period before being forcibly terminated by a kill signal (SIGKILL). You can specify multiple run levels for a process by entering more than one run level value in any combination. If no run level is specified, the process is assumed to be valid for all run levels, 0 through 6. Three other values, a, b and c, can also appear in the rstate field, even though they are not true run levels. Entries having these characters in the rstate field are processed only when a user init process requests them to be run (regardless of the current system run level). They differ from run levels in that boot init can never enter "run level" a, b, or c. Also, a request for the execution of any of these processes does not change the current numeric run level. Furthermore, a process started by an a, b, or c option is not killed when boot init changes levels. A process is killed only if its line in inittab is marked off in the action field, its line is deleted entirely from inittab, or boot init goes into the single-user state. action A keyword in this field tells boot init how to treat the process specified in the process field. The following actions can be specified: boot Process the entry only at boot init's boot-time read of the inittab file. Boot init starts the process, does not wait for its termination, and when it dies, does not restart the process. In order for this instruction to be meaningful, the rstate should be the default or it must match boot init's run level at boot time. This action is useful for an initialization function following a hardware boot of the system. bootwait Process the entry only at boot init's boot-time read of the inittab file. Boot init starts the process, waits for its termination, and, when it dies, does not restart the process. initdefault An entry with this action is only scanned when boot init is initially invoked. Boot init uses this entry, if it exists, to determine which run level to enter initially. It does this by taking the highest run level specified in the rstate field and using that as its initial state. If the rstate field is empty, boot init enters run level 6. The initdefault entry cannot specify that boot init start in the single- user state. Additionally, if boot init does not find an initdefault entry in inittab, it requests an initial run level from the user at boot time. off If the process associated with this entry is currently running, send the warning signal (SIGTERM) and wait 20 seconds before forcibly terminating the process via the kill signal (SIGKILL). If the process is nonexistent, ignore the entry. once When boot init enters a run level that matches the entry's rstate, start the process and do not wait for its termination. When it dies, do not restart the process. If boot init enters a new run level but the process is still running from a previous run level change, the process is not restarted. ondemand This instruction is really a synonym for the respawn action. It is functionally identical to respawn but is given a different keyword in order to divorce its association with run levels. This is used only with the a, b, or c values described in the rstate field. powerfail Execute the process associated with this entry only when boot init receives a power-fail signal (SIGPWR see signal(5)). powerwait Execute the process associated with this entry only when boot init receives a power-fail signal (SIGPWR) and wait until it terminates before continuing any processing of inittab. respawn If the process does not exist, start the process; do not wait for its termination (continue scanning the inittab file). When it dies, restart the process. If the process currently exists, do nothing and continue scanning the inittab file. sysinit Entries of this type are executed before boot init tries to access the console. It is expected that this entry will be only used to initialize devices on which boot init might attempt to obtain run level information. These entries are executed and waited for before continuing. wait When boot init enters the run level that matches the entry's rstate, start the process and wait for its termination. Any subsequent reads of the inittab file while boot init is in the same run level cause boot init to ignore this entry. process This is a sh command to be executed. The entire process field is prefixed with exec and passed to a forked sh as "sh -c 'exec command'". For this reason, any sh syntax that can legally follow exec can appear in the process field. Comments can be inserted by using the ; #comment syntax. WARNINGS The use of a four-character id is strongly recommended. Many pty servers use the last two characters of the pty name as an id. If an id chosen by a pty server collides with one used in the inittab file, the /etc/utmp file can become corrupted. A corrupt /etc/utmp file can cause commands such as who to report inaccurate information. FILES /etc/inittab File of processes dispatched by boot init. SEE ALSO sh(1), getty(1M), exec(2), open(2), signal(5).
mount
mount - List mounted file systems or mount file systems.
.
mount(1M) mount(1M) NAME mount (generic), umount (generic) - mount and unmount file systems SYNOPSIS /usr/sbin/mount [-l] [-p|-v] /usr/sbin/mount -a [-F FStype] [-eQ] /usr/sbin/mount [-F FStype] [-eQrV] [-o specific_options] {special|directory} /usr/sbin/mount [-F FStype] [-eQrV] [-o specific_options] special directory /usr/sbin/umount [-v] [-V] {special|directory} /usr/sbin/umount -a [-F FStype] [-v] DESCRIPTION The mount command mounts file systems. Only a superuser can mount file systems. Other users can use mount to list mounted file systems. The mount command attaches special, a removable file system, to directory, a directory on the file tree. directory, which must already exist, will become the name of the root of the newly mounted file system. special and directory must be given as absolute path names. If either special or directory is omitted, mount attempts to determine the missing value from an entry in the /etc/fstab file. mount can be invoked on any removable file system, except /. If mount is invoked without any arguments, it lists all of the mounted file systems from the file system mount table, /etc/mnttab. The umount command unmounts mounted file systems. Only a superuser can unmount file systems. Options (mount) The mount command recognizes the following options: -a Attempt to mount all file systems described in /etc/fstab. All optional fields in /etc/fstab must be included and supported. If the -F option is specified, all file systems in /etc/fstab with that FStype are mounted. File systems are not necessarily mounted in the order listed in /etc/fstab. -e Verbose mode. Write a message to the standard output indicating which file system is being mounted. -F FStype Specify FStype, the file system type on which to operate. See fstyp(1M). If this option is not included on the command line, then it is determined from either /etc/fstab, by matching special with an entry in that file, or from file system statistics of special, obtained by statfsdev() (see statfsdev(3C)). -l Limit actions to local file systems only. -o specific_options Specify options specific to each file system type. specific_options is a list of comma separated suboptions and/or keyword/attribute pairs intended for a FStype-specific version of the command. See the FStype-specific manual entries for a description of the specific_options supported, if any. -p Report the list of mounted file systems in the /etc/fstab format. -Q Prevent the display of error messages that result from an attempt to mount already mounted file systems. -r Mount the specified file system as read-only. Physically write-protected file systems must be mounted in this way or errors occur when access times are updated, whether or not any explicit write is attempted. -v Report the regular output with file system type and flags; however, the directory and special fields are reversed. -V Echo the completed command line, but perform no other action. The command line is generated by incorporating the user-specified options and other information derived from /etc/fstab. This option allows the user to verify the command line. Options (umount) The umount command recognizes the following options: -a Attempt to unmount all file systems described in /etc/mnttab. All optional fields in /etc/mnttab must be included and supported. If FStype is specified, all file systems in /etc/mnttab with that FStype are unmounted. File systems are not necessarily unmounted in the order listed in /etc/mnttab. -F FStype Specify FStype, the file system type on which to operate. If this option is not included on the command line, then it is determined from /etc/mnttab by matching special with an entry in that file. If no match is found, the command fails. -v Verbose mode. Write a message to standard output indicating which file system is being unmounted. -V Echo the completed command line, but perform no other action. The command line is generated by incorporating the user-specified options and other information derived from /etc/fstab. This option allows the user to verify the command line. EXAMPLES List the file systems currently mounted: mount Mount the HFS file system /dev/dsk/c1d2s0 at directory /home: mount -F hfs /dev/dsk/c1d2s0 /home Unmount the same file system: umount /dev/dsk/c1d2s0 AUTHOR mount was developed by HP, AT&T, the University of California, Berkeley, and Sun Microsystems. FILES /etc/fstab Static information about the systems /etc/mnttab Mounted file system table SEE ALSO mount_FStype(1M), mount(2), fstab(4), mnttab(4), fs_wrapper(5), quota(5). STANDARDS COMPLIANCE mount: SVID3 umount: SVID3 newgrp
newgrp - Change the group in which you are a member.
.
newgrp(1) newgrp(1) NAME newgrp - switch to a new group SYNOPSIS newgrp [-] [group] DESCRIPTION The newgrp command changes your group ID without changing your user ID and replaces your current shell with a new one. If you specify group, the change is successful if group exists and either your user ID is a member of the new group, or group has a password and you can supply it from the terminal. If you omit group, newgroup changes to the group specified in your entry in the password file, /etc/passwd. Whether the group is changed successfully or not, or the new group is the same as the old one or not, newgrp proceeds to replace your current shell with the one specified in the shell field of your password file entry. If that field is empty, newgrp uses the POSIX shell, /usr/bin/sh (see sh-posix(1)). If you specify - (hyphen) as the first argument, the new shell starts up as if you had just logged in. If you omit -, the new shell starts up as if you had invoked it as a subshell. You remain logged in and the current directory is unchanged, but calculations of access permissions to files are performed with respect to the new real and effective group IDs. Exported variables retain their values and are passed to the new shell. All unexported variables are deleted, but the new shell may reset them to default values. Since the current process is replaced when the new shell is started, exiting from the new shell has the same effect as exiting from the shell in which newgrp was executed. EXTERNAL INFLUENCES International Code Set Support Characters from the 7-bit USASCII code set are supported in group names (see ascii(5)). DIAGNOSTICS The newgrp command issues the following error messages: Sorry Your user ID does not qualify as a group member. Unknown group The group name does not exist in /etc/group. Permission denied If a password is required, it must come from a terminal. You have no shell Standard input is not a terminal file, causing the new shell to fail. EXAMPLES To change from your current group to group users without executing the login routines: newgrp users To change from your current group to group users and execute the login routines: newgrp - users WARNINGS There is no convenient way to enter a password into /etc/group. The use of group passwords is not recommended because, by their very nature, they encourage poor security practices. Group passwords may be eliminated in future HP-UX releases. FILES /etc/group System group file /etc/passwd System password file SEE ALSO csh(1), ksh(1), login(1), sh-bourne(1), sh-posix(1), group(4), passwd(4), environ(5). STANDARDS CONFORMANCE newgrp: SVID2, SVID3, XPG2, XPG3, XPG4
passwd
passwd - File that contains information about users (this is different from passwd command that is used to change a user's password).
passwd(4) passwd(4) NAME passwd - password file, pwd.h DESCRIPTION passwd contains the following information for each user: - login name - encrypted password - numerical user ID - numerical group ID - reserved field, which can be used for identification - initial working directory - program to use as shell This is an ASCII file. Each field within each user's entry is separated from the next by a colon. Each user is separated from the next by a newline. This file resides in the /etc directory. It can and does have general read permission and can be used, for example, to map numerical user IDs to names. If the password field is null and the system has not been converted to a trusted system, no password is demanded. If the shell field is null, /usr/bin/sh is used. The encrypted password consists of 13 characters chosen from a 64- character set of "digits" described below, except when the password is null, in which case the encrypted password is also null. Login can be prevented by entering in the password field a character that is not part of the set of digits (such as *). The characters used to represent "digits" are . for 0, / for 1, 0 through 9 for 2 through 11, A through Z for 12 through 37, and a through z for 38 through 63. Password aging is put in effect for a particular user if his encrypted password in the password file is followed by a comma and a nonnull string of characters from the above alphabet. (Such a string must be introduced in the first instance by a superuser.) This string defines the "age" needed to implement password aging. The first character of the age, M, denotes the maximum number of weeks for which a password is valid. A user who attempts to login after his password has expired is forced to supply a new one. The next character, m, denotes the minimum period in weeks that must expire before the password can be changed. The remaining characters define the week (counted from the beginning of 1970) when the password was last changed (a null string is equivalent to zero). M and m have numerical values in the range 0 through 63 that correspond to the 64- character set of "digits" shown above. If m = M = 0 (derived from the string . or ..), the user is forced to change his password next time he logs in (and the "age" disappears from his entry in the password file). If m > M (signified, for example, by the string ./), then only a superuser (not the user) can change the password. Not allowing the user to ever change the password is discouraged, especially on a trusted system. Trusted systems support password aging and password generation. For more information on converting to trusted system and on password, see the HP-UX System Administration Tasks Manual and sam(1M). getpwent(3C) designates values to the fields in the following structure declared in <pwd.h>: struct passwd { char *pw_name; char *pw_passwd; uid_t pw_uid; gid_t pw_gid; char *pw_age; char *pw_comment; char *pw_gecos; char *pw_dir; char *pw_shell; aid_t pw_audid; int pw_audflg; }; It is suggested that the range 0-99 not be used for user and group IDs (pw_uid and pw_gid in the above structure) so that IDs that might be assigned for system software do not conflict. The user's full name, office location, extension, and home phone stored in the pw_gecos field of the passwd structure can be set by use of the chfn command (see chfn(1)) and is used by the finger(1) command. These two commands assume the information in this field is in the order listed above. A portion of the user's real name can be represented in the pw_gecos field by an & character, which some utilities (including finger) expand by substituting the login name for it and shifting the first letter of the login name to uppercase. SECURITY FEATURES On trusted systems, the encrypted password for each user is stored in the file /tcb/files/auth/c/user_name (where c is the first letter in user_name). Password information files are not accessible to the public. The encrypted password can be longer than 13 characters . For example, the password file for user david is stored in /tcb/files/auth/d/david. In addition to the password, the user profile in /tcb/files/auth/c/user_name also contains: - numerical audit ID - numerical audit flag Like /etc/passwd, this file is an ASCII file. Fields within each user's entry are separated by colons. Refer to authcap(4) and prpwd(4) for details. The passwords contained in /tcb/files/auth/c/* take precedence over those contained in the encrypted password field of /etc/passwd. User authentication is done using the encrypted passwords in this file . The password aging mechanism described in passwd(1), under the section called SECURITY FEATURES, applies to this password . NETWORKING FEATURES NFS The passwd file can have entries that begin with a plus (+) or minus (-) sign in the first column. Such lines are used to access the Network Information System network database. A line beginning with a plus (+) is used to incorporate entries from the Network Information System. There are three styles of + entries: + Insert the entire contents of the Network Information System password file at that point; +name Insert the entry (if any) for name from the Network Information System at that point +@name Insert the entries for all members of the network group name at that point. If a + entry has a nonnull password, directory, gecos, or shell field, they override what is contained in the Network Information System. The numerical user ID and group ID fields cannot be overridden. The passwd file can also have lines beginning with a minus (-), which disallow entries from the Network Information System. There are two styles of - entries: -name Disallow any subsequent entries (if any) for name. -@name Disallow any subsequent entries for all members of the network group name. WARNINGS User ID (uid) 17 is reserved for the Pascal Language operating system. User ID (uid) 18 is reserved for the BASIC Language operating system. These are operating systems for Series 300 and 400 computers that can coexist with HP-UX on the same disk. Using these uids for other purposes may inhibit file transfer and sharing. The login shell for the root user (uid 0) must be /sbin/sh. Other shells such as sh, ksh, and csh are all located under the /usr directory which may not be mounted during earlier stages of the bootup process. Changing the login shell of the root user to a value other than /sbin/sh may result in a non-functional system. The information kept in the pw_gecos field may conflict with unsupported or future uses of this field. Use of the pw_gecos field for keeping user identification information has not been formalized within any of the industry standards. The current use of this field is derived from its use within the Berkeley Software Distribution. Future standards may define this field for other purposes. The following fields have character limitations as noted: - Login name field can be no longer than 8 characters; - Initial working directory field can be no longer than 63 characters; - Program field can be no longer than 44 characters. - Results are unpredictable if these fields are longer than the limits specified above. The following fields have numerical limitations as noted: - The user ID is an integer value between -2 and UID_MAX inclusive. - The group ID is an integer value between 0 and UID_MAX inclusive. - If either of these values are out of range, the getpwent(3C) functions reset the ID value to (UID_MAX). EXAMPLES NFS Example Here is a sample /etc/passwd file: root:3Km/o4Cyq84Xc:0:10:System Administrator:/:/sbin/sh joe:r4hRJr4GJ4CqE:100:50:Joe User,Post 4A,12345:/home/joe:/usr/bin/ksh +john: -bob: +@documentation:no-login: -@marketing: +:::Guest In this example, there are specific entries for users root and joe, in case the Network Information System are out of order. - User john's password entry in the Network Information System is incorporated without change. - Any subsequent entries for user bob are ignored. - The password field for anyone in the netgroup documentation is disabled. - Users in netgroup marketing are not returned by getpwent(3C) and thus are not allowed to log in. - Anyone else can log in with their usual password, shell, and home directory, but with a pw_gecos field of Guest. NFS Warnings The plus (+) and minus (-) features are NFS functionality; therefore, if NFS is not installed, they do not work. Also, these features work only with /etc/passwd, but not with a system that has been converted to a trusted system. When the system has been converted to a trusted system, the encrypted passwords can be accessed only from the protected password database, /tcb/files/auth/*/*. Any user entry in the Network Information System database also must have an entry in the protected password database. The uid of -2 is reserved for remote root access by means of NFS. The pw_name usually given to this uid is nobody. Since uids are stored as signed values, the following define is included in <pwd.h> to match the user nobody. UID_NOBODY (-2) FILES /tcb/files/auth/*/* Protected password database used when system is converted to trusted system. /etc/passwd Standard password file used by HP-UX. SEE ALSO chfn(1), finger(1), login(1), passwd(1), a64l(3C), crypt(3C), getprpwent(3), getpwent(3C), authcap(4), limits(5). STANDARDS CONFORMANCE passwd: SVID2, SVID3, XPG2 ps
ps - Report status of processes.
ps(1) ps(1) NAME ps - report process status SYNOPSIS ps [-adeflP] [-g grplist] [-p proclist] [-R prmgrplist] [-t termlist] [-u uidlist] XPG4 SYNOPSIS ps [-aAcdefHjlP] [-C cmdlist] [-g grplist] [-G gidlist] [-n namelist] [-o format] [-p proclist] [-R prmgrplist] [-s sidlist] [-t termlist] [-u uidlist] [-U uidlist] DESCRIPTION ps prints information about selected processes. Use options to specify which processes to select and what information to print about them. Process Selection Options Use the following options to choose which processes should be selected. NOTE: If an option is used in both the default (standard HP-UX) and XPG4 environments, the description provided here documents the default behavior. Refer to the UNIX95 variable under EXTERNAL INFLUENCES for additional information on XPG4 behavior. (none) Select those processes associated with the current terminal. -A (XPG4 Only.) Select all processes. (Synonym for -e.) -a Select all processes except process group leaders and processes not associated with a terminal. -C cmdlist (XPG4 Only.) Select processes executing a command with a basename given in cmdlist. -d Select all processes except process group leaders. -e Select all processes. -g grplist Select processes whose process group leaders are given in grplist. -G gidlist (XPG4 Only.) Select processes whose real group ID numbers or group names are given in gidlist. -n namelist (XPG4 Only.) This option is ignored; its presence is allowed for standards compliance. -p proclist Select processes whose process ID numbers are given in proclist. -R prmgrplist Select processes belonging to PRM process resource groups whose names or ID numbers are given in prmgrplist. See DEPENDENCIES. -s sidlist (XPG4 Only.) Select processes whose session leaders are given in sidlist. (Synonym for -g). -t termlist Select processes associated with the terminals given in termlist. Terminal identifiers can be specified in one of two forms: the device's file name (such as tty04) or if the device's file name starts with tty, just the rest of it (such as 04). If the device's file is in a directory other than /dev or /dev/pty, the terminal identifier must include the name of the directory under /dev that contains the device file (such as pts/5). -u uidlist Select processes whose effective user ID numbers or login names are given in uidlist. -U uidlist (XPG4 Only.) Select processes whose real user ID numbers or login names are given in uidlist. If any of the -a, -A, -d, or -e options is specified, the -C, -g, -G, -p, -R, -t, -u, and -U options are ignored. If more than one of -a, -A, -d, and -e are specified, the least restrictive option takes effect. If more than one of the -C, -g, -G, -p, -R, -t, -u, and -U options are specified, processes will be selected if they match any of the options specified. The lists used as arguments to the -C, -g, -G, -p, -R, -t, -u, and -U options can be specified in one of two forms: - A list of identifiers separated from one another by a comma. - A list of identifiers enclosed in quotation marks (") and separated from one another by a comma and/or one or more spaces. Output Format Options Use the following options to control which columns of data are included in the output listing. The options are cumulative. (none) The default columns are: pid, tty, time, and comm, in that order. -f Show columns user, pid, ppid, cpu, stime, tty, time, and args, in that order. -l Show columns flags, state, uid, pid, ppid, cpu, intpri, nice, addr, sz, wchan, tty, time, and comm, in that order. -fl Show columns flags, state, user, pid, ppid, cpu, intpri, nice, addr, sz, wchan, stime, tty, time, and args, in that order. -c (XPG4 Only.) Remove columns cpu and nice; replace column intpri with columns cls and pri. -j (XPG4 Only.) Add columns pgid and sid after column ppid (or pid, if ppid is not being displayed). -P Add column prmid (for -l) or prmgrp (for -f or -fl) immediately before column pid. See DEPENDENCIES. -o format (XPG4 Only.) format is a comma- or space-separated list of the columns to display, in the order they should be displayed. (Valid column names are listed below.) A column name can optionally be followed by an equals sign (=) and a string to use as the heading for that column. (Any commas or spaces after the equals sign will be taken as a part of the column heading; if more columns are desired, they must be specified with additional -o options.) The width of the column will be the greater of the width of the data to be displayed and the width of the column heading. If an empty column heading is specified for every heading, no heading line will be printed. This option overrides options -c, -f, -j, -l, and -P; if they are specified, they are ignored. -H (XPG4 Only.) Shows the process hierarchy. Each process is displayed under its parent, and the contents of the args or comm column for that process is indented from that of its parent. Note that this option is expensive in both memory and speed. The column names and their meanings are given below. Except where noted, the default heading for each column is the uppercase form of the column name. addr The memory address of the process, if resident; otherwise, the disk address. args The command line given when the process was created. This column should be the last one specified, if it is desired. Only a subset of the command line is saved by the kernel; as much of the command line will be displayed as is available. The output in this column may contain spaces. The default heading for this column is COMMAND if -o is specified and CMD otherwise. cls Process scheduling class, see rtsched(1). comm The command name. The output in this column may contain spaces. The default heading for this column is COMMAND if -o is specified and CMD otherwise. cpu Processor utilization for scheduling. The default heading for this column is C. etime Elapsed time of the process. The default heading for this column is ELAPSED. flags Flags (octal and additive) associated with the process: 0 Swapped 1 In core 2 System process 4 Locked in core (e.g., for physical I/O) 10 Being traced by another process 20 Another tracing flag The default heading for this column is F. intpri The priority of the process as it is stored internally by the kernel. This column is provided for backward compatibility and its use is not encouraged. gid The group ID number of the effective process owner. group The group name of the effective process owner. nice Nice value; used in priority computation (see nice(1)). The default heading for this column is NI. pcpu The percentage of CPU time used by this process during the last scheduling interval. The default heading for this column is %CPU. pgid The process group ID number of the process group to which this process belongs. pid The process ID number of the process. ppid The process ID number of the parent process. pri The priority of the process. The meaning of the value depends on the process scheduling class; see cls, above, and rtsched(1). prmid The PRM process resource group ID number. prmgrp The PRM process resource group name. rgid The group ID number of the real process owner. rgroup The group name of the real process owner. ruid The user ID number of the real process owner. ruser The login name of the real process owner. sid The session ID number of the session to which this process belongs. state The state of the process: 0 Nonexistent S Sleeping W Waiting R Running I Intermediate Z Terminated T Stopped X Growing The default heading for this column is S. stime Starting time of the process. If the elapsed time is greater than 24 hours, the starting date is displayed instead. sz The size in physical pages of the core image of the process, including text, data, and stack space. Physical page size is defined by _SC_PAGE_SIZE in the header file <unistd.h> (see sysconf(2) and unistd(5)). time The cumulative execution time for the process. tty The controlling terminal for the process. The default heading for this column is TT if -o is specified and TTY otherwise. uid The user ID number of the effective process owner. user The login name of the effective process owner. vsz The size in kilobytes (1024 byte units) of the core image of the process. See column sz, above. wchan The event for which the process is waiting or sleeping; if there is none, a hyphen (-) is displayed. Notes ps prints the command name and arguments given at the time of the process was created. If the process changes its arguments while running (by writing to its argv array), these changes are not displayed by ps. A process that has exited and has a parent, but has not yet been waited for by the parent, is marked <defunct> (see zombie process in exit(2)). The time printed in the stime column, and used in computing the value for the etime column, is the time when the process was forked, not the time when it was modified by exec*(). To make the ps output safer to display and easier to read, all control characters in the comm and args columns are displayed as "visible" equivalents in the customary control character format, ^x. EXTERNAL INFLUENCES Environment Variables UNIX95 specifies to use the XPG4 behavior for this command. The changes for XPG4 include support for the entire option set specified above and include the following behavioral changes: - The TIME column format changes from mmmm:ss to [dd-]hh:mm:ss. - When the comm, args, user, and prmgrp fields are included by default or the -f or -l flags are used, the column headings of those fields change to CMD, CMD, USER, and PRMGRP, respectively. - -a, -d, and -g will select processes based on session rather than on process group. - The uid or user column displayed by -f or -l will display effective user rather than real user. - The -u option will select users based on effective UID rather than real UID. - The -C and -H options, while they are not part of the XPG4 standard, are enabled. LC_TIME determines the format and contents of date and time strings. If it is not specified or is null, it defaults to the value of LANG. If LANG is not specified or is null, it defaults to C (see lang(5)). If any internationalization variable contains an invalid setting, all internationalization variables default to C (see environ(5)). International Code Set Support Single-byte character code sets are supported. EXAMPLES Generate a full listing of all processes currently running on your machine: ps -ef To see if a certain process exists on the machine, such as the cron clock daemon, check the far right column for the command name, cron, or try ps -f -C cron WARNINGS Things can change while ps is running; the picture it gives is only a snapshot in time. Some data printed for defunct processes is irrelevant. If two special files for terminals are located at the same select code, that terminal may be reported with either name. The user can select processes with that terminal using either name. Users of ps must not rely on the exact field widths and spacing of its output, as these will vary depending on the system, the release of HP-UX, and the data to be displayed. DEPENDENCIES HP Process Resource Manager The -P and -R options require the optional HP Process Resource Manager (PRM) software to be installed and configured. See prmconfig(1) for a description of how to configure HP PRM, and prmconf(4) for the definition of "process resource group." If HP PRM is not installed and configured and -P or -R is specified, a warning message is displayed and (for -P) hyphens (-) are displayed in the prmid and prmgrp columns. FILES /dev Directory of terminal device files /etc/passwd User ID information /var/adm/ps_data Internal data structure SEE ALSO kill(1), nice(1), acctcom(1M), exec(2), exit(2), fork(2), sysconf(2), unistd(5). HP Process Resource Manager: prmconfig(1), prmconf(4) in HP Process Resource Manager User's Guide. STANDARDS COMPLIANCE ps: SVID2, XPG2, XPG3, XPG4 shutdown
shutdown - Terminate all running processes in an orderly fashion.
shutdown(1M) shutdown(1M) NAME shutdown - terminate all processing SYNOPSIS /sbin/shutdown [-h|-r] [-y] [-o] [grace] DESCRIPTION The shutdown command is part of the HP-UX system operation procedures. Its primary function is to terminate all currently running processes in an orderly and cautious manner. shutdown can be used to put the system in single-user mode for administrative purposes such as backup or file system consistency checks (see fsck(1M)), and to halt or reboot the system. By default, shutdown is an interactive program. Options and Arguments shutdown recognizes the following options and arguments. -h Shut down the system and halt. -r Shut down the system and reboot automatically. -y Do not require any interactive responses from the user. (Respond yes or no as appropriate to all questions, such that the user does not interact with the shutdown process.) -o When executed on the cluster server in a diskless cluster environment, shutdown the server only and do not reboot clients. If this argument is not entered the default behavior is to reboot all clients when the server is shutdown. grace Either a decimal integer that specifies the duration in seconds of a grace period for users to log off before the system shuts down, or the word now. The default is 60. If grace is either 0 or now, shutdown runs more quickly, giving users very little time to log out. If neither -r (reboot) nor -h (halt) is specified, standalone and server systems are placed in single-user state. Either -r (reboot) or -h (halt) must be specified for a client; shutdown to single-user state is not allowed for a client. See dcnodes(1M), init(1M). Shutdown Procedure shutdown goes through the following steps: - The PATH environment variable is reset to /usr/bin:/usr/sbin:/sbin. - The IFS environment variable is reset to space, tab, newline. - The user is checked for authorization to execute the shutdown command. Only authorized users can execute the shutdown command. See FILES for more information on the /etc/shutdown.allow authorization file. - The current working directory is changed to the root directory (/). - All file systems' super blocks are updated; see sync(1M). This must be done before rebooting the system to ensure file system integrity. - The real user ID is set to that of the superuser. - A broadcast message is sent to all users currently logged in on the system telling them to log out. The administrator can specify a message at this time; otherwise, a standard warning message is displayed. - The next step depends on whether a system is standalone, a server, or a client. - If the system is standalone, /sbin/rc is executed to shut down subsystems, unmount file systems, and perform other tasks to bring the system to run level 0. - If the system is a server, the optional -o argument is used to determine if all clients in the cluster should also be rebooted. The default behavior (command line parameter -o is not entered) is to reboot all clients using /sbin/reboot; entering -o results in the server only being rebooted and the clients being left alone. Then /sbin/rc is executed to shut down subsystems, unmount file systems, and perform other tasks to bring the system to run level 0. - If the system is a client, /sbin/rc is executed to bring the system down to run-level 2, and then /sbin/reboot is executed. Shutdown to the single-user state is not an allowed option for clients. - The system is rebooted or halted by executing /sbin/reboot if the -h or -r option was chosen. If the system was not a cluster client and the system was being brought down to single-user state, a signal is sent to the init process to change states (see init(1M)). DIAGNOSTICS device busy This is the most commonly encountered error diagnostic, and happens when a particular file system could not be unmounted; see mount(1M). user not allowed to shut down this system User is not authorized to shut down the system. User and system must both be included in the authorization file /etc/shutdown.allow. EXAMPLES Immediately reboot the system and run HP-UX again: shutdown -r 0 Halt the system in 5 minutes (300 seconds) with no interactive questions and answers: shutdown -h -y 300 Go to run-level s in 10 minutes: shutdown 600 FILES /etc/shutdown.allow Authorization file. The file contains lines that consist of a system host name and the login name of a user who is authorized to reboot or halt the system. A superuser's login name must be included in this file in order to execute shutdown. However, if the file is missing or of zero length, the root user can run the shutdown program to bring the system down. This file does not affect authorization to bring the system down to single-user state for maintenance purposes; that operation is permitted only when invoked by a superuser. A comment character, #, at the beginning of a line causes the rest of the line to be ignored (comments cannot span multiple lines without additional comment characters). Blank lines are also ignored. The wildcard character + can be used in place of a host name or a user name to specify all hosts or all users, respectively (see hosts.equiv(4)). For example: # user1 can shut down systemA and systemB systemA user1 systemB user1 # root can shut down any system + root # Any user can shut down systemC systemC + WARNINGS The user name compared with the entry in the shutdown.allow file is obtained using getlogin() or, if that fails, using getpwuid() (see getlogin(3) and getpwuid(3)). The hostname in /etc/shutdown.allow is compared with the hostname obtained using gethostbyname() (see gethostbyname(3)). shutdown must be executed from a directory on the root volume, such as the / directory. The maximum broadcast message that can be sent is approximately 970 characters. When executing shutdown on an NFS diskless cluster server and the -o option is not entered, clients of the server will be rebooted. No clients should be individually rebooted or shutdown while the cluster is being shutdown. SEE ALSO dcnodes(1M), fsck(1M), init(1M), killall(1M), mount(1M), reboot(1M), sync(1M), dcnodes(3), gethostbyname(3), getpwuid(3), hosts.equiv(4).
vipw
vipw - Edit the passwd file with locking.
.
vipw(1M) vipw(1M) NAME vipw - edit the password file SYNOPSIS vipw DESCRIPTION vipw edits the password file while setting the appropriate locks, and does any necessary processing after the password file is unlocked. If the password file is already being edited, you will be told to try again later. The vi editor is used unless the environment variable EDITOR indicates an alternate editor. vipw performs a number of consistency checks on the password entry for root, and does not allow a password file with an incorrectly formatted root entry to be installed. WARNINGS An /etc/passwd.tmp file not removed when a system crashes prevents further editing of the /etc/passwd file using vipw after the system is rebooted. AUTHOR vipw was developed by the University of California, Berkeley. FILES /etc/passwd.tmp SEE ALSO passwd(1), passwd(4).
| CONTENTS |
EAN: 2147483647
Pages: 34
- ERP Systems Impact on Organizations
- The Second Wave ERP Market: An Australian Viewpoint
- The Effects of an Enterprise Resource Planning System (ERP) Implementation on Job Characteristics – A Study using the Hackman and Oldham Job Characteristics Model
- Healthcare Information: From Administrative to Practice Databases
- Relevance and Micro-Relevance for the Professional as Determinants of IT-Diffusion and IT-Use in Healthcare
- Step 1.1 Install OpenSSH to Replace the Remote Access Protocols with Encrypted Versions
- Step 2.1 Use the OpenSSH Tool Suite to Replace Clear-Text Programs
- Step 3.3 Use WinSCP as a Graphical Replacement for FTP and RCP
- Step 4.3 How to Generate a Key Pair Using OpenSSH
- Step 4.5 How to use OpenSSH Passphrase Agents