Backup and Recovery
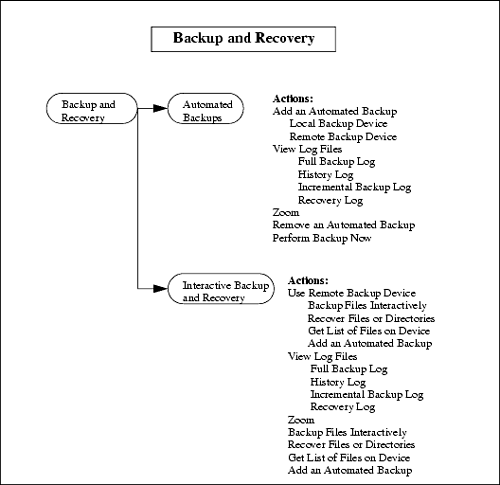
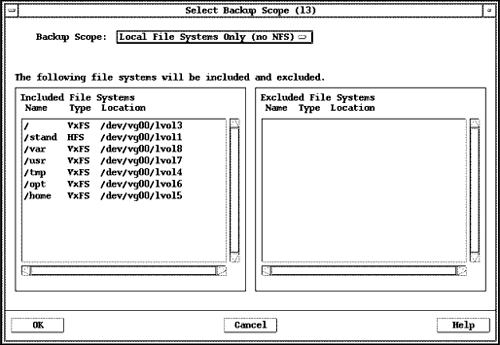
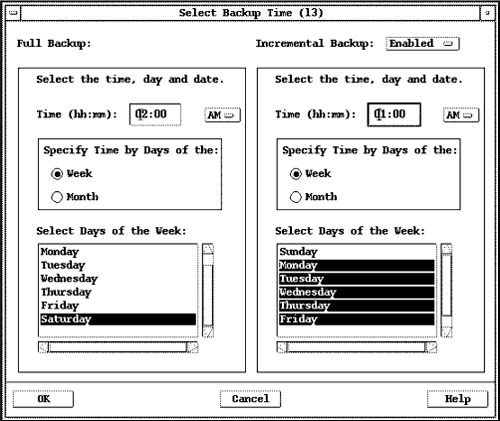
| The most important activities you'll perform as a system administrator are system backup and recovery. The SAM team put a lot of thought into giving you all the options you need to ensure the integrity of your system through backup and recovery. You may also want to review Chapter 6, which covers various backup commands available on HP-UX. Figure 10-12 shows the hierarchy of the Backup and Recovery SAM menu: Figure 10-12. Backup and Recovery Menu Structure Scheduling a BackupThe first step is to enter the Automated Backups subarea. You won't see any automated backups appear in the list until you have specified one. Using the Actions menu and selecting Add an Automated Backup, you can specify all the information about your automated backup. When you select Add an Automated Backup, you have to specify whether your backup will be to a local or a remote backup device. You will have to enter information pertaining to the backup scope, backup device, backup time, and additional parameters. Select Backup ScopeYou can view the backup scope as the files that will be included and excluded from the backup. This can include Network File System (NFS)-mounted file systems as well. Figure 10-13 shows the window used to specify files to be included and excluded from a backup: Figure 10-13. Selecting the Backup Scope In the selections shown in Figure 10-13 are several directories specified under Included Files . These were selected with the Local File Systems Only (no NFS) option. We could easily have excluded files and directories from the backup scope as well. Select Backup DeviceIf you plan to back up to a local backup device, then those attached to your system will be listed and you select the desired device from the list. If you plan to use a remote backup device, then you will be asked to specify the remote system name and device file. Select Backup TimeAs with the backup scope, you are provided with a window in which you can enter all the information about backup time for both full and incremental backups, as shown in Figure 10-14. If Incremental Backup is Enabled, then you must provide all pertinent information about both the full and incremental backup, as shown in the figure. Figure 10-14. Selecting the Backup Time A key point to keep in mind here is that the incremental backup that SAM creates for you includes files that have been changed since the last full backup . This means that you need only the full backup and last incremental backup to recover your system; that is, you do not need to restore the full backup and each incremental backup. Set Additional Parameters
The format of entries in the crontab file is as follows : You have many options in the crontab for specifying the minute, hour, monthday, month, and weekday to perform a task. You could list one entry in a field and then a space, several entries in any field separated by a comma, two entries separated by a dash indicating a range, or an asterisk, which corresponds to all possible entries for the field. To list the contents of the crontab file, you would issue the command crontab -l . following command . SAM will create a crontab entry for any backups you specify.
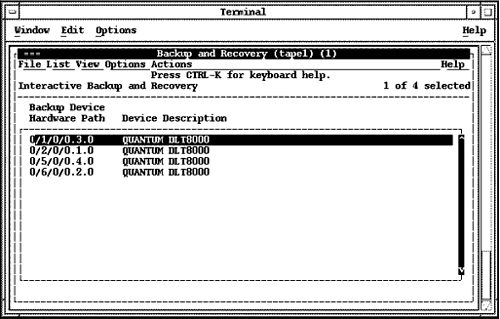
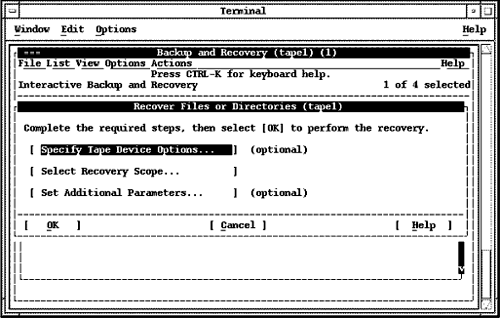
$ crontab -r This will remove the crontab file for the user from the /var/spool/cron/crontabs directory. To place a file in the crontab directory, you would simply issue the crontab command and the name of the crontab file: $ crontab crontabfile You can schedule cron jobs using SAM. The section in this chapter covering Process Management has a section called Scheduling Cron Jobs. Interactive Backup and RecoveryThe Interactive Backup and Recovery subarea is used to perform a backup interactively or to restore information that was part of an earlier backup. When you enter this area, you are asked to select a backup device from a list that is produced, in the same way that you are asked to select a backup device when you first enter the Automated Backups subarea. After selecting a device from the list, you may select an item from the Actions menu shown earlier. If you decide to use Backup Files Interactively, you are again provided a window from which you can specify files to be included and excluded from the backup. You are asked to Select Backup Scope, Specify Tape Device Options , and Set Additional Parameters . You are not, however, asked to Select Backup Time, since the backup is taking place interactively. The steps in this area will vary, depending on the tape devices you have selected. The index files can be reviewed from the Actions menu. These are stored in the /var/sam/log directory. The following shows the very top and bottom of an index file for an interactive backup: # 1 / # 1 /.profile # 1 /.rhosts # 1 /.sh_history # 1 /.sw # 1 /.sw/sessions # 1 /.sw/sessions/swinstall.last # 1 /.sw/sessions/swlist.last # 1 /.sw/sessions/swmodify.last # 1 /.sw/sessions/swreg.last # 1 /.dt # 1 /.dt/Desktop # 1 /.dt/Desktop/Two TOP # 1 /.dt/Desktop/Four # 1 /.dt/Desktop/One # 1 /.dt/Desktop/Three . . . # 1 /var/uucp/.Log/uucico # 1 /var/uucp/.Log/uucp # 1 /var/uucp/.Log/uux # 1 /var/uucp/.Log/uuxqt # 1 /var/uucp/.Old # 1 /var/uucp/.Status # 1 /var/varspool/sw # 1 /var/varspool/sw/catalog/dfiles # 1 /var/varspool/sw/catalog/swlock # 1 /var/varspool/sw/swagent.log # 1 /var/yp # 1 /var/yp/Makefile BOTTOM # 1 /var/yp/binding # 1 /var/yp/securenets # 1 /var/yp/secureservers # 1 /var/yp/updaters # 1 /var/yp/ypmake # 1 /var/yp/ypxfr_1perday # 1 /var/yp/ypxfr_1perhour # 1 /var/yp/ypxfr_2perday Performing a RestoreA full or incremental backup, however, is only as good as the files it restores . To retrieve a file from the backup tape, you specify a backup device and then many options related to the backup. Figure 10-15 shows one device selected from among four DLT units connected to a system: Figure 10-15. Selecting From Among Four DLT Units After selecting a device, there are a number of options from which you can select, including those shown in Figure 10-16: Figure 10-16. Recover Files Interactively In this window you supply information in three areas: Select Recovery Scope; Specify Tape Device Options ; and Set Additional Parameters . The device options you specify will depend on the tape device you are using. Select Recovery Scope allows you to either enter a file name that contains the files to be recovered or manually list the files to be included in the recovery. You can optionally list files to be excluded from the recovery as well. A list of tape device files is provided in Specify Tape Device Options, from which you can select the tape device. In this step, you may select the tape device file; in other cases, you might make selections such as a magneto-optical surface, or you may have nothing to select at all. Under Set Additional Parameters, you can select any of the following options:
After you make all the desired selections, the recovery operation begins. If a file has been inadvertently deleted and you wish to restore it from the recovery tape, you would select the Preserve Original File Ownership and Recover Files Using Full Path Name options. You will be given the status of the recovery as it takes place and may also View Recovery Log from the Actions menu after the recovery has completed. If you View Recovery Log, you will receive a window that provides the name of the index log and the names of the files recovered. |
EAN: 2147483647
Pages: 301
