Installing HP-UX
| < Day Day Up > |
| This section covers installing HP-UX 11i on an HP Integrity server. At the time of this writing there is a version of HP-UX specifically for Integrity servers. The release we're loading is HP-UX 1i version 1.6 (B.11.22). Begin the process to load HP-UX by placing the HP-UX core oe install and recovery DVD-ROM into the DVD-ROM on the Integrity server and then interrupting the boot process when we reach the window shown in Figure 13-1. Figure 13-1. Select Boot option maintenance menu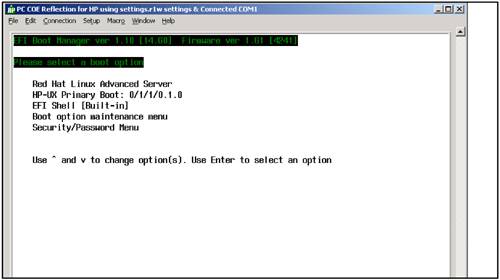 From the menu shown in Figure 13-1, you could make a variety of selections, including booting a Red Hat Linux or HP-UX that you already have installed. You want to install from DVD-ROM, so you select Boot option maintenance menu. The next menu to appear is shown in Figure 13-2. Figure 13-2. Select Boot from a file Many boot maintenance options are shown in Figure 13-2. You could perform a variety of tasks, such as adding and deleting boot options or changing the boot order. To install from DVD-ROM select Boot from a file which brings up the menus shown in Figure 13-3. Figure 13-3. Select CD-ROM You are now presented with a series of volumes off of which you could boot or go to the EFI shell. You have your HP-UX 11i DVD-ROM in the first entry in the figure that has CD-ROM in it. There are many volumes shown on which operating systems are already loaded. When CD-ROM is selected, the menu in Figure 13-4 is displayed. Figure 13-4. Select INSTALL.EFI to Proceed with the Installation You want to load INSTALL.EFI, which is the second entry in the list. After you make this selection and enter the console line, the screen in Figure 13-5 appears. Figure 13-5. HP-UX Installation Screen with Install HP-UX Selected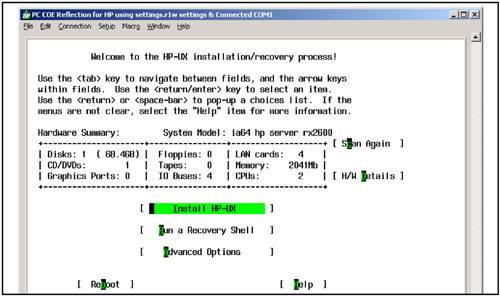 At this point, you see the familiar screen of the HP-UX installation and recovery process. Loading HP-UX from this point is nearly identical to loading HP-UX on a Precision Architecture-based system. Now select Install HP-UX and the screen shown in Figure 13-6 appears. Figure 13-6. Options to Loading HP-UX Now you can select from a variety of Source and User options. Since this installation is from DVD-ROM, select Media only and Advanced Installation, which brings up the window shown in Figure 13-7. Figure 13-7. Making Selections When Loading HP-UX Across the top of the screen shot are a series of tabs from which you can select and make modifications before installing HP-UX. The Software tab has been selected and you've selected All software to be loaded. Figure 13-8 shows the System tab. Figure 13-8. System Tab This figure shows the system-related information that we've entered as part of the installation. You could select other tabs as well, such as File System to adjust the setup of the file systems. To complete the HP-UX installation, select Go!. The installation process that we just walked through is nearly identical to a Precision Architecture-based installation once we reached the installation and recovery window. The next section discusses how to install Windows Server 2003 on an Integrity server. |
| < Day Day Up > |
EAN: 2147483647
Pages: 100