| Encrypted wireless communications use the exact same policy-based encrypted communications process used in IPSec encryption. Rather than using a static WEP key to provide secured communications between a client system and a wireless access point, a certificate is used to encrypt communications between client systems and the network. This certificate is issued through the use of group policies that enable the automated distribution of security for wireless systems. Preparing for Wireless Configuration There are a couple things that must be added to Active Directory in order for automatic wireless encryption operations to work properly. One is that your Active Directory should be in Windows 2003 functional level so that you can configure remote access policy for clients using a group policy. This is not mandatoryyou can always configure each user to have remote access manually; however, it is a lot easier to do it through a policy. If you want to raise the functional level of your domain to Windows 2003 functional level, do the following: 1. | Launch the Active Directory Users and Computers utility by clicking on Start | Programs | Administrative Tools, and select Active Directory Users and Computers.
| 2. | Right-click the forest name (for example, companyabc.com) and choose the Raise Domain Functional Level option.
| 3. | As shown in Figure 18, select Windows 2003 for the functional level (if the domain is on Windows 2000 for the functional level), and then click OK.
Figure 18. Raising the domain functional level to Windows 2003. 
|
Once in a Windows 2003 functional level, you will be able to set the remote access policy through a group policy object. The second requirement is to install Windows 2003 Internet Authentication Service (IAS) on a server. IAS will provide secured authentication to the network. To install IAS, do the following: | | 1. | On the server that will become your IAS server, click on Start | Settings | Control Panel.
| 2. | Double-click on Add or Remove Programs, and then click on Add/Remove Windows Components.
| 3. | Highlight the Networking Services option and click the Details button.
| 4. | Select the check box for Internet Authentication Service, and then click OK.
| 5. | Click Next to install IAS on the system, and then click Finish after IAS has been installed.
|
After IAS has been installed, you'll need to configure the IAS service. You configure IAS by doing the following: 1. | Launch the IAS Administrative Tool by clicking on Start | Programs | Administrative Tools, and select Internet Authentication Service.
| 2. | Right-click Internet Authentication Service (Local) on the main screen of the administrative tool and choose Register Server in Active Directory.
| 3. | When prompted to authorize the computer to read users' dial-in properties, click OK, and then continue to click OK through the rest of the prompts.
| 4. | Right-click on the RADIUS Clients folder and choose New RADIUS Client.
| 5. | For the Friendly Name, enter anything that is descriptive of the access point to which you are setting up RADIUS access. (It could be something such as Conference Room A Access Point.) Then enter the IP address of the access point, and click Next.
| 6. | Select RADIUS Standard for the Client-Vendor option, and enter the Shared Secret word that will link your IAS server to your access point for security, as shown in Figure 19. (It could be something such as iaswirelessjust make sure you enter that same Shared Secret word on the access point configuration page.)
|
Figure 19. Setting the RADIUS standard and Shared Secret word configuration. 
Creating a Wireless Remote Access Policy Your next step is to create a wireless remote access policy. To do so, do the following: 1. | Right-click the Remote Access Policies item on the Internet Authentication Service (Local) administration tool page and choose New Remote Access Policy.
| 2. | Click Next to begin the wizard.
| 3. | Choose Use the Wizard to Set Up a Typical Policy for a Common Scenario and enter a policy name such as Wireless Access Policy, and then click Next.
| 4. | Select Wireless for the Access method, as shown in Figure 20, and then click Next.
Figure 20. Choosing wireless access for the remote access policy in IAS. 
| | | 5. | Click the Add button to select the group(s) that you want to grant wireless access, and then click Next.
| 6. | Specify Protected EAP (PEAP) for the Authentication method, and then click Next.
| 7. | Click Finish when done.
|
Configuring a Group Policy to Limit Supported Access Points The next step is to configure a group policy to limit the access points the clients can connect to on the network, as well as enforce the 802.1x wireless encryption policy. To configure the group policy, do the following: 1. | Launch the Active Directory Users and Computers tool by selecting Start | Programs | Administrative Tools and choosing Active Directory Users and Computers.
| 2. | Right-click on the forest name of the network (such as companyabc.com) and choose Properties.
| 3. | Click on the Group Policy tab.
| 4. | Highlight the Default Domain Policy and click Edit.
| 5. | Under the Computer Configuration container, expand the Windows Settings folder, and then expand the Security Settings folder.
| 6. | Right-click on the Wireless Network (IEEE 802.11) Policies option and choose Create Wireless Network Policy, and then click Next.
| 7. | Give the Wireless Network Policy a name such as Wireless Network Group Policy, and then click Next.
| 8. | With the Edit Properties checked, click Finish.
| 9. | Leave the Policy Change setting to the default 180 minutes. Change the Networks to Access so they are Access Point (Infrastructure) Networks Only. Check the Use Windows to Configure Wireless Network Settings option, and uncheck the Automatically Connect to Non-preferred Networks option.
| | | 10. | Click on the Preferred Networks tab, and then click the Add button and enter the names of the SSIDs that you want the users to access. Typically, you would have your Network Authentication to Open, your Data Encryption to WEP, and you would uncheck The Key Is Provided Automatically, as well as make sure the Ad Hoc Network option is unchecked.
| 11. | Click on the IEEE 802.1x tab. Change the EAP type to PEAP so the screen looks similar to what is shown in Figure 21, and then click OK.
Figure 21. Setting IEEE 802.1x settings. 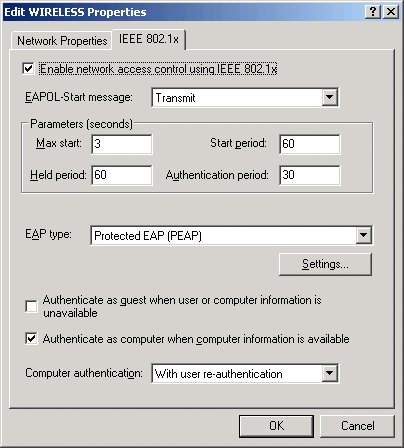
|
Tuning Windows XP to Process Policies After the policy has been set in Active Directory, a minor tweak needs to be made to resolve a problem in Windows XP in which a wireless device logs on in a sequence that causes wireless connection, group policy processing, and authentication problems. This involves making Windows XP process scripts and policies serially rather than in parallel. This can be set in a group policy as follows: 1. | Launch the Active Directory Users and Computers tool by selecting Start | Programs | Administrative Tools and choosing Active Directory Users and Computers.
| 2. | Right-click on the forest name of the network (such as companyabc.com) and choose Properties.
| 3. | Click on the Group Policy tab.
| 4. | Highlight the Default Domain Policy and click Edit.
| 5. | Under the Computer Configuration container, expand the Administrative Templates folder, and then expand the System folder.
| | | 6. | Click on the Logon container.
| 7. | Double-click on the Always Wait for the Network at Computer Startup and Logon group policy object and choose Enabled, as shown in Figure 22, and then click OK.
Figure 22. Setting a group policy to support network logon sequencing. 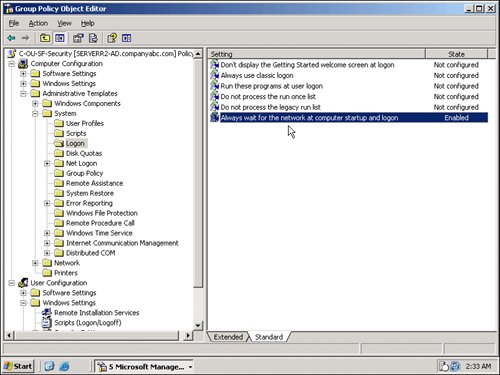
|
With the policies applied to the wireless systems, the devices will use 802.1x wireless leveraging PEAP to access the network for secured wireless connection. |