6.7. Effects: The iMovie Catalog iMovie comes with 48 built-in effects, including dozens of new ones. The following list describes them all. 6.7.1. Adjust Colors This powerful effect adjusts the actual color palette used in your clip footage. If your footage has an unfortunate greenish tint, you can color -correct it; if you're hoping for a sunset look, you can bring out the oranges and reds; if it's a scifi flick taking place on Uranus, you can make it look blue and spooky. The special sliders for this effect affect the hue, saturation, and brightness of your footage. Hue, saturation, and brightness are cornerstones of color theory; you can read much more about them on the Web, or in books and articles about photo editing. In the meantime, here's a brief summary: -
Hue Shift (LeftRight) . Adjusts the overall color tint of the clip. What iMovie is actually doing is rotating the hue around the hue circle, either to the left or the right. In practice, this effect doesn't do anything predictable to an image; you're meant to play with it until you find something you like. -
Color (B&WVivid) . This slider lets you control the intensity of a color, or its saturation . If it's blue, you control how blue it is: increasing toward Vivid makes the blue more intense . -
Lightness (DarkBright) . Use this slider to adjust the overall brightness or darkness of the colors in your clip. There's only a subtle difference between these effects and the Brightness/Contrast effect described below; this slider adjusts the brightness of the colors, rather than the overall brightness. 6.7.2. Aged Film Here you've just spent $500 on a camcorder and a couple thou on a Macintosh, all in the name of attaining perfect purity of videoand then this effect comes along. It's designed to make a clip look like an old, flickering , dusty film, complete with horrible scratches along the celluloid. Using the Exposure, Jitter, and Scratches sliders, you can control just how faded, shaky-in-the-projector, and scratched up the footage looks (Figure 6-9, top). Combine this one with Black & White, described next , and you've got yourself something that looks authentically like a horribly preserved reel you dug up from somebody's attic. Figure 6-9. Top: Modern museum? Nothanks to the Aged Film effect, it's ancient edifice circa 1938.
Bottom: Earthquake! (For a better simulation of what iMovie really does, shake this book rapidly in front of your face.) This effect looks really great when you adjust the Effect In and Effect Out sliders so that the shaking begins gradually and intensifies. (Better yet, apply the effect several times, to make the intensity of the shaking appear to fluctuate.) 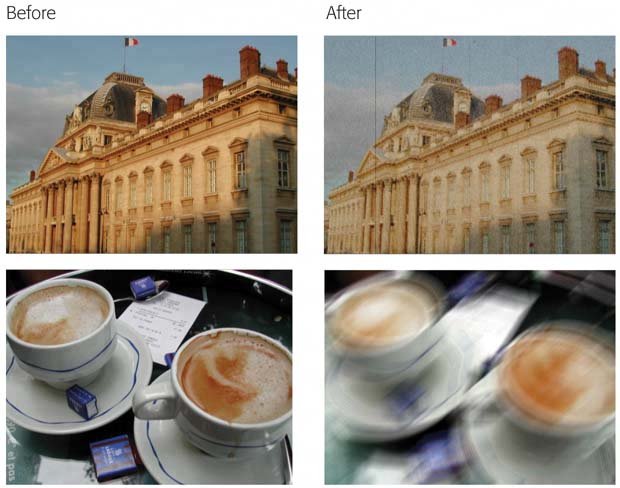
6.7.3. Black & White This effect does one thing very well: It turns your clip into a black-and-white piece of footage, suitable for simulating security-camera footage or TV from the 1950s. 6.7.4. Brightness & Contrast Footage that's too dark is one of the most common hallmarks of amateur camcorder work. If you're filming indoors without extra lights, you may as well accept the fact that your clip will be too dark. The Brightness & Contrast controls can help, but they're no substitute for good lighting in the original footage. When you drag the Brightness and Contrast sliders in very small amounts, you may be able to rescue footage that's slightly murky or washed out. Dragging the sliders a lot, however, may make the too-dark footage grainy and weird-looking.
Tip: Using the Effect In and Out sliders, you can control which parts of the clip are affected by the Adjust Colors and Brightness & Contrast effects. If you need the colors or brightness to shift several times over the course of a clip, consider chopping up the clip into several smaller clips, each of which is an opportunity to reset the effect settings and timings.
6.7.5. Earthquake Talk about an effect you'll use only rarely! This one (Figure 6-9, bottom) is designed to simulate camera shake , the jittery, shuddering, handheld, no-tripod, stabilizer-off look that you'd get if you felt the earth move under your feet, and felt the sky come tumblin' down. You can use the two sliders to specify how the earthquake is tossing your camera around: sideways or vertically, and to what degrees. Figure 6-10. Top: Lightning strikes as often as you feel like making it strike, thanks to the Electricity effect.
Bottom: The Fairy Dust effect might be better named Fireworks Sparkler, or perhaps Burning Fuse on an Invisible String. The trajectory and angle are up to you. 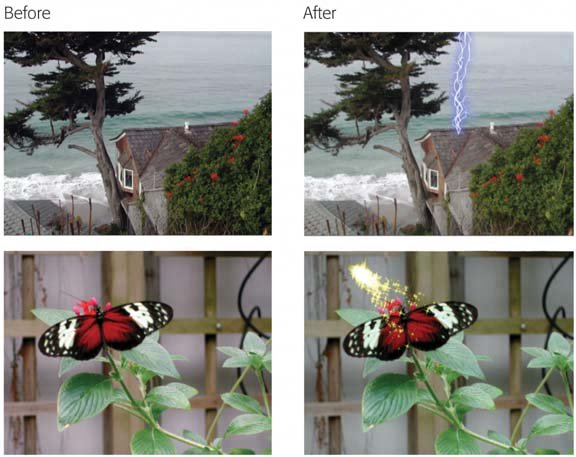
6.7.6. Electricity Unlike most of the other effects, which apply equally everywhere in the video frame, this one (Figure 6-10, top) actually superimposes an imagein this case, a purplish, flickering bolt of lightningonto any spot of the footage you want. You can use this one to great comic effect; when attached to the end of somebody's wand or walking stick, the electricity looks like it's shooting out. When attached to somebody's head or rear end, the electricity looks like it's zapping that hapless person. You can probably figure out that the Rotate slider lets you change the lightning bolt's angle (CW = Clockwise, CCW = Counterclockwise). But what you may not realize is that you can click inside the Preview window to specify the landing (or starting) point of the sparkler. By using the rotation and position controls in combination, you have complete freedom in designing the placement of the zap within the frame. (Alas, you can't make the bolt move during a clip. It stays put, crackling away right in place, so it's primarily useful for adding to a tripod shot that you filmed expressly for the purpose of doctoring later in iMovie.) 6.7.7. Fairy Dust Like Electricity, this effect (Figure 6-10, bottom) is designed to superimpose a professional-looking sparkler effect on your footage. In this case, you get a shooting firework that follows a specified arc across the frame; the net effect is something like a burning fuse. Here again, you can click within the Preview frame to position the starting point, thereby adjusting the sparkler's trajectory. Use the Direction slider to specify whether the fire flies left to right across the frame, or right to left. (It really has no business being a slider. It has only two positions : left or right. Dragging the handle to an intermediate point does nothing.) The Trail slider, meanwhile, governs the size of the sparkler. 6.7.8. Fast/Slow/Reverse If you're a veteran of iMovie, you may remember that the Fast, Slow, and Reverse controls used to be at the bottom edge of the Timeline Viewer. It occurred to somebody at Apple that this placement really made very little sense; those are, after all, special effects. Why should they work differently from all the other effects? So Fast/Slow/Reverse is now a card-carrying occupant of the Effects listand each component has been improved and upgraded in the process. 6.7.8.1. Reverse Direction When you hear that iMovie can play clips backward, you might assume that this feature is a gimmick that's primarily useful for applying to footage of people jumping into swimming pools or jumping off of walls. To be sure, iMovie does a great job at creating these comic effects, even if their novelty does wear off quickly. But reverse motion can be useful in much less obvious situationscases where your original footage needs some help. For example, you can use this feature to create a zoom out when all you filmed was a zoom in, or a pan to the right when you shot a pan to the left. You can make your star's head turn away from the camera instead of toward it. Even reversing the playback of a slow-motion eye blink can make all the difference in the emotional impact of a certain shot. To make a clip play backwards , click its icon, click the Effects button, click Fast/Slow/ Reverse, and then turn on Reverse Direction. The video in a reverse-motion clip plays back beautifully; even the audio gets reversed , offering hours of fun to the kind of people who look for secret messages in Beatles albums. (Of course, you can always turn off the clip's sound, if that backward-audio effect isn't what you want.) 6.7.8.2. Slow Motion, Fast Motion Slow motion is extremely effective when you're going for an emotional, nostalgic, warm feeling, especially when you delete the original soundtrack and replace it with music (see Chapter 8). On the more pragmatic side, it's also useful when analyzing your tennis swing, golf stroke, or sleight-of-hand technique. Fast motion is generally useful only for comic effectskids wrasslin' on the living-room floor is a sure winner. It can also help with time-lapse effects if you didn't think to use the new Time Lapse importing mode ahead of time (Section 4.9). To produce one of these effects, use the Speed slider at the bottom of the Fast/Slow/Reverse effect panel. You can drag this slider to the left or right to make the clip play faster or slower. This slider has been enhanced in one very important way since its iMovie 4 incarnation: You're no longer limited to positioning the slider handle directly on the slider notches. That is, you're no longer obligated to make your footage play exactly two, three, four, or five times faster or slower. Now you can make a clip play just slightly faster by parking the little blue handle between the slider notches. When you adjust this slider and click Apply, the clip's blue bar grows or shrinks in the timeline to indicate its new duration. iMovie also speeds up and slows down the sound to match the video. Dialogue in sped-up clips takes on an "Alvin and the Chipmunks" quality, as though you're fast-forwarding through a tape; slowed-down clips sound like the dying computer HAL in 2001: A Space Odyssey .
Tip: If the distortion of slow- or fast-motion audio bothers you, you may find it wise to split the audio from the video before applying a slow- or fast-motion effect, so that the sound will be unaffected (see Section 8.11). Of course, the sound will no longer match the length of the video clip, but you may be able to solve this by cropping some of the audio or video.
6.7.9. Flash This effect simulates flash bulbs going off. You won't have much call for this effect in everyday filmmaking , but when that day arrives that you're trying to depict a movie star arriving at opening nightor somebody getting electrocuted iMovie stands ready. -
Count (OneMax) . This slider controls how many flashes will go off in the scene. (The maximum number depends on your Speed slider setting and the length of the clip, but the most you'll get is about one every seven frames , or about four per second.) -
Brightness (MinMax) . Controls the intensity of each flash. For true flashbulb effects, you'll want the slider at, or close to, its Max. For storm lightning or nuclear -bomb-watching effects, use lower settings. -
Speed (FastSlow) . Governs how far apart the flashes appear.
Tip: You can use this effect to create a convincing newsreel (or school science film) look. First, turn your clip into black-and-white using the Black & White effect. Now apply the Flash effect with the sliders set to Max, Min, and Fast, respectively.
6.7.10. Fog You already knew that by letting you edit and add music to your movies, iMovie lets you fiddle with the emotional overtones of your own memories. What you may not have realized is that it also lets you retroactively change the weather. Figure 6-11. Top: Weather not cooperating? Now you're the weatherman! Make it as foggy as you like, using the Fog effect.
Bottom: The Lens Flare creates an effective impersonation of an actual lens flare, especially if the angle of the shot changes to match the motion of the flare. 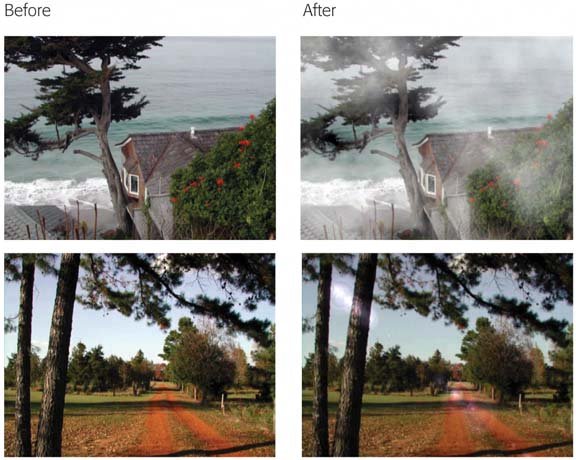
The Fog effect (Figure 6-11, top) creates a mist that seems to float in front of the camera lens. It's suitable for atmospheric effects, simulated fire or crash footage, comical hangover clips, and so on. The Amount slider controls the opacity of the fog, the Wind slider governs how quickly it drifts, and the Color slider lets you specify the color.
Tip: Don't be fooled by the Color slider's Black and White labels. The various positions along the slider actually proceed through all the colors of the rainbow.
6.7.11. Ghost Trails This effect makes moving portions of the video leave behind "visual echoes." In addition to blurry-vision effects, it can also be handy when you're trying to depict a runner as a superhero with blinding speed. On clips without much motion, this effect does nothing at all. The sliders let you control the intensity of the effect: -
Trail (ShortLong) . Governs the length of the ghost images that follow a rapidly moving object in your scene. -
Steps (SmallLarge) . Controls how closely the ghost image follows the object. -
Opacity (ClearOpaque) . Lets you specify the transparency of the ghost image. 6.7.12. Lens Flare When you aim the camera toward the sun, sunshine can strike the antireflective coating on the inside of each lens, resulting in a reflectiona bright spot, or (on complex lens systems) a trail of bright spotscalled lens flare. Ordinarily, photographers try to avoid lens flare. But hey, as long as Apple is on a quest to let you deliberately make your footage look damaged (see Aged Film and Earthquake), why not? Click within the Preview window to set the rotation point for the lens flare. Then use the Sweep slider to control how broadly the flare line sweeps across the frame, as happens when the camera moved during the shot. (If it did not, in fact, move, do your best to position the Sweep slider handle squarely in the middle of the slider to prevent the flare from moving at all.) The Intensity slider adjusts the size of the primary sunshine blob. (You'll get it as soon as you try it.) Figure 6-11, bottom, shows the result. 6.7.13. Letterbox This filter adds black letterbox bars above and below the frame, creating the look of movies (which have 16:9 proportions) as they sometimes appear when presented on a TV (which has 4:3 proportions ). You may have seen this look on the Bravo channel, on a Woody Allen video, on some DVDs, or in artsy TV commercials. The paradox, of course, is that your footage was already correctly shaped for a 4:3 TV screen. So to make it look as though the original was movie-shaped, iMovie has no choice but to chop off the top and bottom slices of your movie. It works, therefore, only when the subject matter is already vertically centered. Fortunately, you can use the Shift slider to nudge the original footage upward or downward in the gap between the black bars, or use the Size slider to make the bars themselves more or less intrusive (thinner or fatter). 6.7.14. Mirror This completely freaky effect makes iMovie split the video picture down the middle horizontally, vertically, or both (in quadrants). It then fills the left half of the screen with a mirror image of the right half, or the top half with a mirror of the bottom. There's no seam to indicate what's going on; the result is an Alice-in-Wonderland hybrid. -
Vertical (TopBottom) . This slider moves a horizontal "mirror" up and down the frame. At the Top setting, the footage doesn't look any different. At far right, you've flipped the entire frame upside-down.
Tip: If you drag the Vertical slider all the way to Bottom, and the Horizontal slider to Left, you neatly flip your clip upside-downan iMovie first.
-
Horizontal (LeftRight) . This slider moves a vertical "mirror" left and right across the frame. Pushing this slider all the way to Left removes the horizontal reflections altogether. At far right, you've flipped the entire frame right-for-left. (While the Mirror effect in general doesn't seem to be very practical for most filmmaking, the ability to flip the frame horizontally can be terrifically useful. It can make the actor look left instead of right, make the fire engine drive west instead of east, and otherwise fix continuity problems.) If you drag both sliders to their center positions, all four quadrants of the picture are, in fact, upside-down and/or horizontally flipped copies of the lower-right quadrant of the original footage. The Effect In and Effect Out sliders make the mirrors fly in from the top and side of the frame as the clip plays. (Memo to music-video makers : The effect can be truly creepy.)
Tip: Be careful of signs (such as road signs) in footage you've mirrored. Their reverse-image type is a dead giveaway that you've rewritten history.
6.7.15. N-Square If you've been secretly burning to remake The Fly from the insect's point of view, this is your effect. It "echoes" the video frame over and over again in miniature , like tiles of a mosaicor some visually repetitive video edition of Hollywood Squares . The Squares (MinMax) controls how many panes the frame contains, each showing the same image. At the Min position, you get four copies; at Max, you get literally hundreds. (Talk about The Matrix !)
Tip: If you use the Effect In and Effect Out sliders, you get an interesting variation on the N-Square effect. The clip starts out looking normal; as it plays, the grid of duplicates flies in from the lower right, sliding into its final matrix.
6.7.16. Quartz Composer "Quartz Composer," in case you were wondering, isn't a film or TV term. It's an Apple term , and it refers to Quartz, the underlying graphics-processing software of Mac OS X. Quartz (and the free programmers' tool, Quartz Composer) comes programmed to manage dozens of special effects. Some of those that now appear in iMovie will seem distinctly familiar if you've ever used, for example, the Photo Booth program that comes with many new Macs; once again, Quartz Composer is at work. The best way to find out what these gizmos do is to click each in turn and watch the resultsbut here's the executive summary of the effects in the Quartz Composer category: -
Bloom . Causes bloominga photographer's term that means foggy areas of light blossoming around the brightest spots of the image. Use for a misty, nostalgic memory effect. The Radius slider controls, weirdly, the size of the video frame (the picture shrinks as the slider moves toward the Max setting); Intensity governs how much blooming is going on. -
Bump Distortion . Talk about weird: This effect makes it look like there's a big bulge in your lens. You can adjust three settings: the Radius slider, the Scale slider, and the position of the bump itself (represented by the small yellow dot in the Monitor window, which you can drag to any position). Depending on how you've massaged these settings, the effect can make part of the screen look really, really bulgy. -
Circle Splash Distortion . Remember this one when you're going for a "Zeeblox from the Future" effect. It distorts the picture by creating rays of colored light beaming outward from the center of the frame (or wherever you've dragged the little yellow dot), as seen in Figure 6-12 (top left). Usually, you'll want to put it around somebody's head, so they look like they're all-knowing. The Radius slider controls the diameter of the central, circular undistorted area. -
Color Monochrome . Tints the entire scene with a color of your choice. Click the Color swatch to choose. The Intensity slider lets you maintain some of the original video color. -
Color Posterize . Posterizing is representing a scene using a computer palette of fewer colors, resulting in grainy, pixellated patches of flat color. Now you, too, can make your video look as though something is profoundly wrong with your video card. (The Levels slider governs how badly your video is messed up.) -
Color TV . Depicts the entire scene as though it's a color halftoned photo in the newspaperthat is, with lots of grainy color dots. The Width slider governs the size of those dots; the Sharpness slider controls how sharp-edged they are (and therefore how recognizable your own video is). -
Crystallize . This effect makes your footage look like you shot it through a stained-glass window, or perhaps a translucent honeycomb (Figure 6-12, top right). As you drag the Size slider toward Max, the size of the individual "crystal" facets gets so large, it's more like you're looking at a living stained-glass window. At the Max end, you can't even identify what you're looking at; it's as though you've got an abstract painting that's come to life. This is not, ahem, an effect you'll use often. Figure 6-12. Top: The new Quartz Composer effects take your video to some nearly unrecognizable extremes.
Top: Circle Splash Distortion; Crystallize.
Middle: Glass Distortion; Edges.
Bottom: Peephole ; Star Shine . 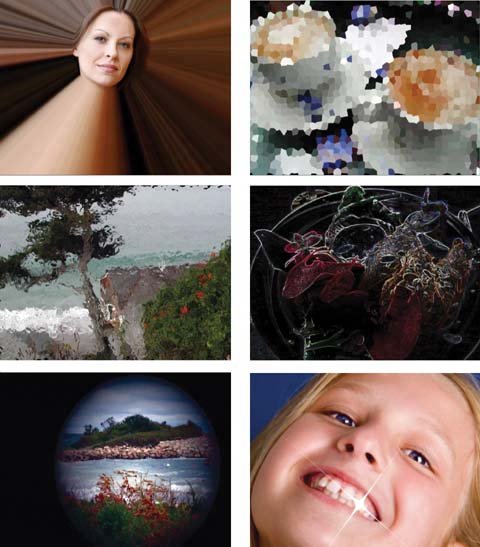 -
Displacement Distortion . Creates vibrating ghost lines around the edges of things in your shot. Use to simulate a drunk or drugged person's point of view. (The Scale slider controls the intensity of the effect.) -
Edge Work . Its peculiar mission: to reduce the scene to black-and-white moving blobs, as though the entire clip had been constructed of bad Xerox copies. iMovie creates this effect by setting every edge that it detectsborders between light and dark areasin fat "boldface." The Max slider governs the chunkiness of the rendered black and white blobs. You could easily imagine Edge Work finding a home in music videos , homemade animated movies, or courtroom scenes where you want to mask a witness 's identity. -
Edges . Again, think "music-video weirdness." This amazing-looking effect reduces the entire scene to an inverted photocopy. That is, the scene goes black except for the moving edges of things, which are white (Figure 6-12, middle right). You can still tell what you're looking at, especially if you move the Intensity slider to the right, but the whole thing has a weird, ghostly, "erased" look to it. -
Exposure Adjust . By golly, this one adjusts the exposure of the scene. This is your chance to brighten up a dimly lit scene, or bring some details back into view in a " blown-out ," too-bright shot. It's absolutely fantastic for restoring video from 1980s videotapes whose colors are going dim. (No miracles , though. Graininess can result.) The EV slider controls the intensity. -
False Color . Imagine your scene in black-and-whiteand use the Color 1 and Color 2 boxes to substitute different colors for "black" and "white." Either way, you wind up with a low-saturation, low-contrast, monochromatic or duochromatic look. -
Gamma Adjust . Don't be put off by the geeky name; this one is extremely useful. Use the Power slider as a one-click fixer for washed-out (or overly contrasty) video. -
Gaussian Blur . Would you like some Vaseline on that lens, sir/ma'am? That's the effect of this tool: It makes the entire picture look blurry. Use it in conjunction with the Effect In or Effect Out slider to make it look like your hero is slowly slipping into, or out of, anesthesia. -
Glass Distortion . Those nutty Apple programmers must start to go a little stir-crazy after too many long days and sleepless nights. Why else would they offer you an effect that makes it look like you shot the scene through, ahem, the textured glass of a bathroom window? Anyway, that's exactly what Glass Distortion does (Figure 6-12, middle left). It's incredibly realisticas long as you are, in fact, going for that public-restroom- window look. (The Scale slider affects the size of the " wrinkles " in the "glass" of the "window.") -
Hue Adjust . As you drag the Angle slider, iMovie cycles through the color spectrum, tinting the entire scene in different ways. You might find this effect useful when you want to bump up the intensity of a sunset, say, or to rescue some weirdly discolored 1960s home movies. -
Motion Blur . Here's another way to make your footage look blurry. This time, though, the idea is to simulate a camera that's been whipped around quickly, too fast for the autofocus to lock in. Great for creating speed effects. Use the Angle slider to indicate how the camera's been whipped (vertically, horizontally, what?), and the Radius slider to govern the intensity of the effect. -
Negative . We're talkin' X-ray. Black becomes white, white becomes dark. -
Newspaper . Here's exactly the same halftoning effect as Color TV, except all in shades of black and white, like a newspaper photo. -
Old Black And White . Not only turns your video into grayscale (black and white), but also messes with the contrast curves so that everything looks muddy and poorly developed. -
Peephole . How many times have you wanted to simulate looking through a telescope or peephole? (Don't answer that.) Anyway, here's your chance (Figure 6-12, bottom left). Drag the yellow dot to position the circular "hole" on the screen (the rest of the screen is black), use the Radius 2 slider to change the size of the hole, and use the two Color boxes to tint what's inside and outside the hole. -
Pinch Distortion . If your movie were playing on a sheet of rubber, this effect would pinch the center (at the point indicated by the movable yellow dot). As you fiddle with the Radius and Scale sliders, the sheet becomes so pinched that it pulls away from the edges of the frame, revealing black background. -
Pixellate . You'll recognize this one when you see it: The entire picture is broken down into low-res square pixels. It's like the effect TV shows use on an informant's face to protect his identity, except that iMovie applies it to the entire frame. -
Pointillize . Same idea as Pixellate, except the building blocks of the scene are round, not square. Drag the Radius slider to the right, and you wind up with enormous colored blinking Superballs that completely conceal whatever the scene was supposed to show. -
Saturate . This useful effect lets you boost the color intensity of the sceneor subdue it. -
Sepia Tone . You might think of this effect as a more nostalgic version of the Black & White effect. Once again, the color drains out of your clip, but instead of black-and-white, you get brown-and-white, which conveys the feeling of memory (thanks to its resemblance to the look of antique photographs). Don't forget to follow up with the Brightness/Contrast effect, if necessary, to fine-tune the effect. -
Star Shine . With this effect, Apple is tiptoeing into animation territory. It lets you create a cartoony reflection "star," of the sort you might see used in a movie as an over-the-top depiction of somebody's gold tooth, or highly polished car, or super-white smile (Figure 6-12, bottom right). Drag the yellow dot to position the shiny animated star, use the Cross Angle slider to govern its rotation, drag the Cross Scale slider to adjust its size, and the Cross Width slider to determine its shape. Click Color to change the tinting of its edges. -
Water Color . The name isn't quite right; your video doesn't look like a watercolor. It does, however, look a little like a photo that's been soaking in water; the colors bleed and look somehow burned-in. -
White Point Adjust . In theory, you can use this effect to fix old footage in which the colors aren't quite right. By clicking the Color swatch, you can choose a new color to represent the white point of the scenethat is, the whitest point; iMovie adjusts all the other colors in the scene, shifting them around the spectrum, to accommodate you. -
Zoom Blur . When a cameraman zooms in fast and suddenly, a zoom blur resultsa blurriness that radiates outward from the center. In iMovie, though, you can move the zoom point around by dragging the yellow dot, and control the intensity of this disorienting effect using the Amount slider. 6.7.17. Rain Here's one of iMovie's most realistic efforts. It makes your clip look as though it was filmed in a driving rainstorm (Figure 6-13, top). Figure 6-13. Top: Be grateful. The Rain effect is about the only time you'll ever be able to control the rain, at least in this lifetime.
Bottom: The Soft Focus effect is great for anything misty, nostalgic, or filmed through a nylon stocking. 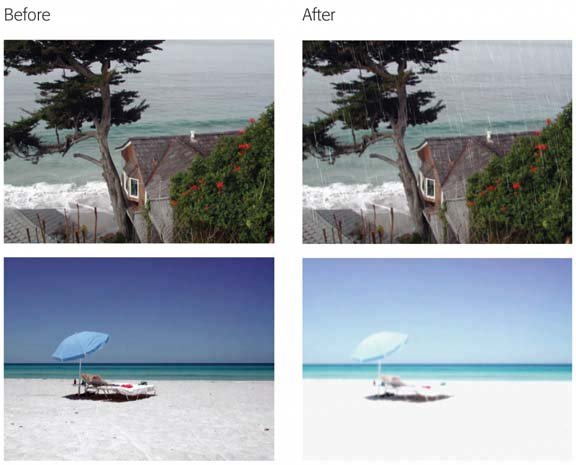
How driving? You determine that by adjusting the Amount slider (which controls the lengths of the raindrop slashes ) or the Wind slider (which specifies how much the drop directions change over time).
Tip: You can create a better depth simulation by stacking this effect onto a clip twice: once with small droplets (farther) and once with long ones (closer). Try throwing in a little Fog, too.
6.7.18. Sharpen You might guess that this effect could help to repair out-of-focus scenes. In practice, however, the Sharpen effect isn't very effective in that role. Instead, it adds a fine grain to your footage, often creating a "solarized" color-banding effect, to the degree you specify using the Amount slider. 6.7.19. Soft Focus Soft-focus lenses are often used when filming TV commercials that feature aging movie stars, because the fine netting or Vaseline coating on such lenses blurs fine wrinkles. (Soft-focus lenses also give everything a faintly blurry, fuzzy-edged look, but that's the price the stars pay for wrinkle obfuscation.) Now you, too, can hide your subjects' wrinkles, by applying this soft-focus effect after the filming is complete (Figure 6-13, bottom). This effect is also good for suggesting dreams, memory, summertime nostalgia, or other hazy situations. At the sliders' extreme positions, the whole frame looks like the nuclear-holocaust scene in Terminator 2 (especially if you use the Effect In slider to make the glow creep in over time). Use the Softness slider to adjust the amount of Vaseline on the lens, Amount to specify what percentage of the frame is smeared, and Glow to govern just how radioactive the bright spots look. |