6.6. Video FX The Video FX button (also at the top of the Editing pane) summons a panel full of video effects that you can apply directly to your footage: slow motion, backward, black-and-white, and so on. Some are designed to adjust the brightness, contrast, or color tints in less-than -perfect footage. Most, though, are designed to create actual special effects that simulate fog, rain, earthquakes, lightning, flashbulbs, and blearyeyed bad LSD. And if these don't satisfy your hunger for effects, other software companies have had a field day dreaming up new special effects that you can buy and install as plug-ins. As with transitions, most of these are so out-there and distracting, you should use these only on special occasions. 6.6.1. Selecting the Footage Before you apply an effect, specify which lucky region of footage you want to be affected: -
One clip . Click a clip in the Movie Track or Clips pane; the effect will apply to the entire clip. -
Multiple clips . If you highlight several clips in the Movie Track, your selected effect will apply to all of them, treating them as one giant clip. When you click the Apply button, you'll see multiple progress bars marching across the faces of the affected clips in the Movie Track. (Unfortunately, some effects, like the rocketing sparkler of Fairy Dust, aren't smart enough to continue across more than one clip. If you select several clips, the effect starts over at the beginning of each one.)
Tip: Don't forget that you can select several nonadjacent clips by  -clicking them. At that point, you can apply an effect to all of them at once. -clicking them. At that point, you can apply an effect to all of them at once.
-
Part of a clip . If you use the Scrubber bar's selection handles to highlight only a portion of a clip, iMovie will split the clips at the endpoints of the selection, and then apply the effect to the central clip. (iMovie can apply effects only to entire clips, which is why this automatic splitting takes place.) -
Parts of multiple clips . If you choose Edit  Select None, you can use the Scrubber bars selection handles to enclose any stretch of clips (or portions of clips) you like. If necessary, iMovie will again split the end clips at the locations of your handles. Select None, you can use the Scrubber bars selection handles to enclose any stretch of clips (or portions of clips) you like. If necessary, iMovie will again split the end clips at the locations of your handles. 6.6.2. Surveying Your Options Portions of the Video FX pane (Figure 6-7) should look familiar. The list of effects and the live preview in the Monitor window both work exactly as they do for transitions. (For example, when you click an effect name , a live preview of the finished effect begins looping endlessly in the Monitor window. See Section 6.3 for instructions on using its controls.) But you'll also find other controls that don't exist anywhere else in iMovie: -
Effect In, Effect Out . If you want the chosen effect to start and end exactly at the boundaries of your selection, leave these sliders at their zero points (the far left for Effect In, the far right for Effect Out). If you like, however, you can make these effects kick in (and kick out) gradually, after the clip has already begun (and before it has ended). That's the purpose of these two sliders: to give you control over when they begin or end. For example, if you drag the Effect In slider for a Black & White effect to 5:00, the clip will begin playing in full color. After 5 seconds, however, the color will begin to leach out, leaving the rest of the clip to play in black-and-white (a useful effect if you're trying to depict someone slowly going color-blind). You can set the Effect In and Out points no more than 10 seconds from the beginning or ending of a clip. For example, here's how to make a knockout, professional-looking effect to open your film: Create a still clip from the first frame of a movie, as described in Section 9.5.1. Split it in half. Convert the first half to black and white, then create a Cross Dissolve between it and the second half. The result: What appears to be a black-and-white photograph "coming to life" as it fades into color and then begins to play normally.
Tip: Instead of using the Effect In and Effect Out sliders, you can gain more precision by editing the numbers that appear to their right. Once you've highlighted these digits, you can type new numbers to replace them. These numbers are in seconds: frames format.
Figure 6-7. Several of the effects in the Effects pane offer additional controls, which take the form of sliders beneath the list. You can drag the small blue handle of a slider, or simply click anywhere in its track. 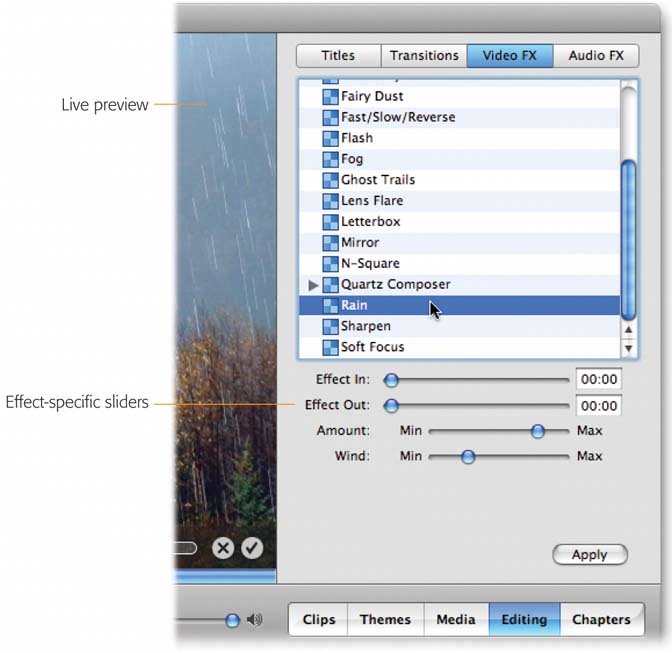 -
Effect-specific controls . As you click the name of each effect in the list, additional sliders may appear above the Effects pane. They're described in the effect-by-effect descriptions later in this chapter. -
Apply . When you click Apply, iMovie begins to render the selected clipto perform the massive numbers of calculations necessary to bring each pixel into compliance with the effect you've specified. As with transitions, effect rendering telegraphs its progress with a subtle red line, a miniature progress bar that crawls from left to right beneath the selected clip (see Figure 6-8). Figure 6-8. The thin red progress bar lets you know how much longer you have to wait. You can tell at a glance that a clip has had an effect applied, thanks to the checkerboard brand in the upper right. And if there's a digit beside the checkerboard, you've applied more than one effect to the same clip. 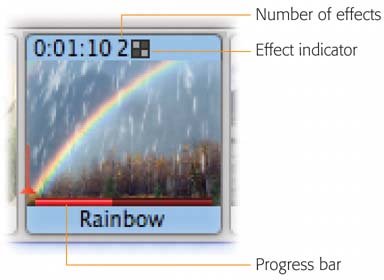 Rendering effects works exactly like rendering transitions: You can continue working on other parts of your movie, but things can bog down if you've got several effects rendering at once. Actually, rendering effects takes much longer than rendering transitions, in part because you apply each effect to an entire clip instead of just the last couple of seconds. Press -period to cancel the rendering. It's important to note, by the way, that iMovie actually applies the selected effect to a duplicate copy of the clip's DV file on your hard drive. iMovie creates the behind-the-scenes duplicate as a safety net for you. It gives you the option of removing or adjusting the effect at any time. (If you're curious , switch to the Finder; open your project package as described in Section 4.12; and open its Media folder. Inside, you'll find a new clip called, for example, Rainbow 01, which represents the modified clip.) You can recover the original clip (and remove the effect) at any time; read on. 6.6.3. Removing an Effect If you click a clip and then press the Delete key, you're saying: "Throw away the effect. Bring back my original, unmodified clip." Much though it may feel like you're instructing iMovie to delete the clip itself , you're not. (You would have to press Delete a second time to achieve that purpose.) In any case, when you delete an effect in this way, iMovie reinstates the original clip. 6.6.4. Adjusting an Effect To adjust the start time, stop time, or any other parameter of a special effect, you must first delete the effect altogether, as described above, and then reapply it using new settings. 6.6.5. Superimposing Effects It's perfectly possible to combine effects by applying first one, and then another. For example, after using the Black & White effect, you may want to use the Brightness & Contrast control to adjust its gray tones. You can even apply a single effect repeatedly, intensifying its effect; for instance, you could apply Fairy Dust several times to make it appear as though multiple fireworks are going off. Or you could apply Rain twice at different intensities to add depth to your simulated deluge. Once you've applied more than one effect to a certain clip, iMovie thoughtfully adds a "number-of-effects" number next to the effects symbol, as shown in Figure 6-8. When it comes time to remove some of your layered effects, you'll appreciate that indicator. It will keep you sane as you peel away one effect after another. For example, suppose you're making a disaster movie. To one climactic clip, you've applied two Rains, three Earthquakes, an Electricity, and a pair of Fogs. If you decide that perhaps you've laid it on a bit thick, you can click the clip and then start tapping the Delete key. With each tap, you remove one effect, in reverse chronological order, until only the original clip remains. (Be careful not to press Delete that last time; you'll remove the clip itself!) |