Section 16.5. The DVD Mapand Autoplay
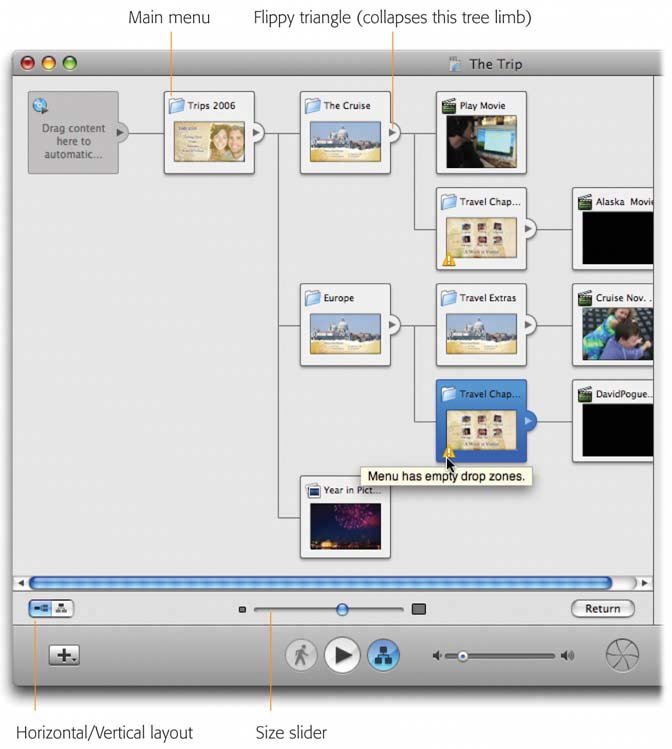
16.5. The DVD Mapand AutoplayAs you can see, menus and submenus can build up with alarming rapidity. At times your projects may grow out of control; pretty soon, you feel like Hansel and Gretel with not enough bread crumbs. iDVD's Map pretty much eliminates these navigation problems. It's a living, interactive diagram whose icons represent your DVD's menus, videos , and slideshows and reveal how they're connected. As your menu and button layouts grow more complex, you can use the map screen to help you keep track of your menu structure. To view the map, click the Map button at the bottom of the main iDVD window. The element you were working on appears with colored highlighting (Figure 16-9). When you're finished working with the Map, click the Map button again, or click Return. Tip: Each menu tile now includes a flippy triangle. Click it to expand or collapse that limb of the menu tree, for ease in managing complex projects. 16.5.1. Editing in the MapIn previous versions of iDVD, the Map window provided a visual treat, but you couldn't really do anything there. But in iDVD 6, the map is interactive; you can actually design and edit your DVD on this single screen. For example:
16.5.2. AutoplayThe Autoplay tile is the key to a great iDVD feature: It lets you create DVDs that start playing instantly when inserted into a DVD player. No menus, no remote controljust instant gratification. Hollywood DVDs use this Autoplay behavior to display video before the menu screen appears. You knowa bright red FBI warning, previews of coming attractions, or maybe just a quick snippet of the movie on the DVD. You can do that, or you can use the Autoplay feature to create a DVD that never even gets to the menu screena DVD consisting only of Autoplay material. That is, you insert the DVD, and the whole thing plays automatically. You could design a project this way for the benefit of, for example, technophobic DVD novices whose pupils dilate just contemplating using a remote control. They can just insert your Autoplay-only DVD and sit back on the couch as the movie plays automatically. Or you could design your DVD that way for use in a kiosk, or just to avoid having to muck around with menu designs. The key to this feature is the Autoplay tile, the very first one in Map view (at the top or the left, depending on the view you've chosen ); see Figure 16-10. Whatever you drag onto it will play automatically when the DVD is inserted, before your viewers even touch their remote controls. These are the kinds of things you can put on the Autoplay tile:
To control how long your still image remains on the screen, or how quickly your Autoplay slideshow plays, double-click the Autoplay tile. You arrive at the Autoplay slideshow editor, a screen just like the one shown in Section 16.6.4.1, where you can adjust the timing, transition, and even the audio that plays behind the picture(s). Note that unless you also turn on looping, described next , the DVD will eventually have to show something after playing the Autoplay material. For that reason, it's a good idea to designate a basic main-menu screen anywaysomething to appear after the Autoplay cycle is complete. Figure 16-10. If you decide to add or replace your Autoplay material, just drag new stuff right onto it. Or, to eliminate the Autoplay segment, drag it right off the tile. It disappears in a little puff of Mac OS X cartoon smoke.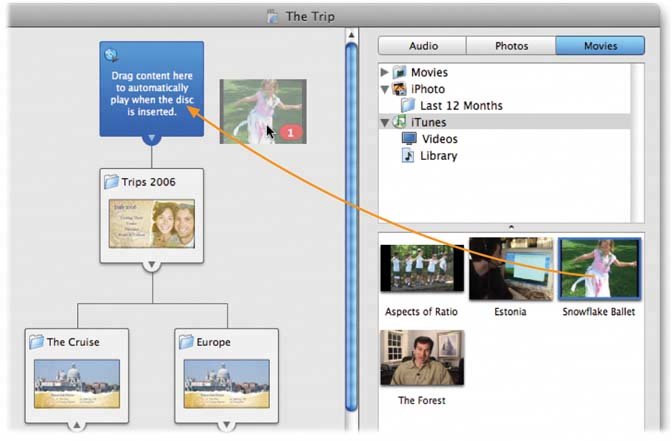 16.5.3. Looping If you highlight the button for a movie, slideshow, or Autoplay tileeither in Map view or on a menu screenand then choose Advanced Tip: In the Map, a small circle appears in the lower-right corner of any element you've set up for looping. That would be a great way to create a DVD containing a self-running, self-repeating slideshow of digital photos that plays on a TV at a party or wedding reception . You could also use it to create a self-looping kiosk display at a trade show. In any case, the DVD will loop endlesslyor at least until it occurs to someone in your audience to press the Menu or Title button on the remote, which displays your main menu. At this point, the Menu button redisplays the previous menu screen; the Title button causes a return to the main menu. |
 Add Submenu or Project
 EAN: N/A
Pages: 203